- Scheduling
- Shift Approvals
Shift Approvals
Overview
The Shift Approvals page is where you review and approve shifts before payroll is processed. This includes approving scheduled times, clock-in and clock-out times, and any associated travel claims (including travel, to, from and during support).
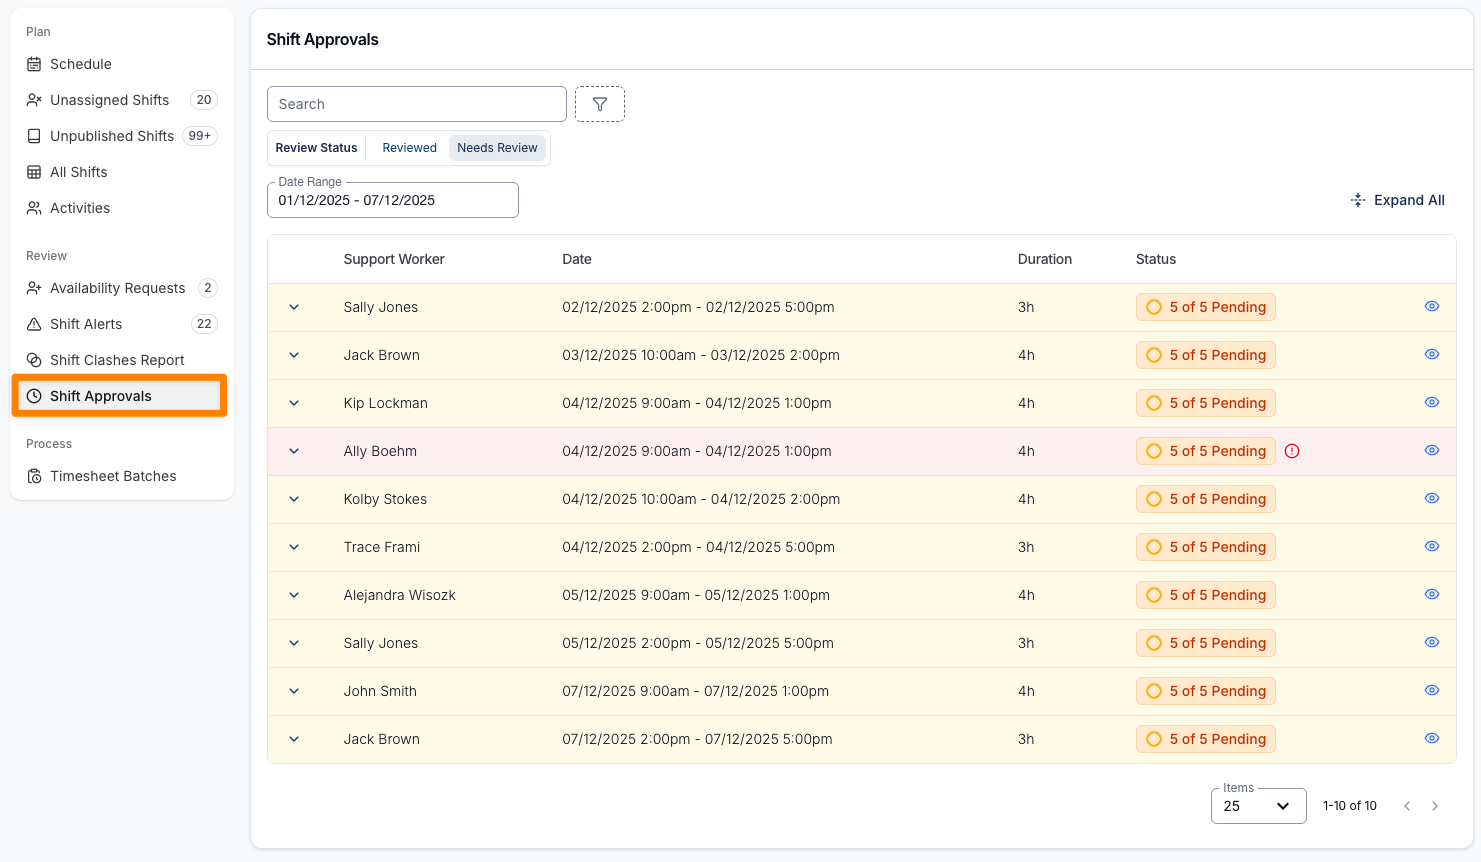
The report displays key details for each shift, including:
- Support Worker
- Date - Start date/time and end date/time.
- Duration - Duration format: h = hours, m = minutes.
- Status - Shows the current approval status for each Support. Items awaiting approval will be displayed as Pending. Once an item has been reviewed and completed, the status updates to Reviewed and reflects other completed states, such as Timesheet Batched, and will be visible when switching the Review Status filter to Reviewed.
Approving Shifts
Shifts follow the selected date range and filters. Use the date picker to choose This Week, This Fortnight, Last Week, Last Month, Last Quarter, or a custom range.
A shift is included by the day it starts, so a support running 4:00 PM Sunday to 9:00 AM Monday appears in a range ending on the Sunday - see Date Ranges and Overnight Supports.
If unapproved shifts started before the range you have selected, a banner offers Adjust dates to widen the range back far enough to include them.
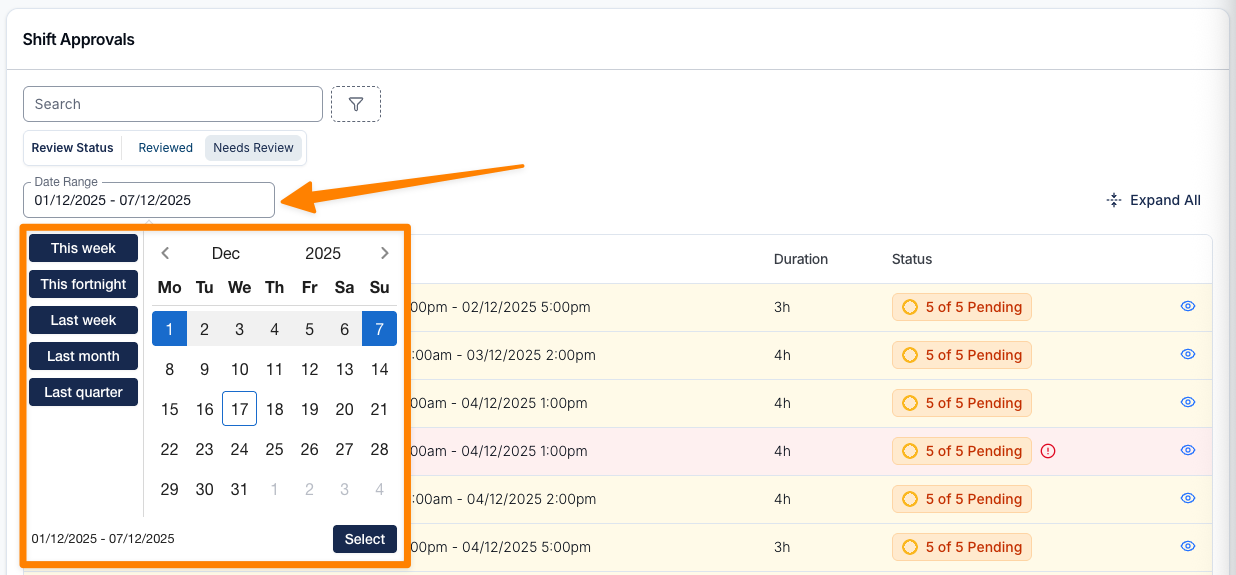
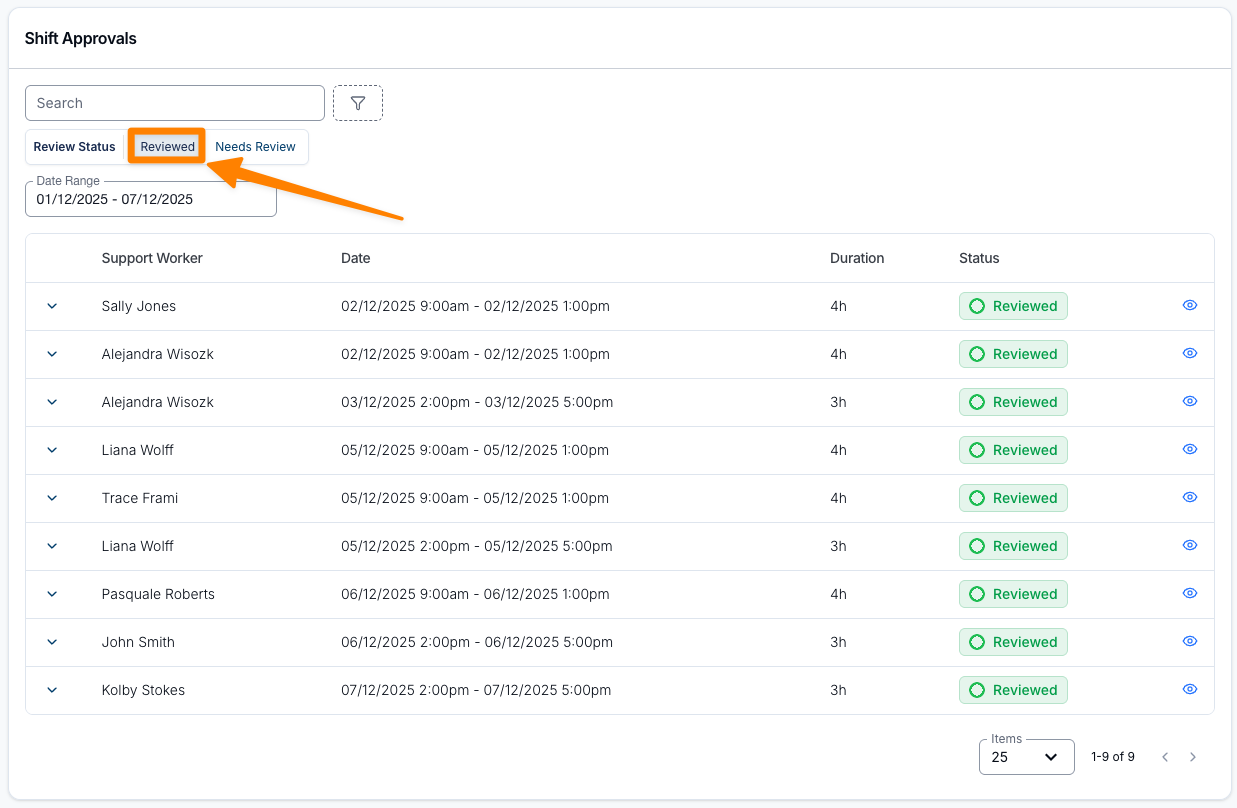
By default, shifts appear in the Needs Review view. To view reviewed shifts, use the Review Status toggle and select Reviewed.
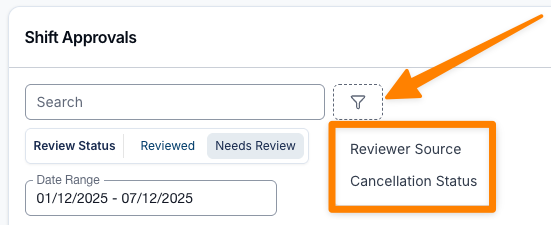
Additional filters are available:
- Reviewer Source - User or System
- Cancellation Status - Cancelled or Not Cancelled
- Charge Mode - Auto or Manual
- User Group, Team, State, Employment Basis, Region, and Site
To view shift details, click the eye icon.
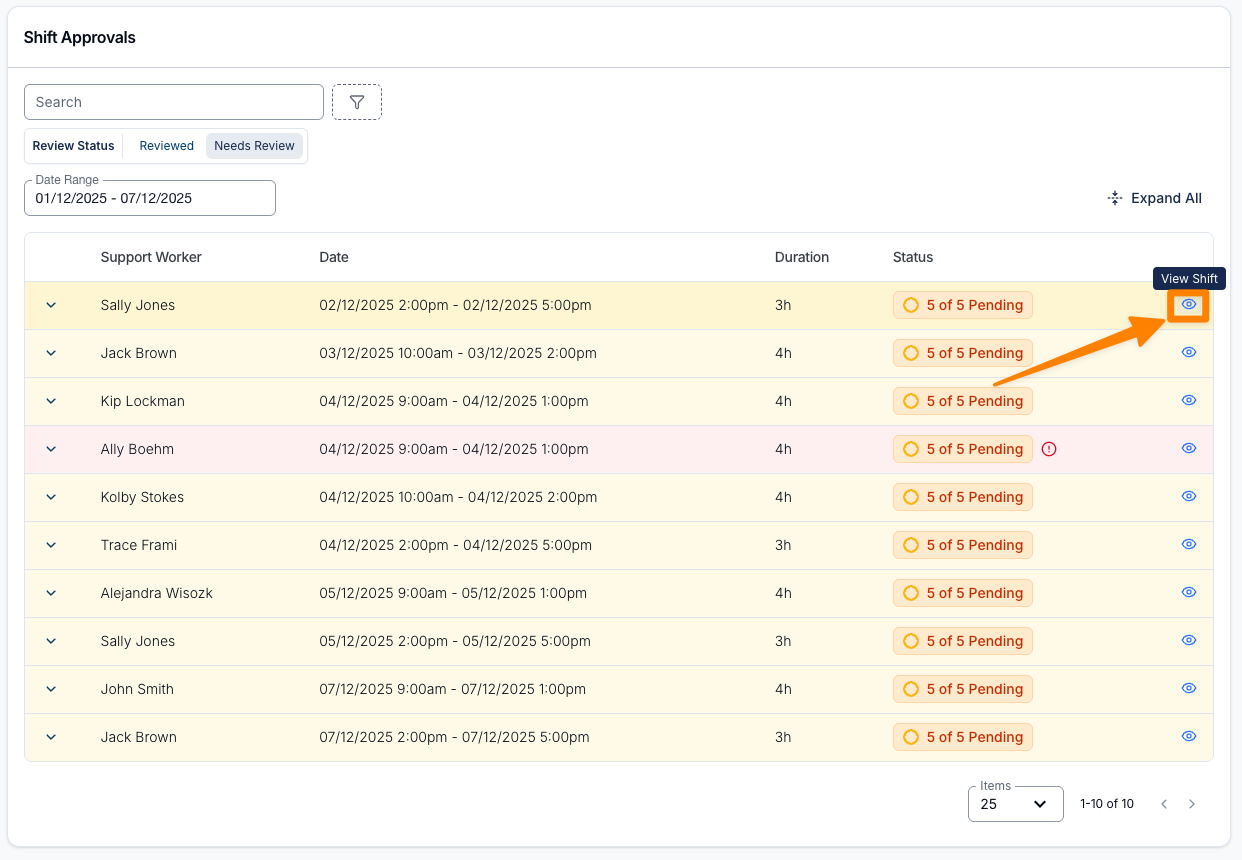
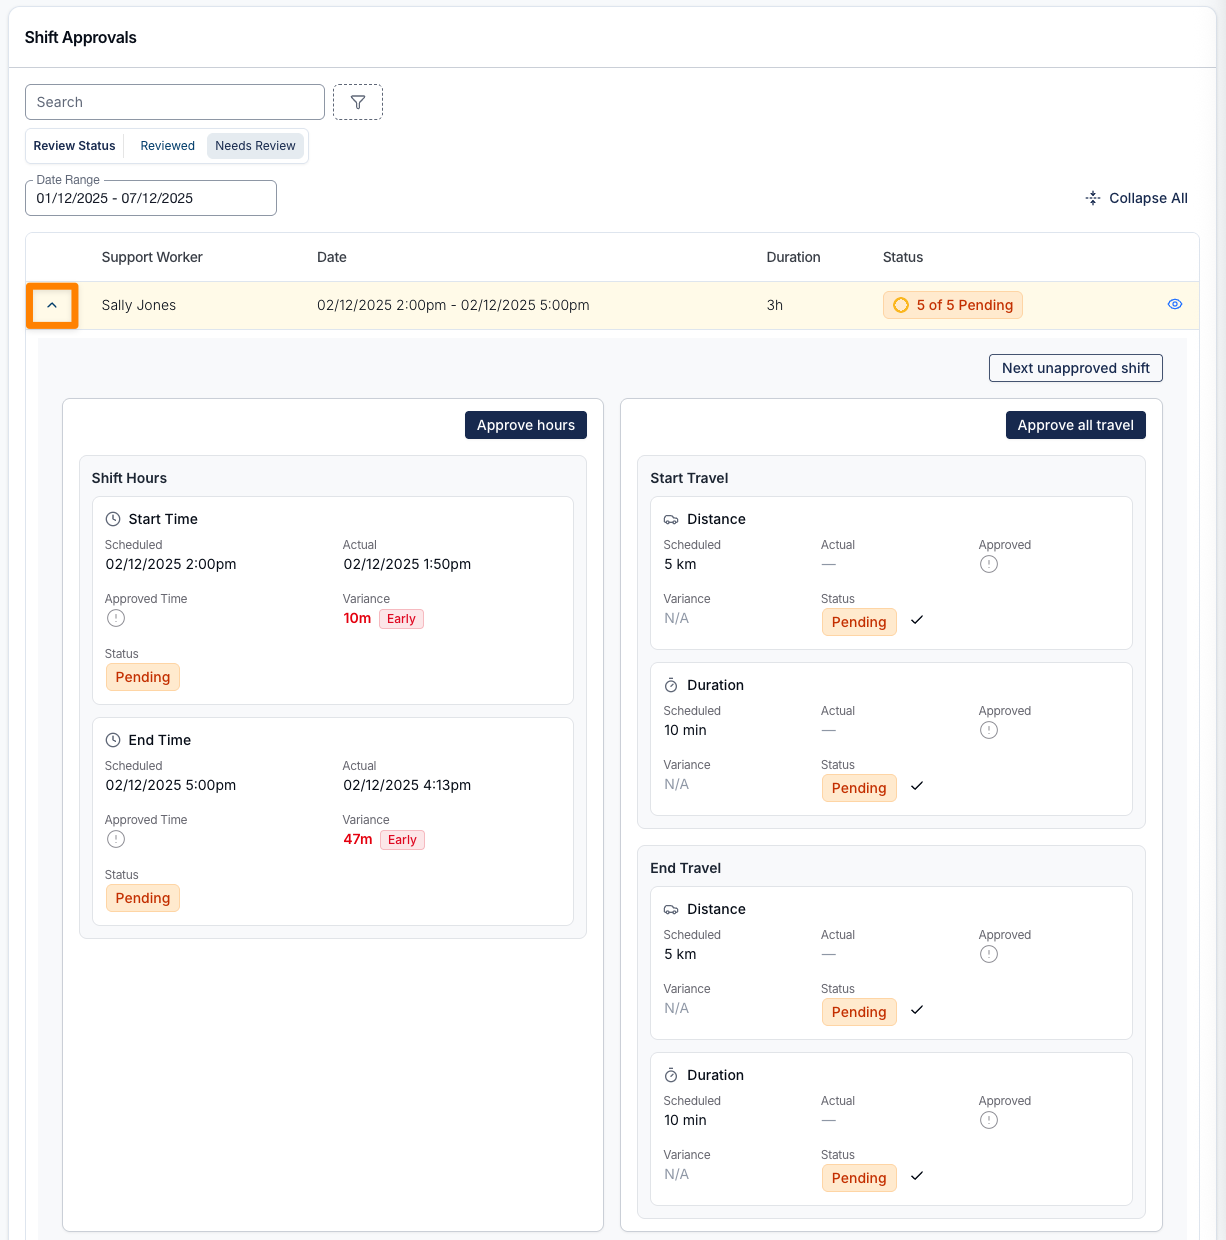
To review items pending approval, click the arrow icon on the shift to expand details for Shift Hours and Travel.
Commenting on a Shift
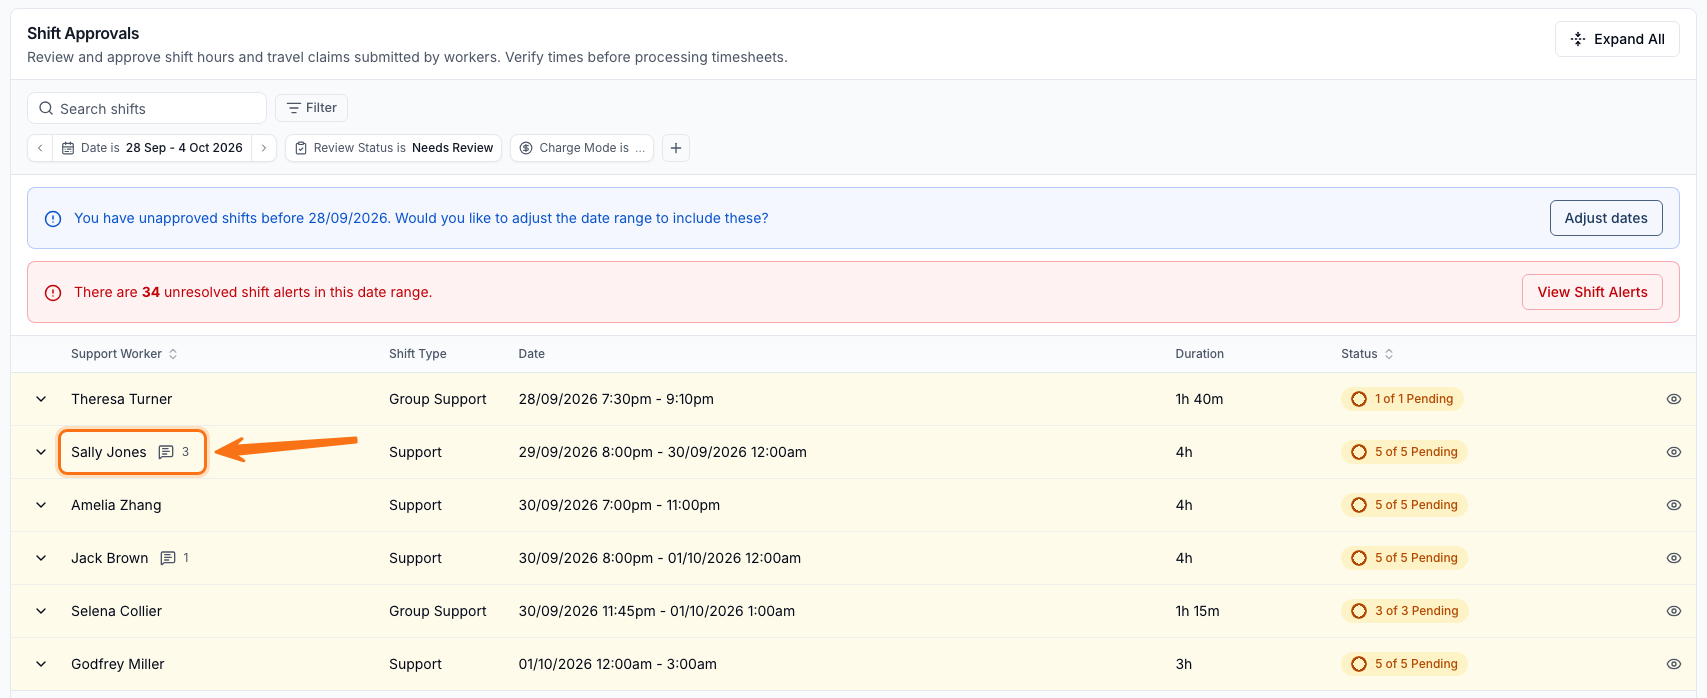
A shift with comments shows a count next to the Support Worker's name, in both the list and the expanded row.
Expand the shift, or open it from the eye icon, to read the Comments panel and click Add Comment - for example, to record why a shift is still waiting on approval.
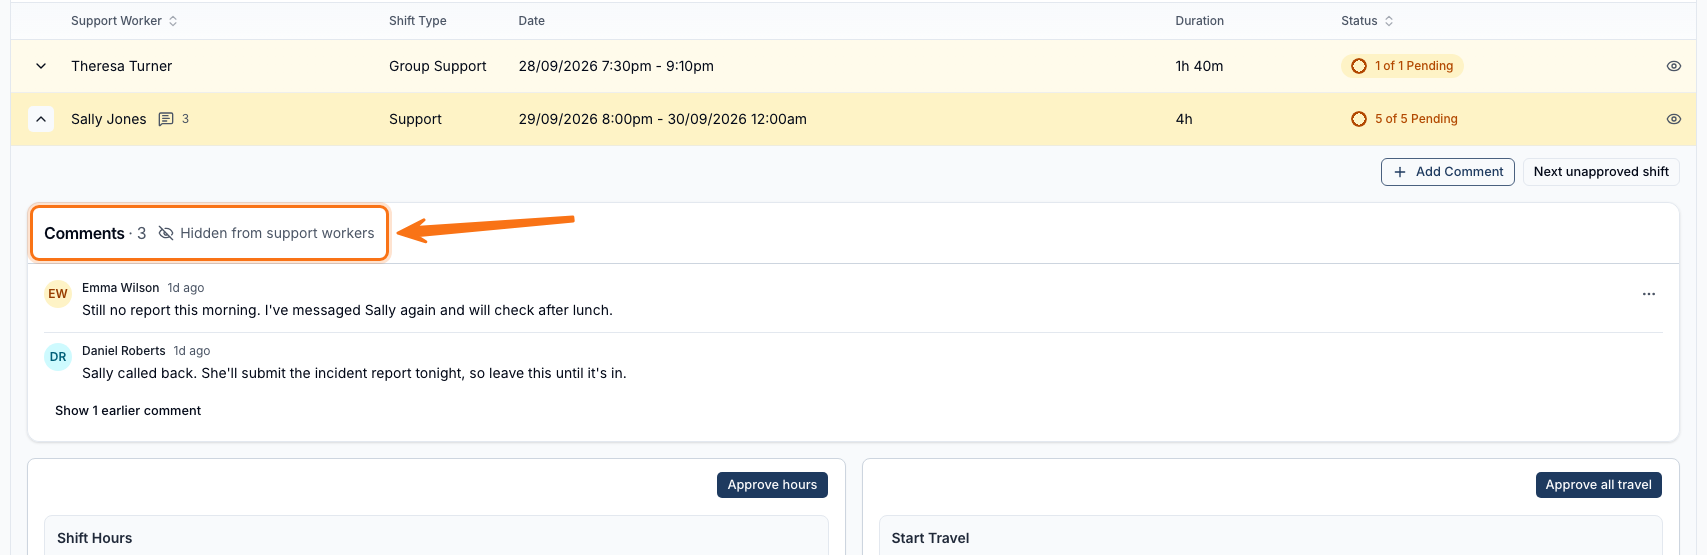
Comments are never visible to the Support Worker; only people who can approve shifts can see or add them, and the dialog repeats this before you post.
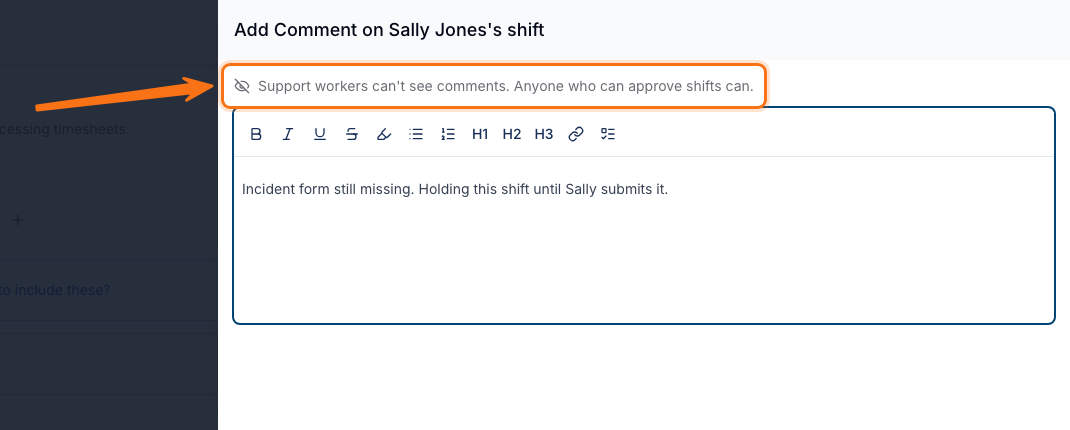
You can edit or delete your own comments; comments from other approvers can only be read.
Approving Hours
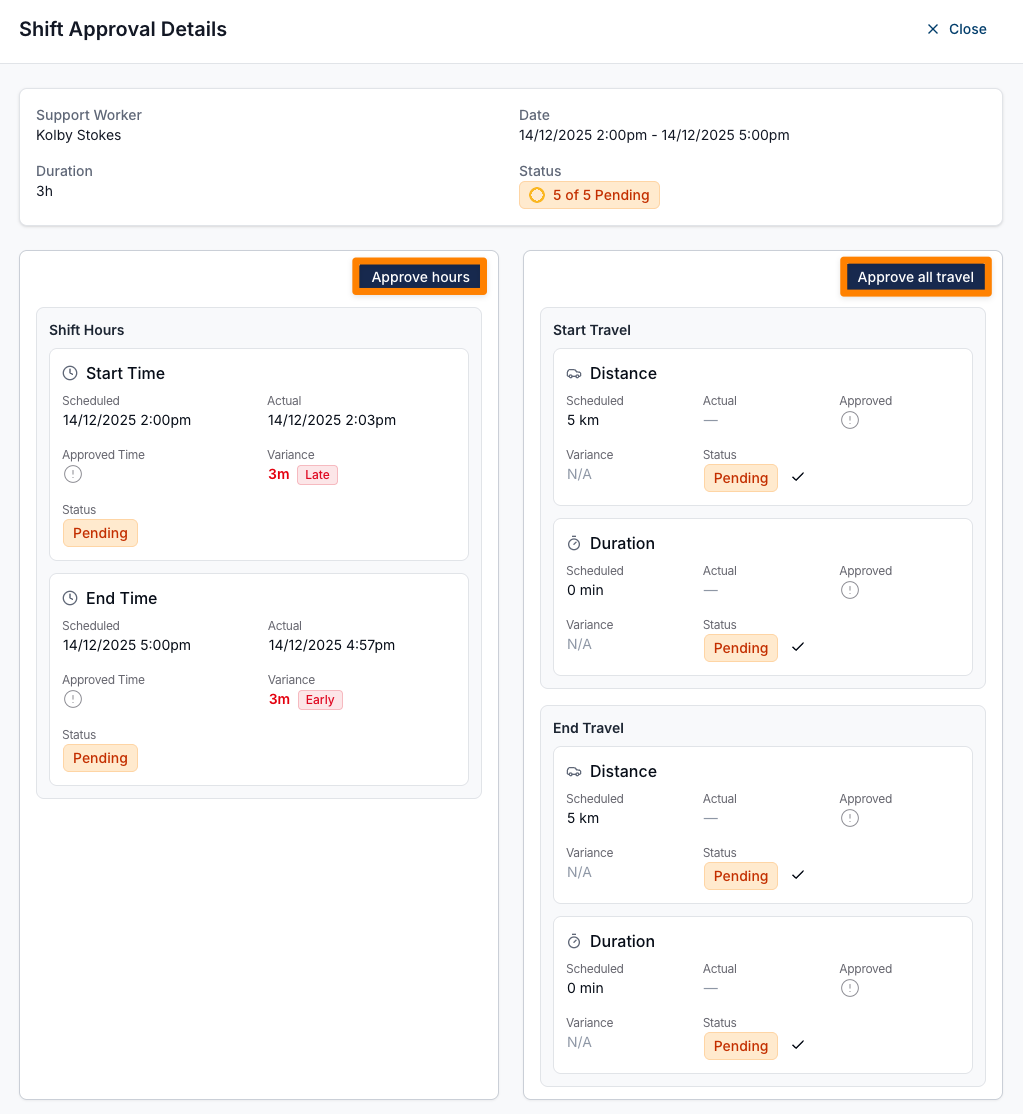
Click on Approve Hours to choose the appropriate approval method.
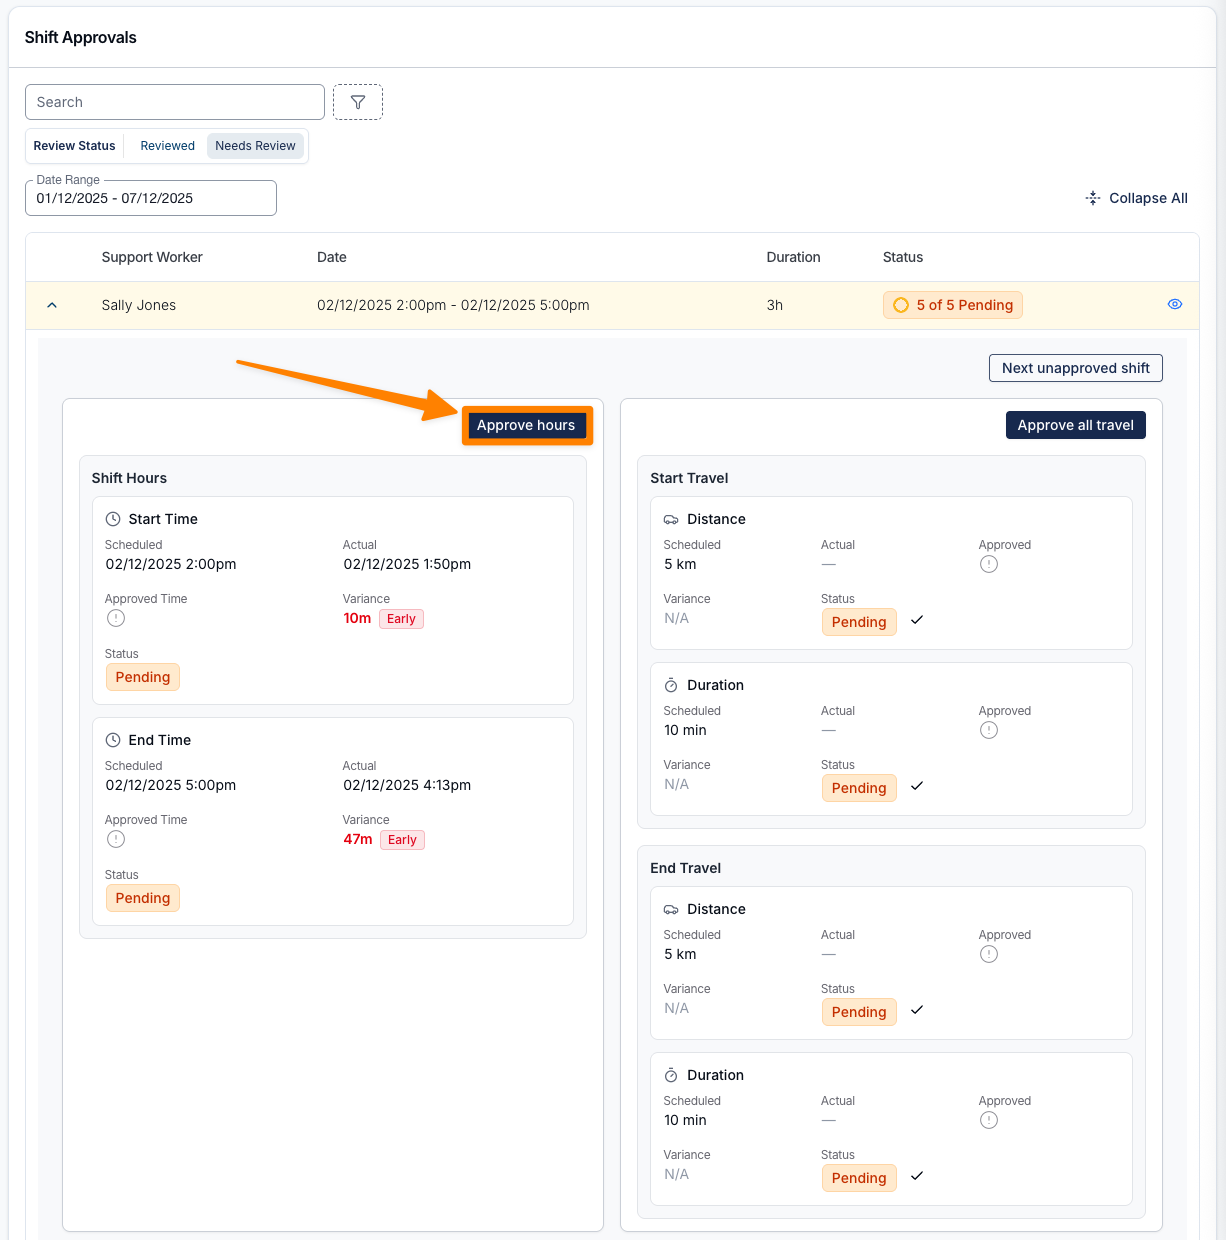
When reviewing a shift, you can choose to approve based on either:
- Scheduled Times - The rostered hours originally set in the schedule.
- Clocked In/Out Times - The actual times recorded by the Support Worker.
You can include additional information in the Note section to explain the reason for your selection. This information is visible to Support Workers and helps minimise back-and-forth communication by clearly outlining why shift times have been approved or declined. To see how this appears to Support Workers, visit the Support Worker App Grid guide.
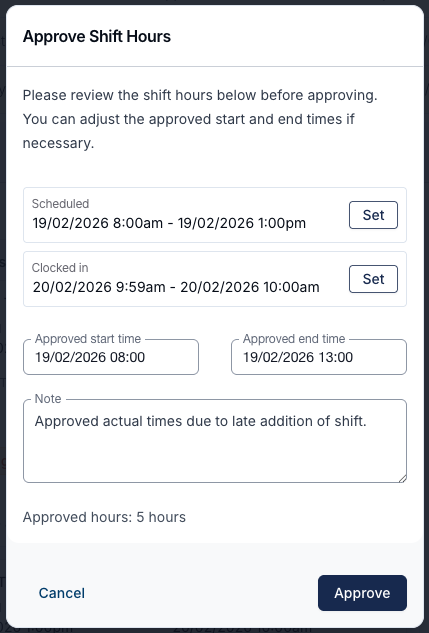
The approved hours also set the units of any per hour custom allowance on the shift. When you expand a shift, its custom allowances are listed under the shift hours.
Comparing Approved Hours to Scheduled Hours
At the bottom of the approval pop-out, the Scheduled and Approved durations are shown side by side, so you can see the effect of your chosen times before you commit to them. The Approved total updates as you adjust the approved start and end times.
If the approved hours differ from the scheduled hours by more than your organisation's tolerance, an orange note appears beneath the totals spelling out the difference - for example, 4 minutes under scheduled. This is there to catch the expensive mistakes, such as approving 21 hours against a 7-hour roster, before they reach the timesheet.

A few things worth knowing:
- It compares total duration, not the start and end times. A shift approved half an hour later than rostered but for the same length of time will not be flagged.
- It is a prompt to check, not a block. The note never stops you approving. Where the variance is genuine, approve as normal and use the Note field to record why.
- The tolerance is set by your organisation. The difference has to exceed the tolerance to be flagged, so at a tolerance of 5 minutes a 5-minute difference passes quietly and a 6-minute difference is highlighted. New accounts start at 5 minutes; the previous default was 15 - see Approved Hours Variance Highlight to check or change it.
The same comparison appears when you approve an active overnight period or an on-call activation. In those pop-outs the totals are labelled Reported and Approved, and the note reads over reported or under reported, because the comparison is against the period that was recorded rather than a rostered time.
Reviewing Travel Claims
You will see separate entries for Travel To Support and Travel From Support.
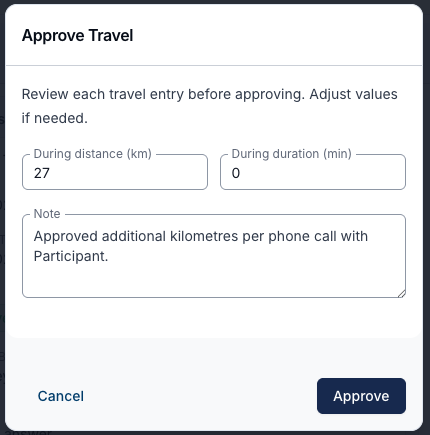
When approving travel, you can confirm:
- Distance (km) - The number of kilometres travelled.
- Duration (minutes) - The time taken for the travel.
- During (km) - The number of kilometres travelled.
You can approve travel for:
- Travel To Support - From the worker's starting point to the support location.
- Travel From Support - From the support location to the worker's final destination.
- During Support - Any travel carried out whilst the Participant is in the vehicle.
The travel options available will depend on how your organisation has arranged travel.
Click on Approve all travel to choose the appropriate kilometre and duration approvals.
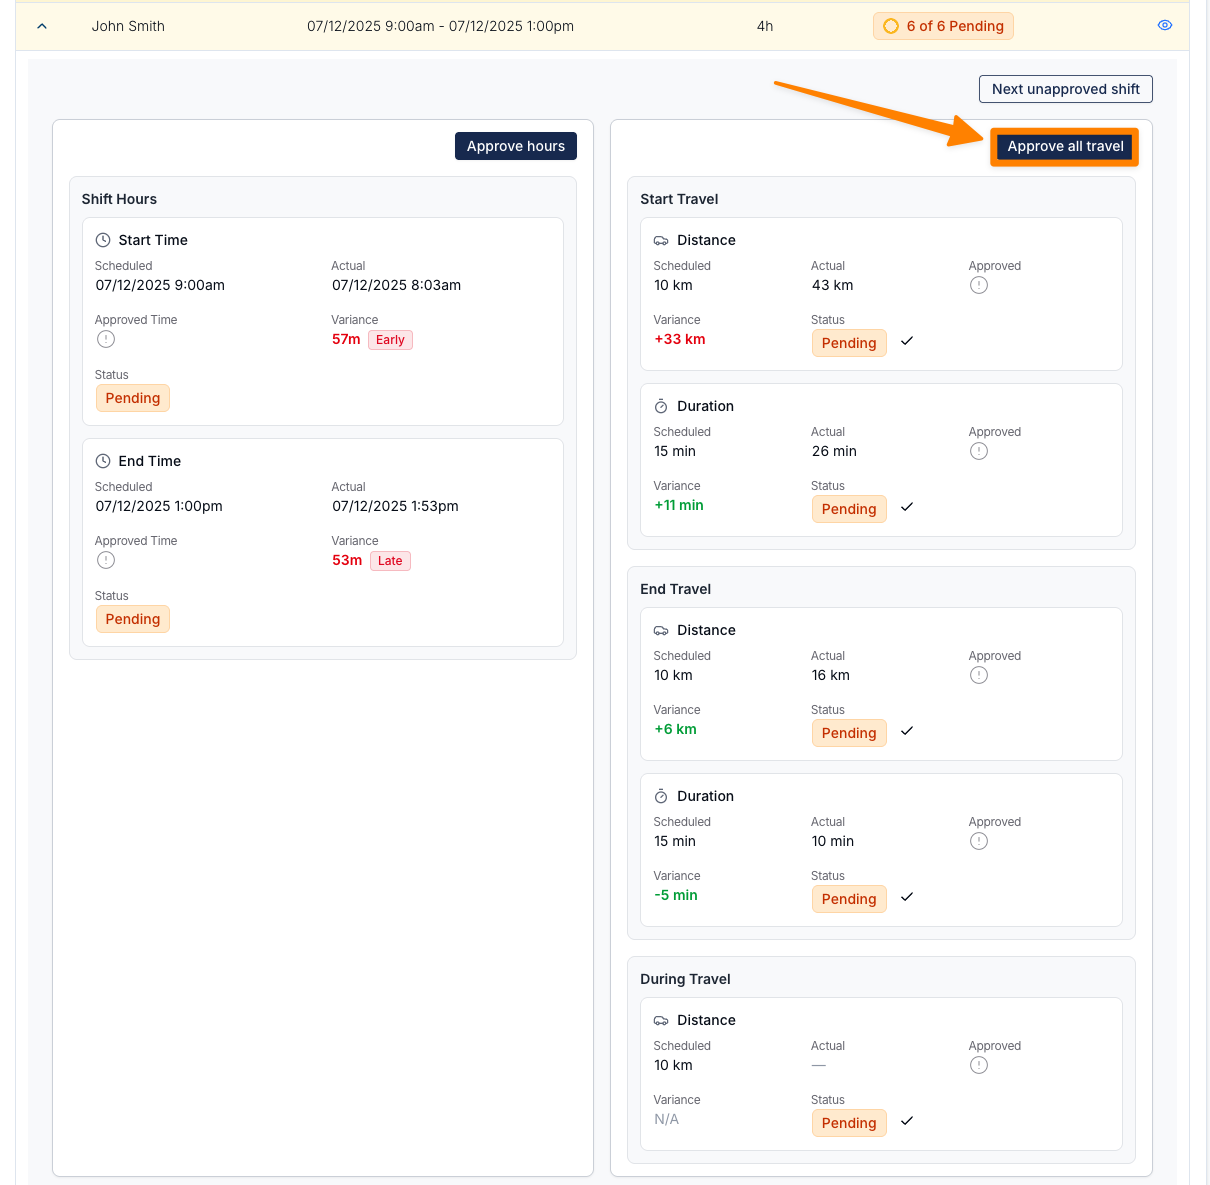
By default, the approval pop-out displays the Support Workers actual values. If these differ from the scheduled values, the approver will need to determine the appropriate value to charge/pay, or remove them where travel was not undertaken.
Notes can be added to Travel Approvals to provide transparency with the Support Worker and reduce the amount of back-and-forth communication by clearly outlining why Travel has been approved or declined. To see how this appears to Support Workers, visit the Support Worker App Grid guide.
Ad-hoc Travel Kilometre Pay and Charge
When a Support Worker records ad-hoc travel (travel that wasn't scheduled on the shift), the Approve Travel Distance dialog shows an extra Kilometre pay and charge section. This lets you decide, at the point of approval, whether the kilometres are charged and paid - independently of one another.
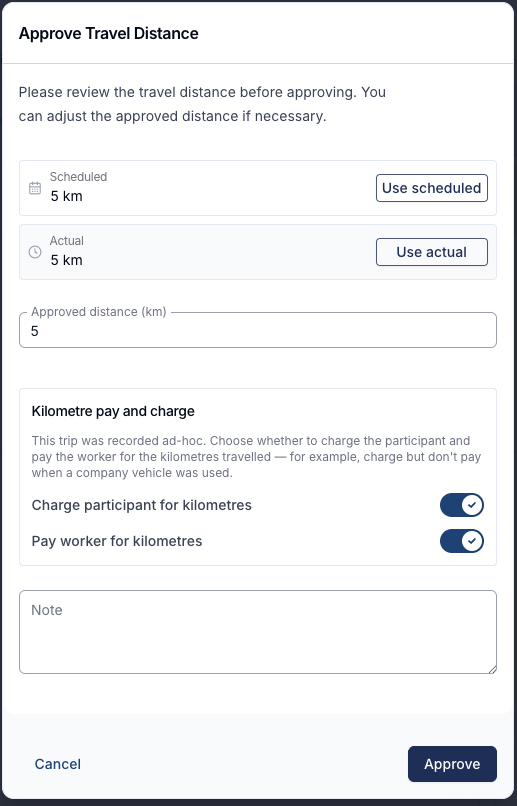
There are two switches:
- Charge participant for kilometres - whether the Participant is billed for the kilometres travelled.
- Pay worker for kilometres - whether the Support Worker is reimbursed for the kilometres travelled.
You can set these independently, or leave both on. Leaving both switches on preserves the previous behaviour, where ad-hoc kilometres were both charged and paid.
This is useful for scenarios such as company or pool vehicle travel - you can charge the Participant for the kilometres but turn off Pay worker for kilometres, since the worker isn't using their own vehicle. For more on this scenario, see How Do I Charge for Travel in Company Vehicles?.
Kilometres With No Travel Charge Item
Kilometres can only be charged to a Participant where the Charge Item Set on the support holds a travel Charge Item for that type of travel. Where it doesn't, both travel approval dialogs warn you before you approve, so the kilometres aren't signed off as billable when nothing will be billed:
The during travel cannot be charged for kilometres, because the charge item set on this support has no Travel During Support charge item. Approving will not create a kilometre charge for the participant.
Add the missing charge item to the charge item set, or set a Travel During KM Charge Item Override on the support.
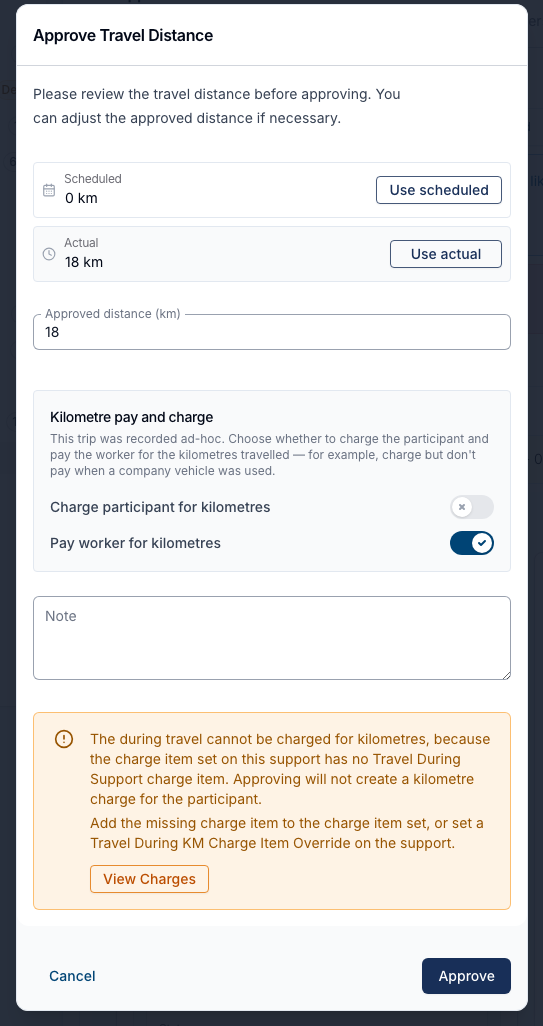
The warning names the travel it applies to and the Charge Item that is missing - Travel During Support for travel during, Travel Before/After Support for travel to and from. Where more than one entry is affected, they are named together in a single warning.
The override is only offered as a remedy for travel during the support, since travel to and from a support always bills against the Charge Item Set. See Charging Kilometres Requires a Travel Charge Item for the three ways to resolve it, and Travel During KM Charge Item Override for billing the kilometres to the Participant's own transport funding instead.
View Charges opens the support's Finance tab in a new browser tab, so you can check what has been billed without losing your place in the dialog.
The warning appears when all of the following are true:
- The support charges automatically. It has a Charge Item Set, isn't set to Manual Charges, and wasn't cancelled with a charge behaviour of no charge.
- The distance being approved is above zero. Setting it to 0 clears the warning, since there are no kilometres to charge.
- Kilometres are expected. Either the Charge Behaviour on the travel includes kilometres, or the travel is ad-hoc and you are approving its distance for the first time.
- No Charge Item covers those kilometres - neither the Charge Item Set nor, for travel during the support, a Travel During KM Charge Item Override.
On Approve Travel, the warning covers only the travel entries that dialog will approve. Travel that has already had its distance approved is left out, because approving from there doesn't touch it.

Rejecting Travel
If no travel was carried out, you can follow the above steps and set each value to 0 before approving.
Shift Approvals
While viewing your shifts within the Schedule, you can also view and action the approval of shifts.
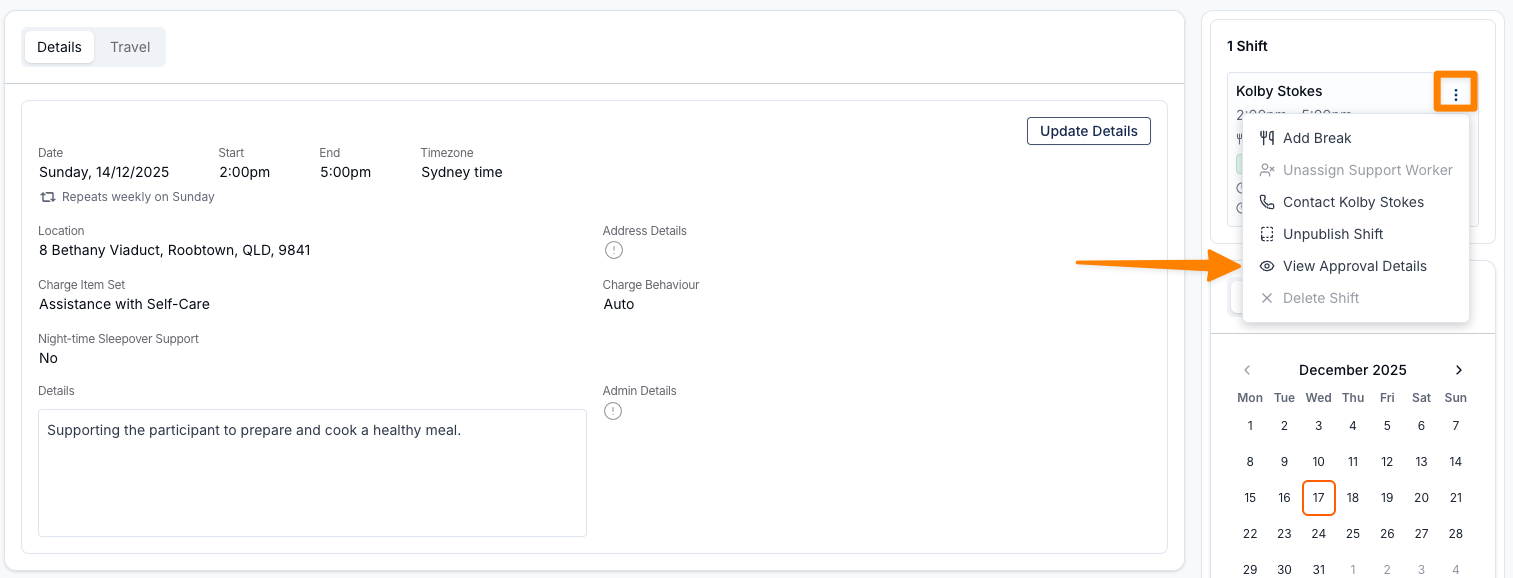
Begin by selecting the shift you would like to view.
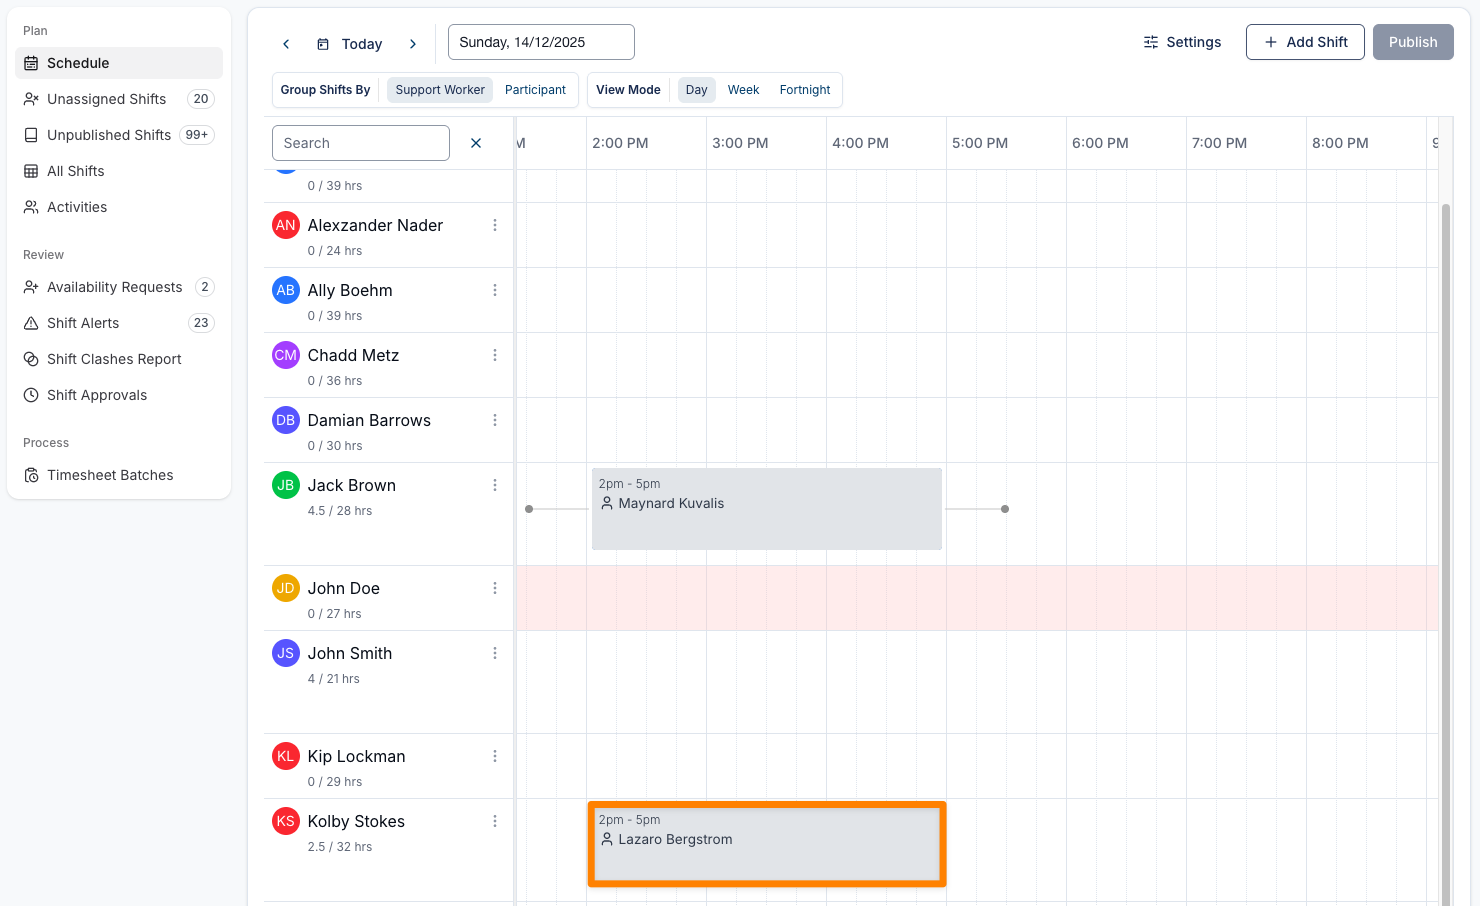
From within the shift, click the ellipsis (3 dot menu) next to the Support Worker's name, then select View Approval Details
A dialog box will appear showing all the details that need approval, as well as options to complete the approval steps.
Cancelled Shifts
A cancelled shift shows a red exclamation mark in Status. Hover over it to see the selected pay behaviour.
- Charge / Not Charge.
- Pay / Not Pay
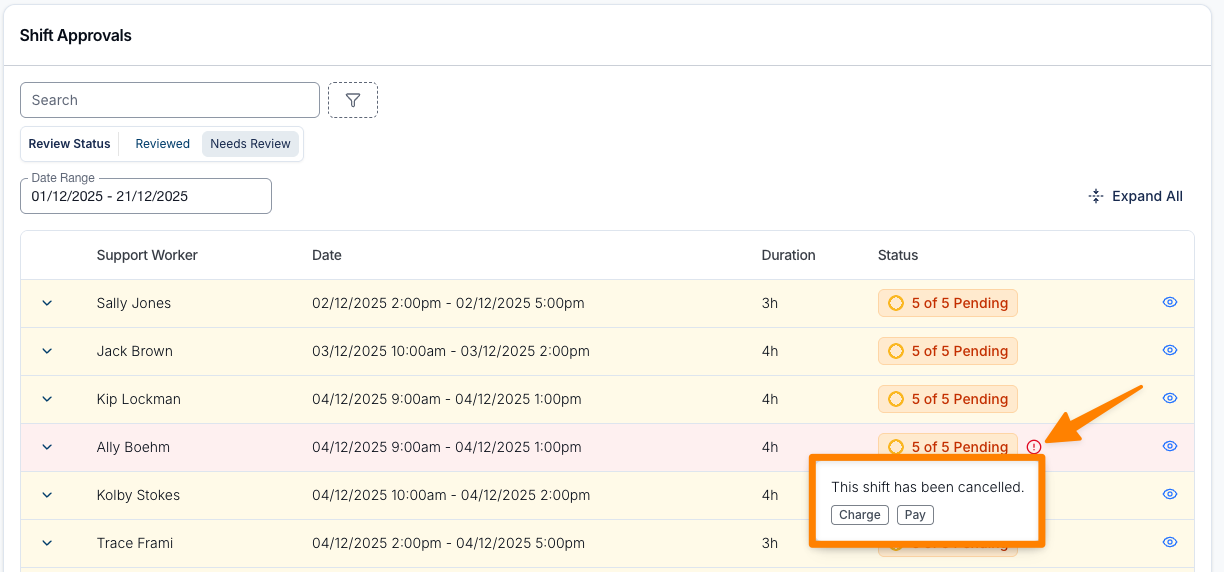
If a cancelled Support is not displayed in this list, it may be because the Support is sitting on the Shift Alerts page. By default, cancelled shifts will move to Shift Alerts as they will not have been clocked in/out of. Head to Shift Alerts for more information.
Undo Shift Approval
Occasionally, a shift may be approved by mistake and the approval will need to be removed. This can be done from the Shift Approvals page, provided the support has not yet been invoiced or included in a Timesheet Batch. Before making any changes, make sure you have selected the correct date range so the relevant shift is displayed.
Steps to undo a shift approval
- Navigate to the Shift Approvals page.
- Select the relevant date range to locate the shift you need to update.
- Set Review Status to Reviewed.
- Find and expand the affected shift.
- Choose one of the following options:
- Select Undo All Approvals to remove every approval from the shift, or
- Select the Undo Approval icon beside a specific approval to remove only that approval.
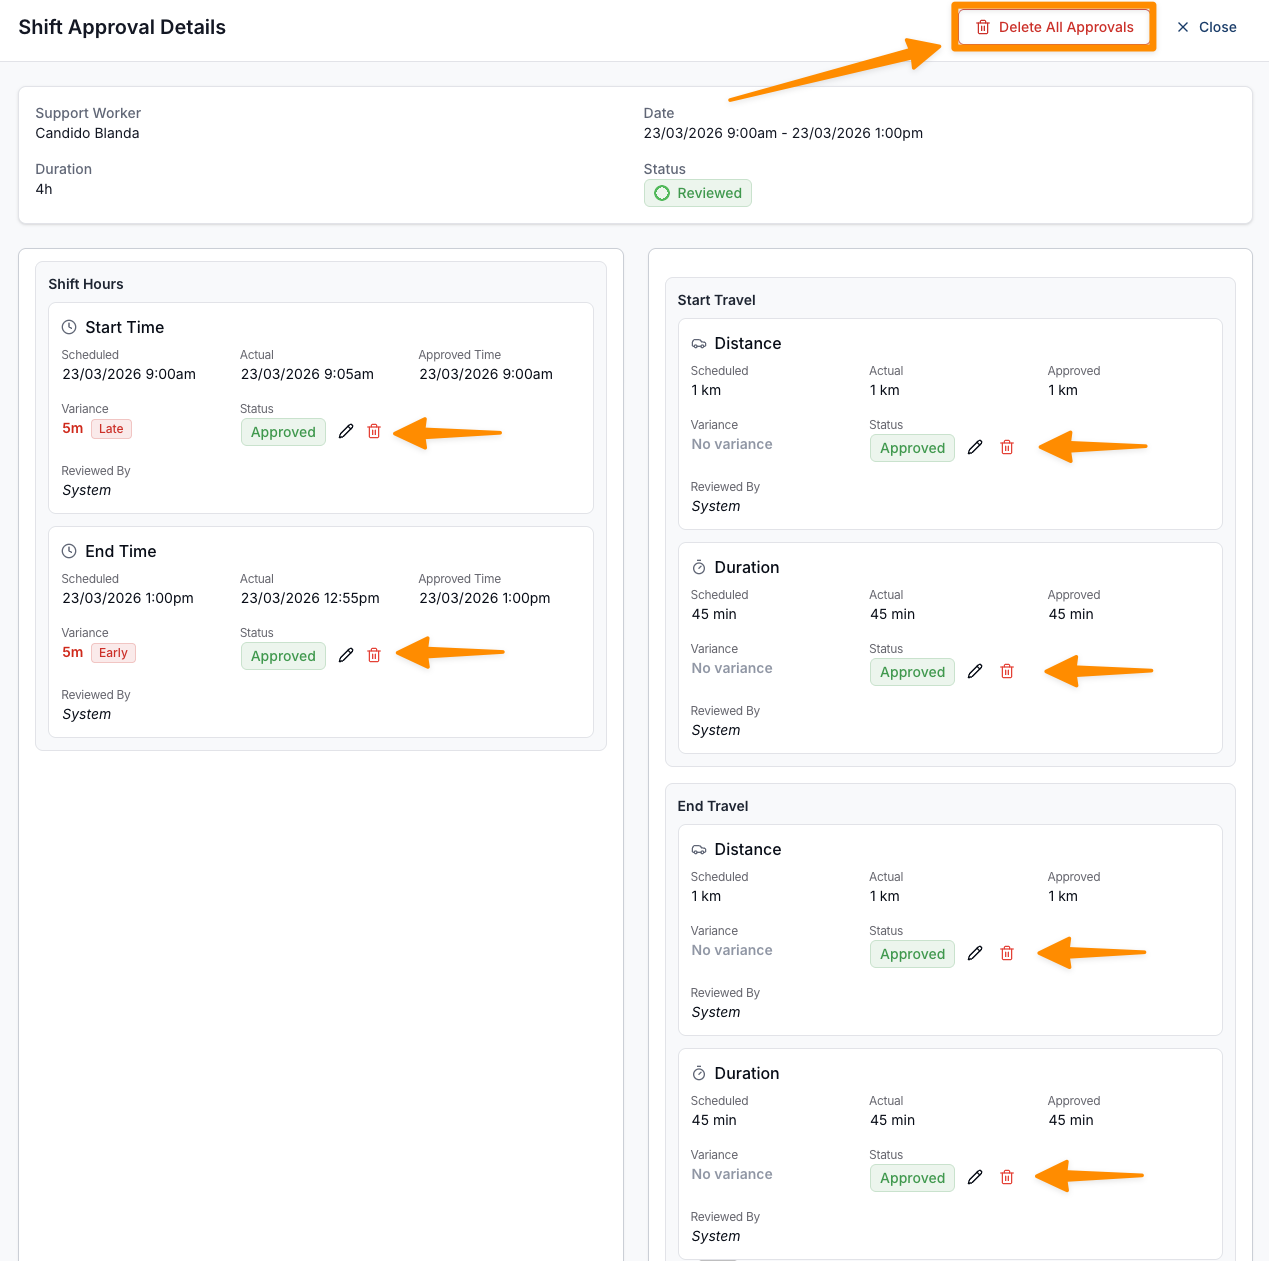
- The shift will revert back to Needs Review if any approvals are removed.
Viewing Shift Alerts from Shift Approvals
When the selected date range has outstanding Shift Alerts, a red banner appears above the shifts. Select it to review missed clock entries, cancelled shifts, and other alerts.
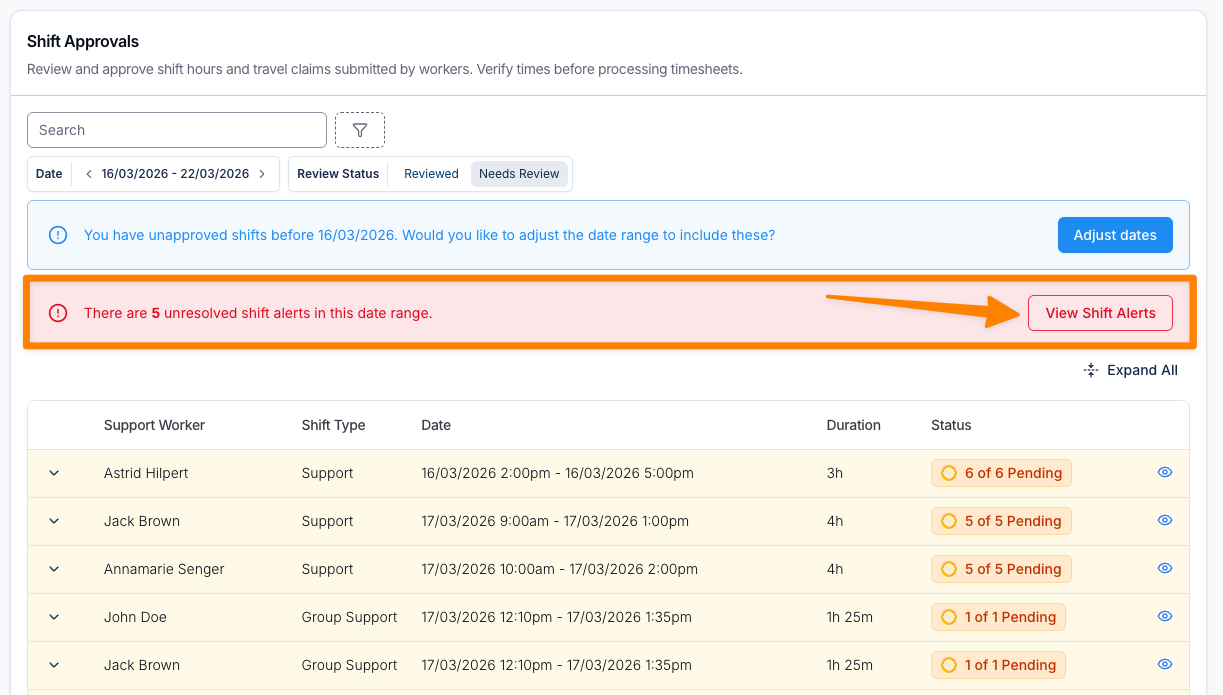
You can find more information on Shift Alerts.
Why approval matters for pay
A shift is only picked up by a timesheet batch once it is fully reviewed. An unreviewed shift is skipped, so the worker is not paid for it in that pay run. After approval, it can be included in a later batch.
To be included, a shift must have:
- Approved start and end times - the hours approval on the shift.
- All travel approved - any travel on the support that was driven by the shift's worker. A single unapproved travel claim holds up the whole shift.
- All active overnight periods approved - where the shift is a sleepover with recorded active overnight periods.
The shift must also be assigned to a worker and have already ended.
One case no amount of approving will fix: if the support was cancelled with a pay behaviour of "No pay", the shift is excluded from timesheet batches regardless of its approval state. See Support cancellations.
Opening the Timesheet Batch a Shift Was Paid In
Once a shift has been picked up by a timesheet batch, you can open that batch from the shift itself.
- On the Shift Approvals page, set the date range so it covers the shift.
- Set the Review Status filter to Reviewed. A batched shift is fully approved, so it never appears under Needs Review.
- Find the shift - its Status carries a Timesheet Batched chip.
- Click the ellipsis (3 dot menu) on the shift row, then View Timesheet Batch.
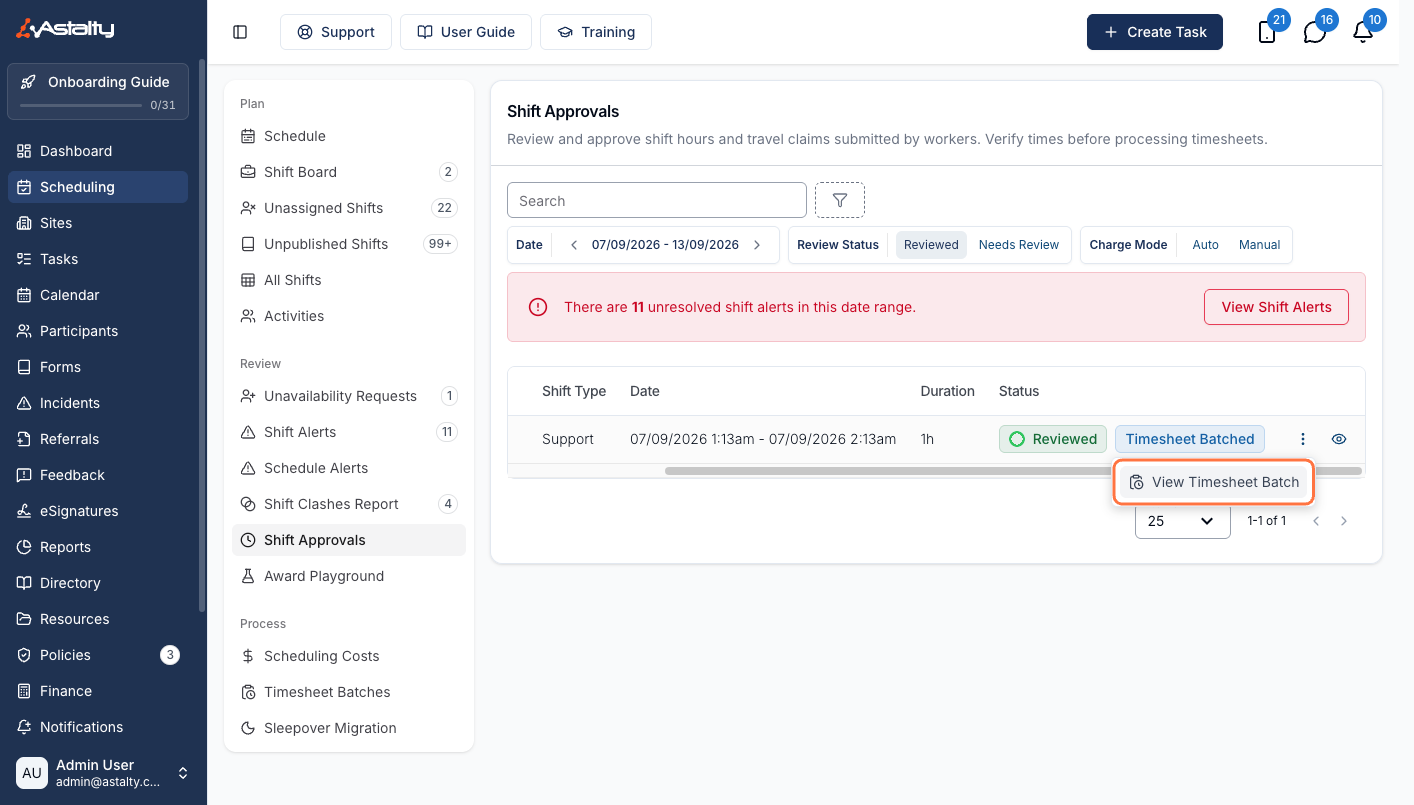
This lands on the Details of the batch the shift was included in, which also has an Award Interpretation menu breaking the shift's hours down into pay lines.
Best Practice
- Work through Shift Alerts first, so missed clock ins and outs are resolved before you start approving.
- Always confirm discrepancies with workers before approving large variations.
- Check travel claims carefully to ensure they align with scheduled expectations.
- Approve everything for the pay period before creating the timesheet batch, so nothing is left behind.