- Participants
- Budget Functionality
Budget Functionality
In Astalty you can create 2 different types of Budgets;
- Internal Budgets
- These should be used when you need to calculate the cost of a service you will be delivering to the Participant
- External Budgets
- These should be used when you'd like to calculate the cost of supports that another Provider will be delivering
Creating a Budget
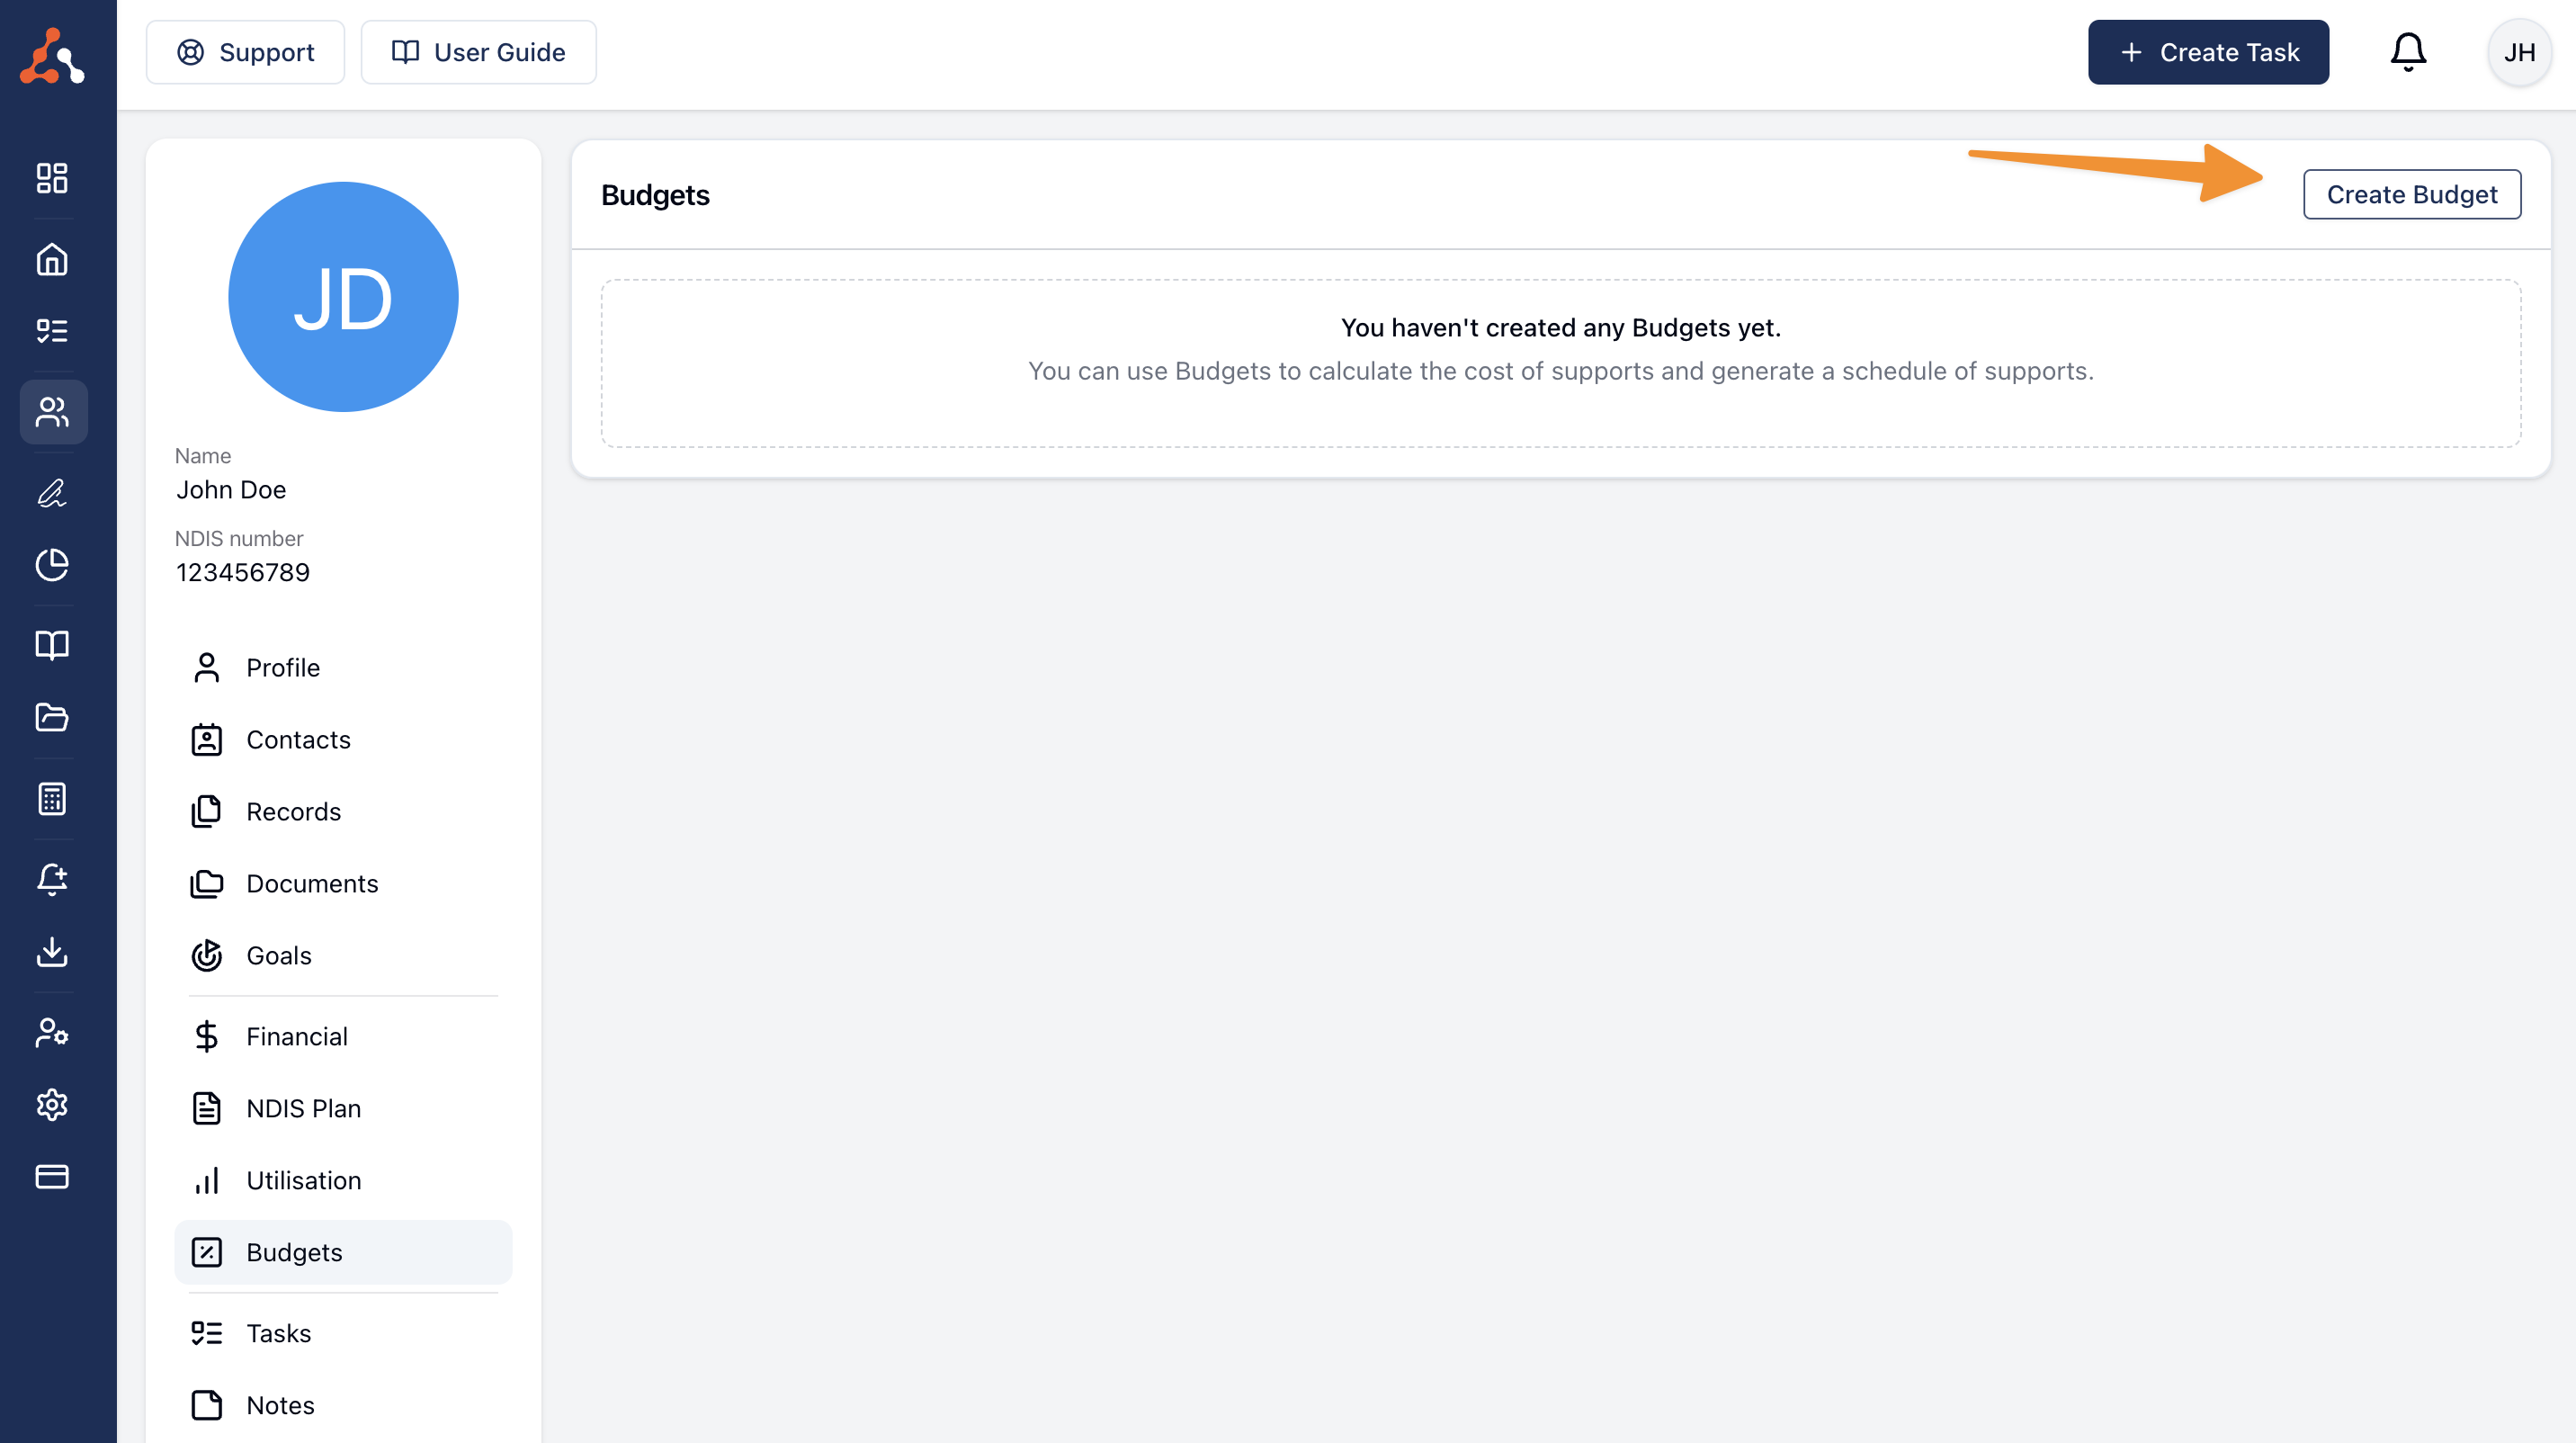
To create a budget, navigate to the Participant you'd like to calculate the budget for and click on the Budgets page in the sub-menu.
Then, click on Create Budget
Name
When creating a Budget, you'll need to enter a name for the budget - this should be short but descriptive.
Description
Under Budget Description you can record optional context about the budget — a Participant's total plan funding, how the funding is intended to be used, or anything else the name alone can't carry. It saves you squeezing that detail into the first budget item.
This is a rich text field, so you can format the text with bold, italics, underline, strikethrough and highlighting, add bullet, numbered and checklist items, apply headings, and insert links. Tables aren't available here.
Once saved, the description appears as a Description row in the Budget Details section of the budget, between Name and Type. The row is collapsed to the first three lines, with Show more and Show less to expand and collapse it — the toggle appears on every description, including one-liners that are already shown in full. Leave the field blank and the row is hidden altogether.
Budget Type
You can choose between an Internal Budget and an External Budget.
Internal Budget
Use an Internal Budget if you will be delivering the Service.
- You will be able to use Charge Items to create the Budget
- You will be able to create a Service from the Budget
- You will be able to export the budget as a PDF
External Budget
Use an External Budget if you'd like to calculate the cost for service another Provider will be delivering
- You will be able to use all items from the Price Guide to create the Budget
- You will not be able to create a Service from the Budget
- You will be able to export the budget as a PDF
Budget Dates
Set a Start date and an End date. Two shortcuts save typing them:
- Where the Participant has a current Plan in Astalty, the form offers it — "Aidan's current Plan dates are 01/03/2026 to 01/10/2027. Click here to use these dates." A Plan that has already ended, or that hasn't started yet, doesn't count, so the line is missing for a Participant whose only Plan is expired or future-dated.
- Once a start date is set, opening the End date picker offers 3 months, 6 months, 12 months, 2 years and 3 years. Each sets the end date to that far after the start date, less one day — so 12 months on a 01/03/2026 start gives 28/02/2027.
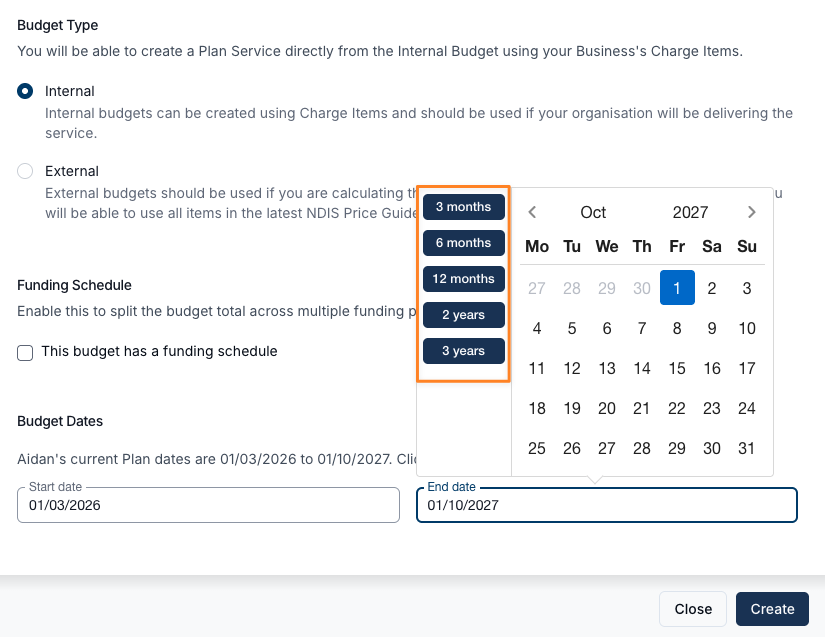
You can always type any other dates instead.
Budget Items
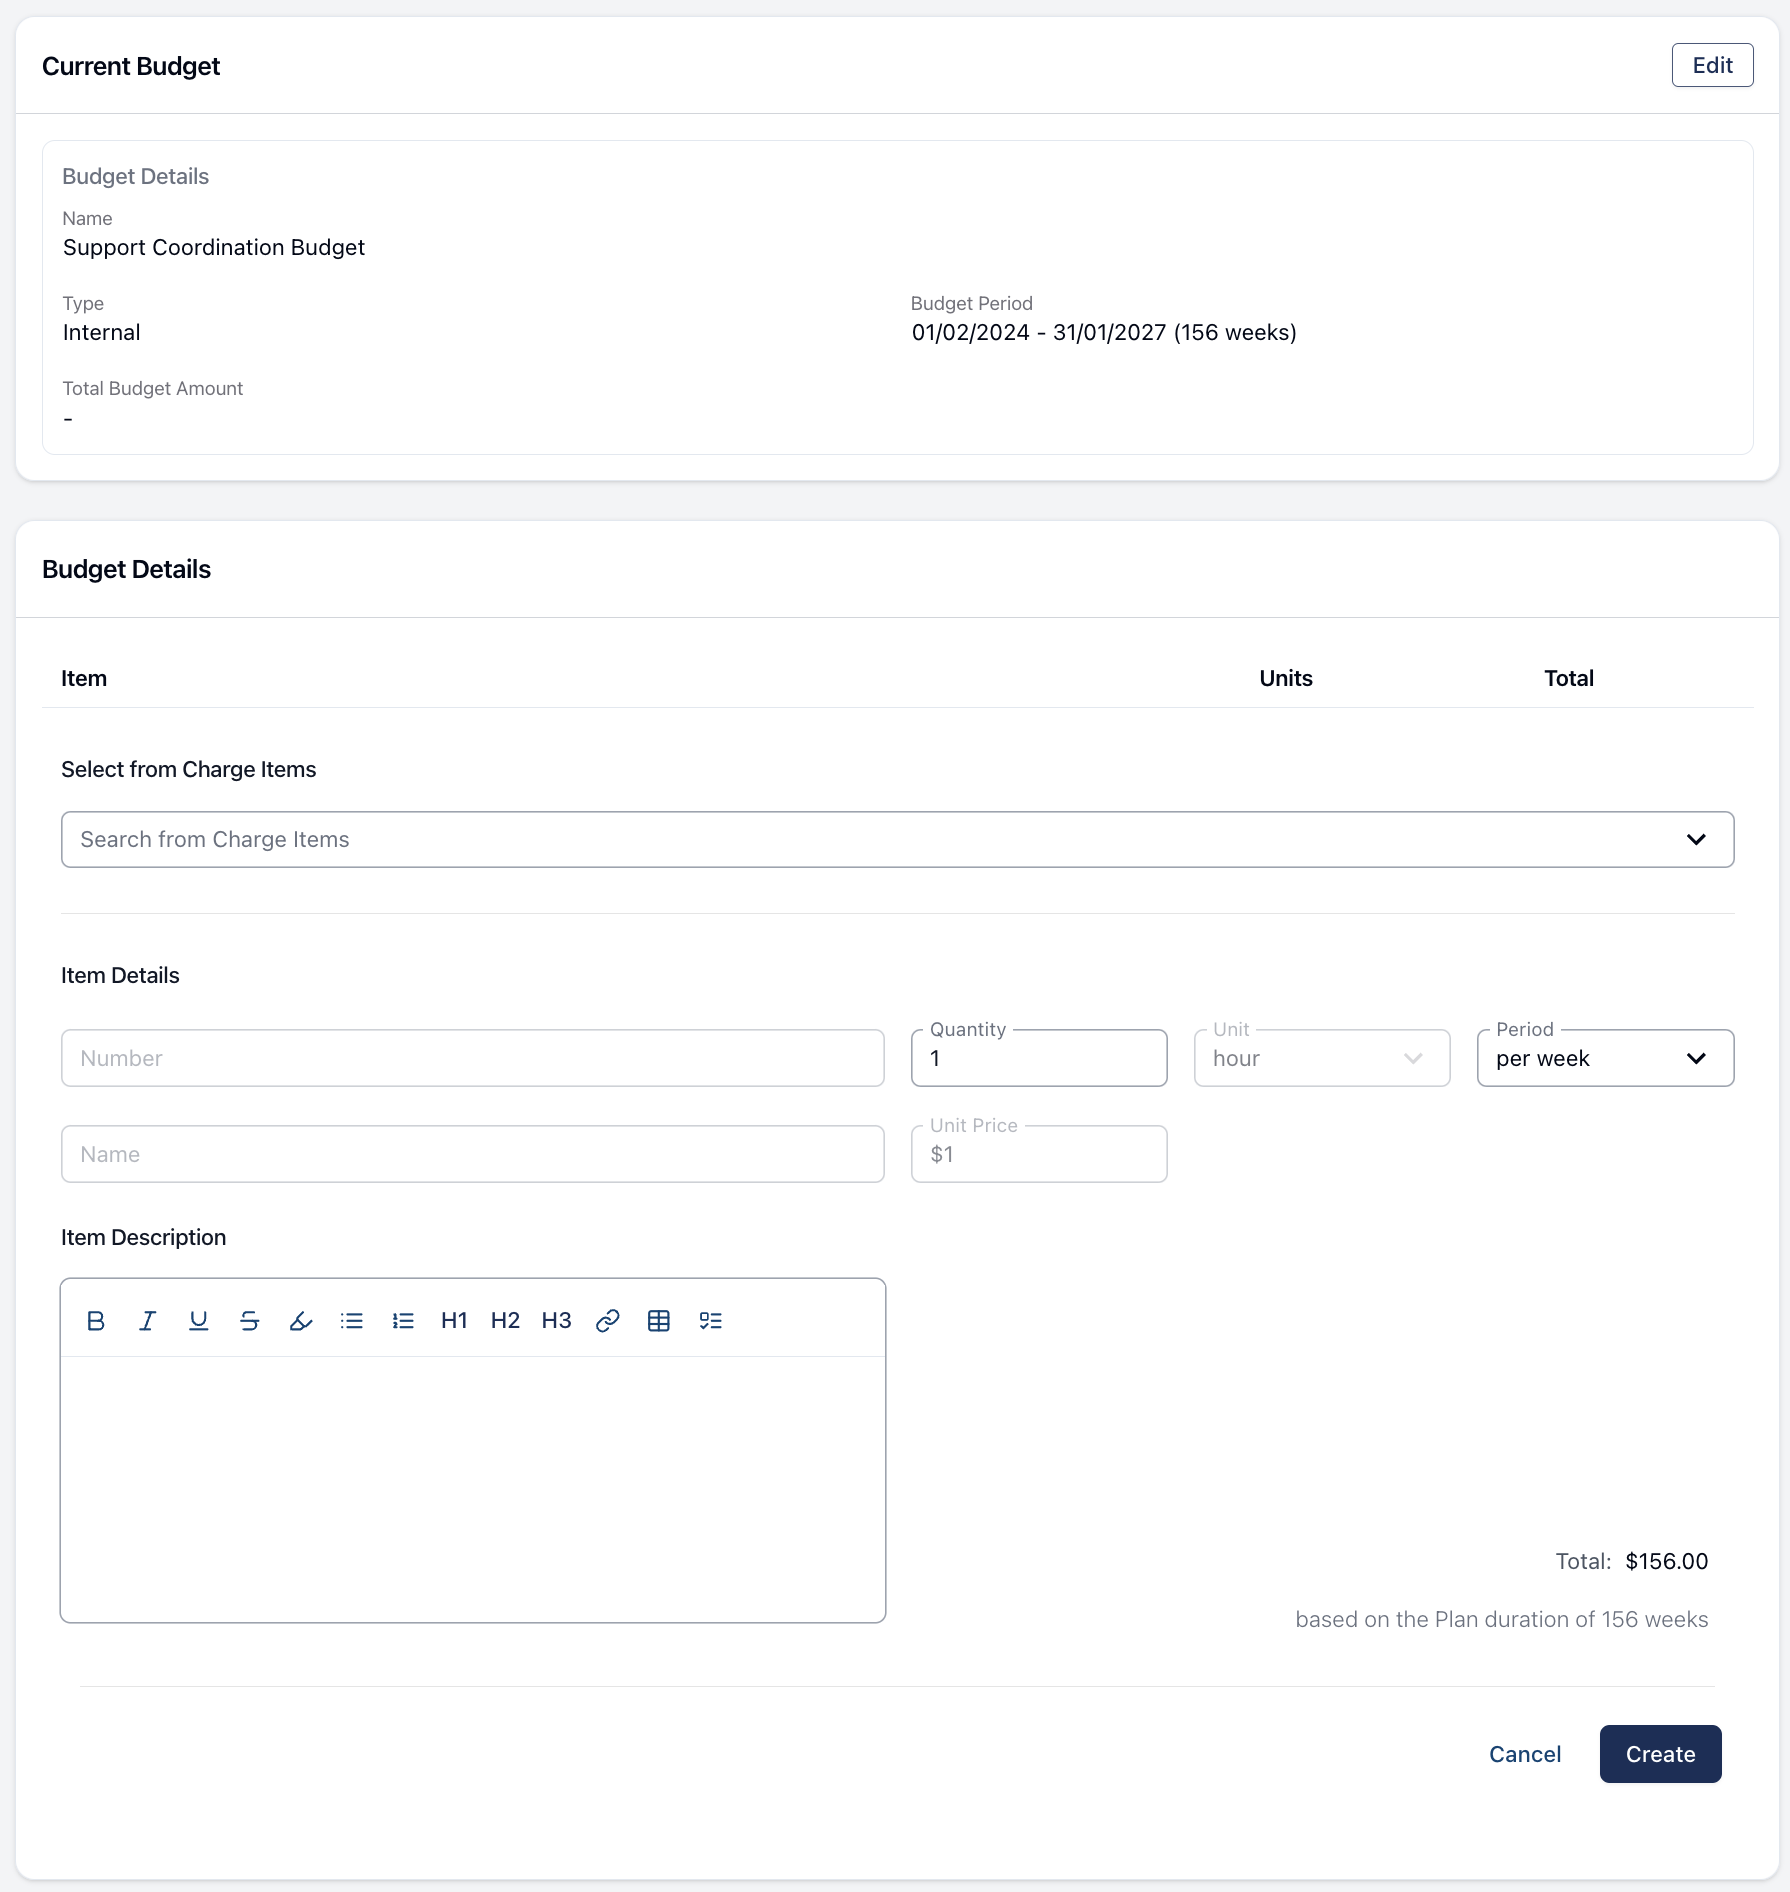
When using an Internal Budget, you will be able to add Budget Items using Charge Items. If you have created an External Budget, you will have access to the full NDIS Price Guide to create your budget.
Editing and Removing Items
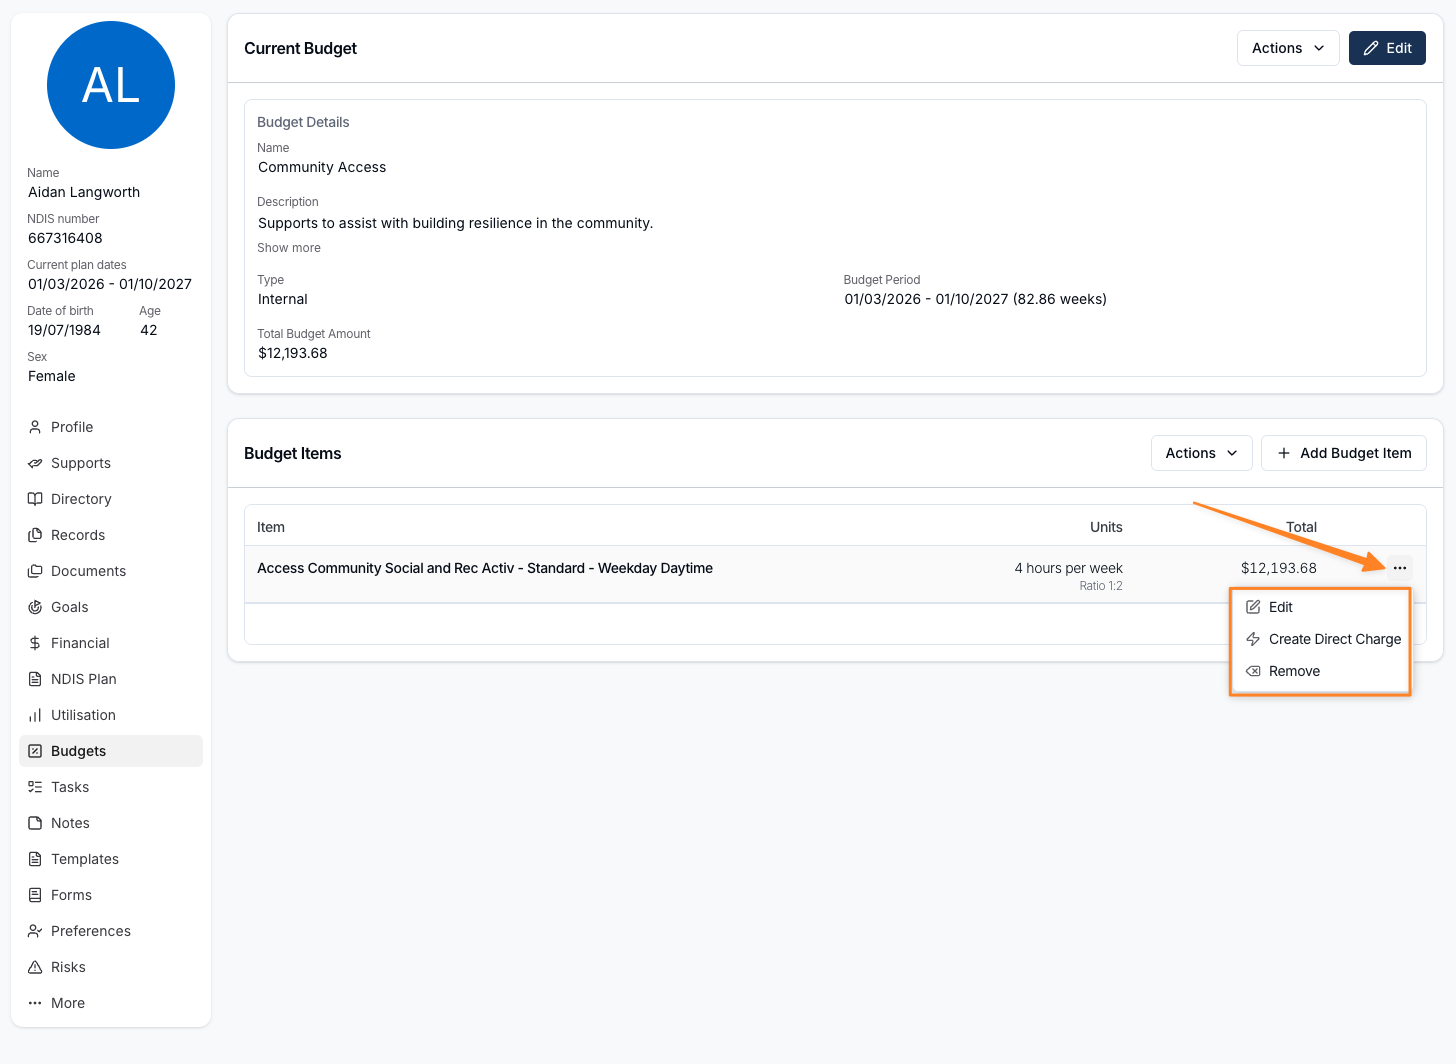
Each row in the Budget Items card has an overflow menu (…):
- Edit opens the item inline beneath its row. Change what you need and click Update.
- Create Direct Charge raises a charge from the item.
- Remove deletes the item.
Editing or removing an item recalculates the budget total, and the funding periods with it.
Reordering Items
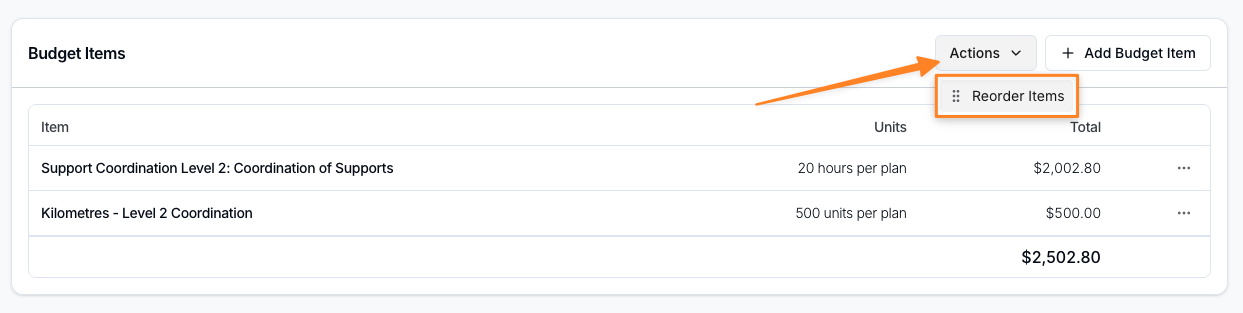
Items are listed in the order you added them. To change that, open Actions on the Budget Items card and select Reorder Items.
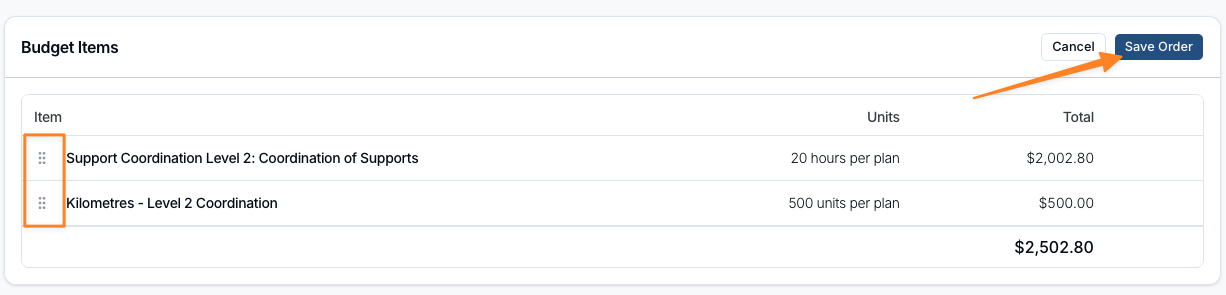
Drag the handles beside each row into the order you want, then click Save Order. Cancel discards the rearrangement. The saved order carries through to the budget PDF and the Schedule of Supports on a Service Agreement.
Creating a Direct Charge From an Item
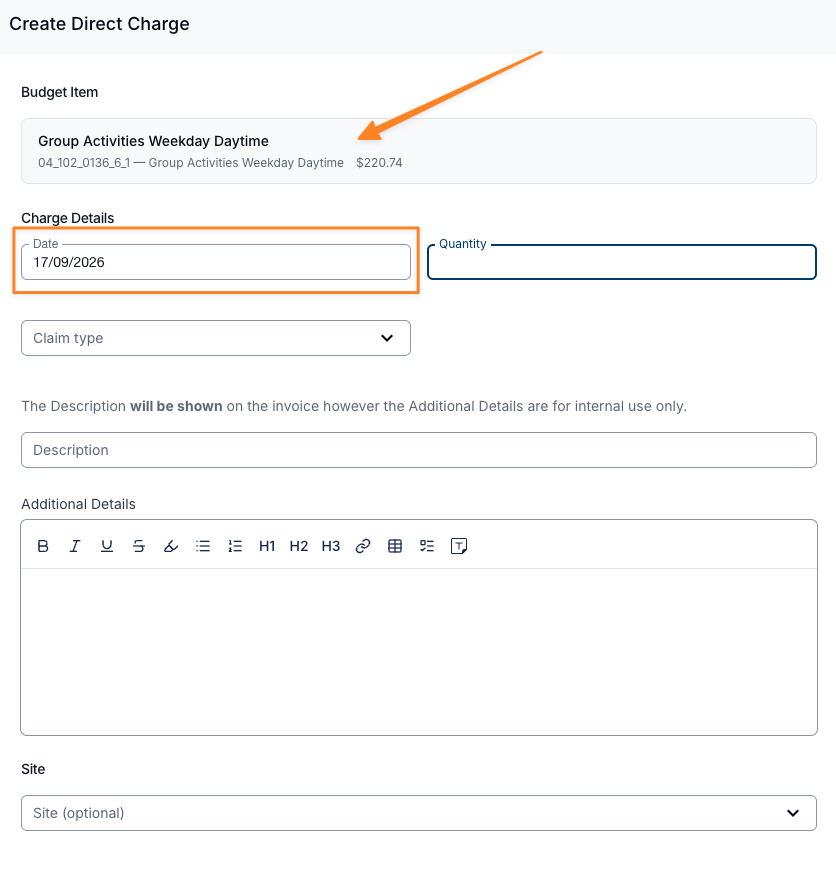
Create Direct Charge raises a Direct Charge for the item without re-entering its details. It appears only on items built from one of your Charge Items — an item taken from the NDIS Price Guide has nothing to charge against.
The drawer opens with the item's name, Charge Item number and total in a read-only panel at the top, and the date set to today. Everything else is blank — enter the Quantity, Claim type, Description and anything else the charge needs.
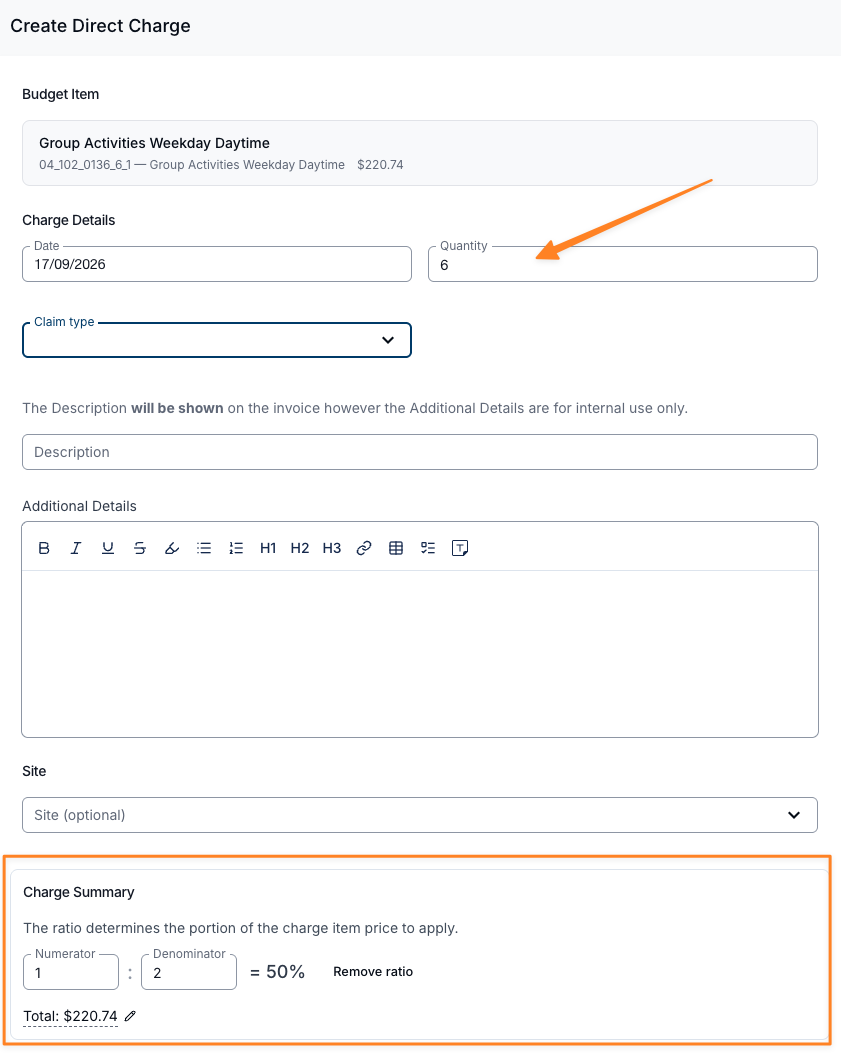
Once you enter a quantity, a Charge Summary appears with the calculated Total. Where the budget item has a ratio, it is already filled in here, and the total is reduced accordingly. Remove ratio clears it; the pencil beside the total sets the total by hand instead.
Support Ratios
When a support is shared between Participants, each Participant only pays a share of the full rate. You can set a ratio on a budget item so the reduced rate and total are calculated in the budget itself — rather than only becoming visible once the support is delivered and an invoice is raised.
Setting a ratio
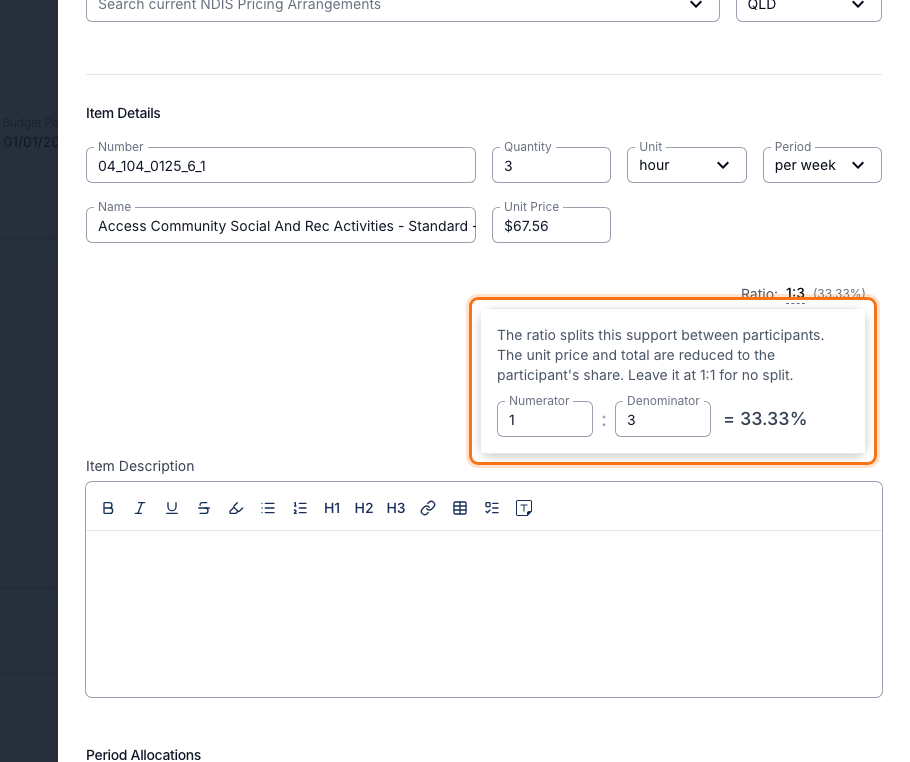
When adding or editing a budget item, a Ratio control appears to the right of the item details, showing the current ratio and the percentage it works out to. It starts at 1:1 (100%) — the full rate.
Click the ratio to open it, then enter a Numerator and a Denominator. The percentage updates as you type, so 1 : 3 shows as 33.33%.
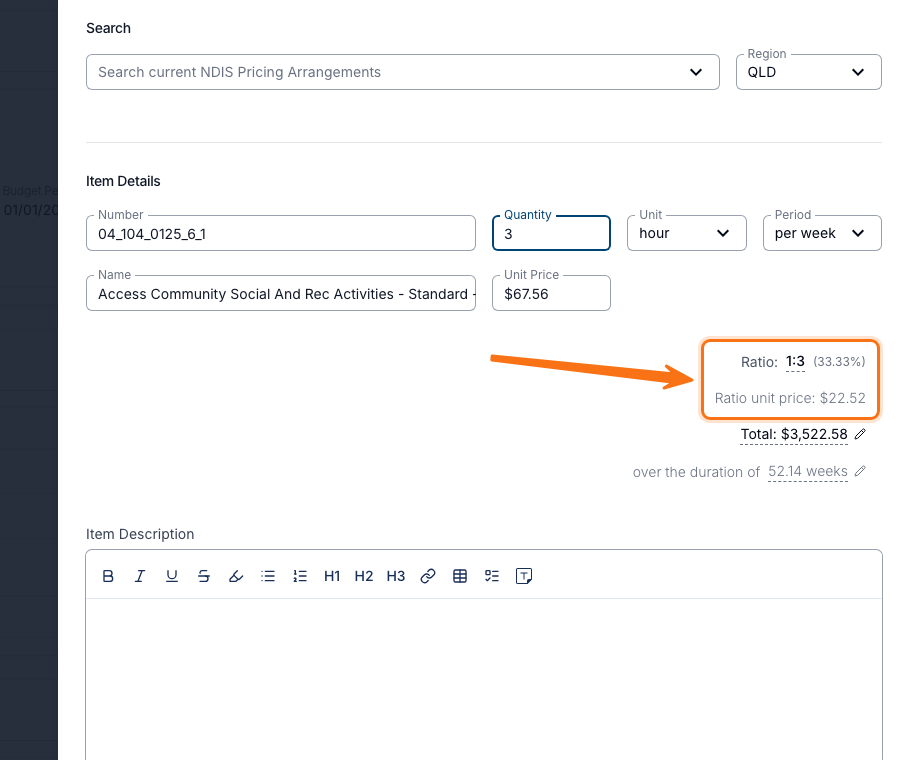
Once a ratio is applied, a Ratio unit price appears beneath it, and the item Total is recalculated from that reduced rate. In the example below, a $67.56 per hour item at 1:3 becomes a ratio unit price of $22.52, and 3 hours per week over 52.14 weeks totals $3,522.58.
Where the ratio appears
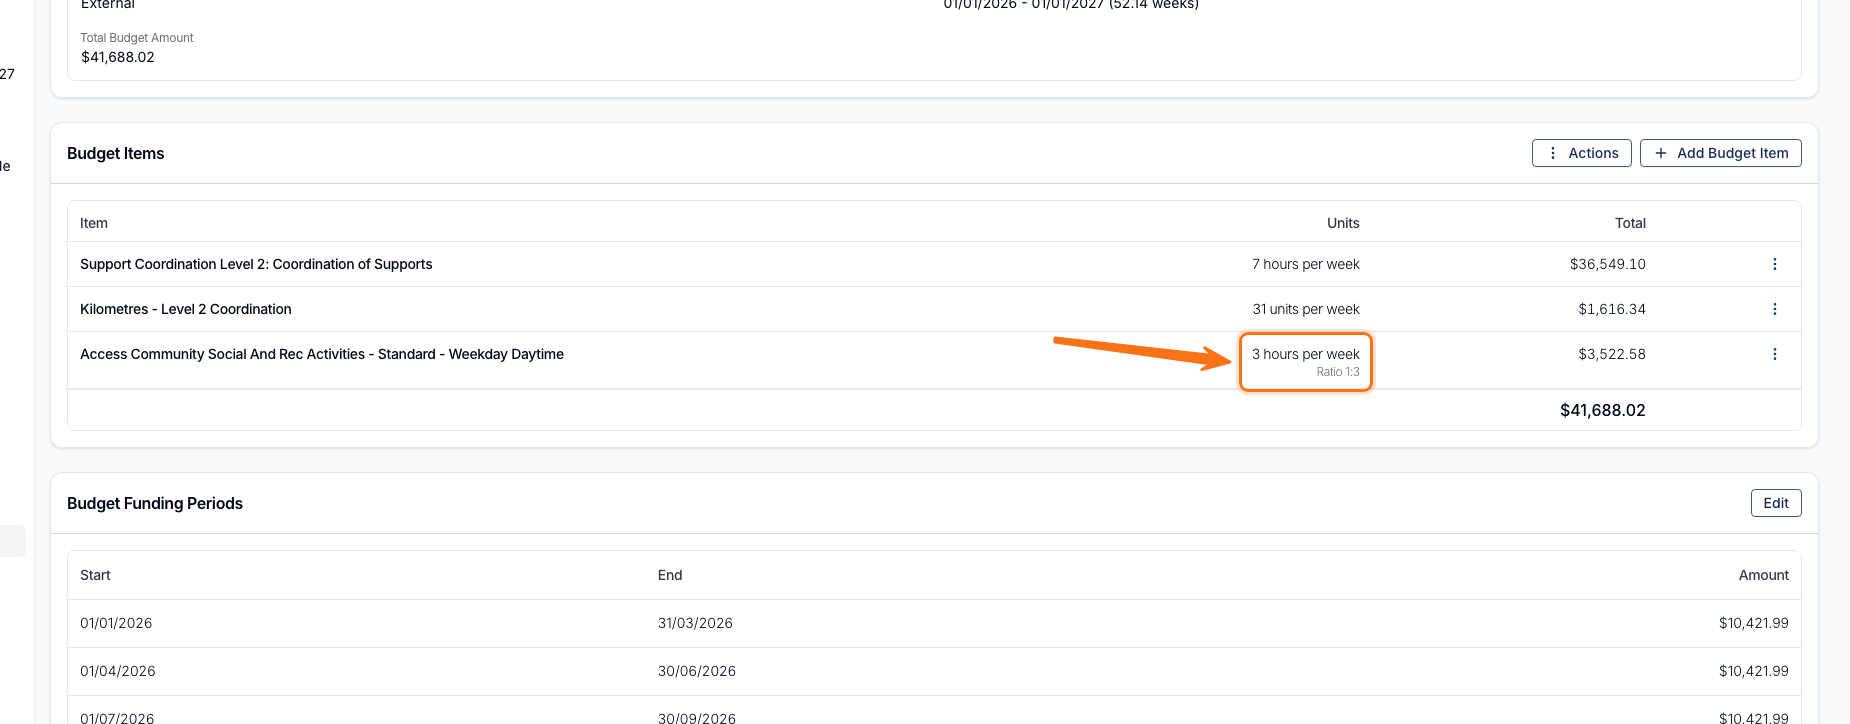
On the budget, ratioed items show a Ratio line under their units, and the item total in the list is the reduced amount:
On the Schedule of Supports in a generated Service Agreement, the item shows the ratio along with a plain-English explanation of the split. The Unit Amount column shows the reduced rate, while the explanation quotes the full rate it was calculated from:
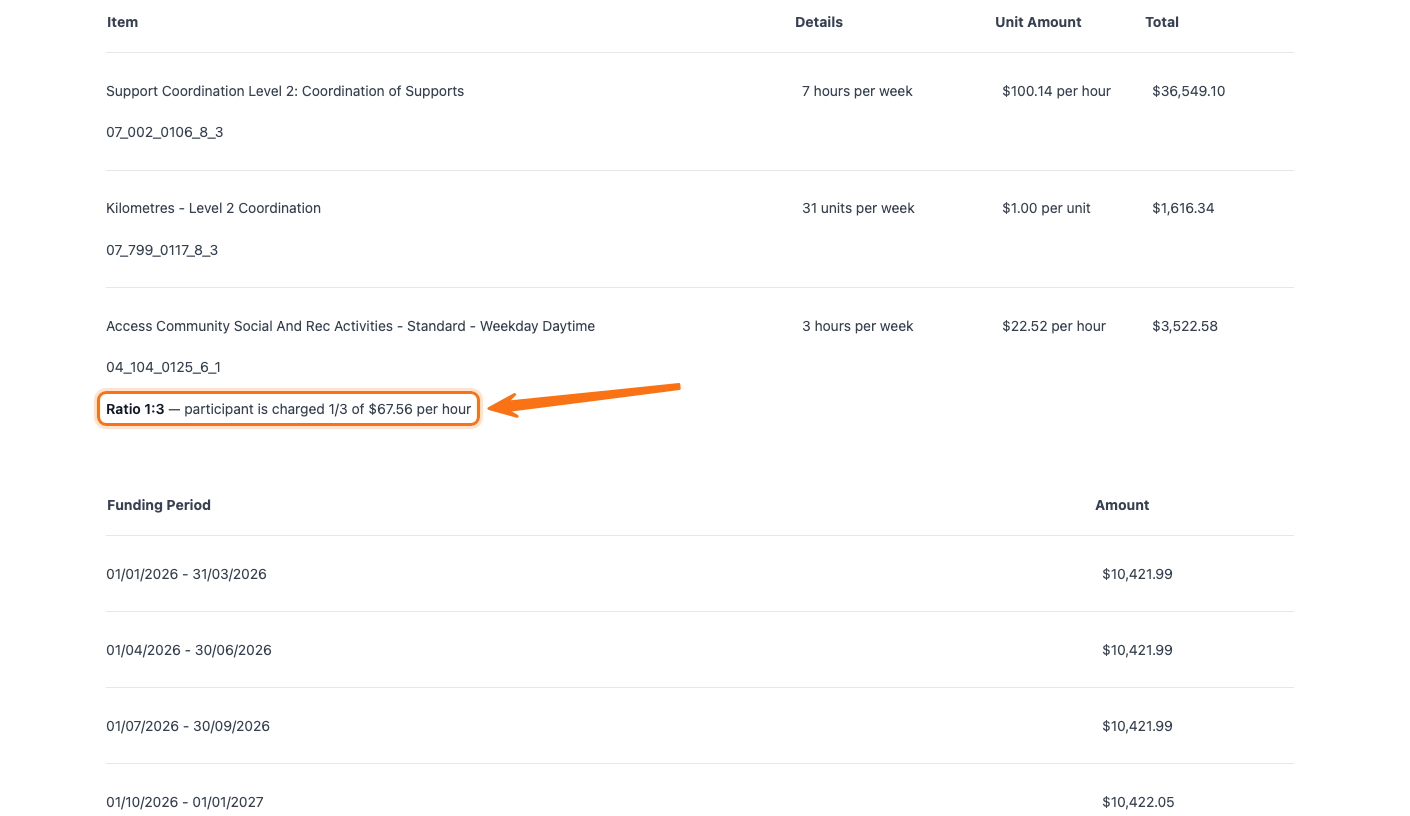
The same line appears when you export the budget as a PDF:
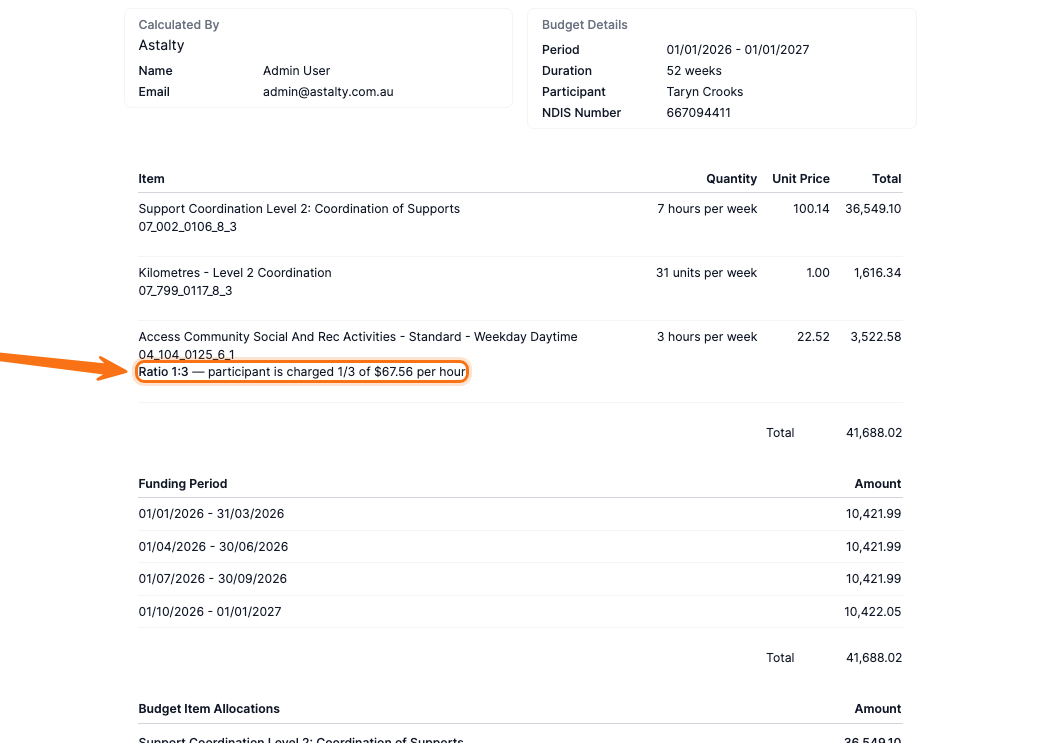
Ratios and funding periods
Because a ratio changes the item total, it also changes how that item is distributed. If the budget has funding periods, changing a ratio recalculates the period amounts to keep them in step with the new total.
Ratios don't carry across to a Service
When you create a Service from the budget, the Service is funded with the ratio-adjusted total — so the dollar amount is correct. The ratio itself is not carried across, because a Service records an amount and the Charge Items that can be used against it, not a ratio.
Two things follow from that:
- Remaining units are worked out at the full rate. The Charge Item chosen under Calculate Remaining Units Using is priced at its ordinary rate, so the remaining hours shown on the Service will look lower than the hours the budget was planning for.
- What draws down the funding is the ratio applied when the support is delivered — not the one on the budget item. Where the support is delivered as a Group Support, Astalty applies that support's own ratio when it charges. If the same support ends up delivered one-to-one at the full rate, the Service's funding is used up faster than the budget assumed.
Budget Funding Periods
You can split a budget's total across multiple funding periods, each with its own dates and amount. This is useful when a Participant's funding is released in stages across their plan rather than all at once.
Enabling a funding schedule
When you create a budget, tick This budget has a funding schedule in the Funding Schedule section, then enter the Number of funding periods. This works for both Internal and External budgets.
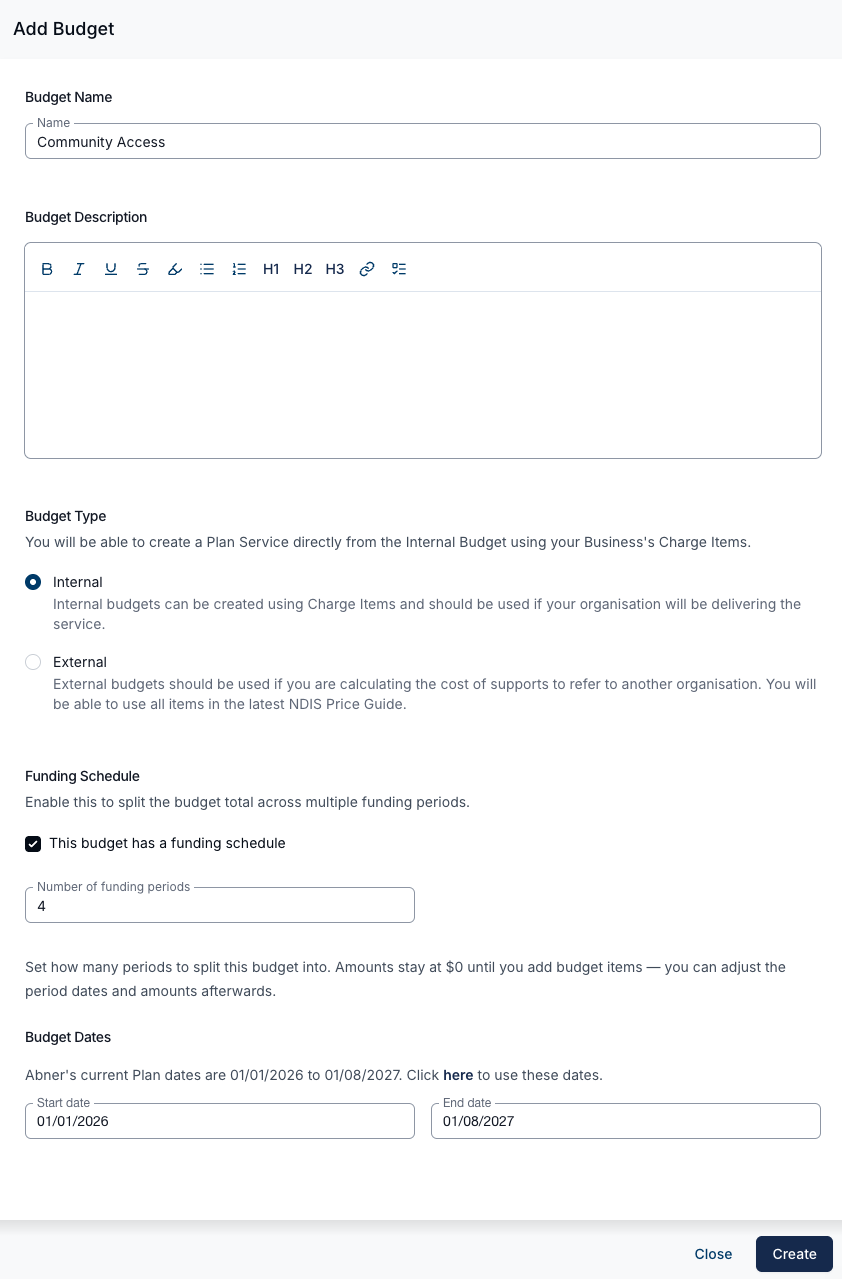
Amounts stay at $0 until you add budget items — you can adjust the period dates and amounts afterwards. The periods are created using the Budget Dates you set, so make sure the start and end dates are correct.
Adding budget items
After creating the budget, add your budget items as normal using Add Budget Item.

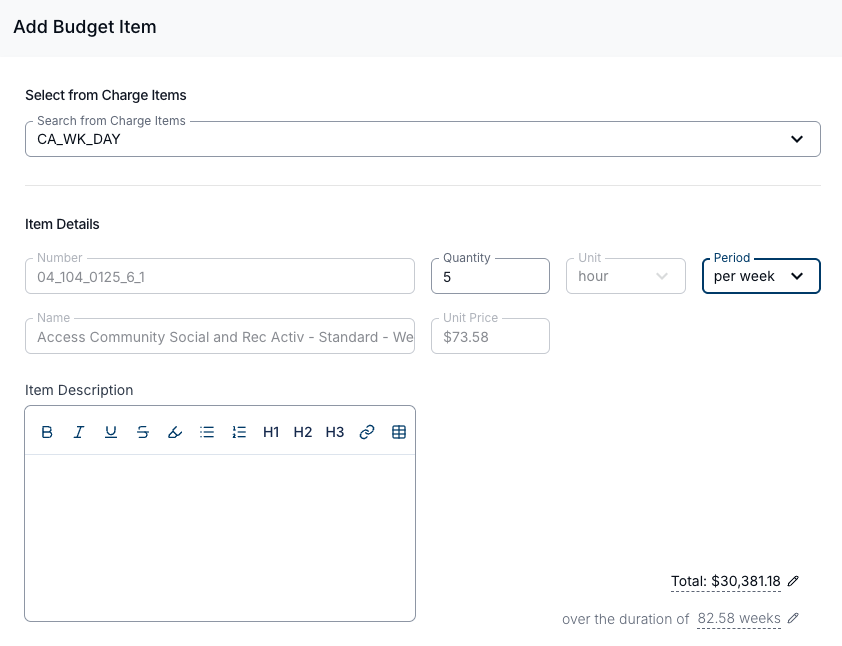
As you add items, Astalty splits the budget total evenly across the funding periods. Any rounding remainder goes to the first period, so period one can be a cent or two higher than the rest. The calculated periods appear in the Budget Funding Periods section on the budget.
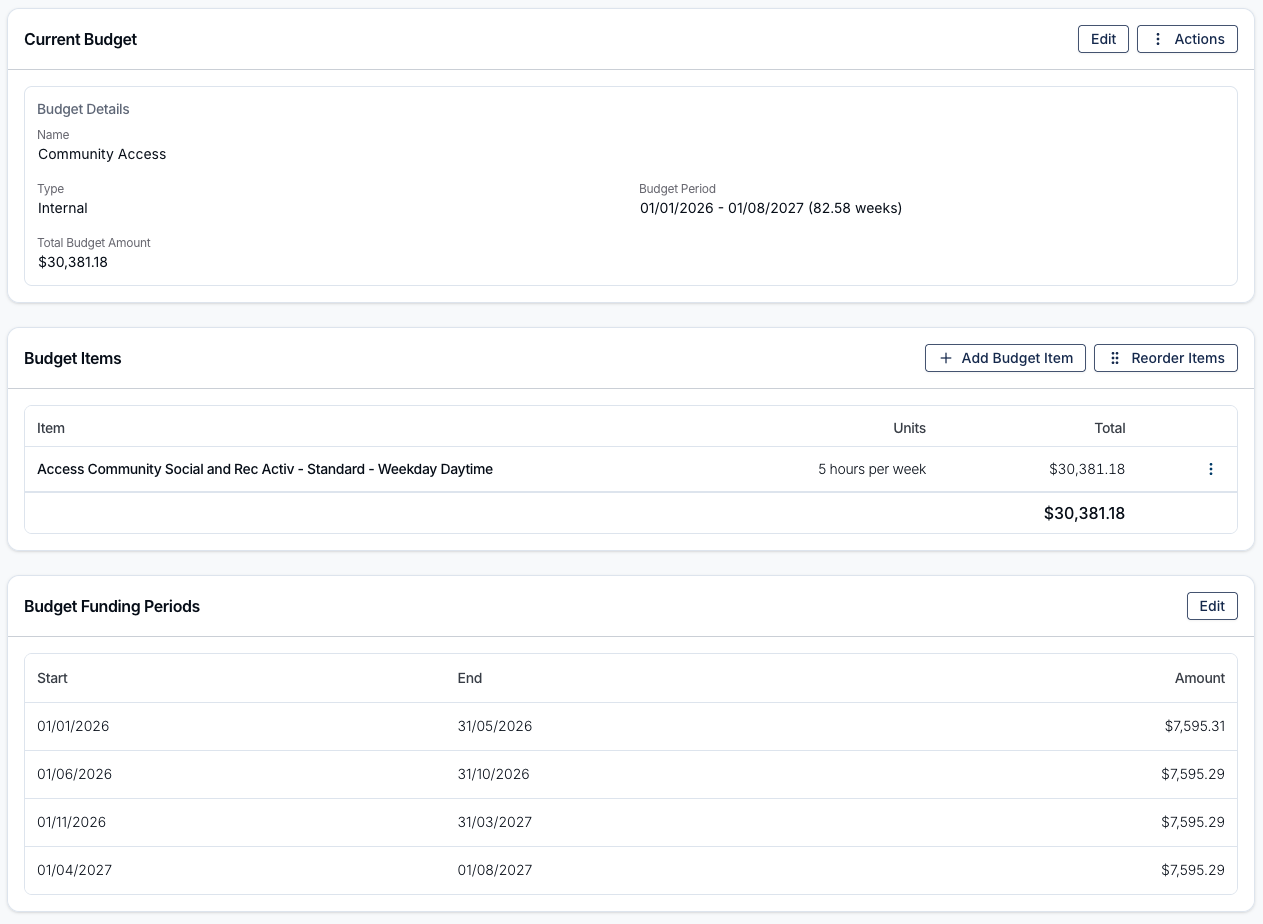
Editing funding periods
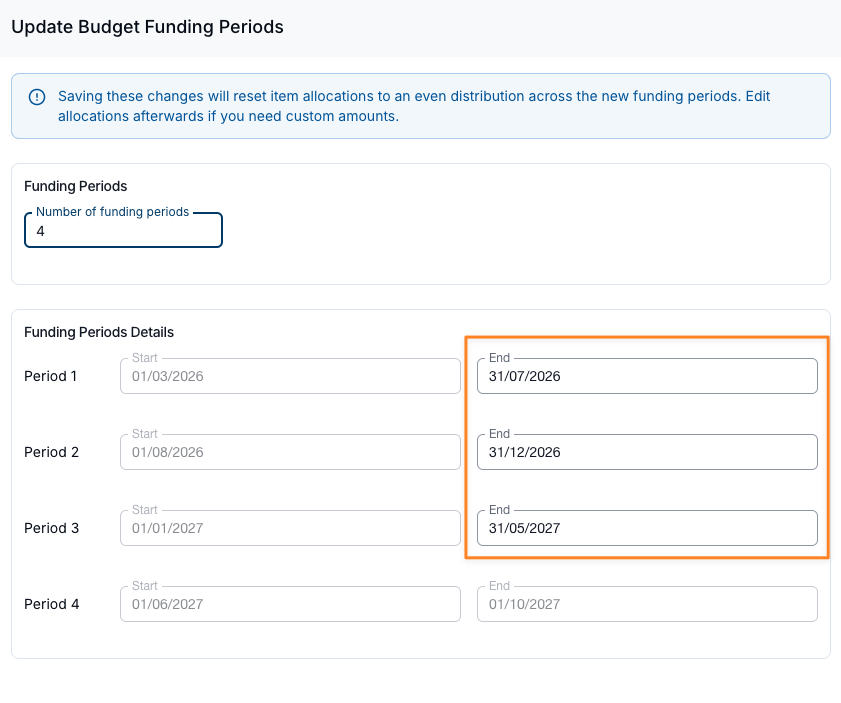
To fine-tune the periods, click Edit in the Budget Funding Periods section. On the Update Budget Funding Periods page you can:
- Change the Number of funding periods,
- Adjust each period's End date, and
- Set the Amount for each period.
Start dates are read-only throughout — each one follows the day after the previous period's end, and the first comes from the budget start date. The last period's End date is read-only too, because it is the budget end date.
Two shortcuts save re-typing amounts:
- The arrow button beside an amount — "Apply this amount to the 3 remaining periods" — copies that figure into every period below it.
- Redistribute Evenly splits the budget total equally across all periods again.
Periods Total and Budget Total at the bottom must match before Update Budget Periods will save; until they do, both turn red and the form reads "Period amounts must add up to the budget total."
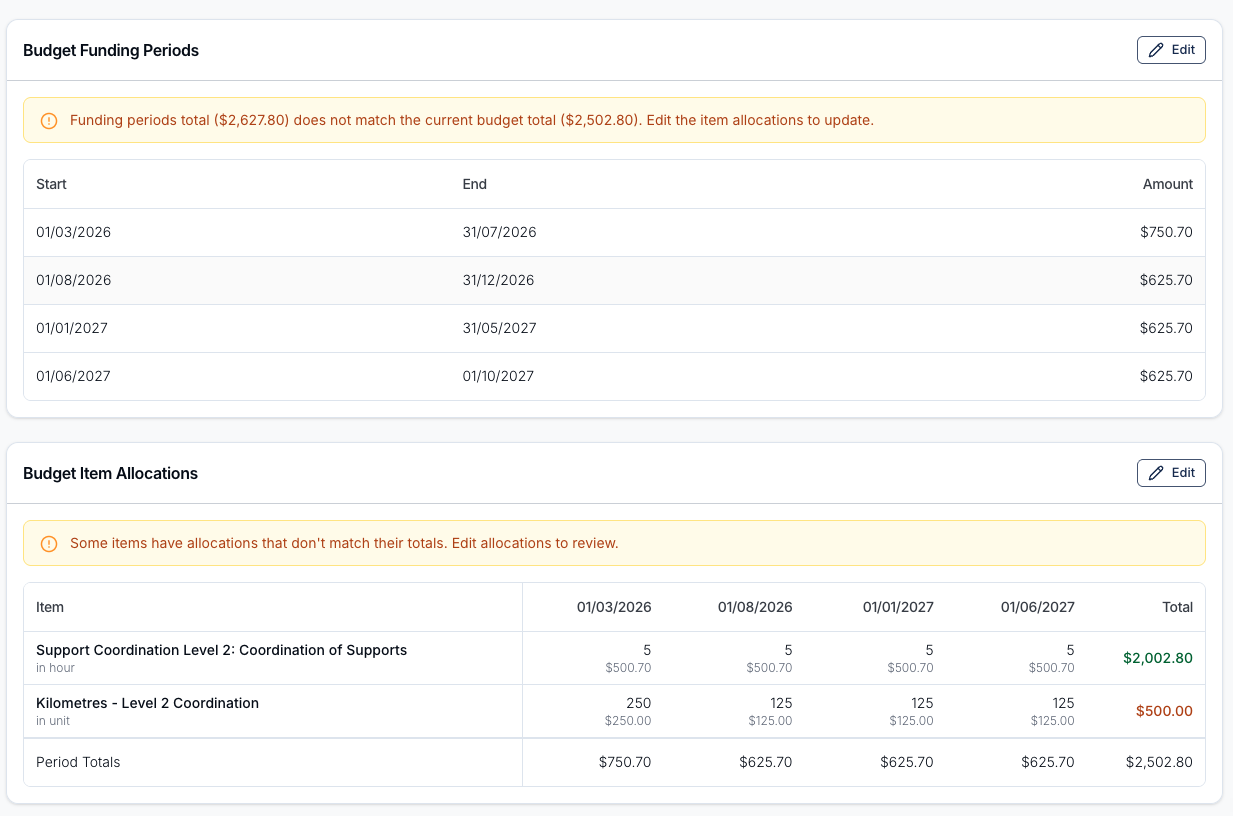
Once a budget has funding periods, they flow through to the Service Agreement via the Schedule of Supports placeholder, to any Service you create from the budget, and to the budget PDF.
Budget Item Allocations
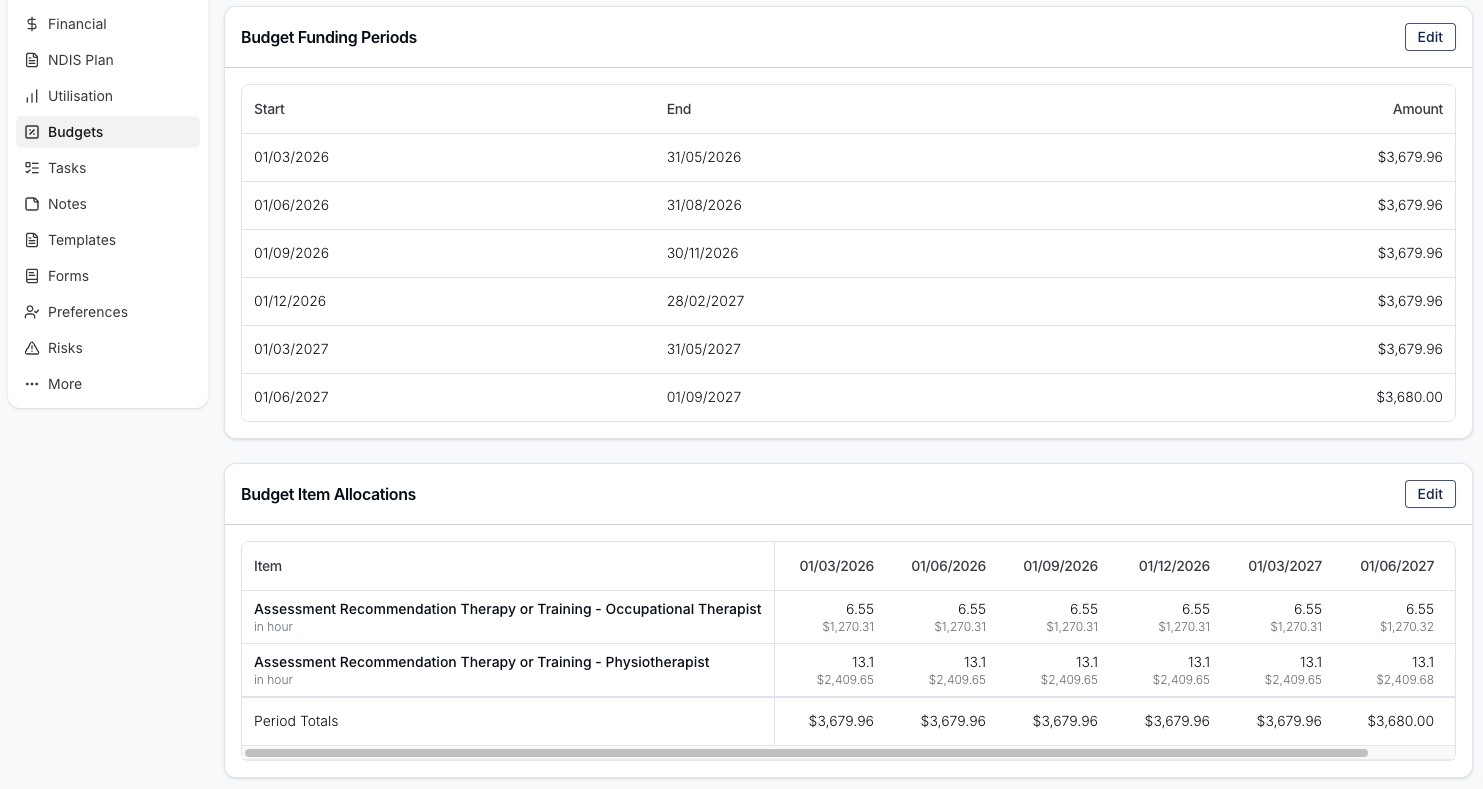
Normally a funding schedule splits the budget total across the funding periods, and you type in each period's amount. Budget Item Allocations turns that around: you split each budget item across the funding periods, and each period's amount is then calculated from those allocations.
That's useful when different supports start, stop or change pace during a plan — for example when Core Supports run evenly across the whole plan but a Support Coordination item is concentrated in the first period.
Before You Start
Two things need to be in place:
- A budget with a funding schedule. Item allocations only apply to a budget whose total is split across funding periods.
- The Budget Item Allocations beta, enabled on your account by the Astalty team. It isn't something you can turn on from your Settings.
Turning On Item Allocations
When you create or edit a budget, tick This budget has a funding schedule in the Funding Schedule section. A second option then appears: Allocate the budget across individual items.
The form explains the difference:
When enabled, you split each budget item across the funding periods and the period amounts are calculated from those allocations. When disabled, you enter the period amounts directly.
Once item allocations are on, you no longer enter period amounts yourself. The amount column disappears from the Update Budget Funding Periods page, and each period's amount is derived from the items allocated to it. Until you add budget items, the periods sit at $0 and the budget shows:
Funding period amounts will populate as you add budget items.
Switching Modes on an Existing Budget
Turning the option on or off on a budget that already has a funding schedule changes existing data, and Astalty warns you before you save:
- Turning it on — "Saving will evenly distribute each item across the periods, replacing the current period amounts. You can fine-tune the split afterwards." Any period amounts you had set by hand are overwritten by the calculated ones.
- Turning it off — "Saving will remove the per-item allocations. The period amounts are kept." The per-item split is deleted, but each period keeps the amount it had.
Allocating an Item as You Add It
The simplest way to allocate is while you're adding or editing a budget item. When the budget uses item allocations and has at least one funding period, the budget item form includes a Period Allocations section listing every funding period with an amount field.
Astalty pre-fills an even split across the periods and keeps adjusting it as you change the item's total, until you edit the figures yourself. Two buttons help you reset:
- Distribute — choose which funding periods to include, then even-split the item's total across just those periods.
- Distribute Evenly — even-split the item's total across every funding period.
A Total row under the periods shows what you've allocated against the item's total, in green when the two match and red when they don't. Allocations entered here must add up to the item's total — Astalty rejects the item with "Period allocations total 50000 but the item total is 60000." if they don't. Those two figures are in cents, so that example is $500.00 against $600.00.
Reviewing and Editing the Allocation Matrix
The budget also gains a Budget Item Allocations card showing every item against every funding period, with a Period Totals row at the bottom.
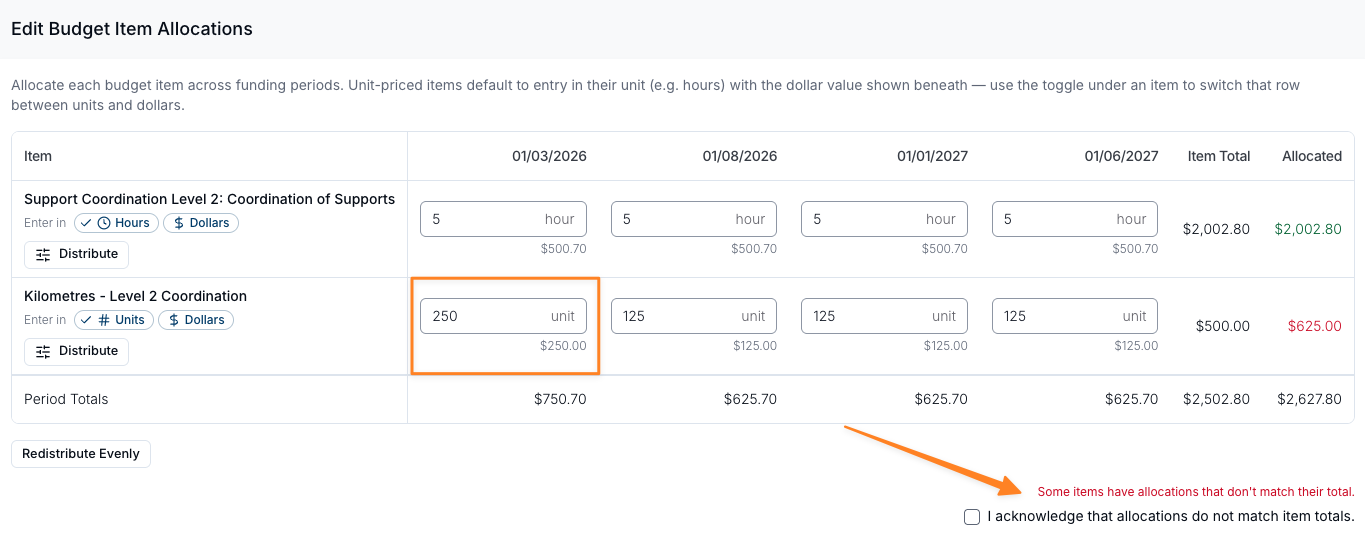
Click Edit on the card to open the Edit Budget Item Allocations drawer, where you can adjust the whole budget in one grid:
- Rows are your budget items; columns are the funding periods, each headed by the period's start date.
- Item Total shows what the item is worth. Allocated shows what you've allocated, in green when the two match and red when they don't.
- Distribute on any row even-splits that item across the funding periods you select.
- Redistribute Evenly resets every item to an even split across all periods.
- Unit-priced items get the same Enter in units-or-dollars toggle as the item form.
- A Period Totals row runs along the bottom.
Click Save Allocations when you're done.
Things to Keep in Mind
- Opening and saving Budget Funding Periods resets every split. The periods are deleted and recreated on save, then every item is evenly redistributed across the new ones — whether or not you changed anything. Astalty warns you as soon as the page opens: "Saving these changes will reset item allocations to an even distribution across the new funding periods. Edit allocations afterwards if you need custom amounts." Close the page rather than saving if you only came to look.
- Changing the budget dates can reset a split too. Budget dates flow down to the items, so an item priced per week, fortnight or month changes in value when the dates change. Any item whose allocations no longer add up to its total is evenly redistributed. Items with an overridden total, on a date change that doesn't remove a period, keep their split.
- A date change that removes a period flattens everything. Periods falling outside the new dates are deleted and their amounts merged into the nearest surviving period. The per-item allocations on a deleted period go with it, so every item — including ones with an overridden total — is re-split evenly across what's left. The on-screen warning about the date change only mentions period amounts, not allocations.
- Allocations are for planning and documentation only. They don't drive spend tracking, utilisation or invoice reconciliation — those still work off the budget and its funding periods.
Where a saved mismatch remains, the Budget Item Allocations card flags it with "Some items have allocations that don't match their totals. Edit allocations to review.", and the Budget Funding Periods card above shows its own mismatch warning ending "Edit the item allocations to update."
Budget Actions
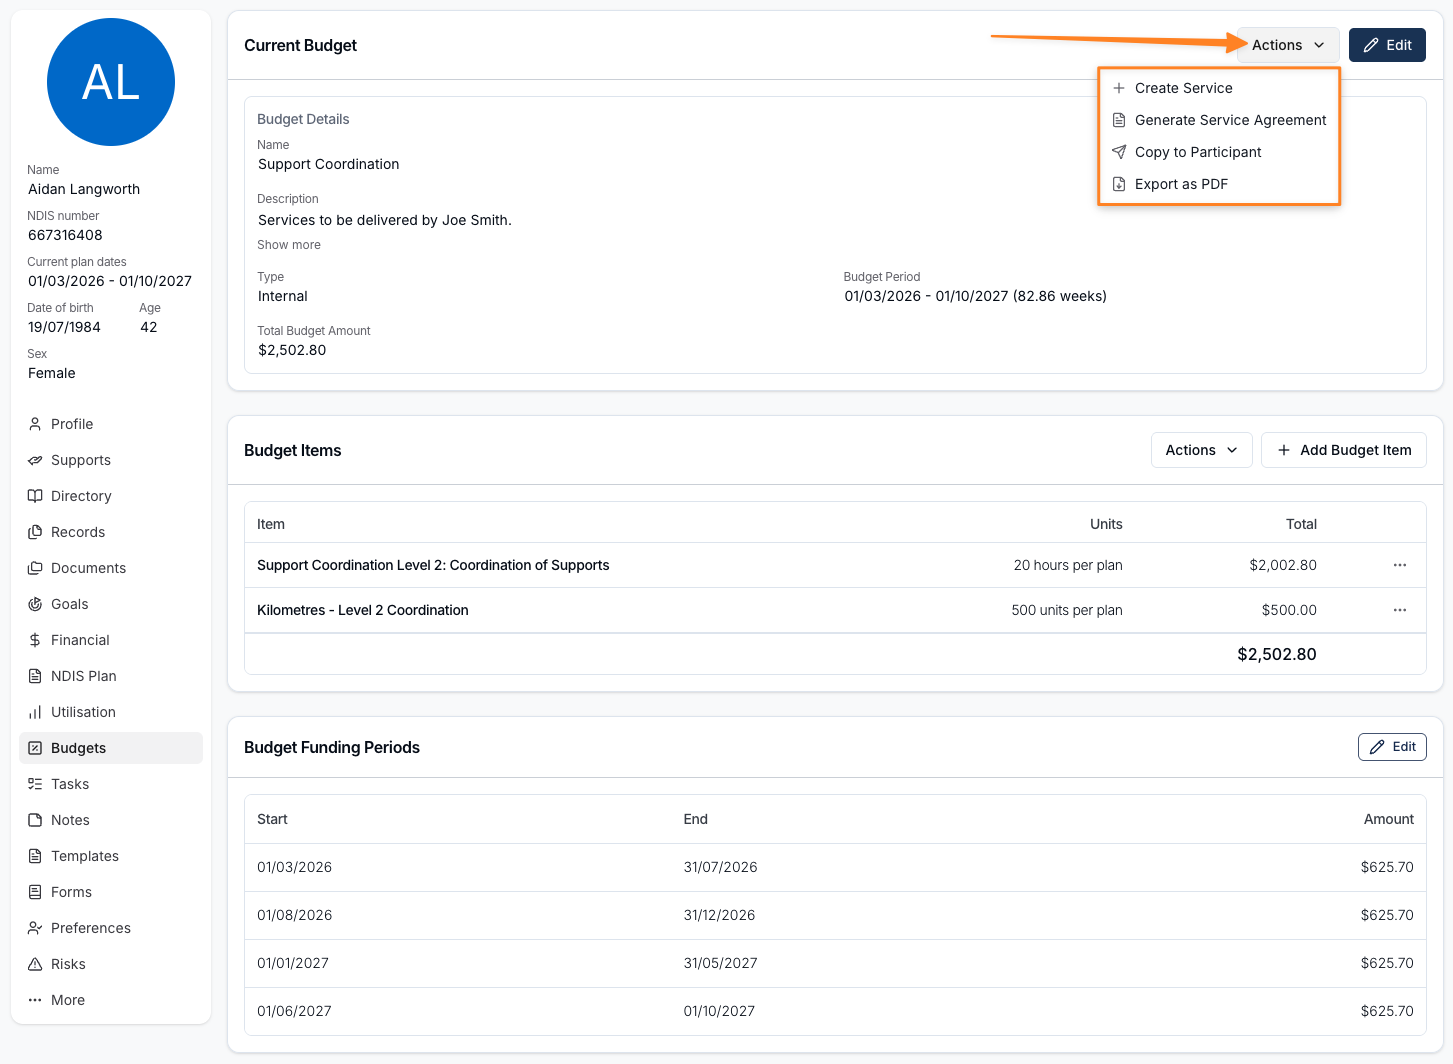
Actions at the top of a budget holds everything you can do with the budget as a whole:
| Action | What it does |
|---|---|
| Create Service | Creates a Service on the Participant's Plan from the budget. Internal budgets only. |
| Generate Service Agreement | Generates a Service Agreement using the budget as the Schedule of Supports. |
| Copy to Participant | Copies the budget to a different Participant. |
| Export as PDF | Exports the budget as a PDF. |
Generate Service Agreement
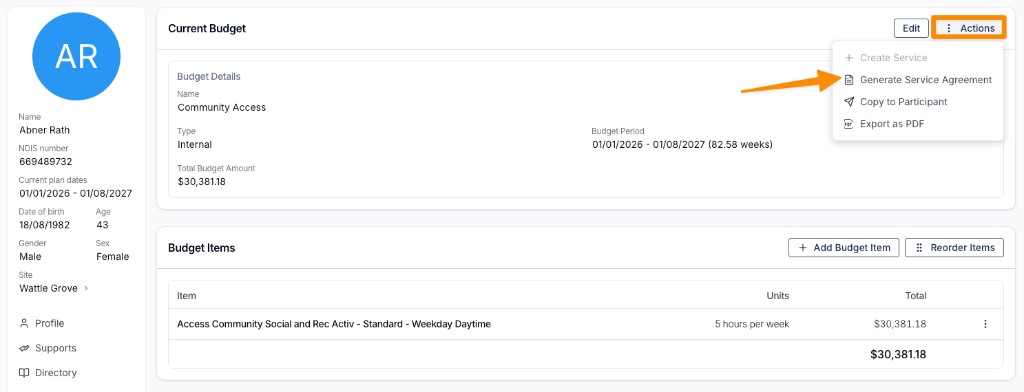
You can generate a service agreement via the budgets menu by clicking Actions and then Generate Service Agreement. To learn more about the custom template functionality, see Participant Custom Templates. This budget will populate the Schedule of Supports placeholder for Service Agreement template types.
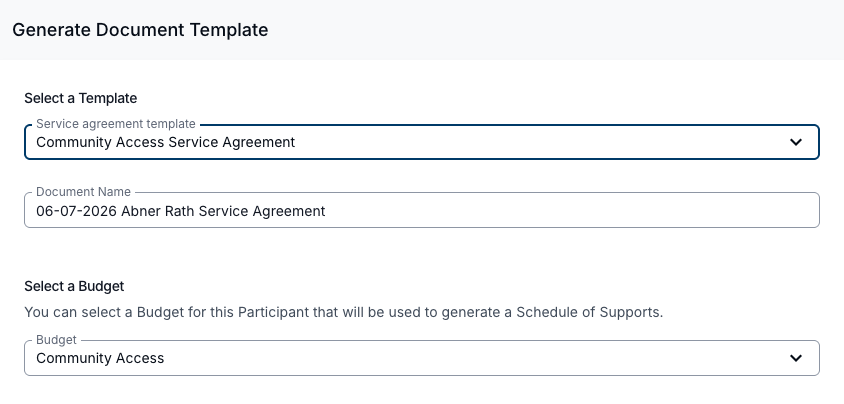
Select the Service Agreement template and the budget you want to use for the Schedule of Supports.
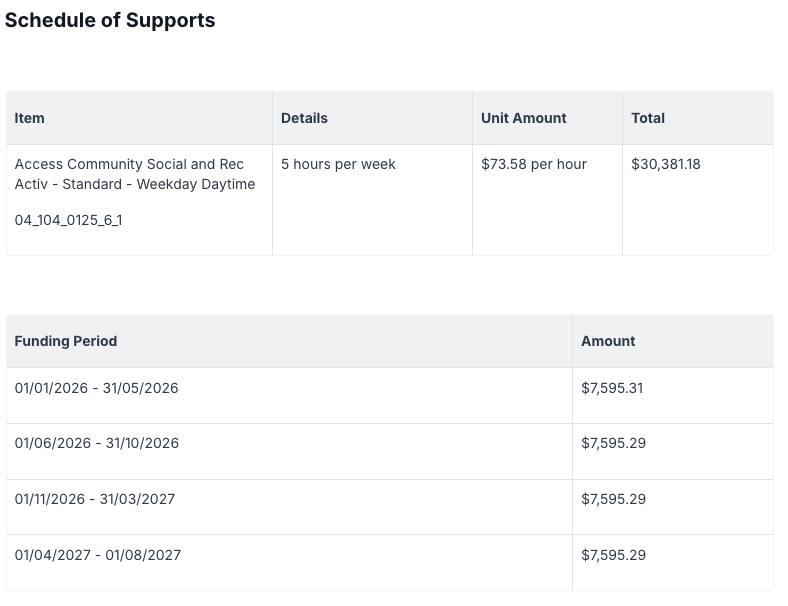
If the selected budget includes funding periods, they're captured in the Schedule of Supports too — each funding period and its amount is listed alongside the supports.
Where the budget uses Budget Item Allocations, you'll also see an Include the per-item funding breakdown option under the budget you select. It is off by default — tick it to list how each budget item is allocated across the funding periods; leave it unticked and the Schedule of Supports shows only the funding period totals.
Exporting as PDF
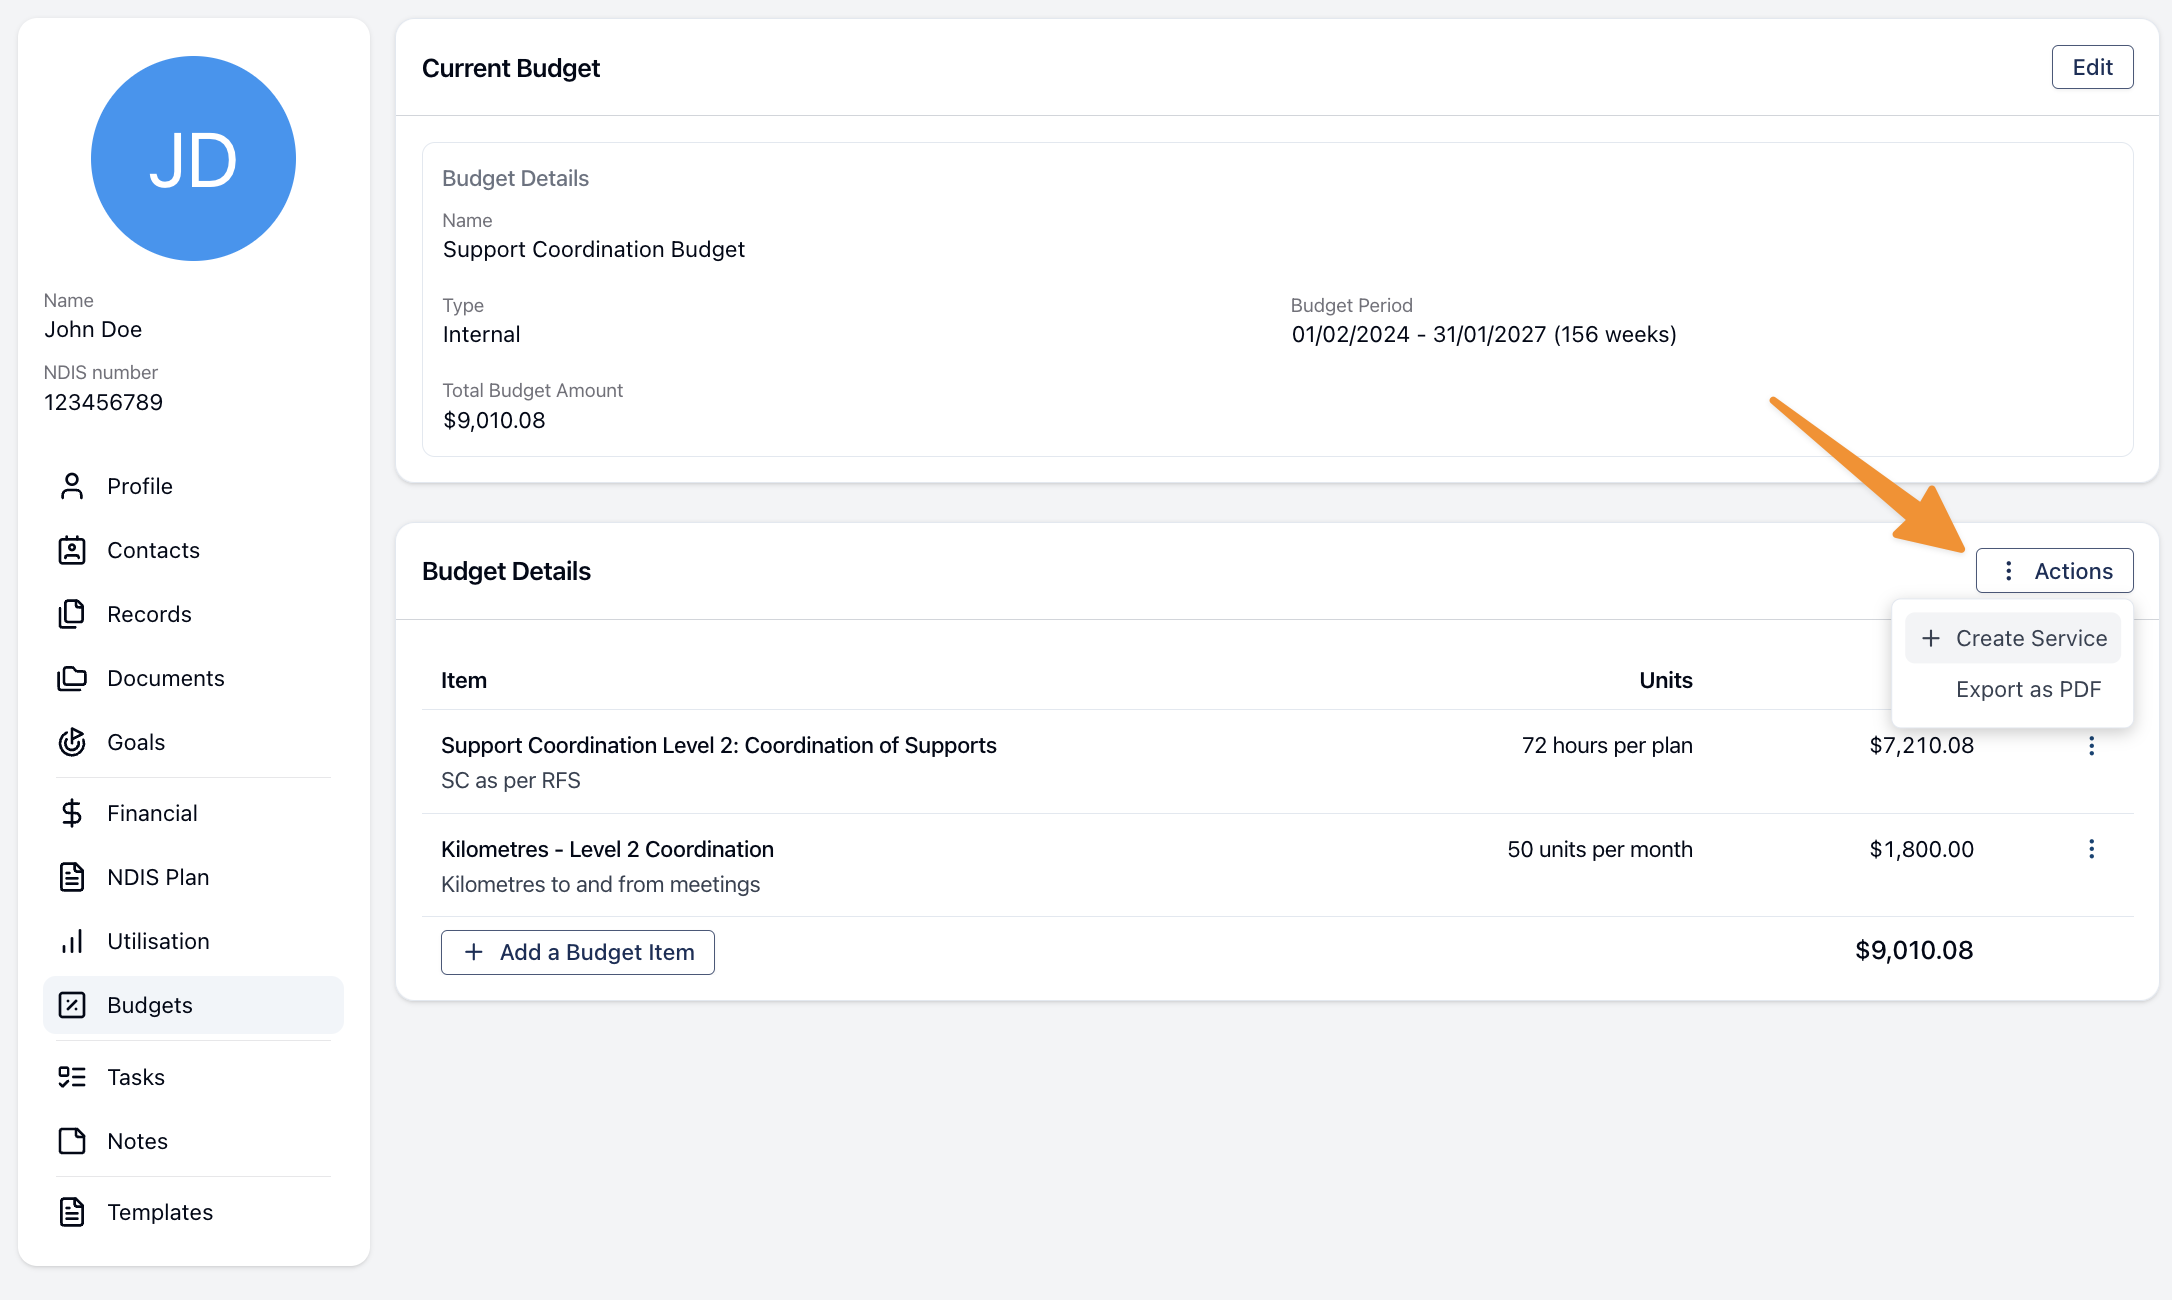
Both Internal and External Budgets can be exported as a PDF using the Actions button.
Including the Budget Description
Where the budget has a description, Export as PDF first opens an Export Budget as PDF window with one option — Include Budget Description.
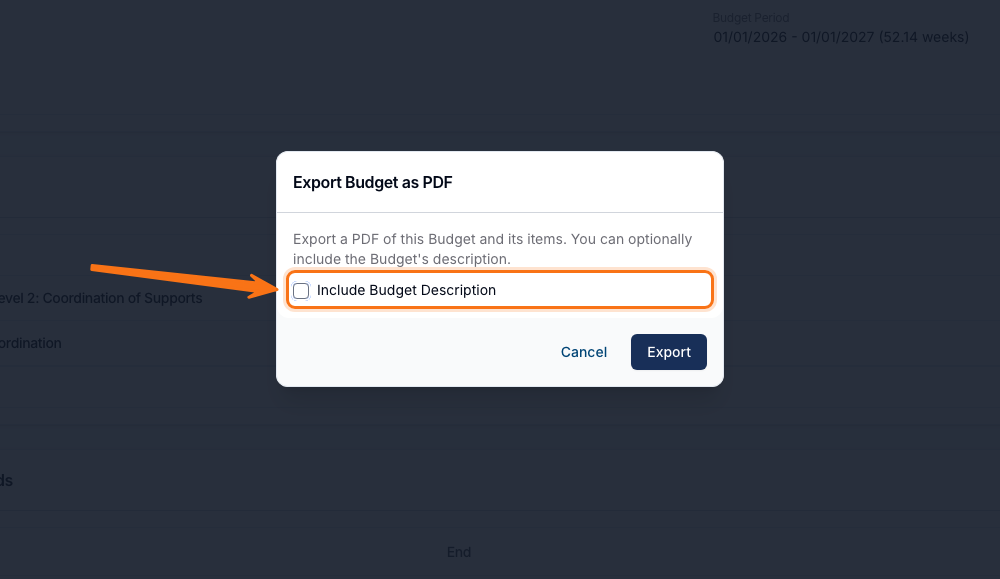
The option is off by default, so the PDF contains the budget and its items only. Tick it before clicking Export and the description is added to the PDF as its own Budget Description panel, sitting between the Participant details and the list of budget items. Formatting is kept, so headings, bold text, lists and links come across as you wrote them.
Where the budget has funding periods, the PDF ends with a Funding Period table listing each period's dates and amount.
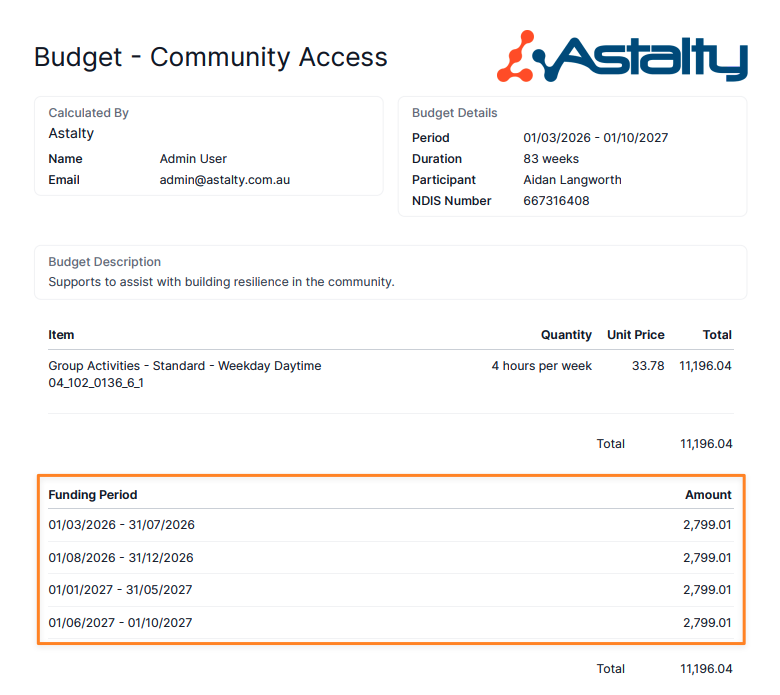
Where the budget uses Budget Item Allocations, the PDF includes a Budget Item Allocations table automatically, breaking each item down across the funding periods. There is no option to include or exclude it — unlike the Service Agreement, which asks.
Copying a Budget to Another Participant
Where several Participants need the same budget, build it once and copy it. From the budget, click Actions then Copy to Participant.
Choose the Destination Participant, then set the Start Date and End Date for their copy. The dates start out as the original budget's — where the destination Participant has a current Plan, the form offers those dates instead.
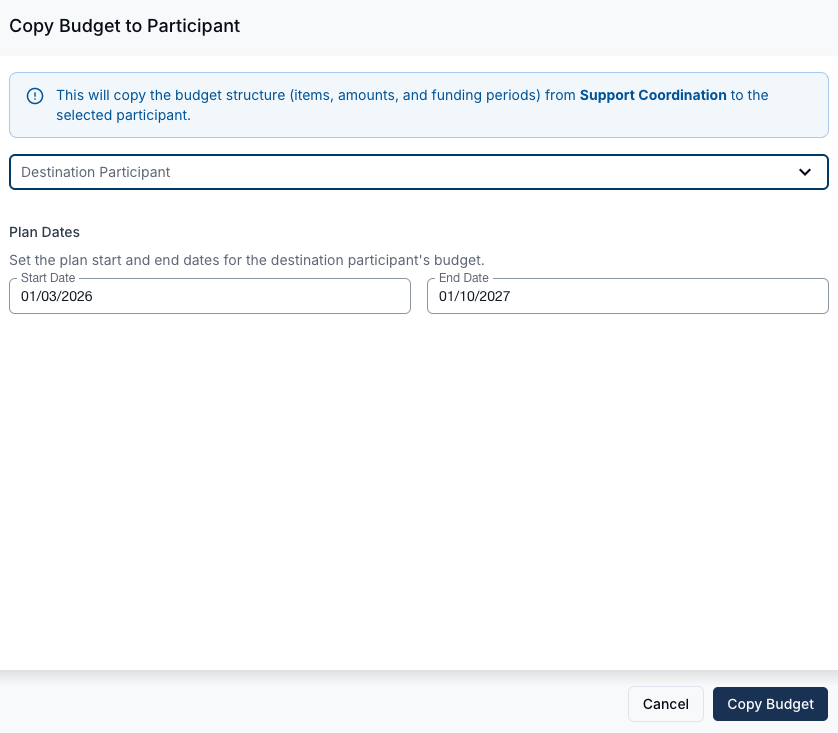
Click Copy Budget. The new budget opens in a new browser tab; the original is untouched.
The copy brings across the budget type, every budget item — including quantities, prices, units, periods, overridden totals and support ratios — and the funding schedule.
Managing Budgets
Duplicating a Budget
To copy a budget for the same Participant, open the overflow menu (…) on its row in the Budgets list and select Duplicate.
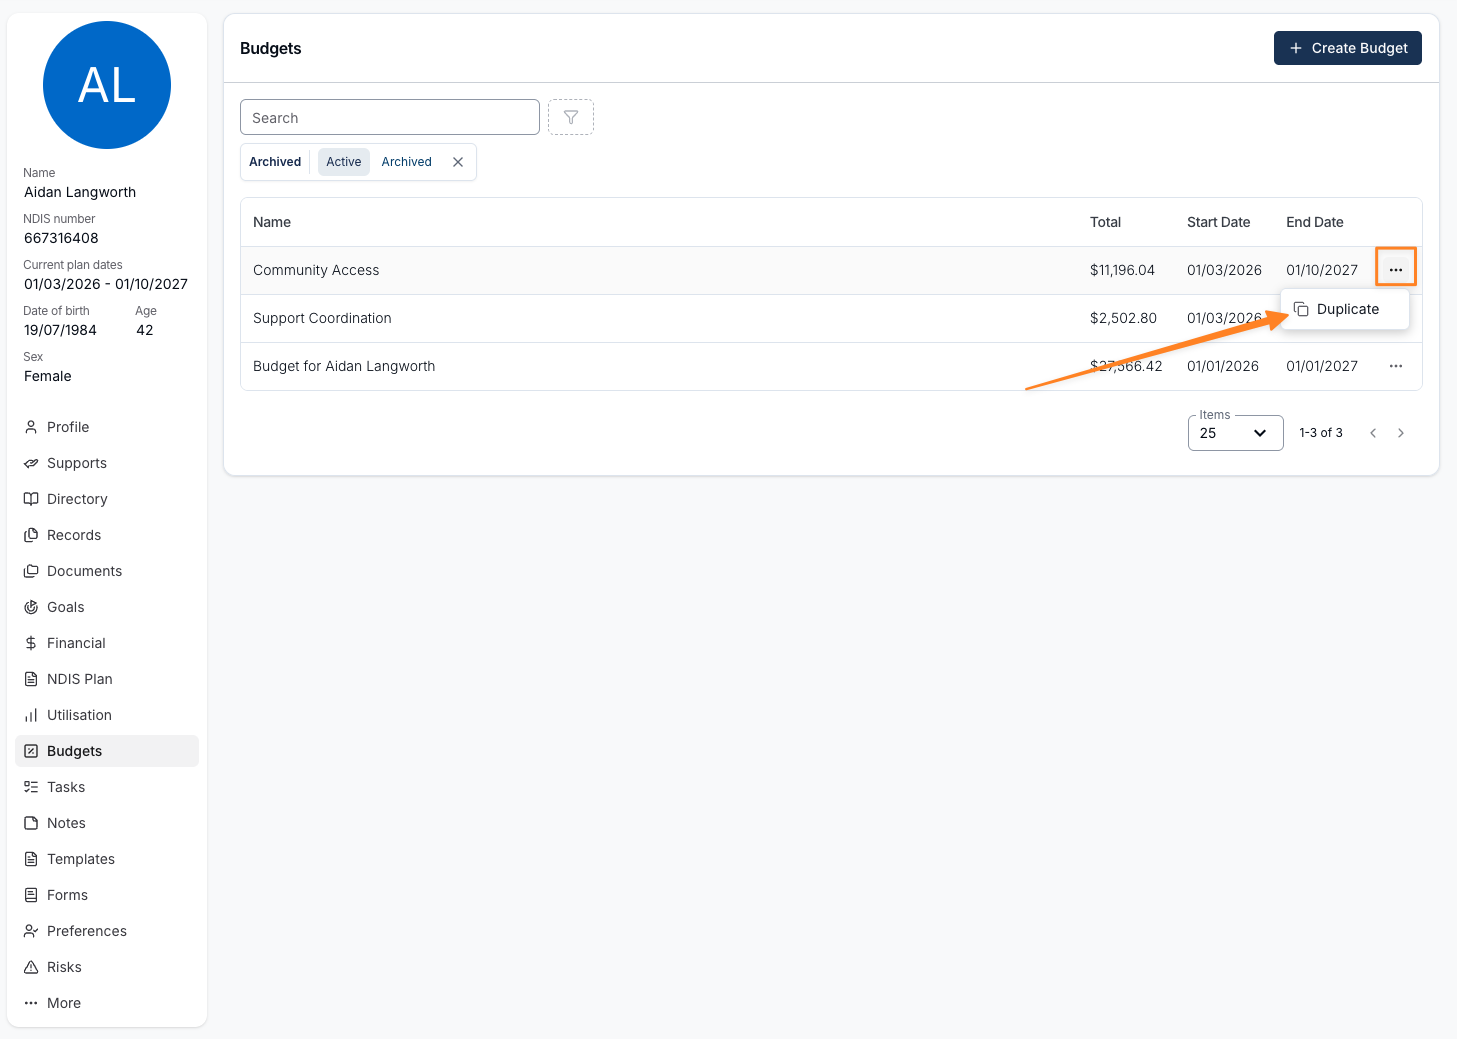
The duplicate is created straight away, with no form to fill in. It keeps the original's dates, items, ratios and funding schedule, and is named after the original with (copy) appended. You stay on the list, so open it from there to rename or edit it.
Duplicate is on the list only — the budget's own Actions menu offers Copy to Participant instead.
Archiving a Budget
Archiving keeps a budget you no longer work from without deleting it. Click Edit on the budget and use Archive in the drawer footer, then confirm.
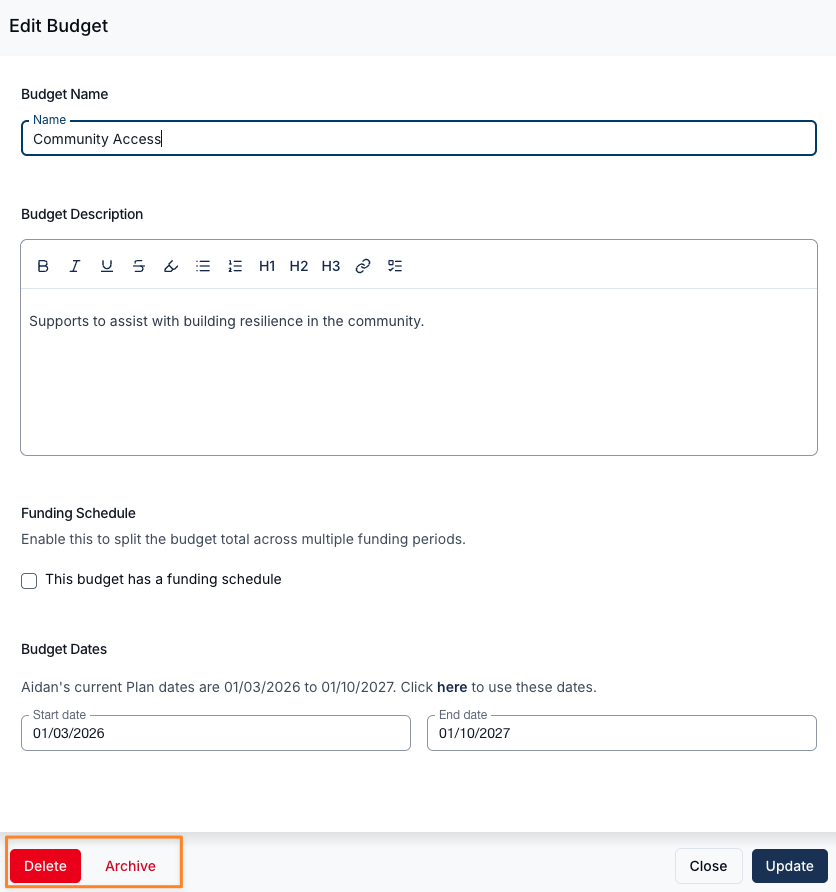
Archived budgets carry an Archived chip and drop out of the Budgets list, which filters to Active by default. Switch the Archived filter to Archived to find them.
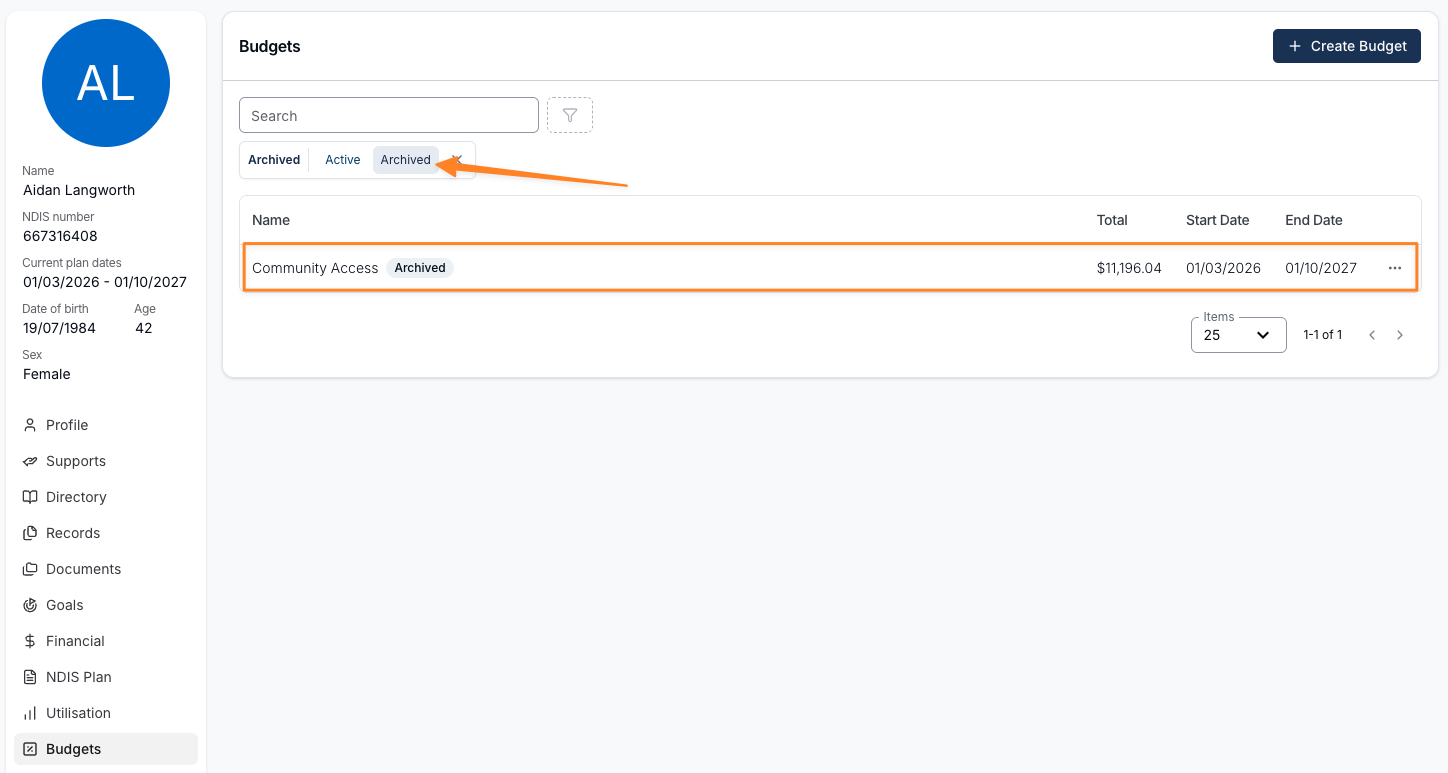
The button reads Unarchive on a budget that is already archived, and restores it immediately without confirming.
Deleting a Budget
Click Edit on the budget and use Delete in the drawer footer.
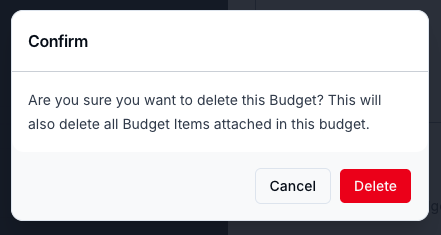
Both Archive and Delete depend on your user's permissions — see Roles and Permissions.
Creating a Service
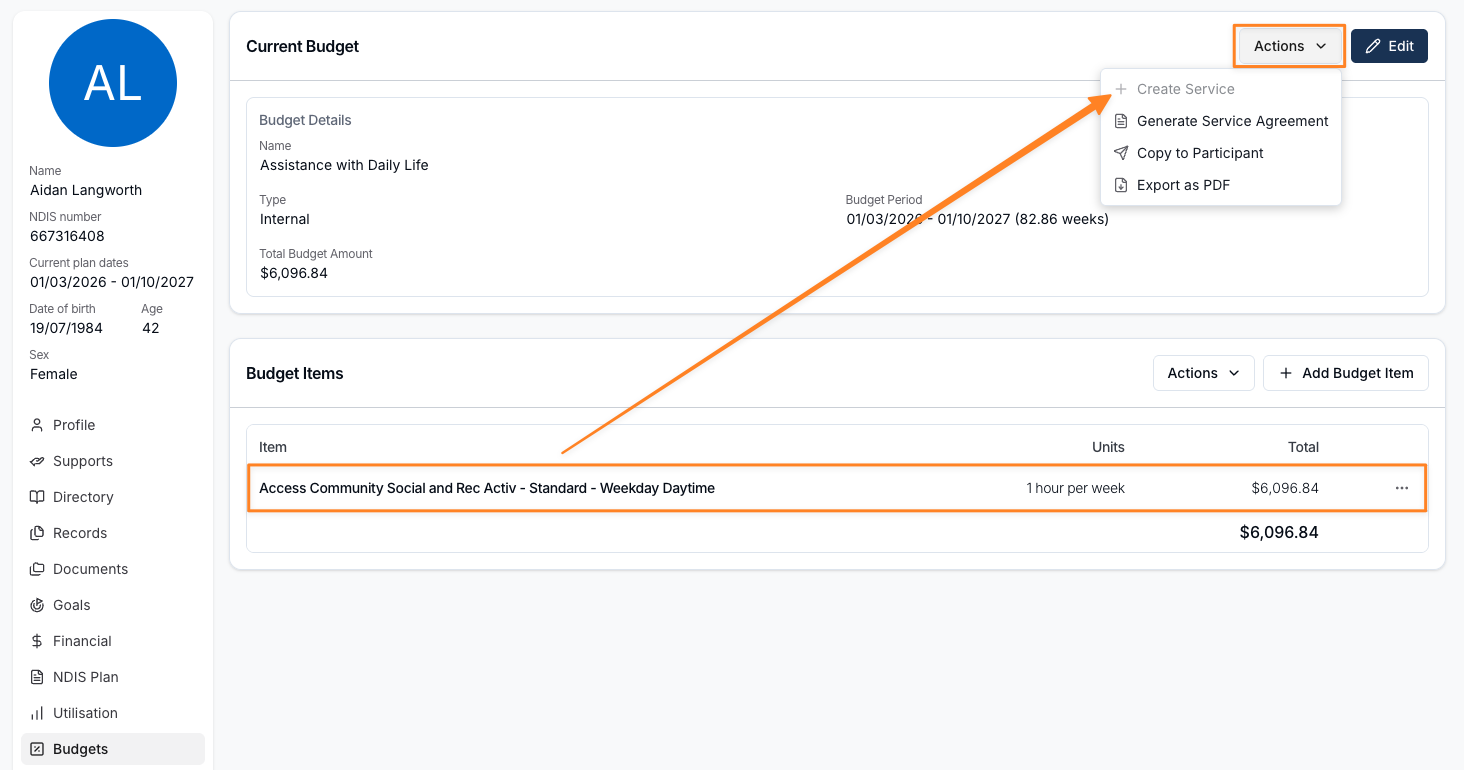
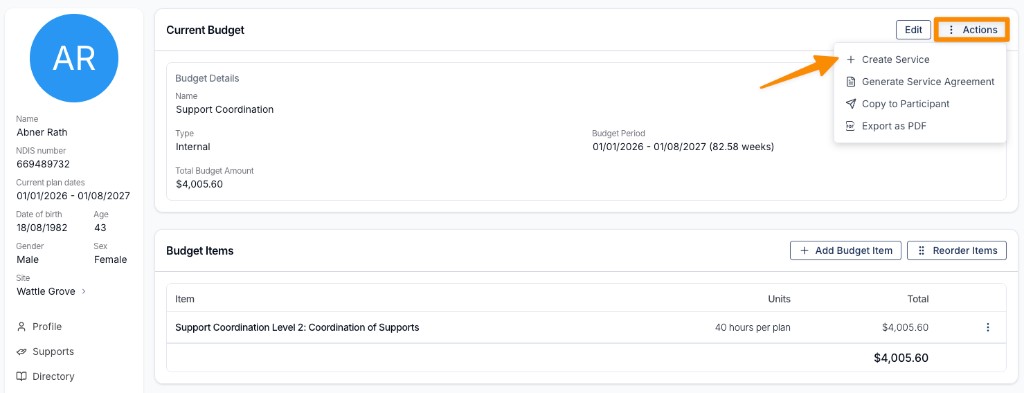
If you have created an Internal Budget, you will be able to create a Service from the Budget so you don't have to re-calculate the total amount. Simply click the Actions button and click Create Service.
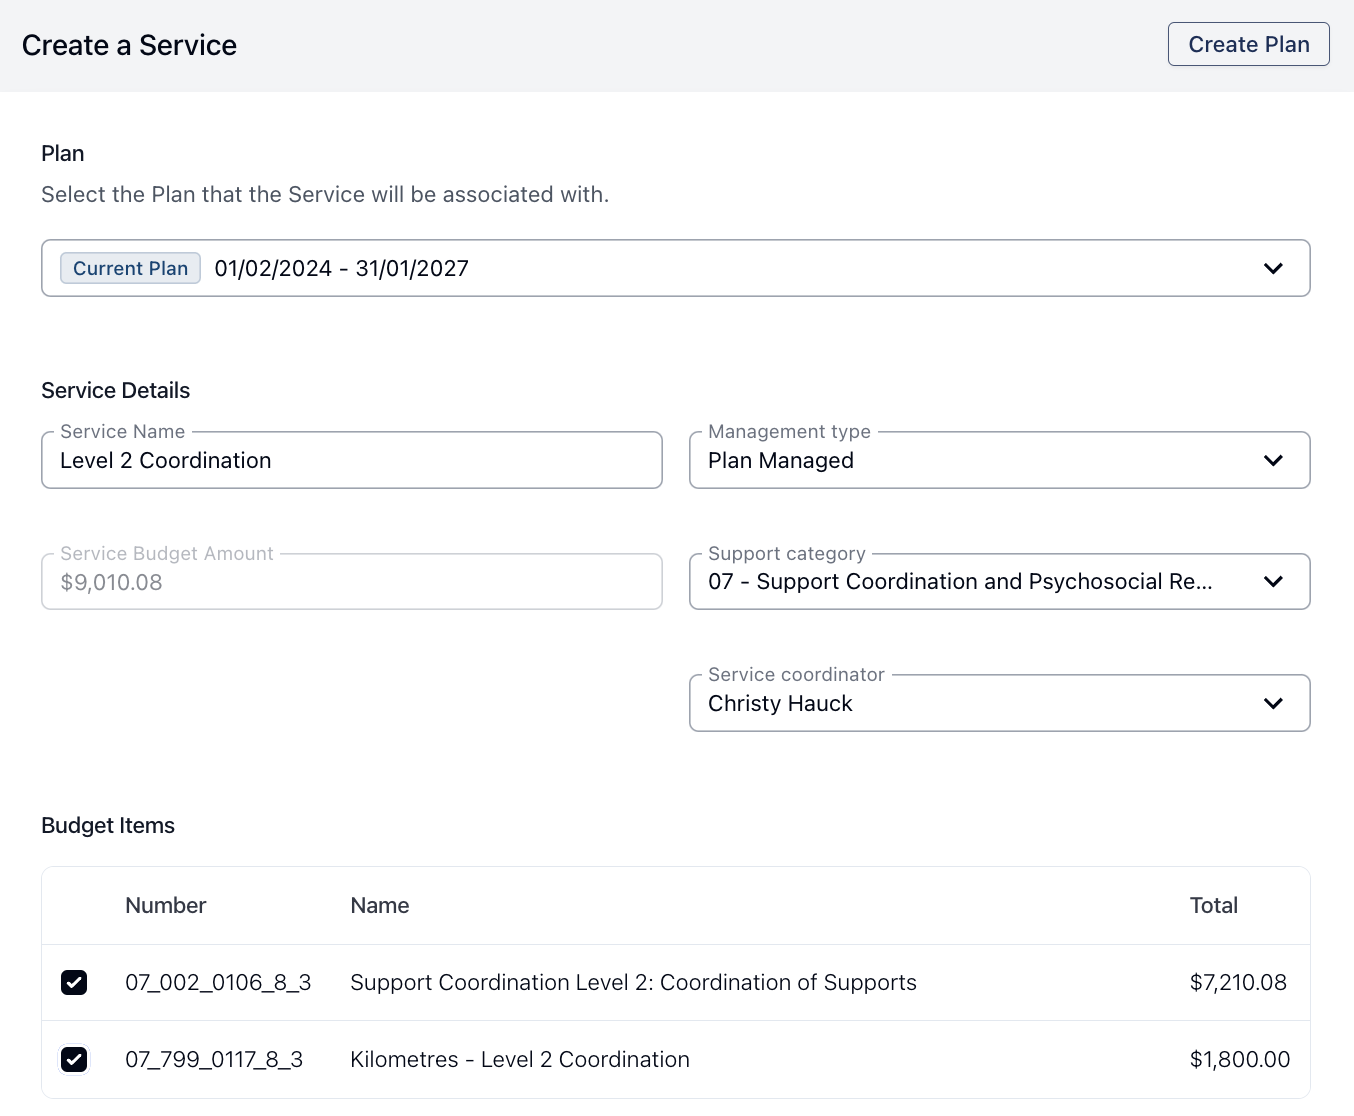
On the Create a Service form, choose the Plan the Service belongs to, then fill in the Service Details — Service Name, Management type, Support category and Service coordinator. The Service Budget Amount is carried over from the budget and can't be edited.
The Budget Items table only appears once you have picked a Support category, and it lists only the items whose support item number starts with that category's prefix. Choose a different category to see the rest.
Creating a Service with funding periods
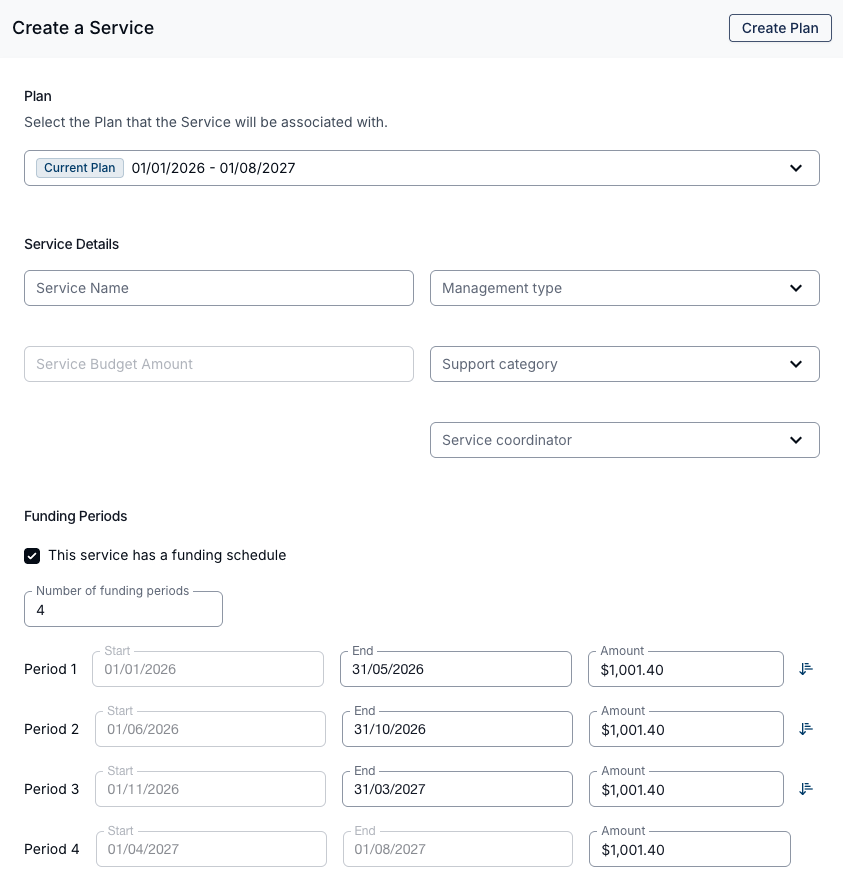
Where a budget built from individual Charge Items includes funding periods, those funding periods carry across to the Service. On the Create a Service page you'll see This service has a funding schedule already ticked, with the periods and amounts pre-filled from the budget.
For more on managing funding periods once a Service has been created, see Funding Periods.