- Forms & Quality
- Manage Forms
- Viewing Submissions for a Form
Viewing Submissions for a Form
Overview
The Submissions menu option allows (if you have the permissions) to view all submissions to the form selected. You can view this in one of two was by list view or by table view.
List View
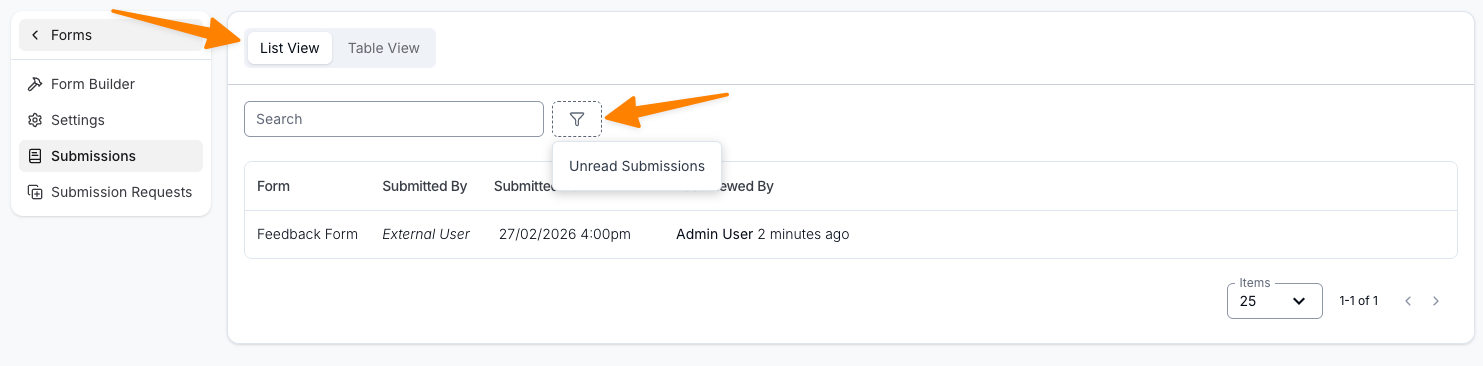
List view shows the submission in a list with the following headings;
- Form Name
- Submitted By
- Submitted At
- Last Viewed By
This view can also be filtered by latest submissions and also can be searched using the search bar.
Table View
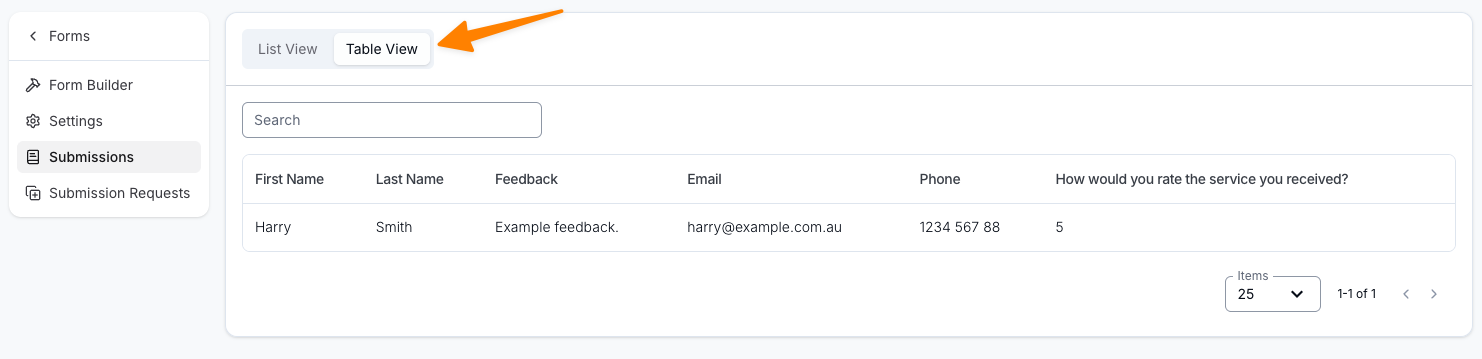
Table view displays the submissions in the form of a table, similarly to how a .CSV file would. You can see the information in line with how the form is created utilising the elements as headings within the table. The Table will differ depending on the elements used. You can search for data in this view by using the search bar.
Editing a Submitted Field
You can correct an answer on a submitted form in place, without asking the person who filled it in to send through a new submission. It is meant for fixing entry errors — a misspelt name, a wrong NDIS number, a date typed incorrectly — while keeping the original submission and a record of every change.
To edit a field:
- Open the form submission.
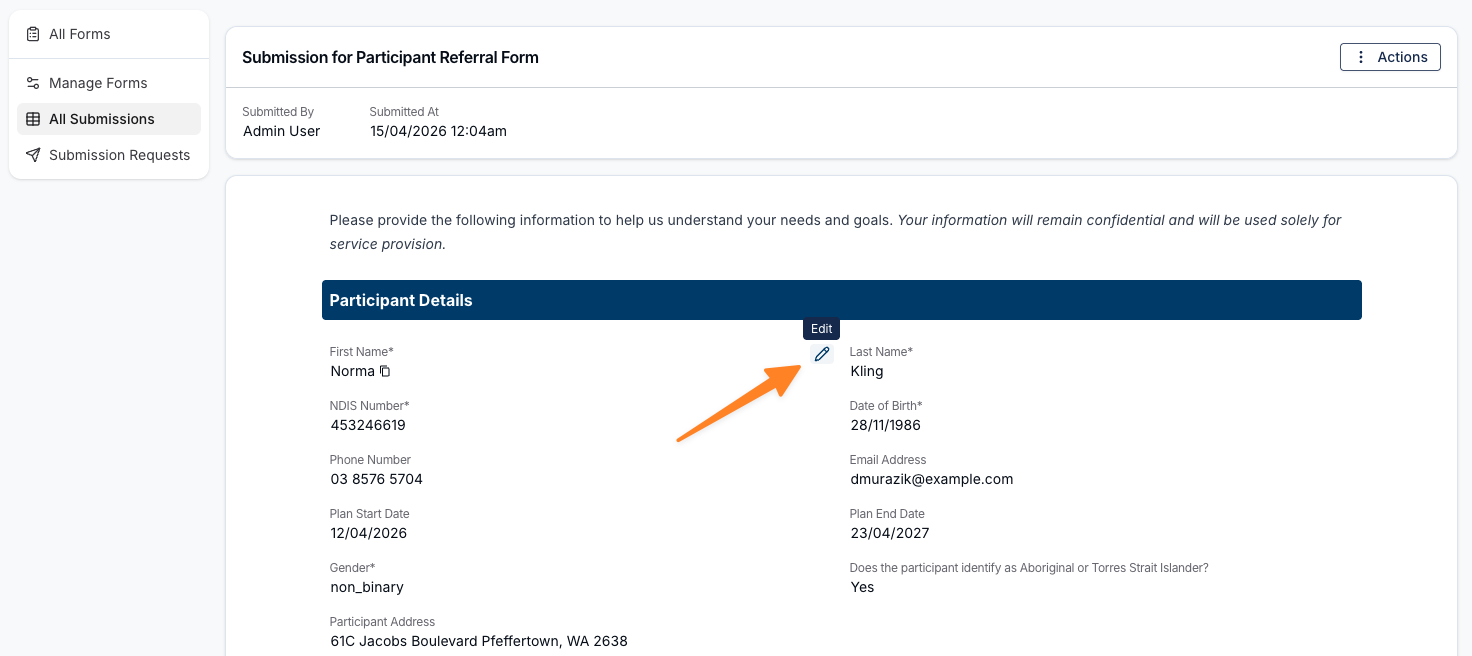
- Hover over the field you want to change and click the pencil (Edit) icon.
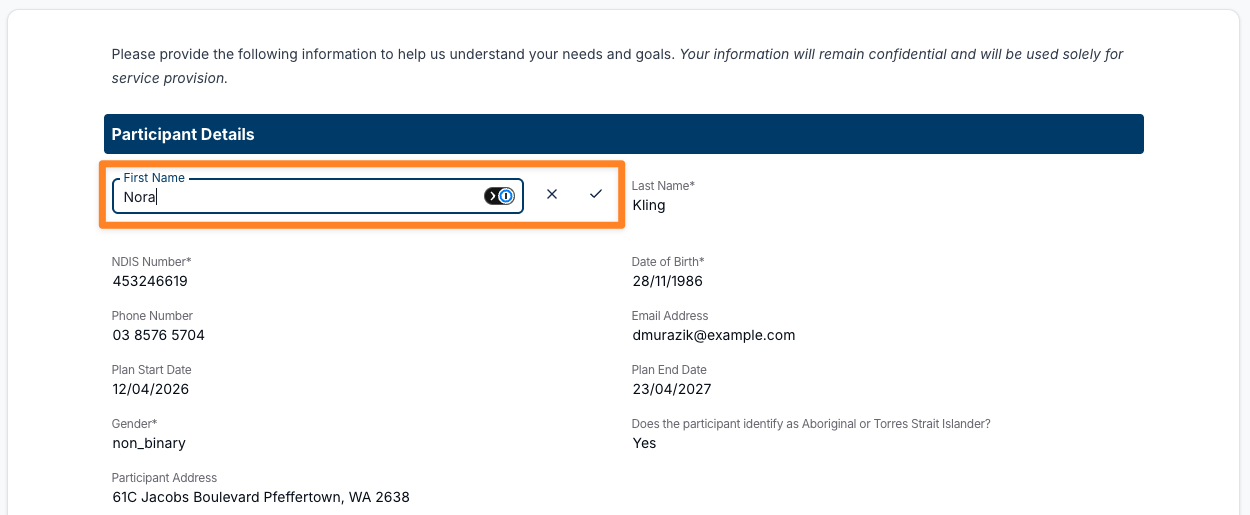
- Update the value.
- Click the tick to save, or the cross to discard the change.
The field becomes an input of the same kind it was built as — a date picker for a Date field, a drop-down for a Dropdown field, an address lookup for an Address field, and so on. Saving records the change against that field. If the field controls conditional logic, the save can also reveal or set aside other answers — see Follow-Up Questions Update When You Edit an Answer below. Otherwise, nothing else on the submission is altered.
Which Fields Can Be Edited
These field types can be edited after submission:
- Single Line Text
- Multi Line Text
- Mobile Phone
- Number
- Money
- Date
- Date and Time
- Dropdown
- Radio Buttons
- Checkbox
- Address
Every other field type stays locked once the form has been submitted, including File Upload, Multi Select, Rating, Annotated Image, Participant Select, User Select and Site Select. Fields inside a Repeater can't be edited either, and layout elements such as Header, Divider, Rich Text Block and Image hold no answer to change.
If a field type can't be edited, no edit icon appears next to it — the answer is simply displayed as it was submitted.
Follow-Up Questions Update When You Edit an Answer
Changing an answer that controls conditional logic re-evaluates its follow-up questions in the same save, instead of waiting for a fresh submission.
If the change unlocks a follow-up question, it appears as "Not answered" after the answer that reveals it, with a required marker (*) if it's required — the marker shows but doesn't block saving the rest of the submission. Click its Answer pencil to fill it in. A field type that can't be edited inline stays "Not answered" with no Answer pencil — there's no way to supply a value for it on this submission.
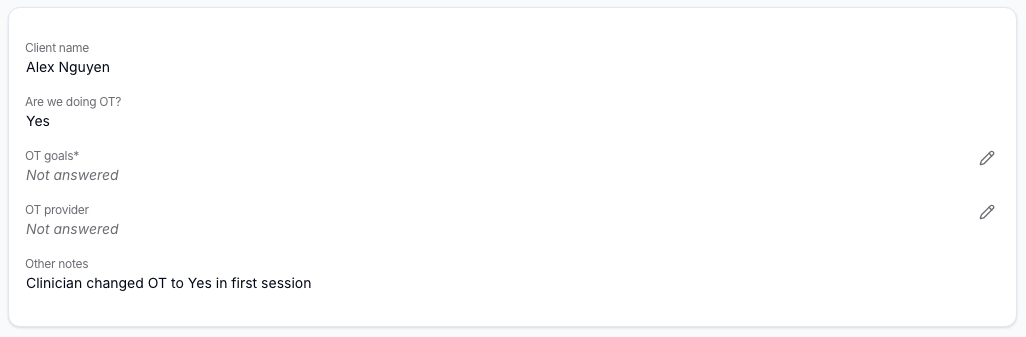
If the change hides a follow-up question, its existing answer moves into a collapsed Answers that no longer apply (N) section at the bottom of the submission. The answer is kept, not deleted, and returns to its place if you change the controlling answer back.
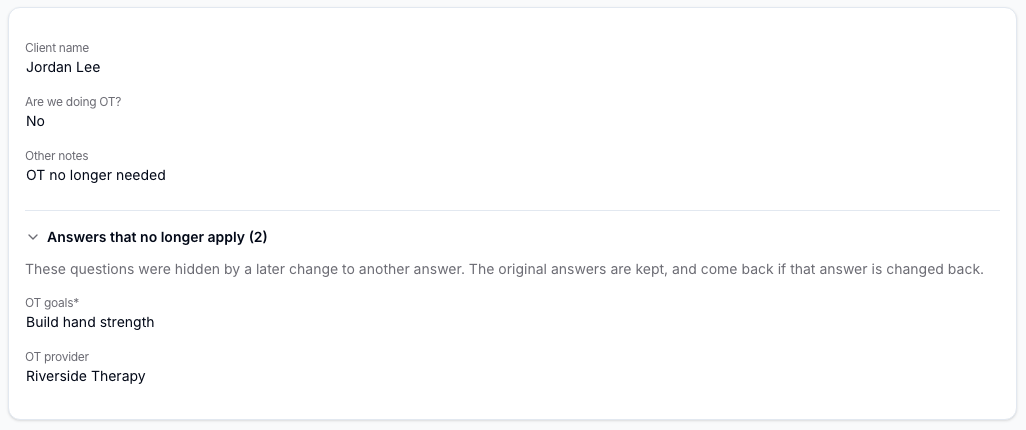
A confirmation message tells you how many answers were moved or restored after you save.
Set-aside answers are left out of the submission's PDF export, the Form Submissions Export spreadsheet, and the Public API — only the submission's current, visible answers are included. Answering a revealed question needs the same Admin or Account Owner permission as editing a field, and isn't available on an archived submission.
Viewing a Field's Edit History
Once a field has been edited, a history icon appears beside it.
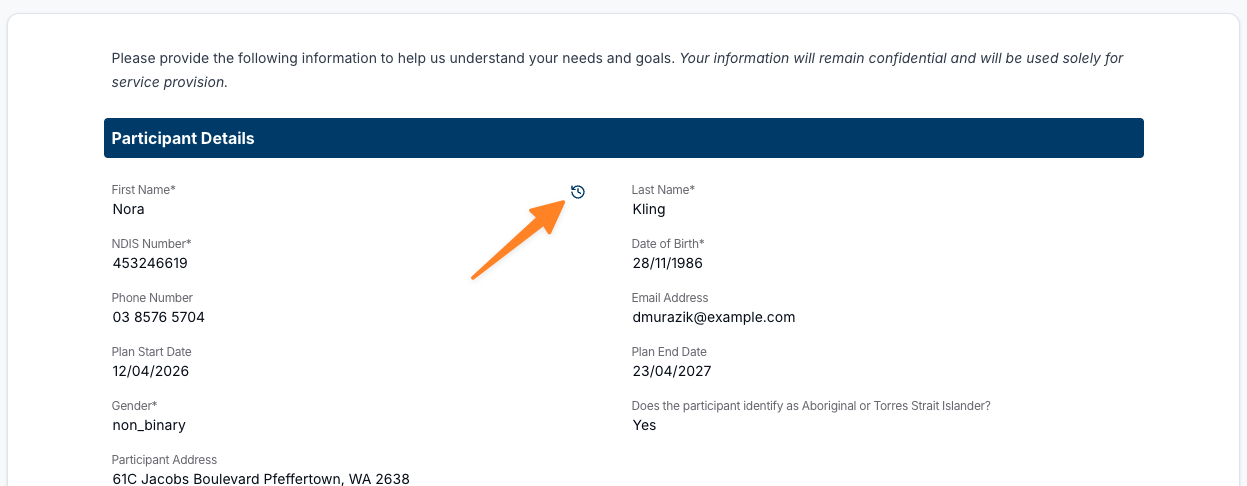
Click the icon to open the Audit Trail for that field. It lists every change made to the answer — the previous value, the new value, who made the change and when — alongside the value that was originally submitted.
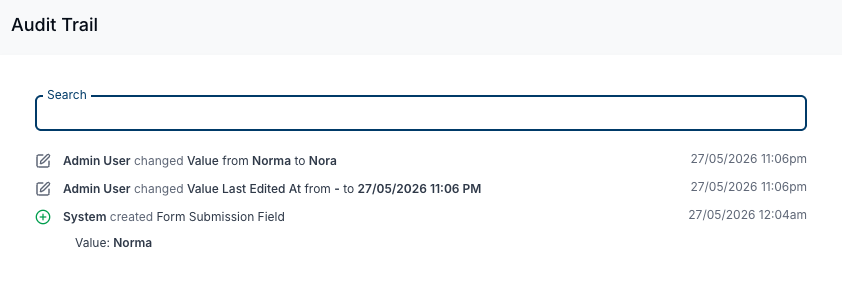
Anyone who can view the submission can open a field's edit history, so you don't need edit access to check what was changed.
Form Submission Action Button
Within the Action button you have several options;
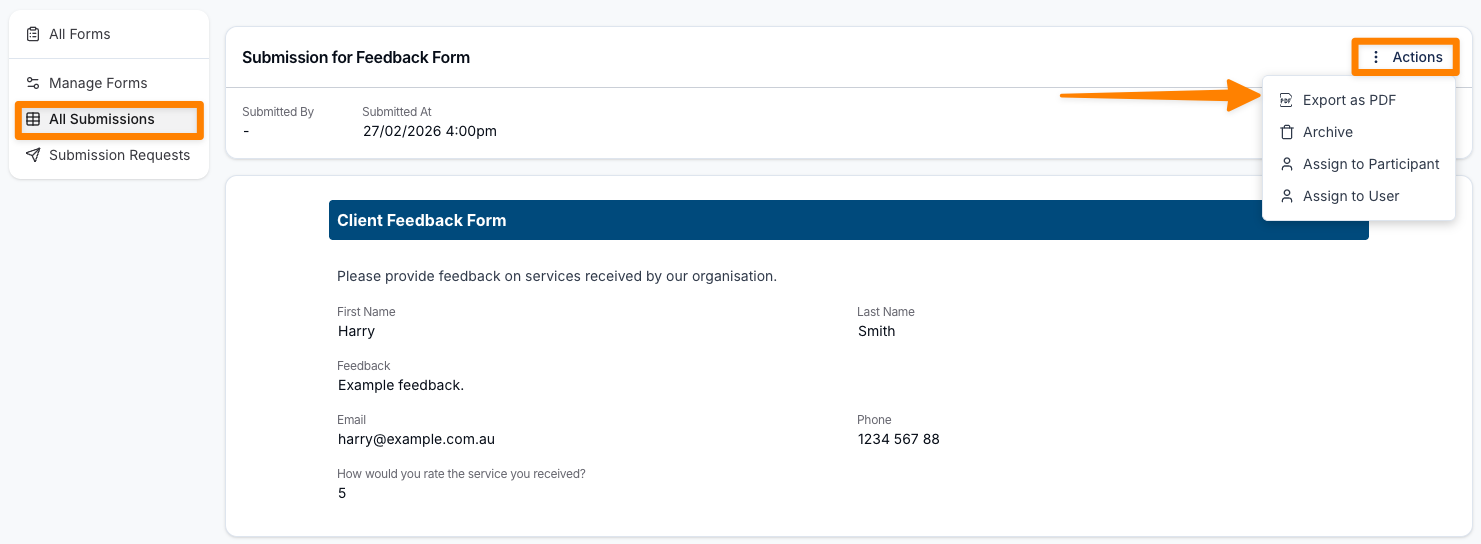
- Export as PDF
- Download Blank Form
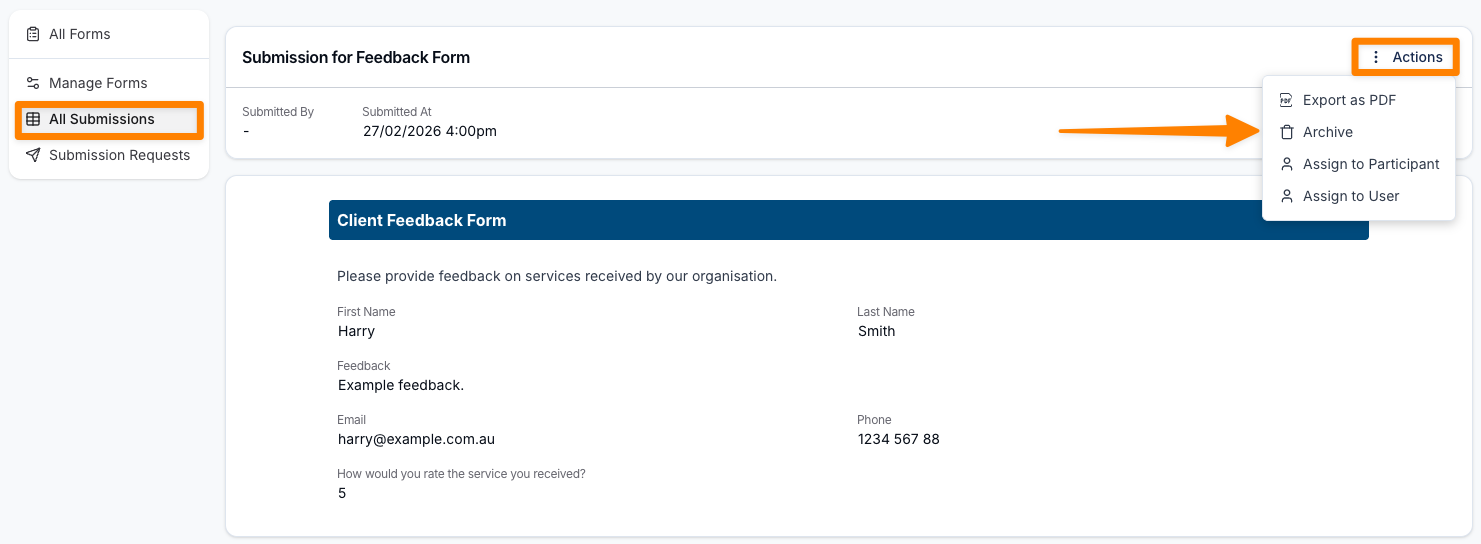
- Archive
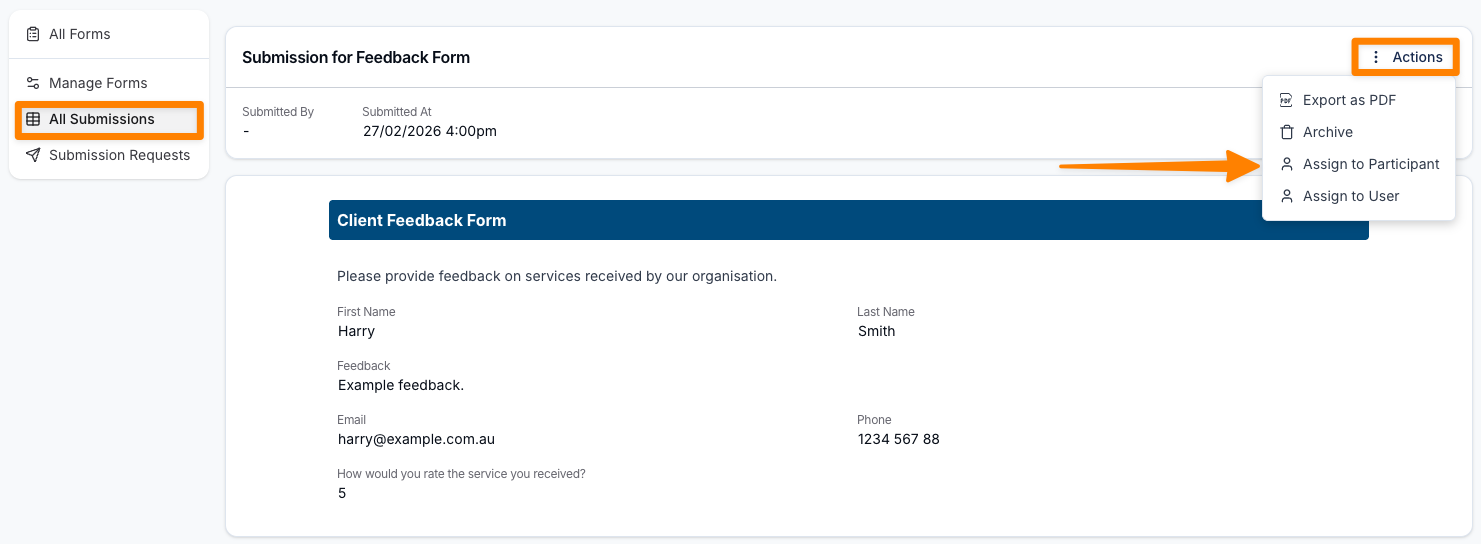
- Assign to Participant
- Assign to User
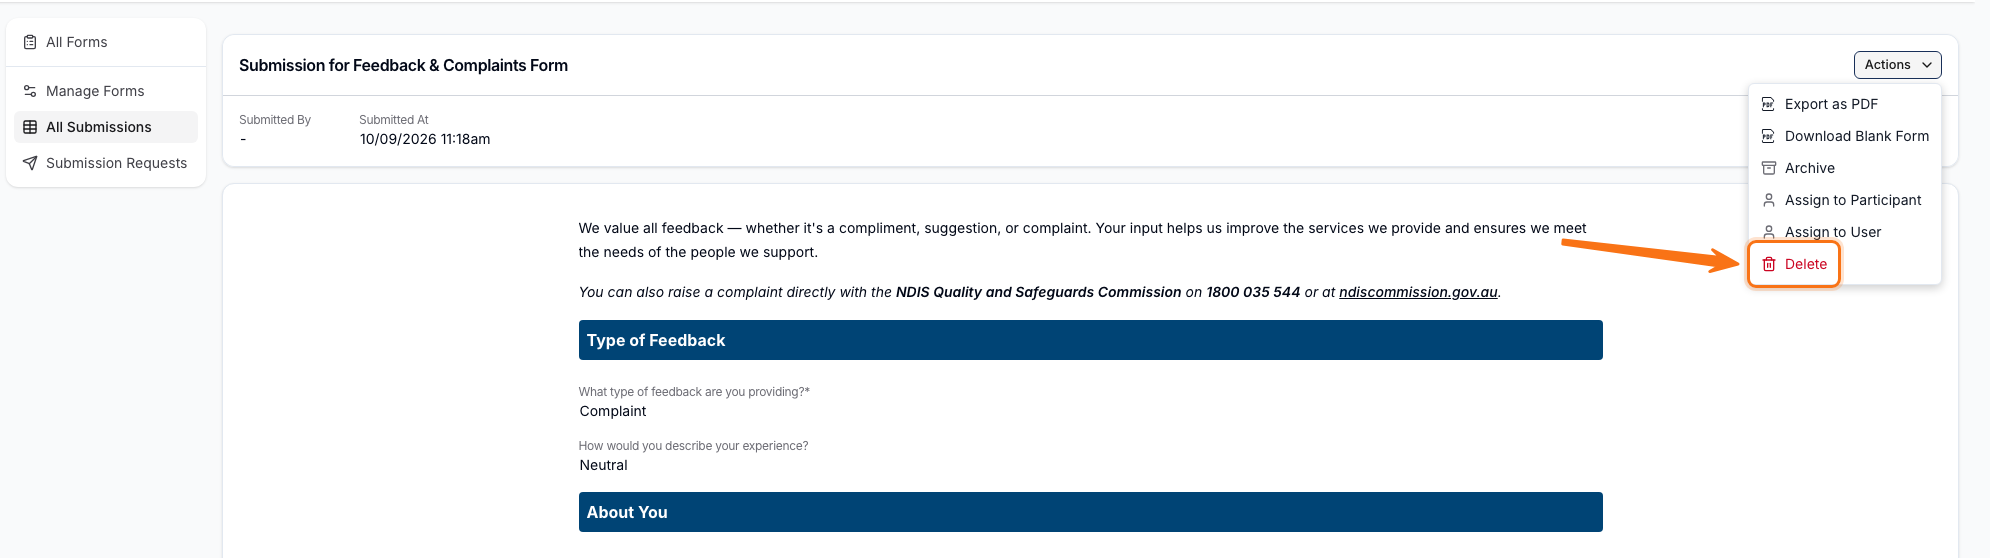
- Delete
Exporting Individual Form Submissions to a PDF
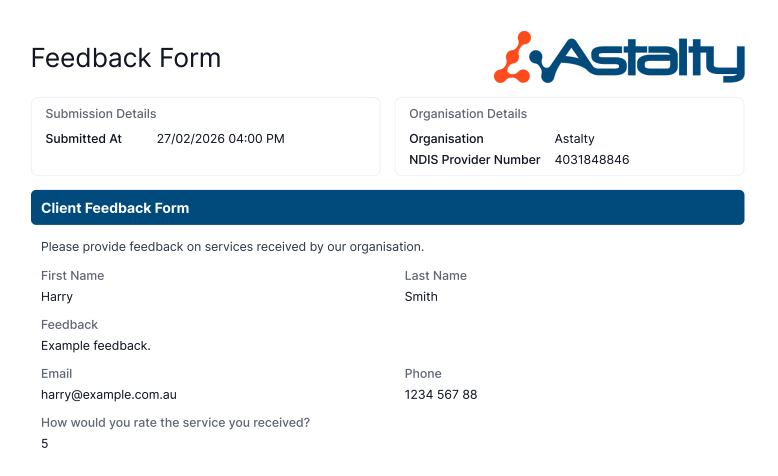
You can export any completed Form Submission as a PDF, including the full submission details and summary information where applicable.
To export a Form Submission:
- Navigate to Forms from the main menu.
- Select All Submissions.
- Open the relevant Form Submission.
- Click Actions.
- Select Export as PDF.
The generated PDF includes the submission's current, visible responses — set-aside answers are left out — along with any associated summary sections, providing a complete and professional record suitable for sharing, printing, or secure storage.
Before exporting, tick Exclude staff surnames if the PDF should show staff first names without their surnames.
Archiving Forms
This section covers archiving a form submission, rather than archiving the form definition itself.
You can archive a form submission within the submission itself. When you do this, the submission no longer displays within any menu it was previously displaying in, this includes the following menu options;
- Referrals
- Incidents
- Participant Forms
Archiving still keeps the submission and its answers. Archived submissions remain available for export unless you select Exclude archived submissions on the Form Submissions Export. You can restore an archived submission later — filter for it, open it, and select Unarchive from Actions.
Assigning a Form to a Participant
You can link a completed form submission directly to a Participant’s profile from within the submission itself.
Once assigned, the form will be accessible in the Forms section of the Participant’s profile, allowing you to easily view and reference it in the future.
For more information on this menu see Participant Forms.
If the form has fields mapped to Participant profile fields — a Referral & Intake form, for example — the Assign Participant drawer also lets you tick Update the participant's profile with this form's mapped fields and copy the submitted answers onto the Participant's profile. See Updating an Existing Participant's Profile from a Referral for how the field preview works.
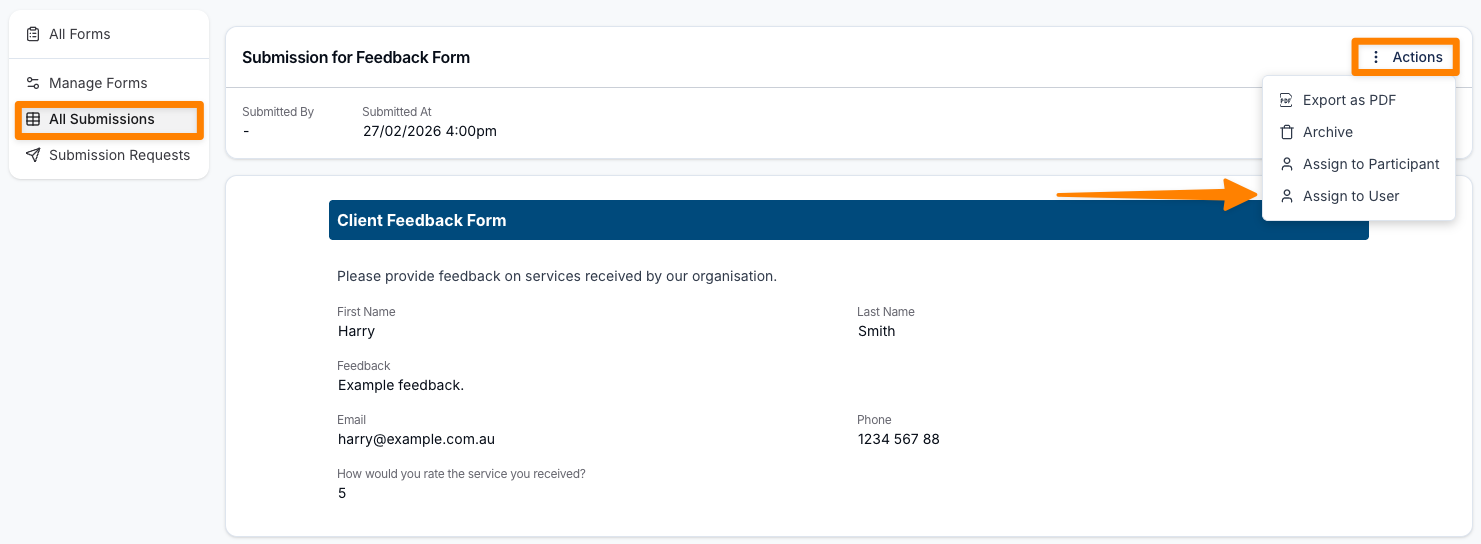
Assigning a Form to a User
Completed form submissions can also be assigned to a User’s profile.
When assigned, the form will appear in the Forms section of the staff member’s profile, ensuring the submission is stored against their record for easy access and ongoing reference.
This helps maintain accurate documentation and keeps relevant records connected to the appropriate team member.
Removing a Participant or User Association
If a submission was assigned to the wrong Participant or staff member, remove that link without deleting the submission.
The submission's Associations panel lists everything it's linked to — Participants, users, shifts, supports and sites.
To remove a Participant or user association:
- Open the form submission.
- On the Associations panel, open the row's action menu (⋯).
- Select Remove Association.
- Confirm.
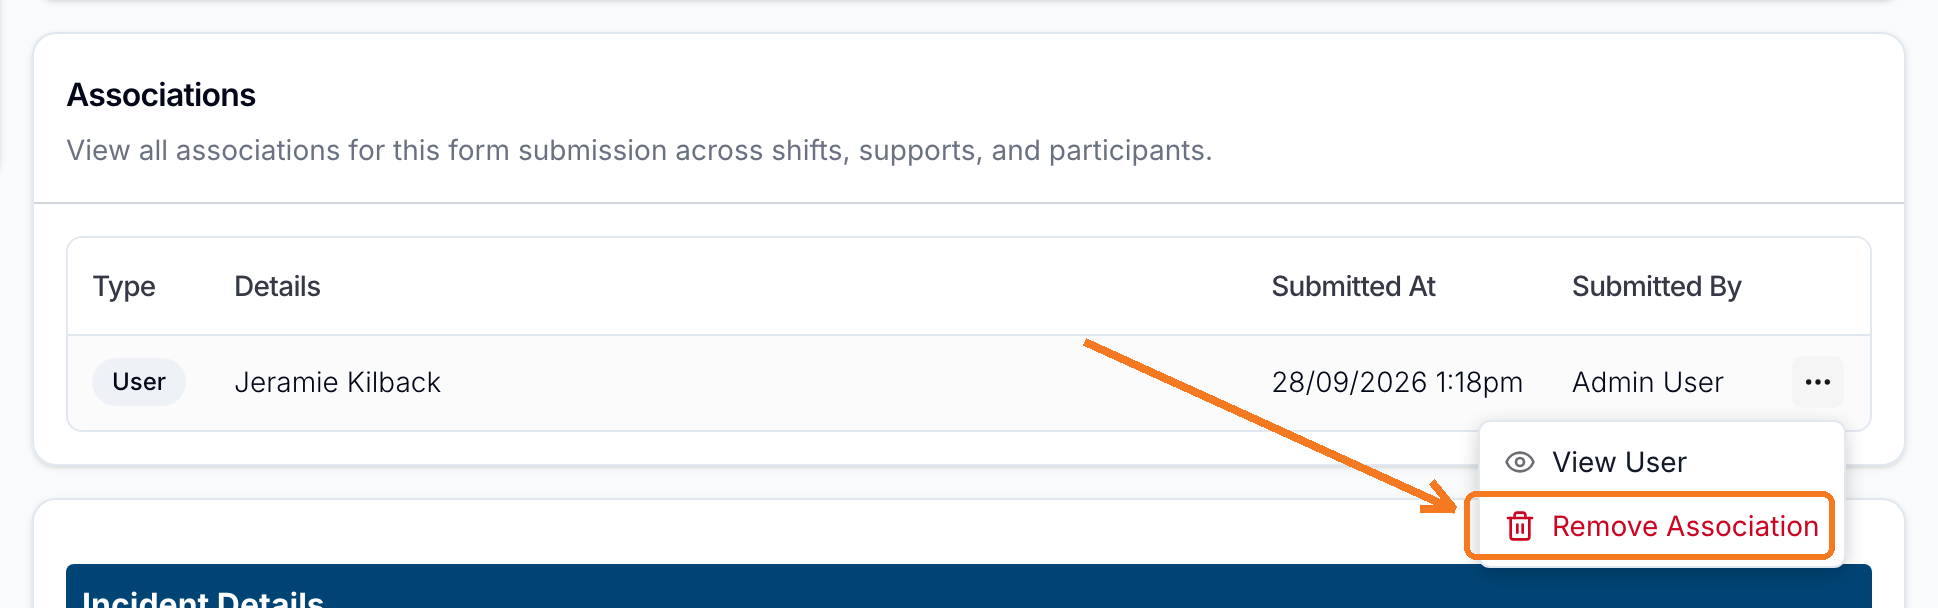
Only Participant and user associations can be removed this way. Shift, support, group support and site associations are created by Astalty itself, so no Remove Association option appears on those rows.
Permanently Deleting a Form Submission
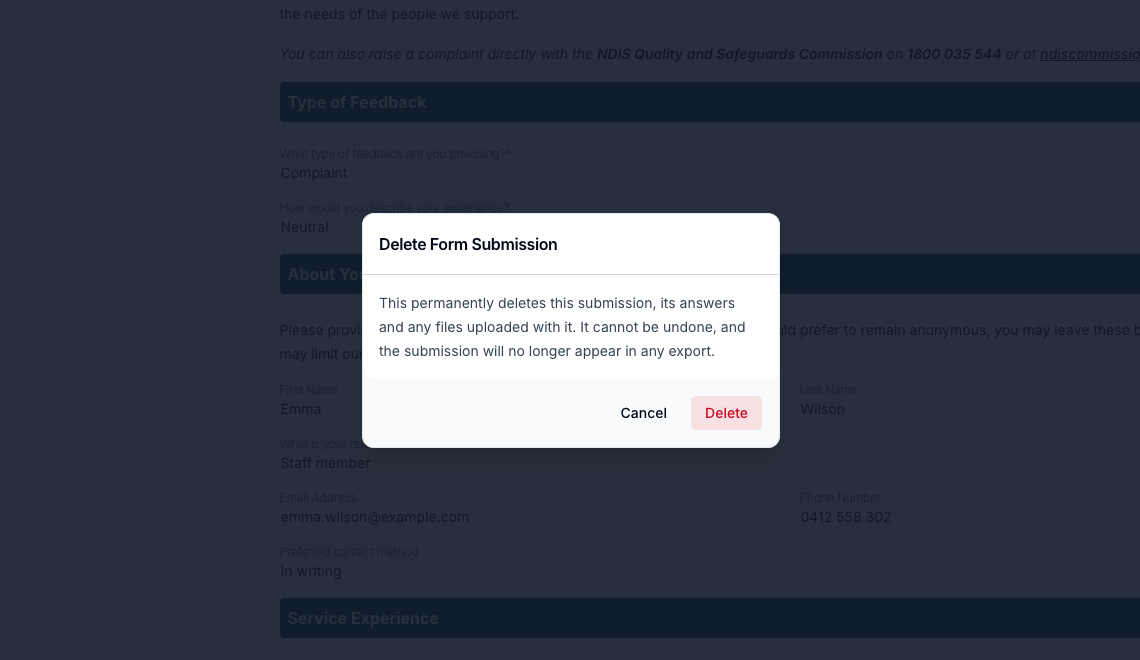
Delete removes a submission's answers and any uploaded files for good, rather than just hiding it. Use this instead of archiving when the data itself needs to go — for example, a confidential submission.
To delete a form submission:
- Open the form submission.
- Click Actions.
- Select Delete.
- Confirm by clicking Delete on the Delete Form Submission dialog.
A submission that created a Referral, Incident, or Feedback record can't be deleted, because deleting the submission alone would not remove the data copied into that record. Archive the submission instead.
Submitted Documents
Files attached through a File Upload field, plus anything added during follow-up, are listed in the Submitted Documents panel at the bottom of the submission. Click Upload Documents to add more, or use a row's ⋯ menu to view, download or delete a single file.
Downloading All Documents
To download every attached file at once:
- Open the form submission.
- In the Submitted Documents panel, click Actions.
- Select Download All.
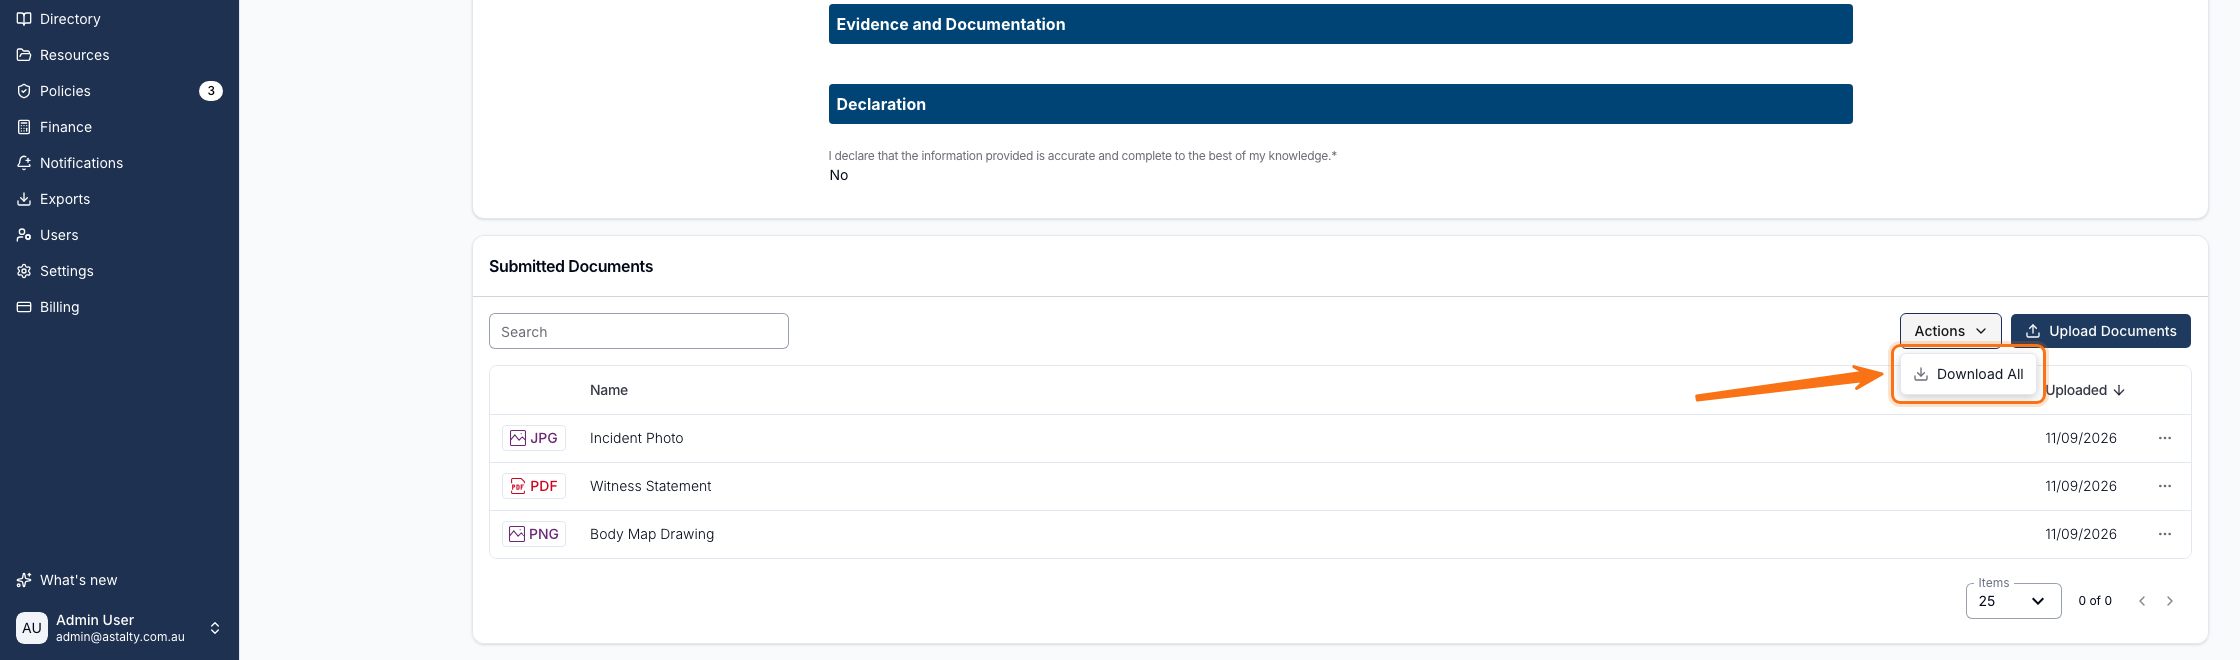
Astalty builds a single zip named for the date you download it and the form — 18-09-2026 Incident Report Submission Documents.zip. Documents that share a filename are numbered (1), (2) inside the zip so none are overwritten. Anyone who can open the submission can use Download All.