- Day-to-Day
- Using the Calendar
- Calendar Events and Tasks
Calendar Events and Tasks
Create, edit, repeat and delete Calendar events, and link them to tasks. Admins, Managers and Team Members can manage their own events. To manage other users' events, see Managing Calendar Events on behalf of other Users.
Creating a Calendar Event/Task
Click the time you want the event to start and drag to where it should finish. In the monthly view, click a day to start a 9am to 10am event. The event form opens with that time, and you can adjust it there.
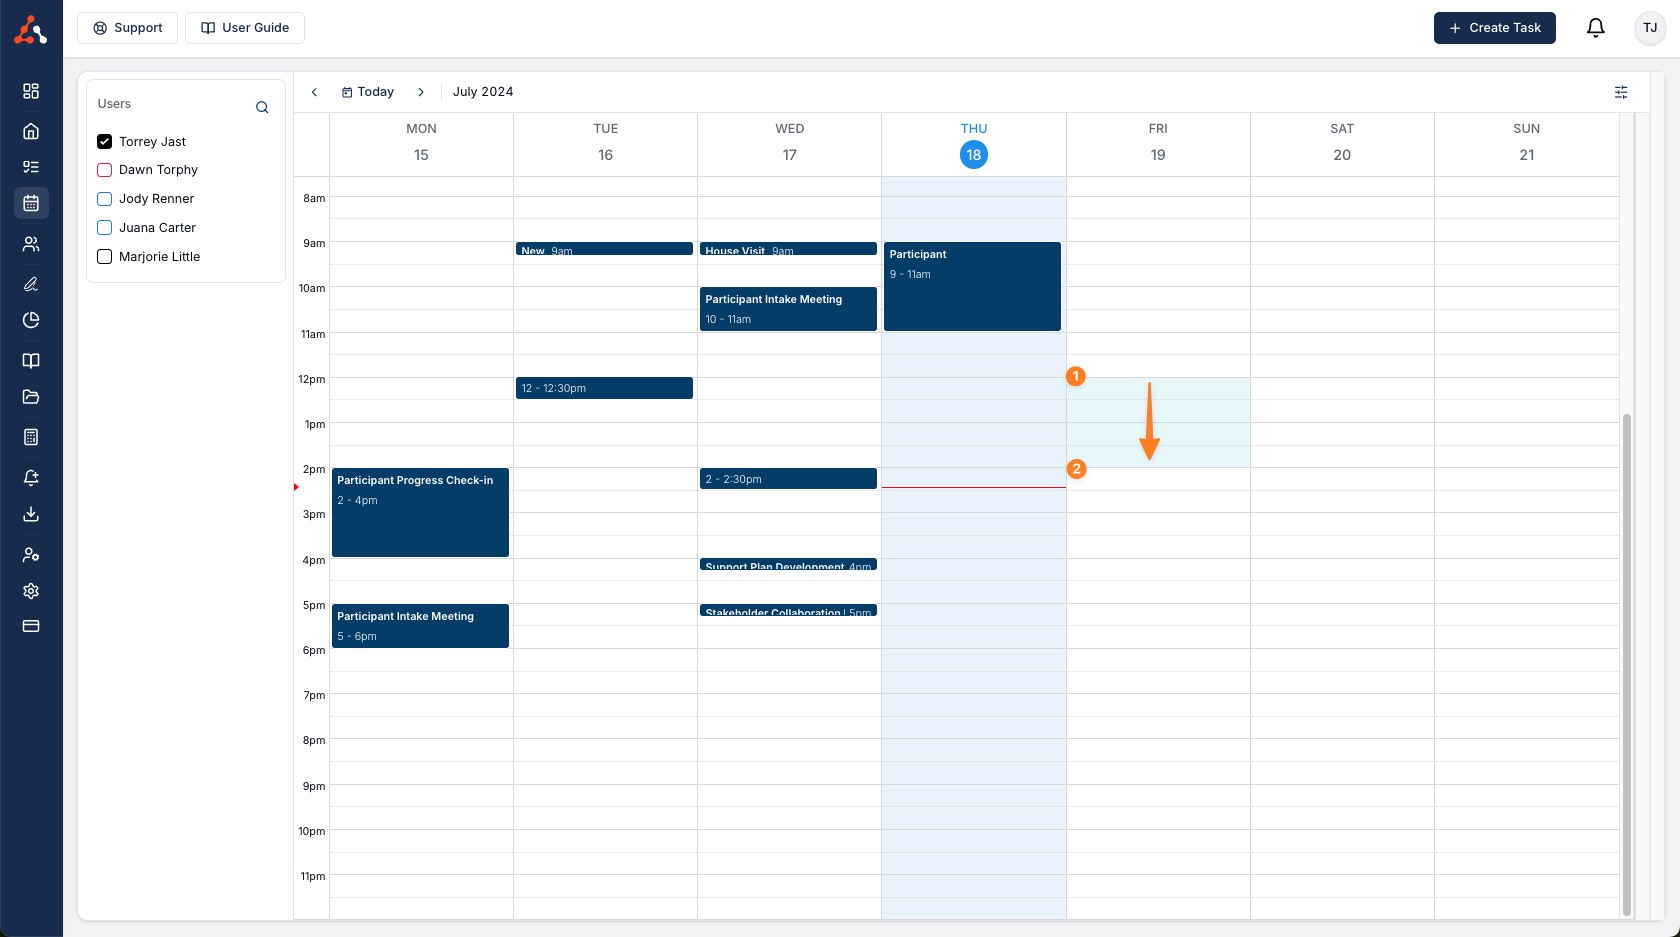
An event must start and finish on the same day.
Event Creation
The event form has these options:
| Option | What it does |
|---|---|
| Title | Required. With a linked task, it is also the task's name. |
| Event Owner | Only shown if you can manage events on behalf of other users. Chooses whose calendar the event belongs to. |
| Event time | The start and finish times. |
| Repeat | Shows Does not repeat until you select Edit beside it. See Repeating Events. |
| Public or Private | Who can see the event's details. See Public Vs. Private. |
| Add Attendees | Invite people and add a video meeting. Only shown when your main external calendar supports meetings, including when you create an event for someone else. See Google or Outlook. |
| Add Location | See Add Location. |
| Add Colour Tag | Colours the event on your calendar. Others see the colour only if they turn on Show each user's own event colours. |
| Details | A description of the event. With a linked task, it becomes the task's first note. |
| Create linked Task | Creates a task with the event. See Task Creation. |
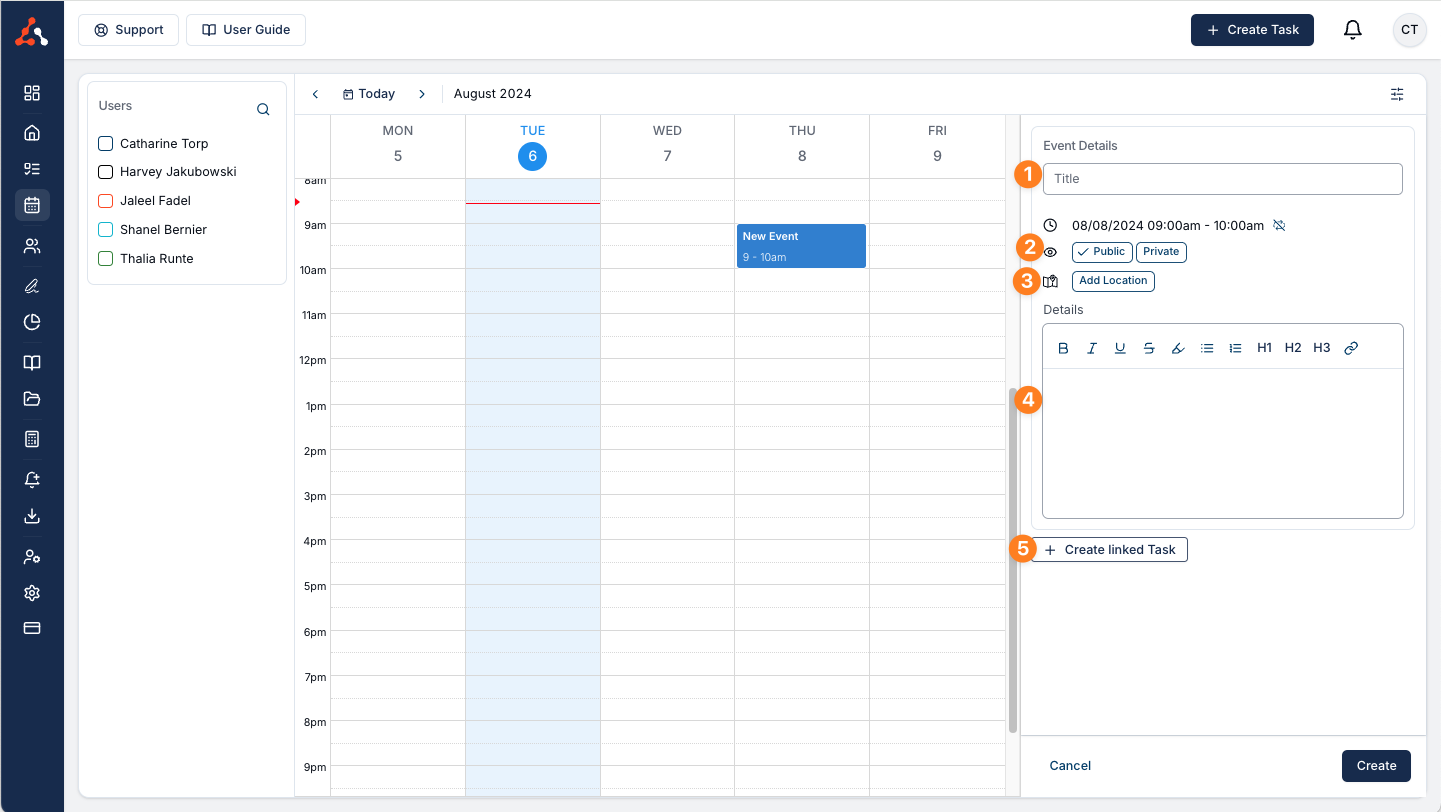
Select Create to add the event to the Calendar. If you have a main external calendar, Astalty also sends the event there. See Seeing Your External Calendar In Astalty.
Public Vs. Private
Events are Public unless you choose Private.
- Public: anyone who can see your calendar sees the event's title and details.
- Private: everyone else who can see your calendar sees only Busy at that time, with no details. This includes users who manage events on your behalf. Use it for personal appointments.
You always see the full details of your own events.
An event with a linked task is always public in Astalty, so colleagues can see what the task is for. If you have no main external calendar, the Public and Private options are unavailable once you add a linked task. If you do have one, your choice sets only whether the copy in Google or Outlook is marked private.
Add Location
Select Add Location and start typing an address, then choose it from the suggestions. The location is saved to the event and included in the copy sent to your main external calendar.
Repeating Events
Select Edit beside Does not repeat and choose how often the event repeats: daily, weekly or fortnightly on the event's weekday, monthly on the same weekday of the month (for example, the second Tuesday), annually on the event's date, or every weekday (Monday to Friday). These options end the series about a year from today.
For any other pattern, choose Custom... to set how often it repeats, which days, and when it Ends: On a date or After a number of occurrences. Every repeating event must have an end.
- Each occurrence is its own event. When you edit, move or delete one, choose This event or This and following events. Moving an occurrence to another day is available for This event only.
- The repeat pattern cannot be changed after the event is created.
- With a linked task, each occurrence gets its own task, and Completed cannot be ticked when you create the series.
Task Creation
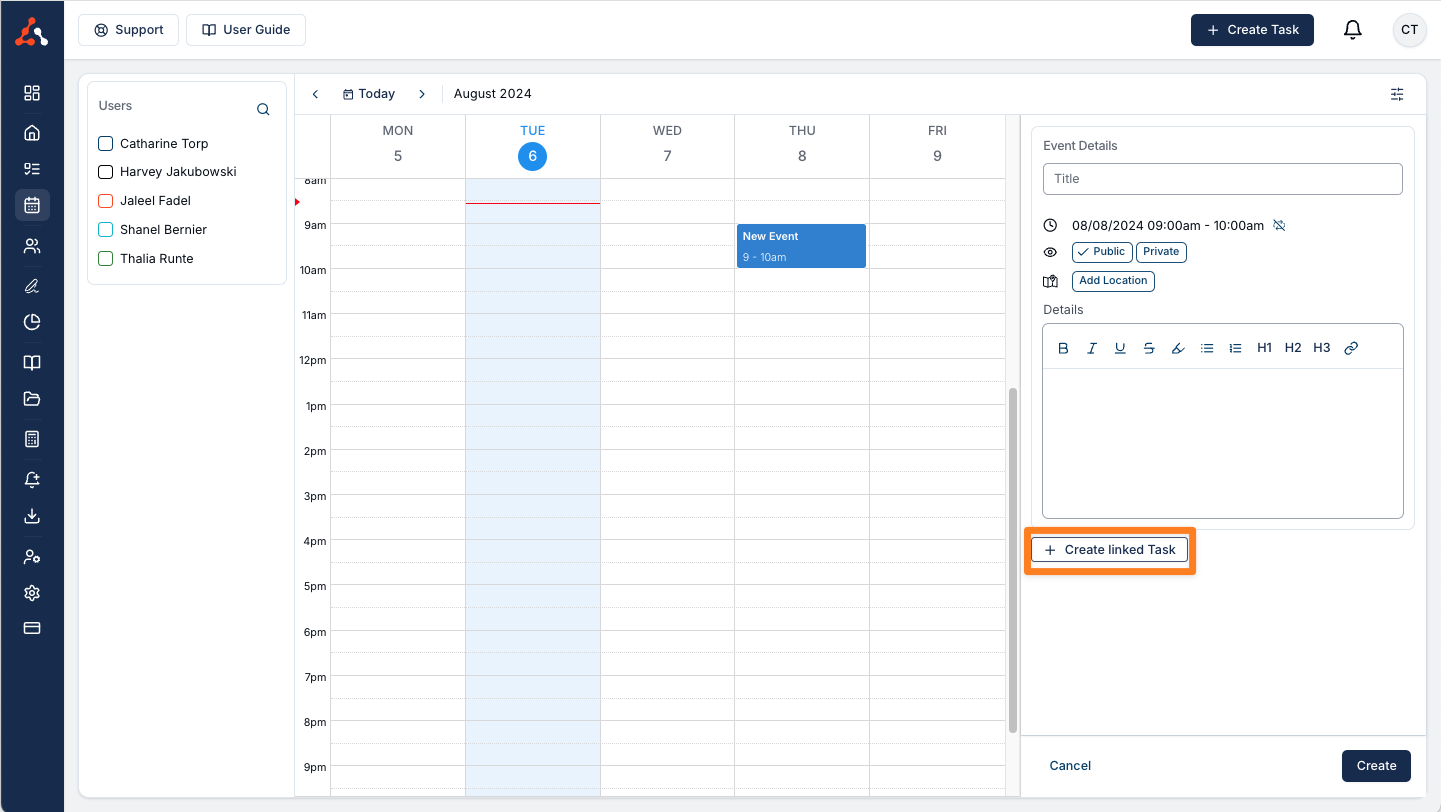
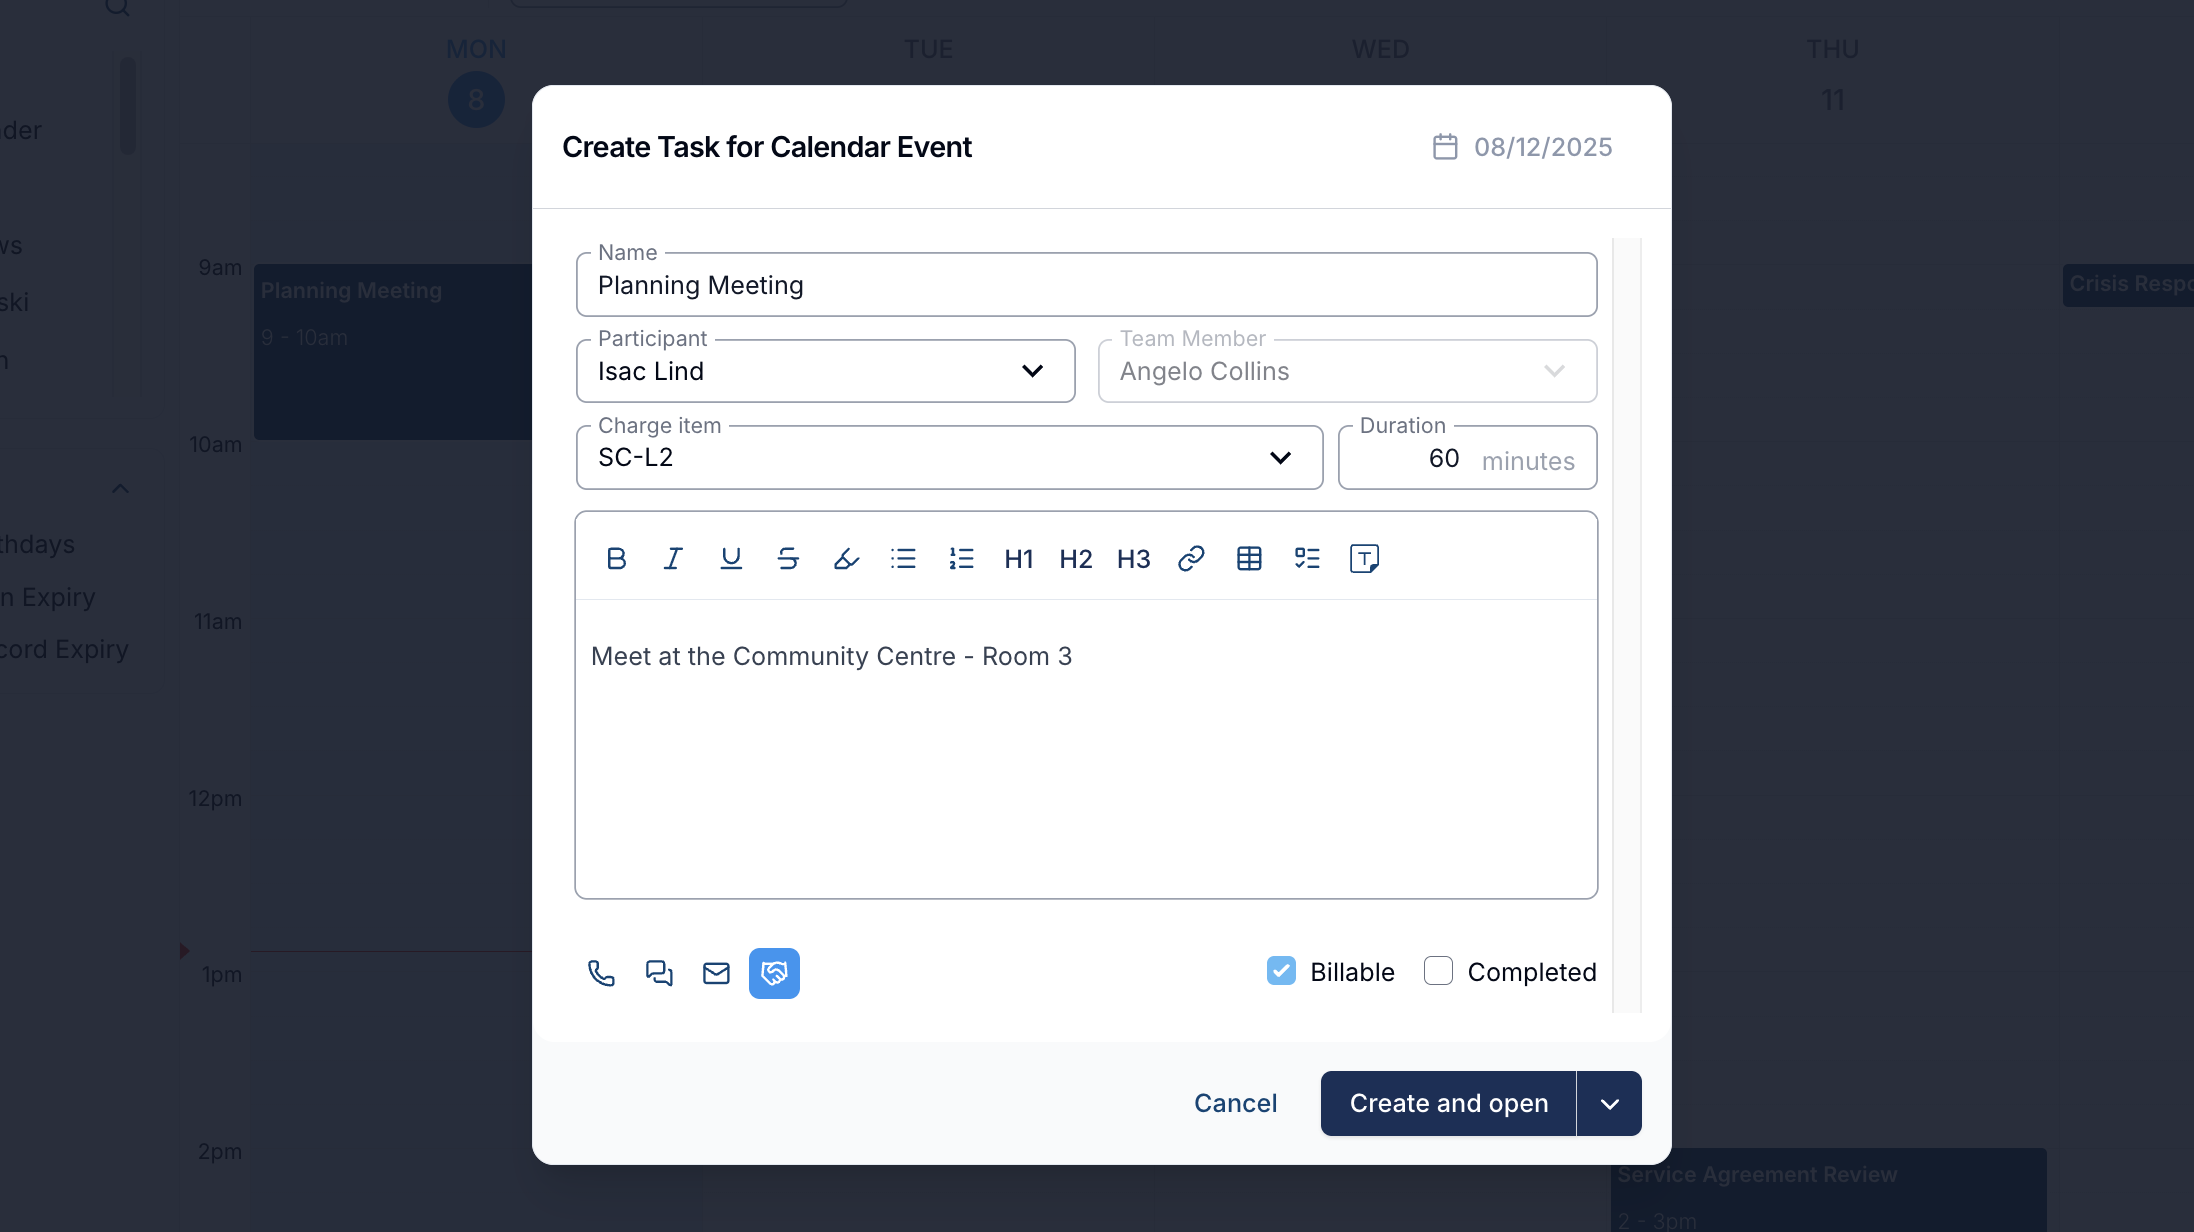
Select Create linked Task to create a task with the event. The task belongs to the event owner and appears on their task board. Its name is the event's Title, and the event's Details become the task's first note.
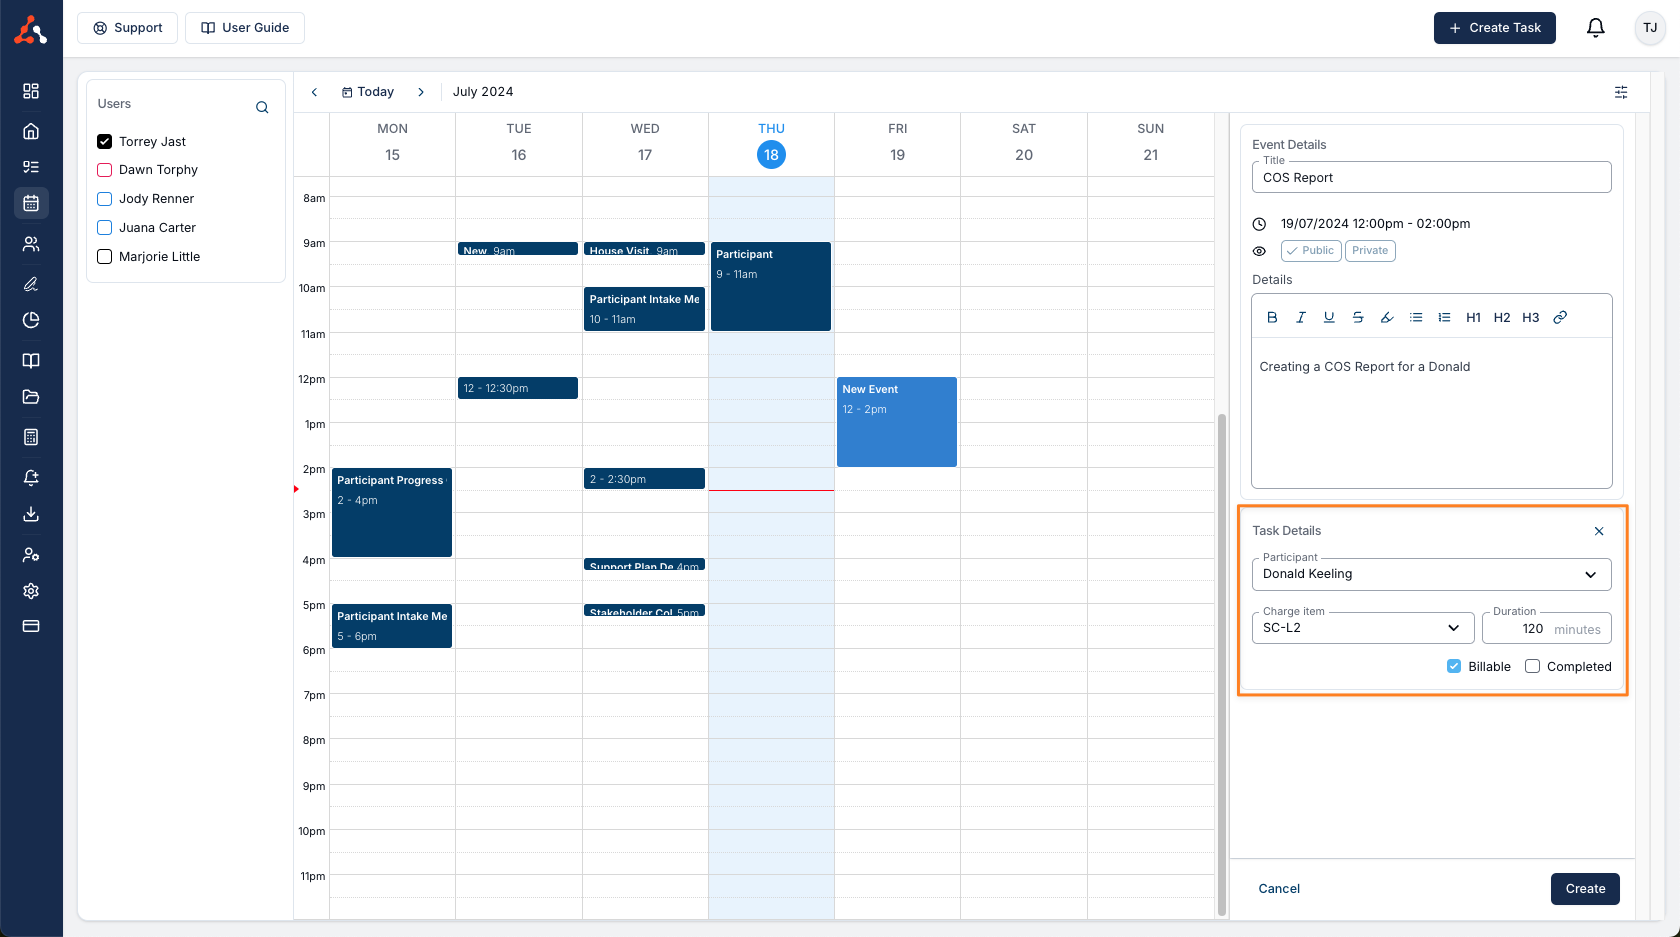
In Task Details you can set:
- A Participant. Choosing one is what lets you pick a Charge Item, additional charges and an SMS reminder.
- A Charge Item.
- The task's duration, which starts as the event's length.
- A check-in type (phone, SMS, email or face to face). Only available for events dated today or earlier, and only once you have written Details to use as the note.
- Billable, ticked by default, and Completed.
Additional Charges
When creating a linked Task, you can add extra Charge Items alongside the main session Charge Item. This is useful for capturing supports such as travel or kilometres on the same appointment. Add these under the Additional charges section of the Task Details and set the quantity for each charge (for example, the number of kilometres travelled).
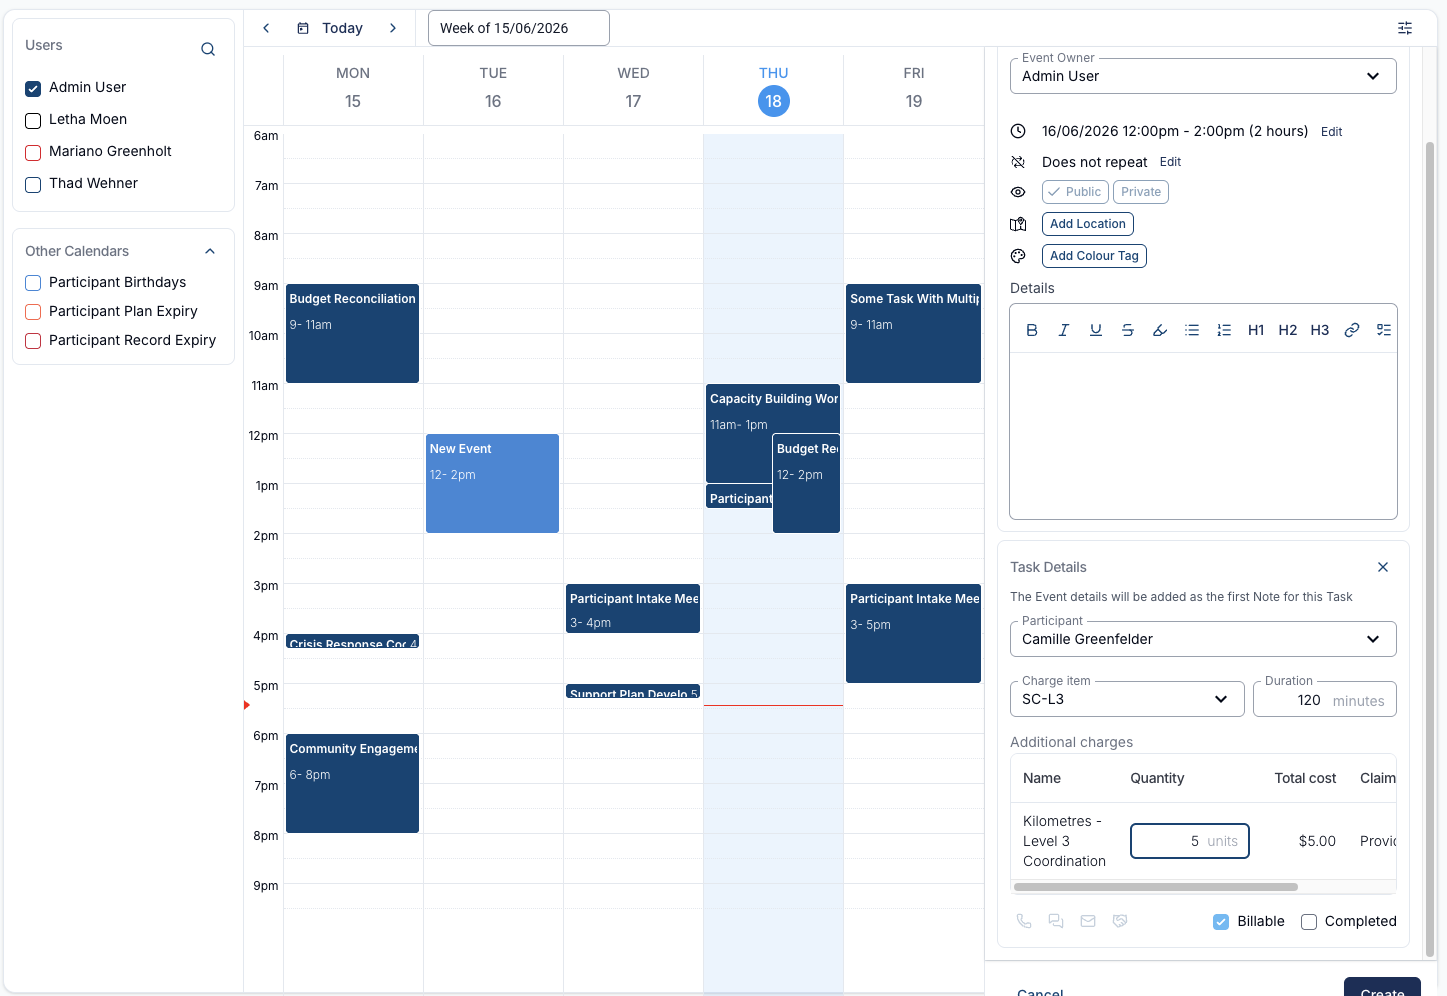
Additional charges are scoped to the selected Participant. If you change the Participant on the Task, any additional charge selections are cleared so you can choose the charges relevant to the newly selected Participant.
A linked task shows a calendar icon on the task board, which opens its event. You cannot change a linked task's date or time from the task board.
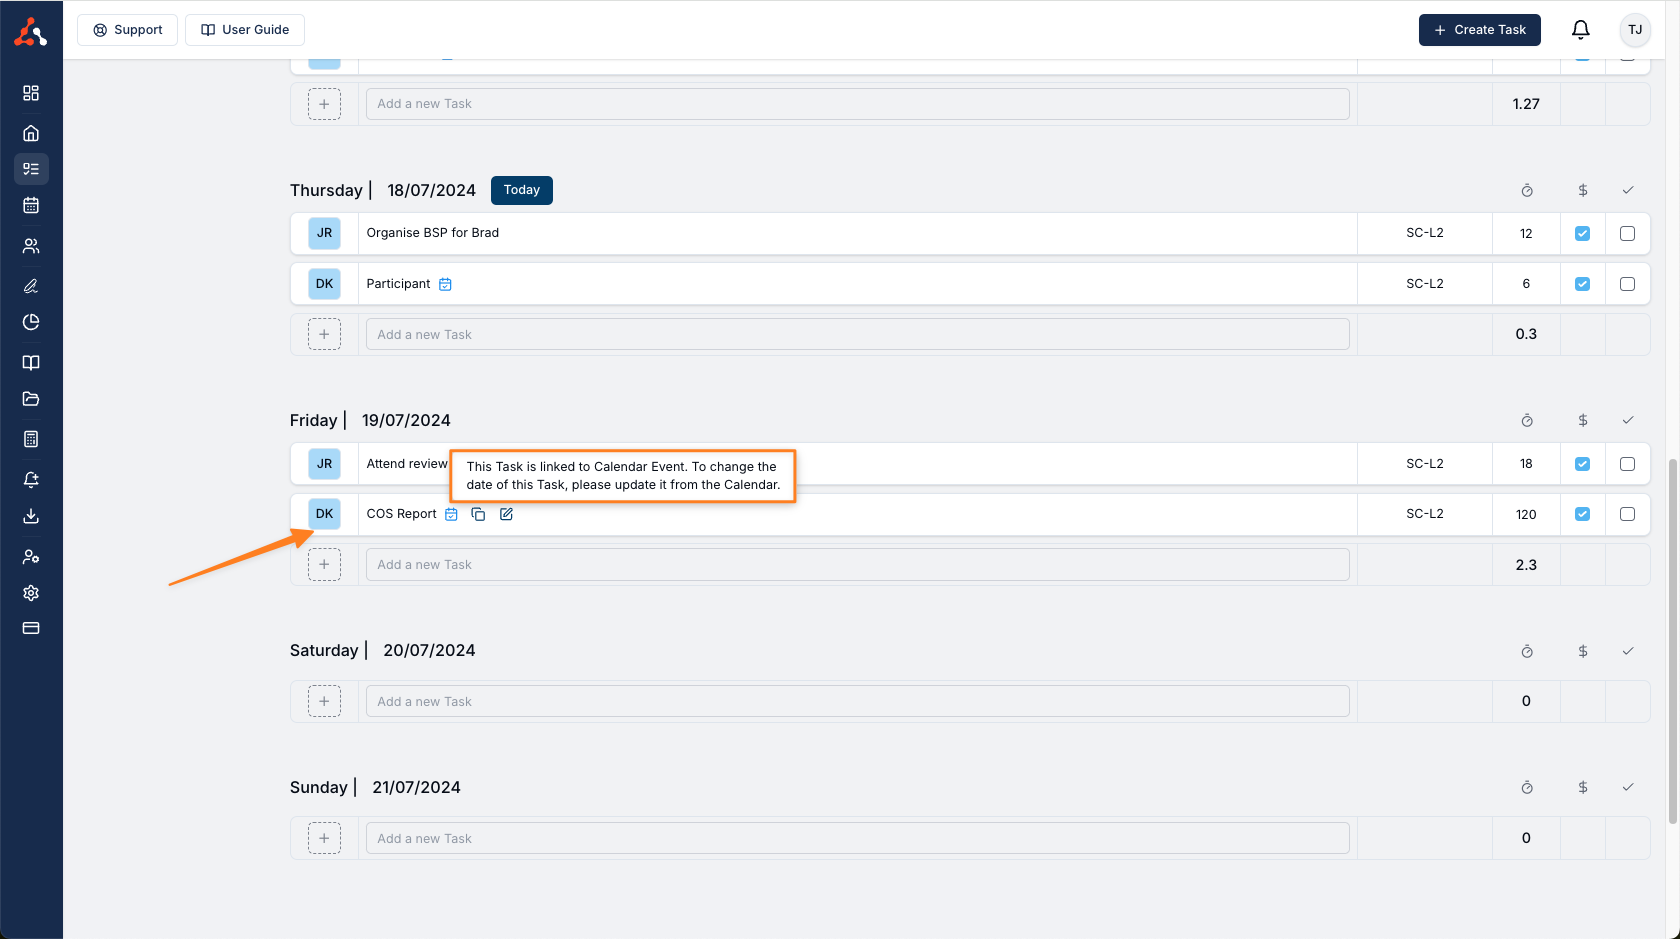
To change it, drag the event to a new date or time on the Calendar, or edit the event. The linked task moves with it.
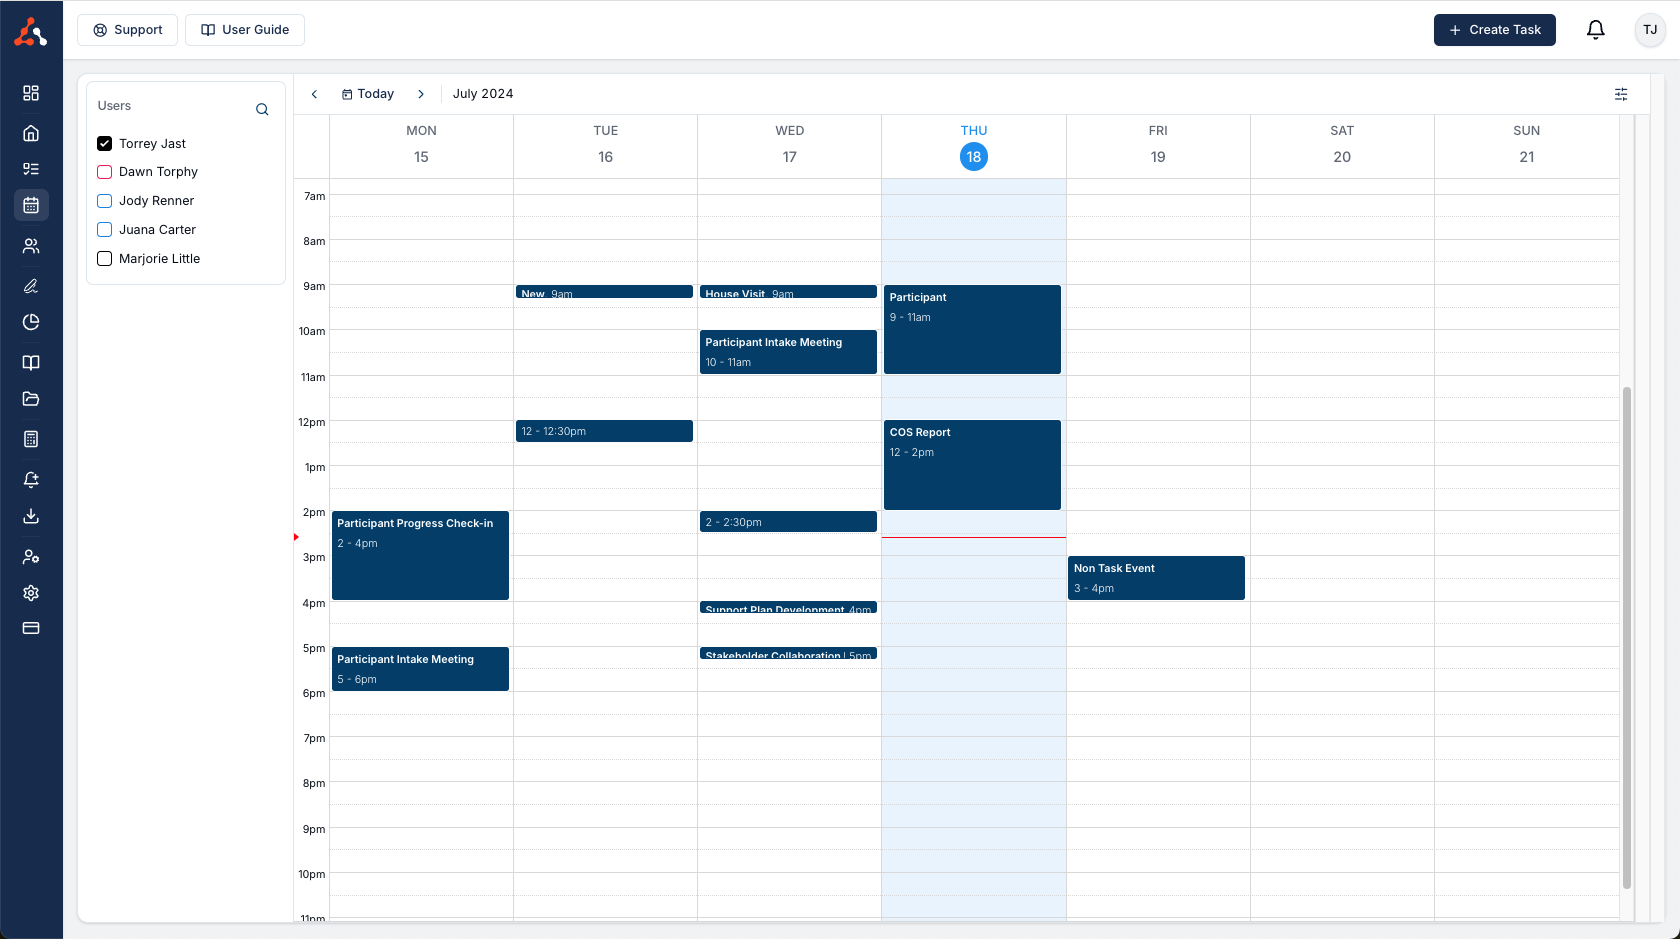
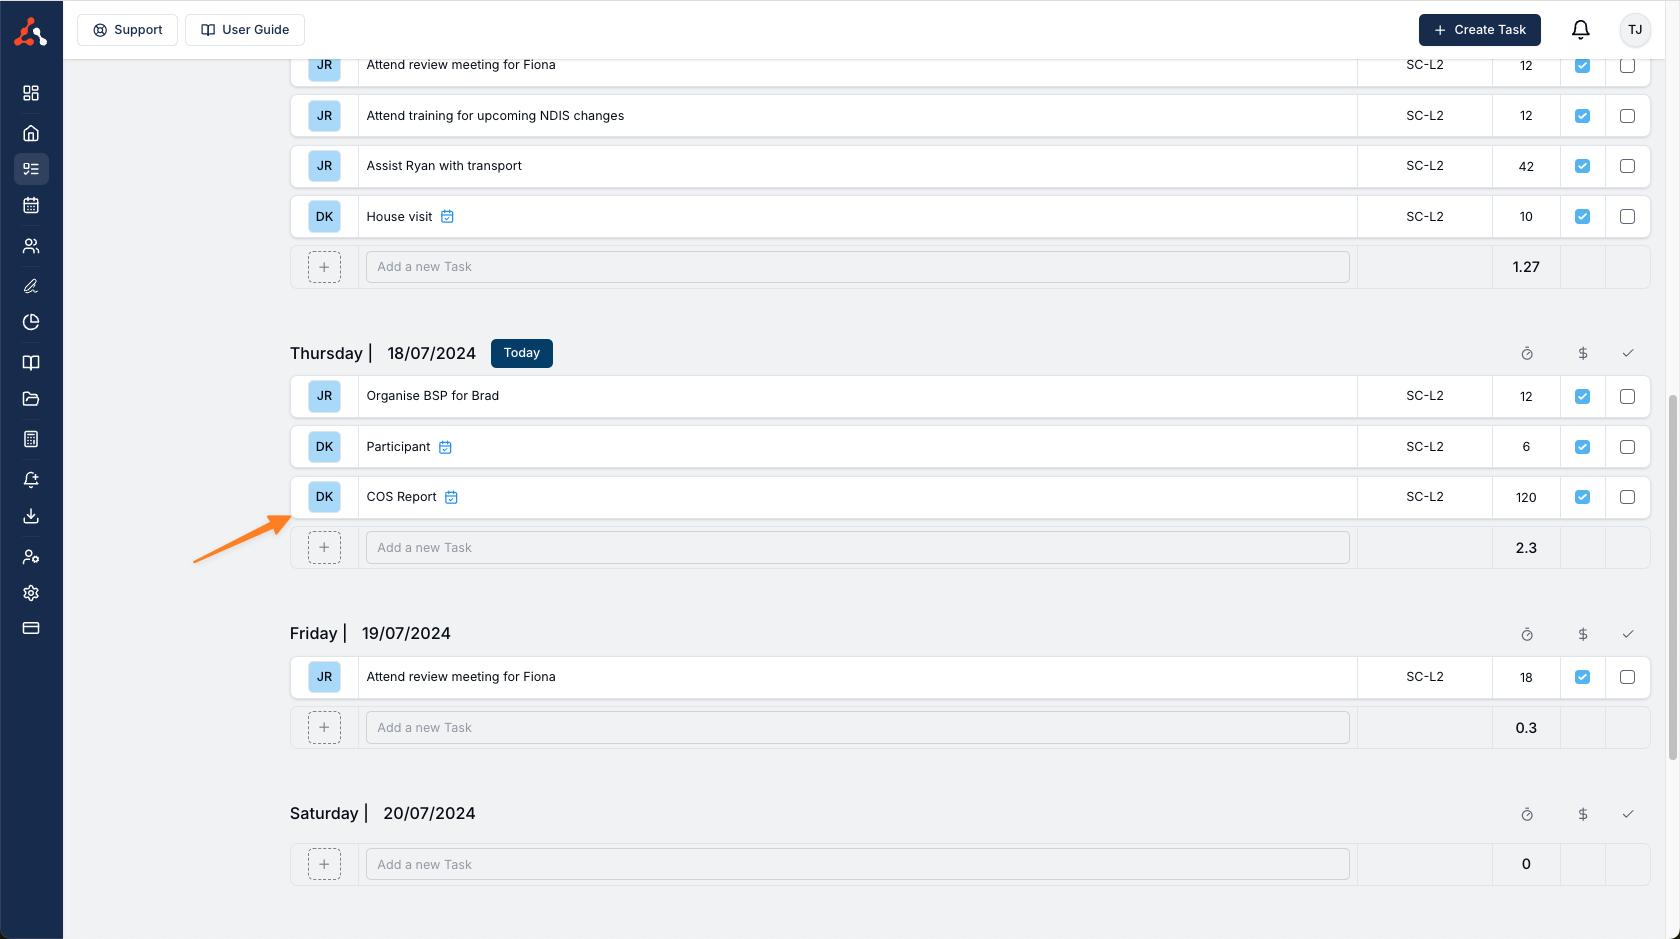
Renaming the event also renames the linked task, as long as the task's name still matches the event's previous name. If the task was renamed separately — on the task board, for example — it keeps that name, and a later event rename does not override it. Changing only the date or time never renames the task.
On a recurring event, this follows whichever edit scope you choose — This event or This and following events — and each occurrence is checked against its own previous name.
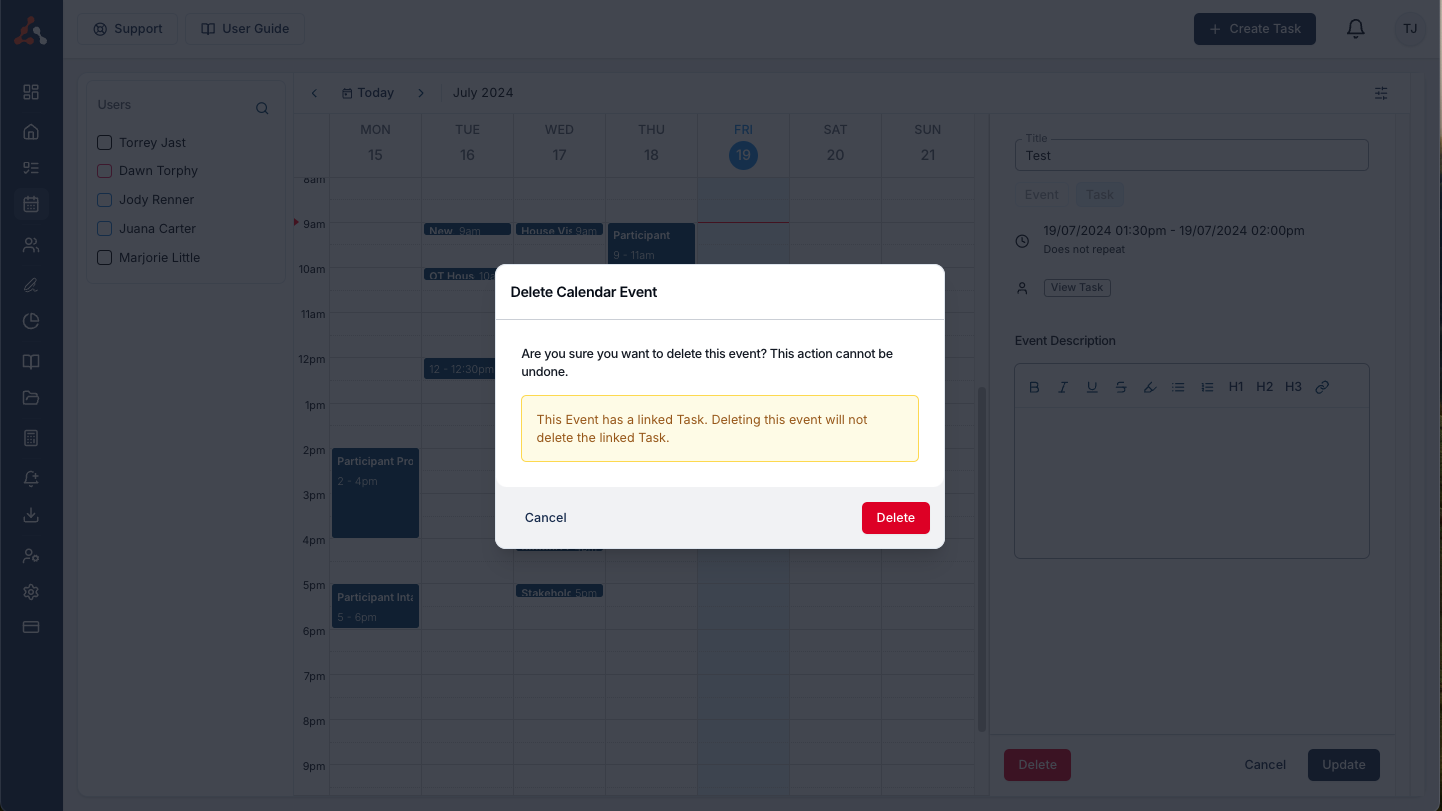
Deleting an event keeps its linked task unless you tick Delete linked Task. See Delete Event.
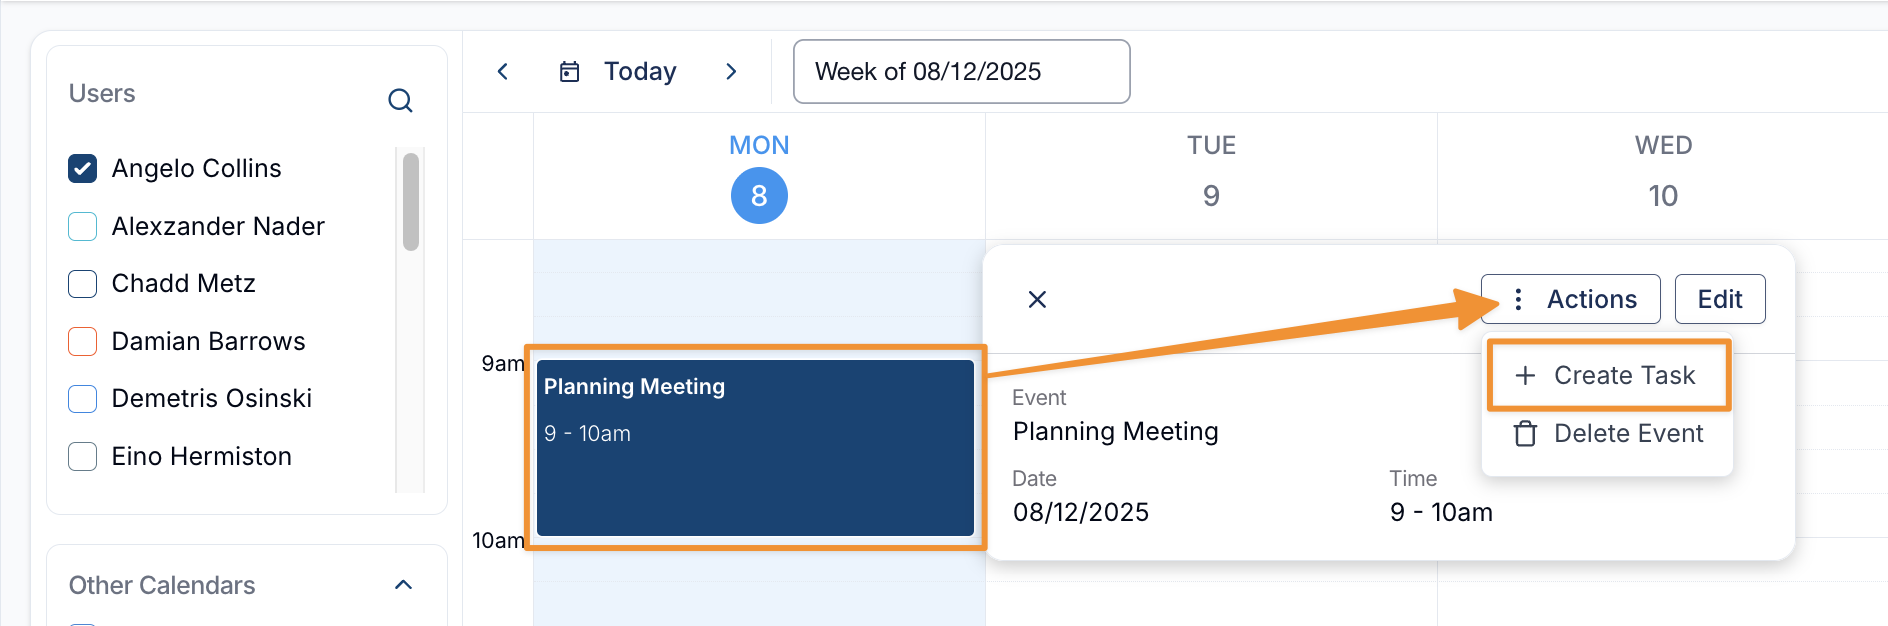
Create New Tasks for Existing Events
You can create a linked Task for an existing event that does not have one. Select the event, then select the Actions menu and Create Task. Create Task is unavailable for a Private event and for an event that already has a linked task.
From there you can select the Participant, service, check-in type, pretick the billable and completed status, and add in any notes before saving it. The task is assigned to the event owner.
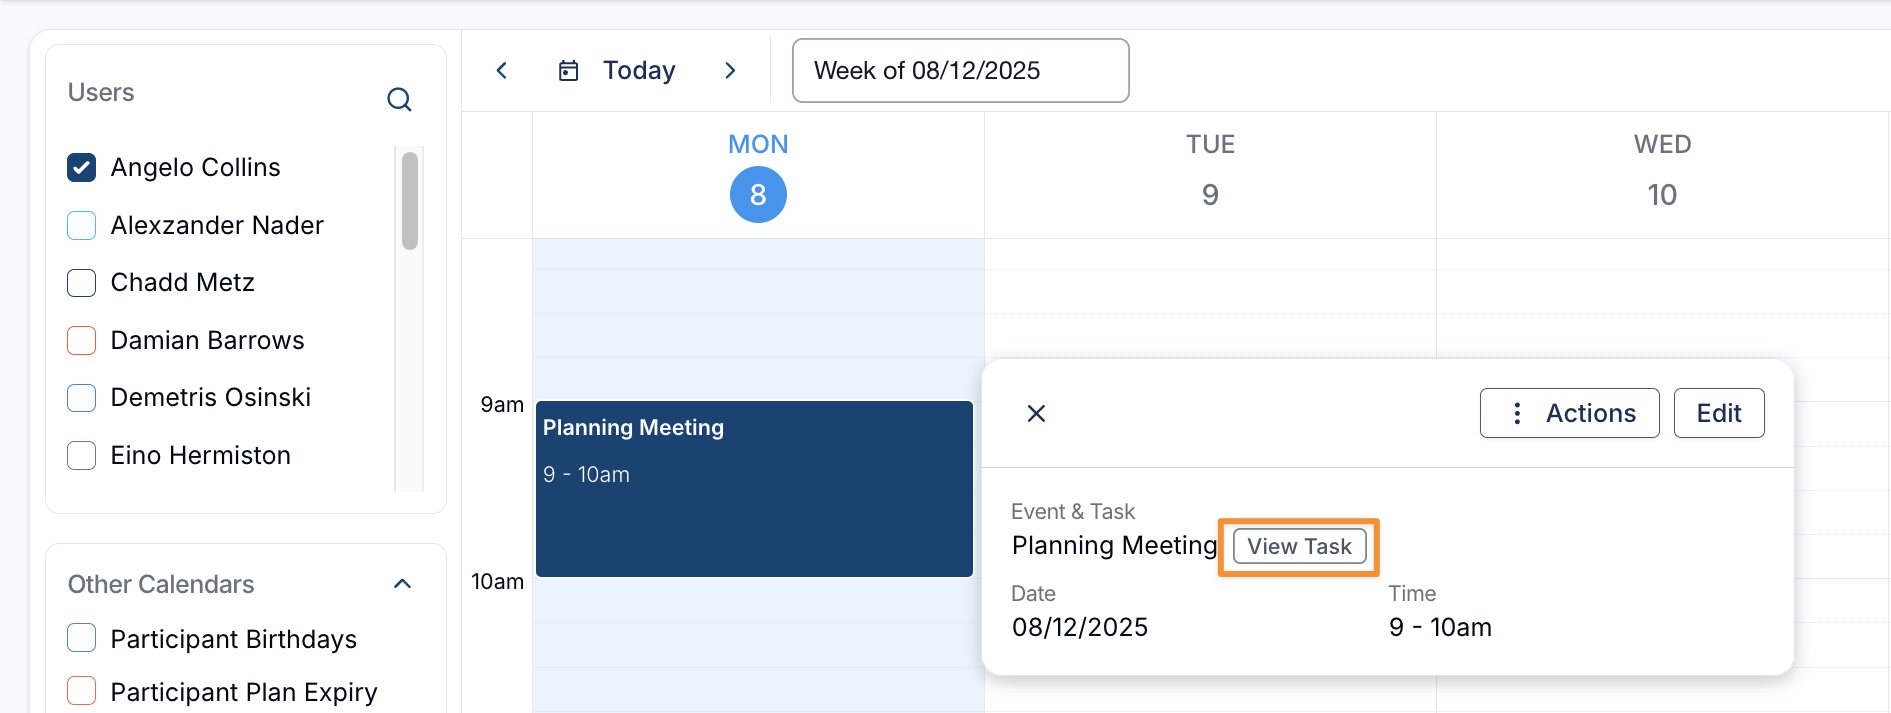
Once saved, select the event and then View Task to open the linked Task.
If you can manage calendar events on behalf of other users, you can also do this on their events. Show their calendar, select the event, then select Actions and Create Task.
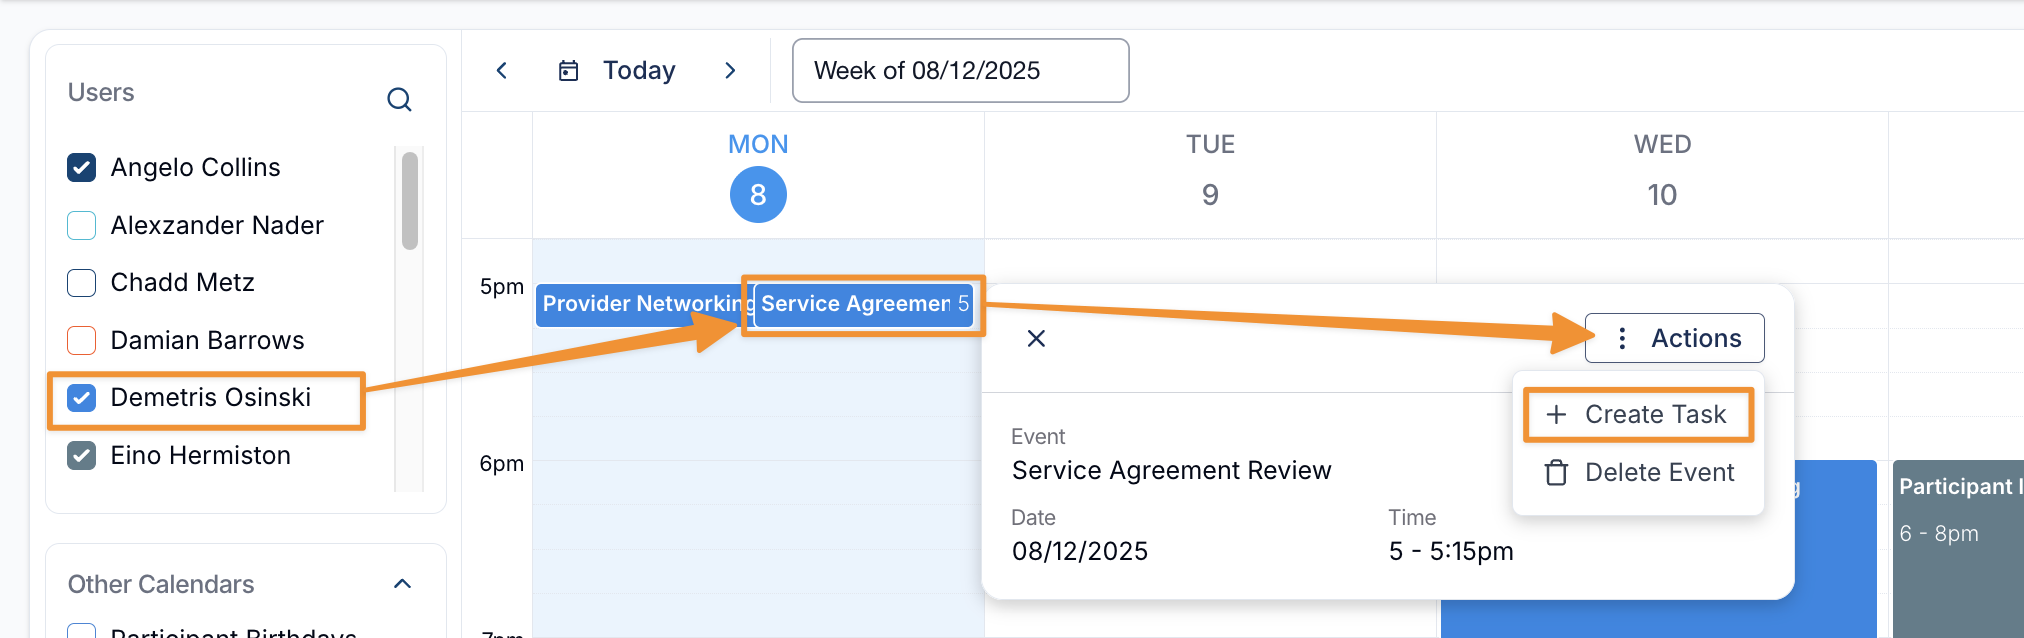
Create Task also works on events from your external calendar. It creates a separate task with the event's title, date and duration, which is not linked to the external event.
Creating an Event From a Task
To put an existing task on the Calendar, open the task and select Actions > Create Calendar Event. Enter the event details and select Create. The task becomes the event's linked task and moves to the event's date and time. Only the task's owner can do this, and only for a task without a linked event.
Editing an Event
Select an event and then Edit. You can edit your own events, and other users' events if you manage events on their behalf. Events from your external calendar cannot be edited in Astalty.
You can change the title, time, Public or Private, location, colour tag, details and SMS reminder. If your main external calendar supports meetings, you can also add a video meeting. You cannot change the event owner, the attendees or the repeat pattern after the event is created, and a video meeting cannot be removed once added.
You can also drag an event to a new time, or drag its bottom edge to change its length.
- If the event has a linked task and its length changes, Astalty asks whether to update the task's duration to match.
- An event whose linked task has invoiced charges cannot be edited or moved.
- If you have a main external calendar, your changes are sent to the copy there.
Cloning an Event
To create a similar event, select an event and then Actions > Clone Event. A new event form opens with the same title, details, visibility, location, colour tag, attendees, video meeting and linked task details, and the same length. It starts now if today is in view, or otherwise at the original event's time. Adjust the date and time, then select Create. The repeat pattern is not copied.
You can clone any Astalty event you can see. Cloning someone else's Private event copies only what you can see of it.
Delete Event
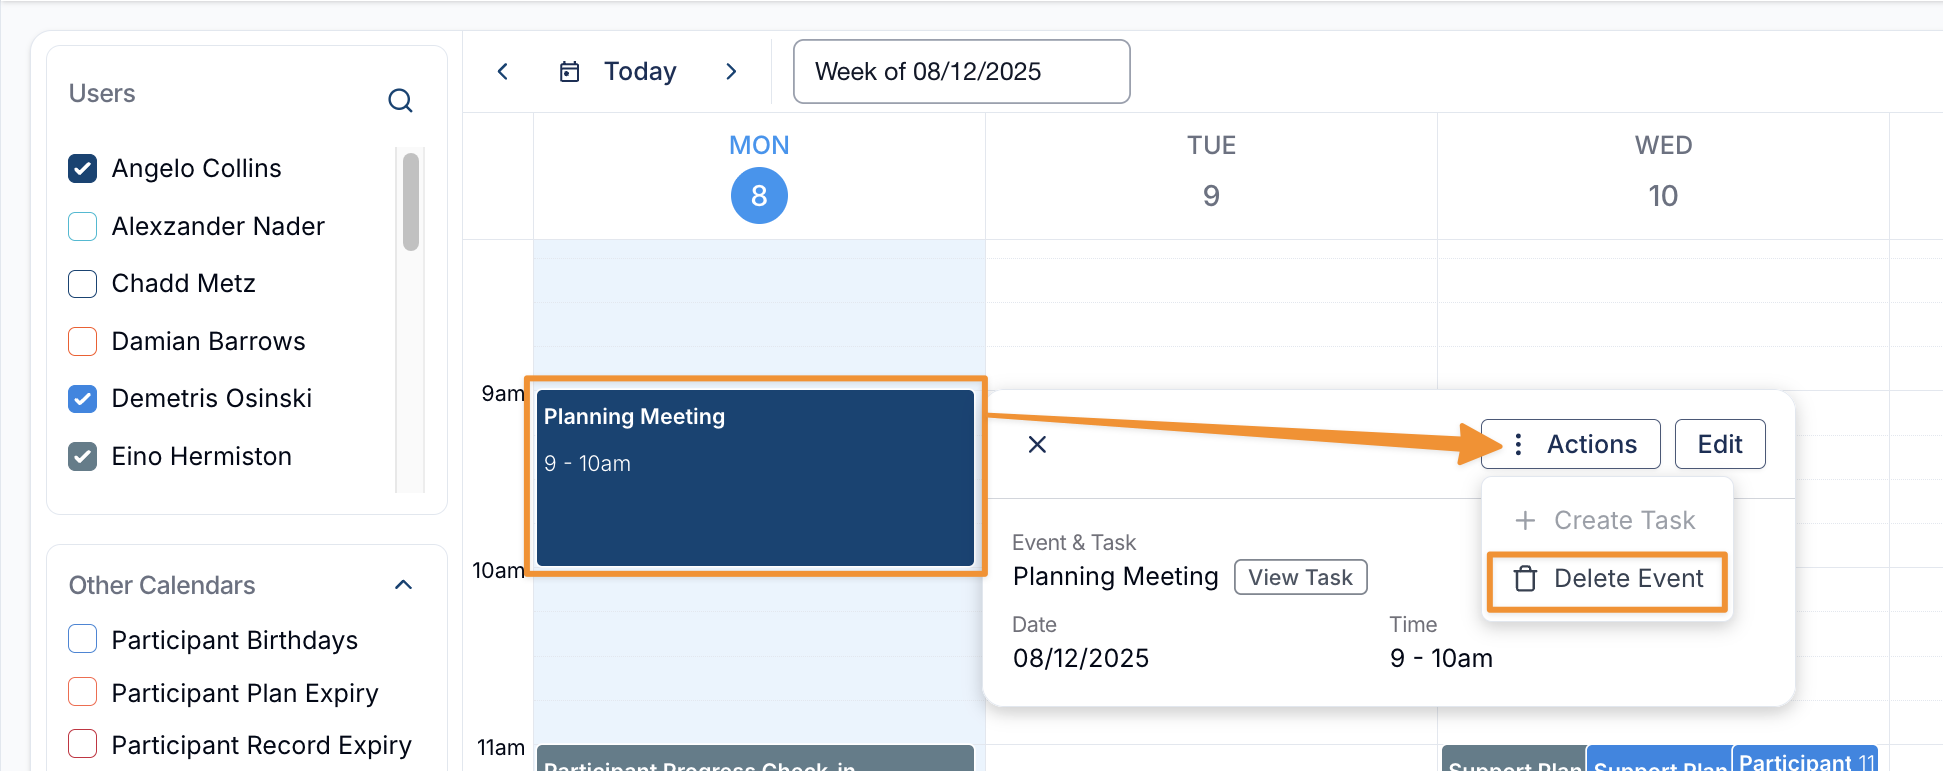
Select the event, then Actions > Delete Event, or select Delete in the event's edit form. Deleting an event cannot be undone.
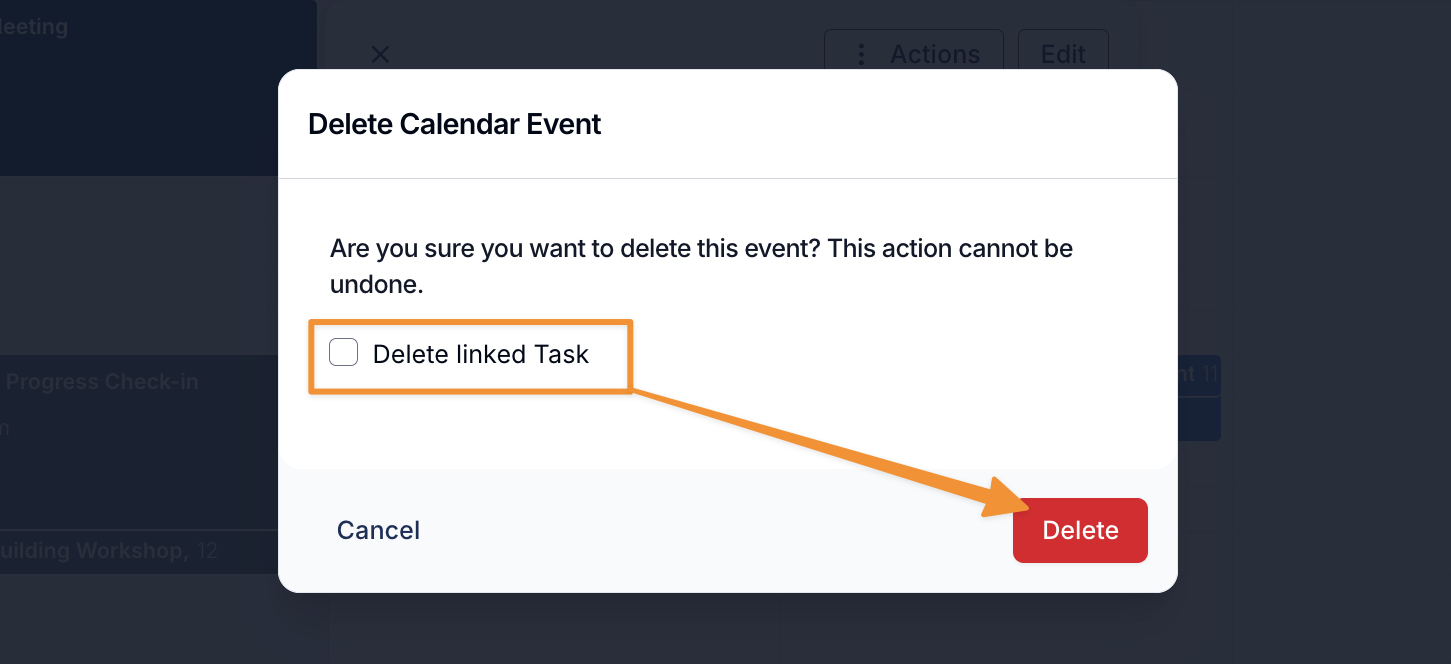
Before you confirm with Delete:
- If the event was sent to your main external calendar, Remove from and the calendar's name is ticked, so the copy in Google or Outlook is deleted too. Untick it to keep that copy. Deleting a later occurrence of a repeating event with This and following events always removes the Google or Outlook copies of those occurrences, even if you untick it. If the event is still being sent to the external calendar, wait for that to finish before deleting.
- If the event has a linked task, tick Delete linked Task to delete the task as well, with its notes, charges and documents. This cannot be undone. A task with invoiced charges cannot be deleted. Leave it unticked to keep the task.
- For a repeating event, choose This event or This and following events.
Managing Calendar Events on behalf of other Users
The Can manage calendar events on behalf of other users permission lets an Admin or Manager:
- See every user's calendar.
- Create events for another user, using the Event Owner field.
- Edit, move and delete other users' events.
- Create linked tasks on other users' events.
It is off by default for Admins and Managers. The Account Owner always has it. Team Members and Support Workers cannot be given it.
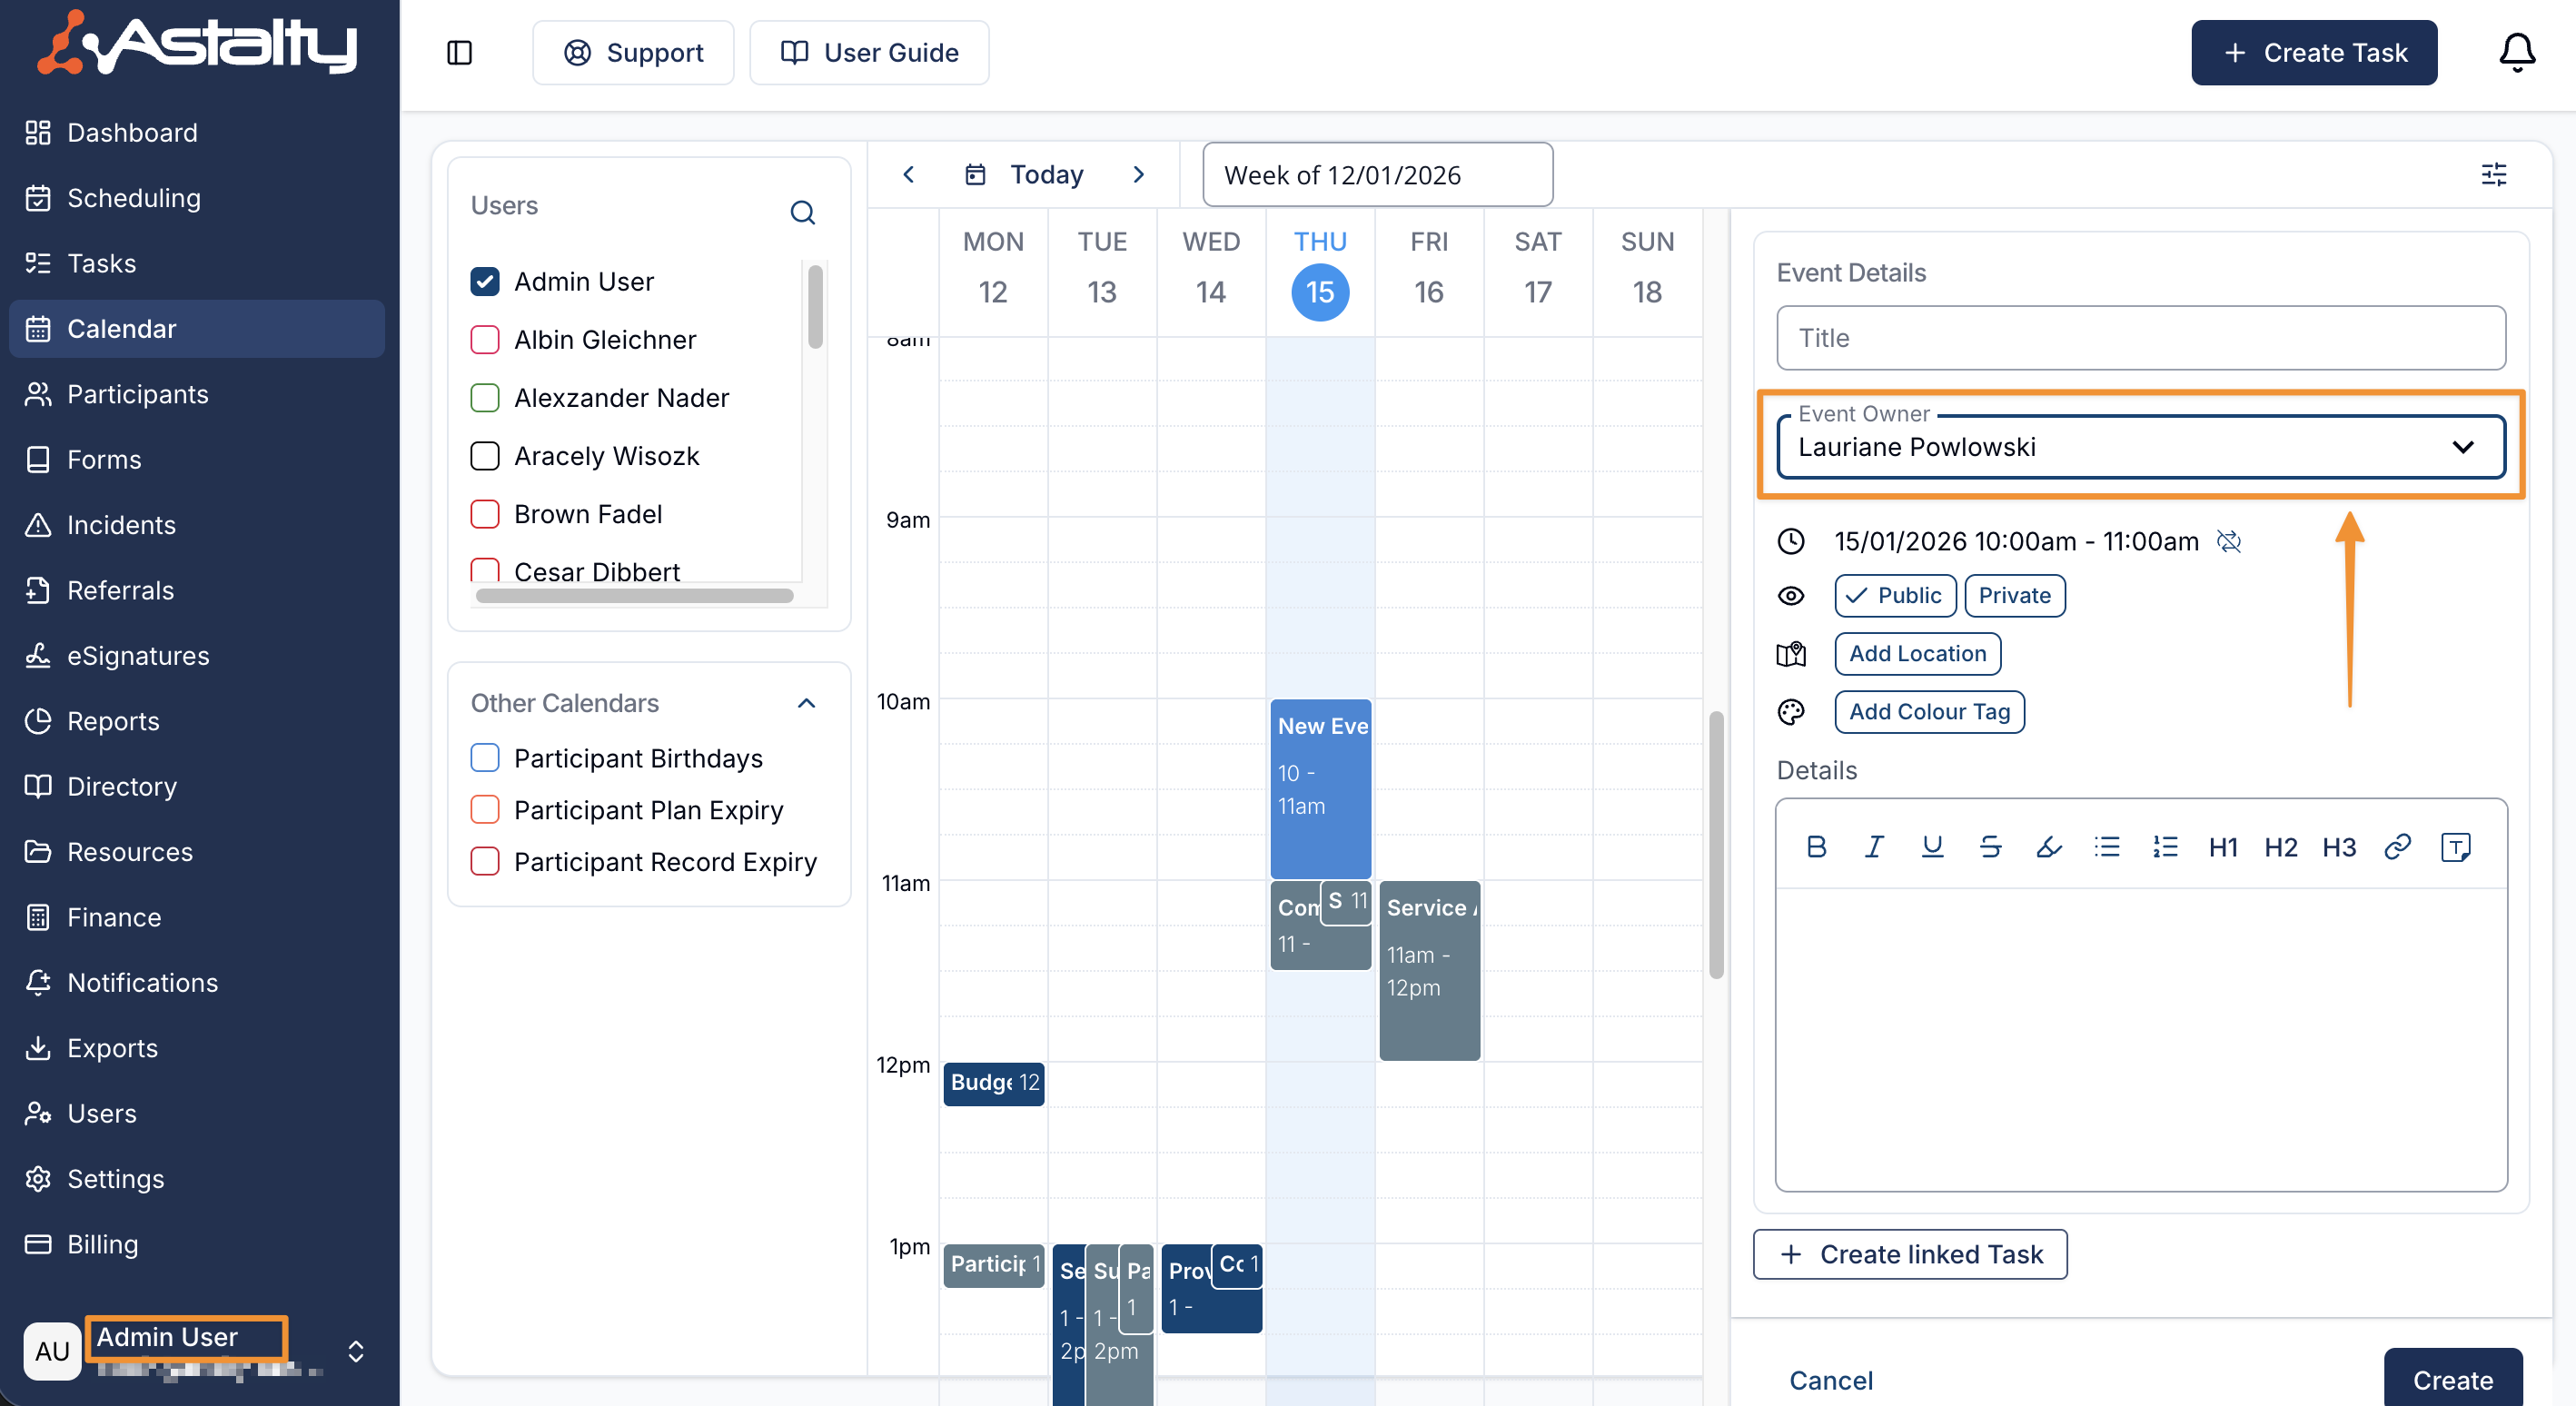
When you create an event for someone else, choose them in Event Owner. Support Workers cannot own events, and the owner cannot be changed after the event is created. The event is sent to the owner's main external calendar, not yours, and a linked task is assigned to the owner. Add Attendees and the video meeting option still follow your own main calendar, so if the owner has no main calendar, or theirs doesn't support meetings, the attendees and meeting aren't sent and no invitations go out. Without this permission, the Event Owner field does not appear and you can only manage your own events.
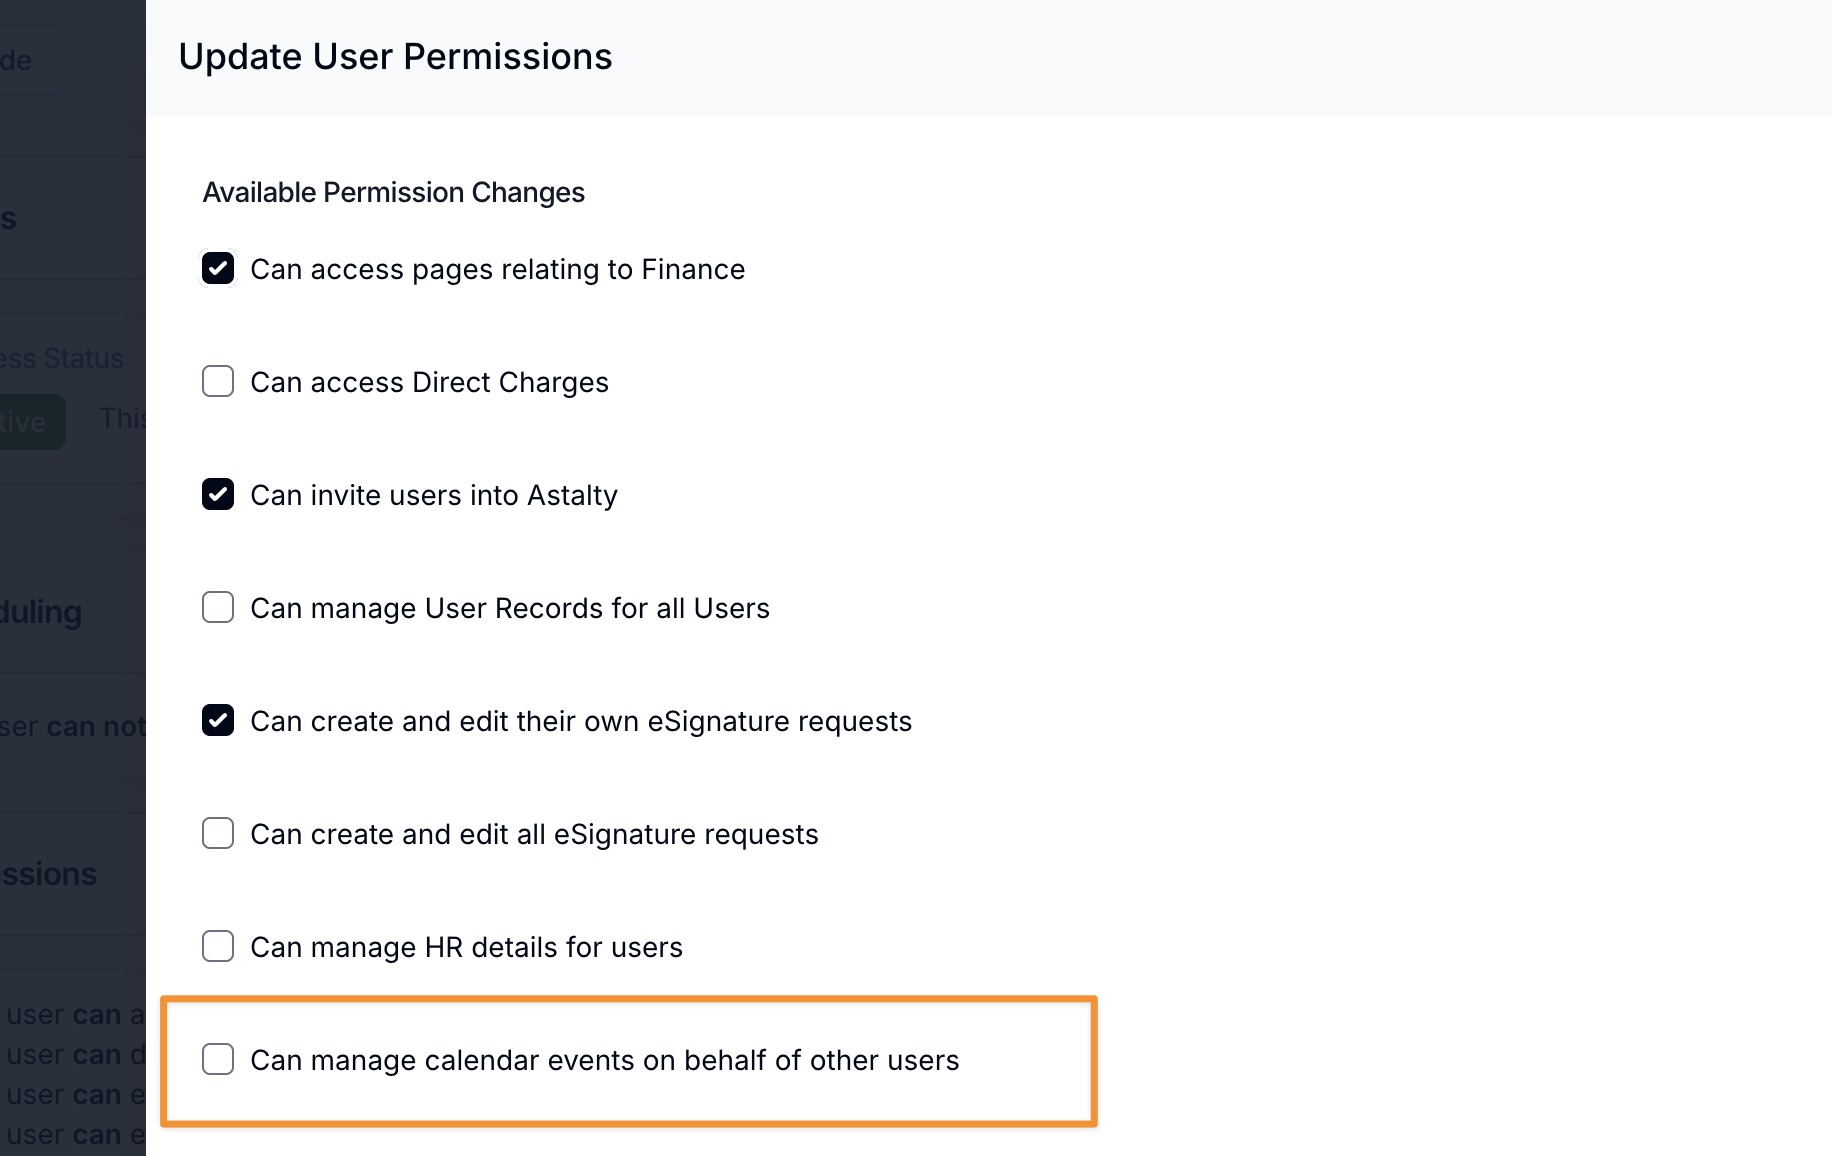
To turn the permission on, open the user in Users, go to their Permissions tab, edit their permissions and tick Can manage calendar events on behalf of other users. Any Admin can change it for a Manager. For an Admin, the Account Owner can change it, or an Admin who has Can manage permissions for admin users.
For more on adjusting a user's permissions, see Updating Roles and Permissions.