- Scheduling
- Travel (to, during and from)
Travel (to, during and from)
Overview
The Configure Travel function records planned travel to, during, and from a support. Charge behaviour also depends on the Participant's Service and the Travel Charge Items available to the support.
Add Travel
To add travel, click Add Travel from within the support.
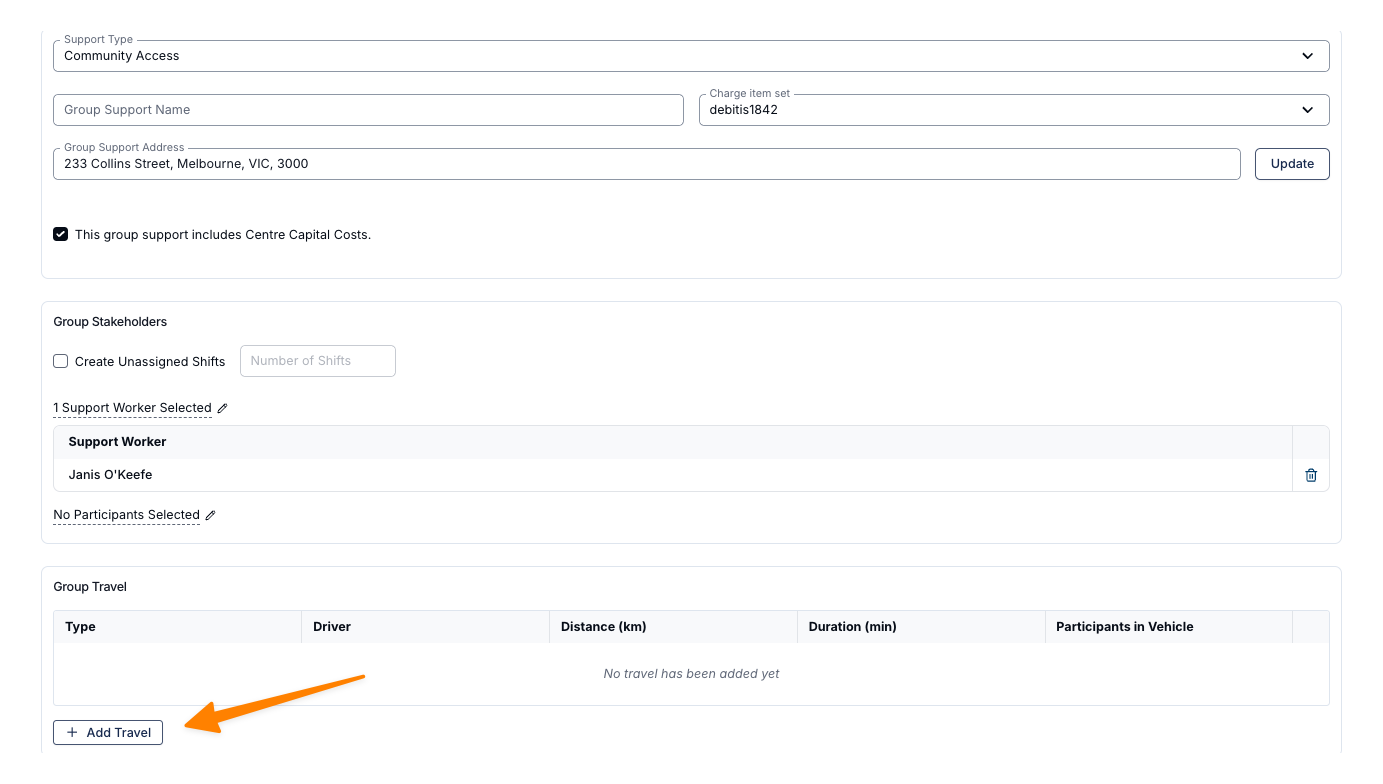
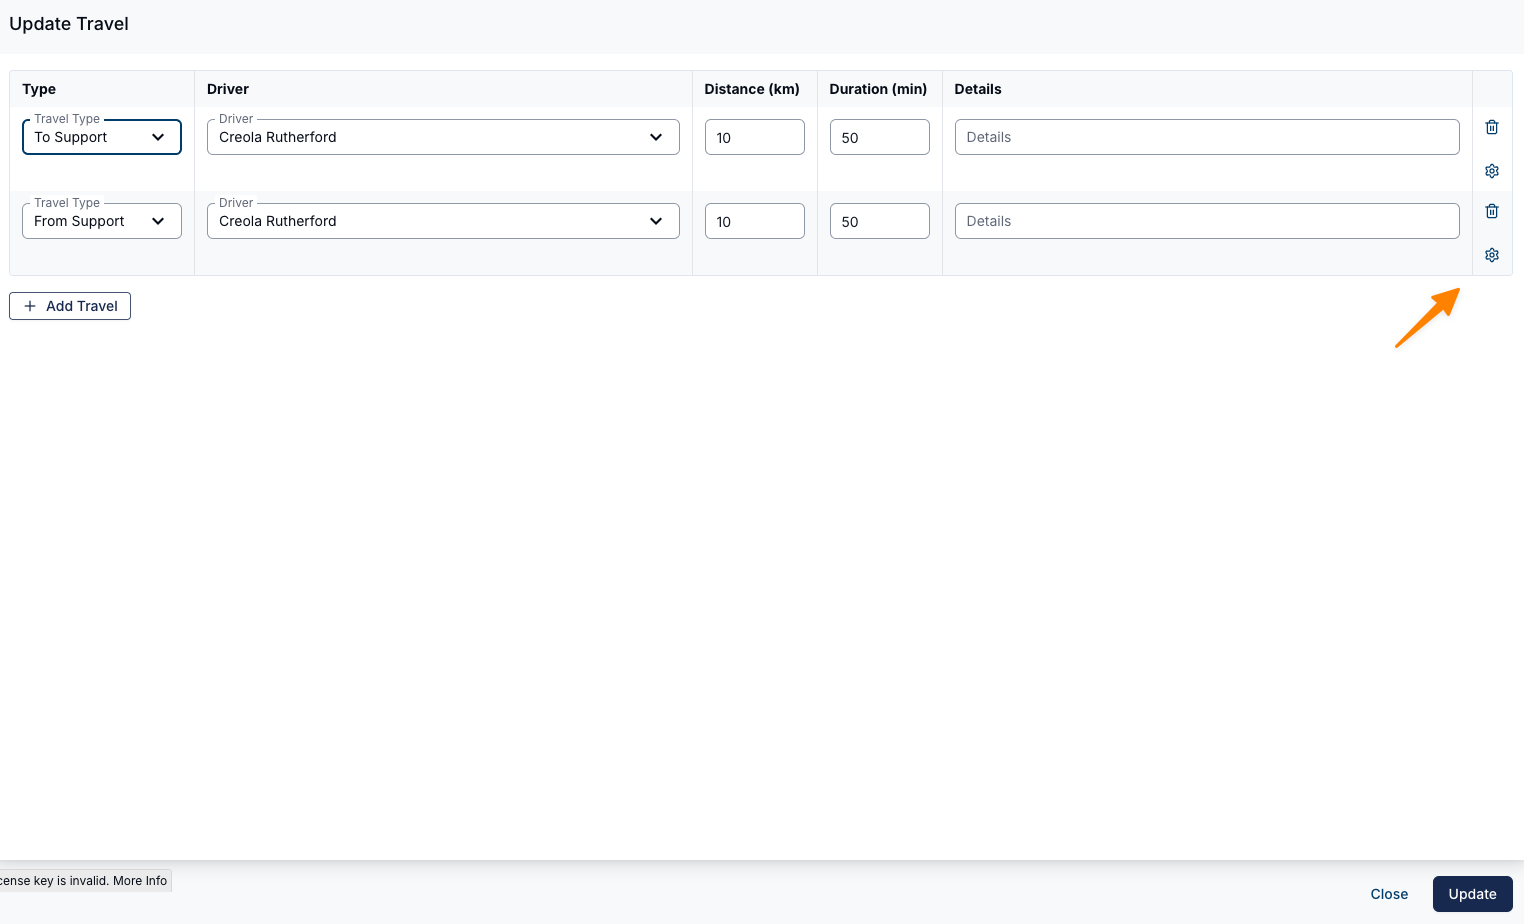
You have the option to set the type of travel - to the support, during the support, and from the support. As well as specify the Driver, Distance, estimated Duration, any Details, Charge Behaviour and Pay Behaviour.
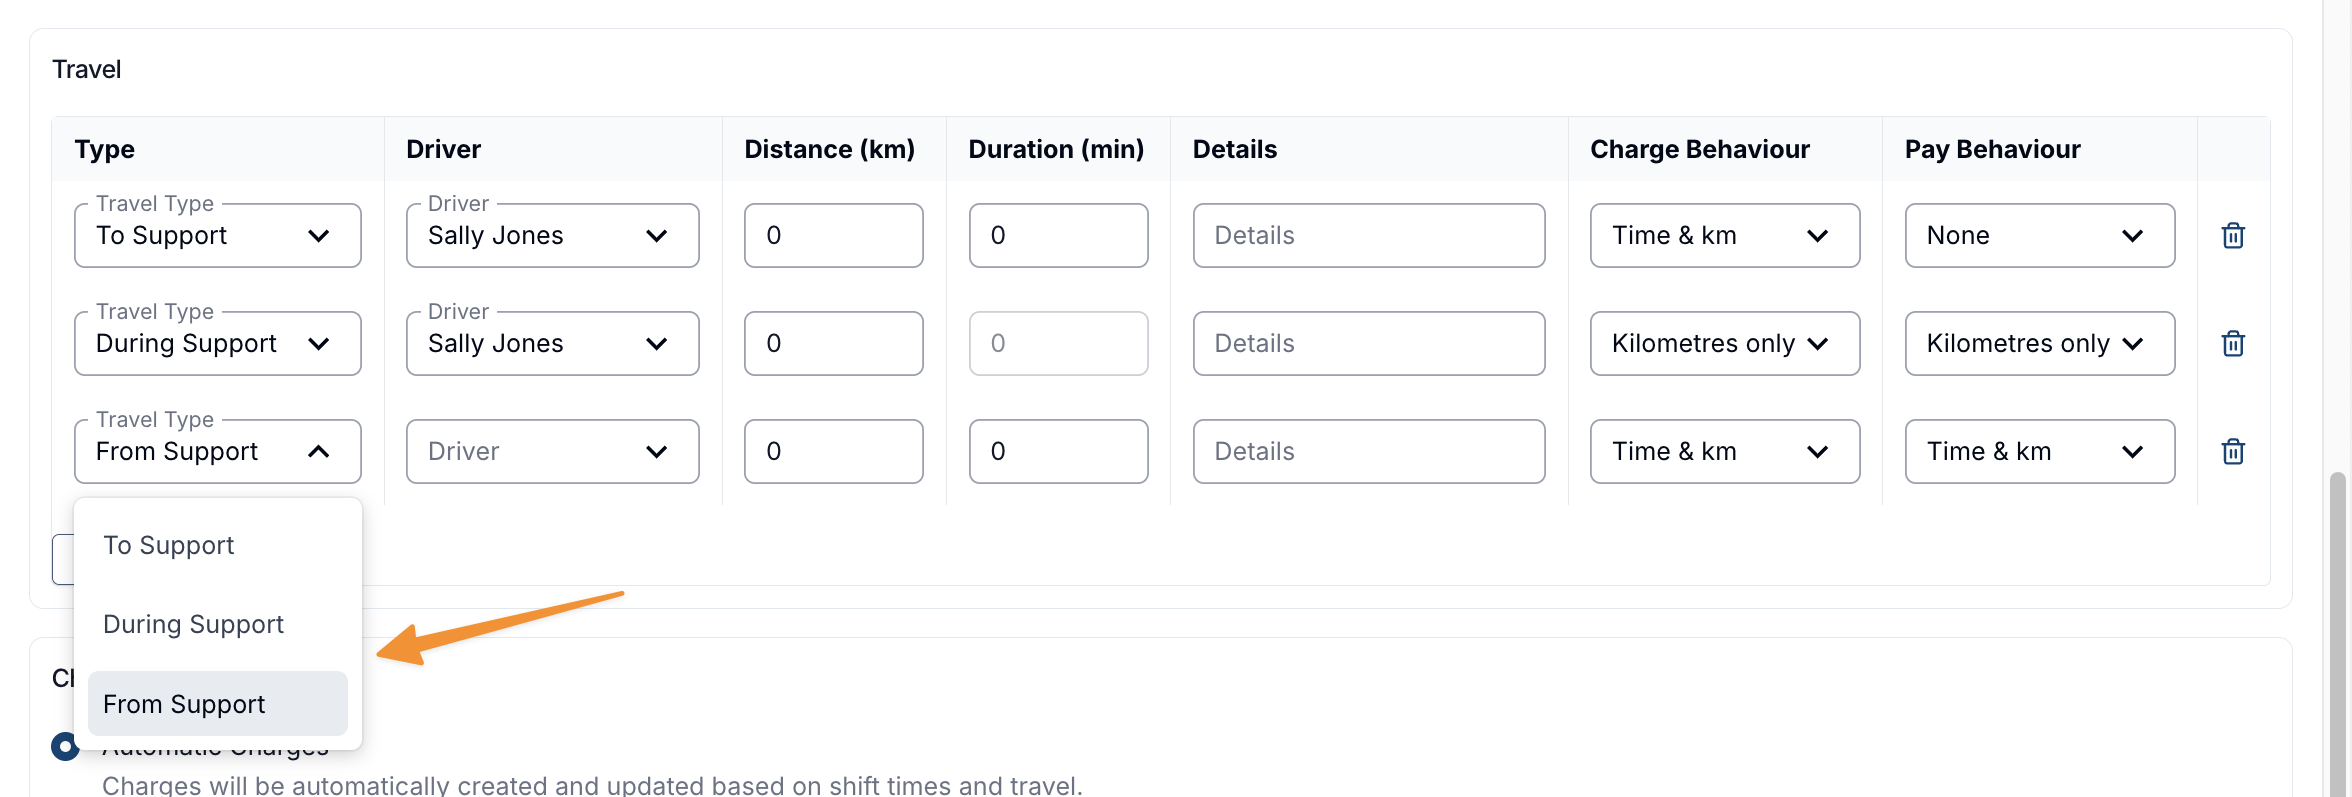
Travel Type
To Support
Used to record travel from the starting point (e.g., the worker's location or first Participant's home) to the support venue. Includes both duration and distance fields.
During Support
Record the kilometres expected while the support is taking place, such as travel between activities or locations. This field accepts distance only.
Any travel recorded under Travel Type - During Support will be automatically apportioned between all Participants assigned to that travel type - this is specific to group supports.
From Support
Used to record travel from the support venue to the final destination (e.g. a Participant's home). Includes both duration and distance fields.
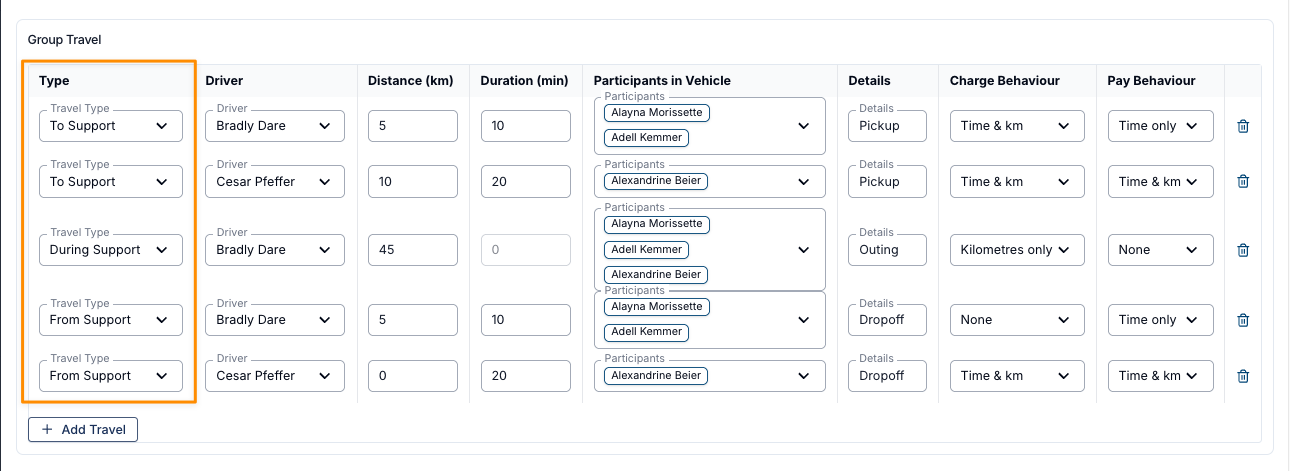
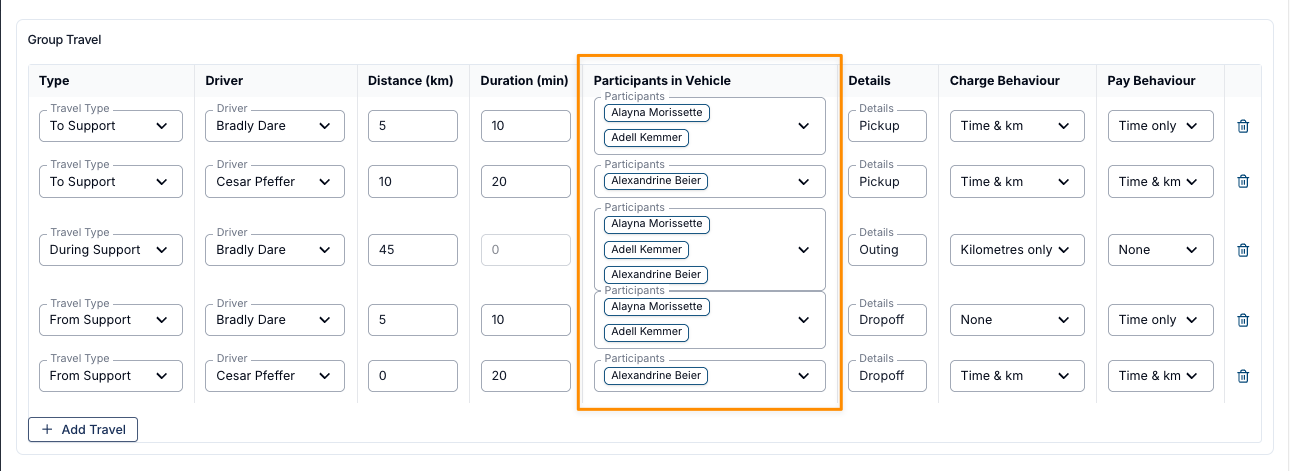
For group supports, travel can be configured for complex arrangements. For example, a Support Worker might pick up one Participant on the way to the group, transport all four Participants during the group, and then drop home two Participants afterwards.
You can also assign different Support Workers to handle specific Participants for pick-up and drop-off, which is especially useful for larger, more complex groups.
Record who will drive, the expected kilometres, and any pickup or drop-off details the Support Worker needs.
A Group Support can use several Travel types for different workers, Participants, and trips.
- different pick up points for Participants,
- they all travel together during the support,
- one of the staff members is using a pool vehicle (requires hours, but not km reimbursement), and
- the other staff member needs to be reimbursed for both time and kms for using their personal vehicle.
Driver
This is the person who will be performing the travel. If it's a group support you can create each Travel item with the designated driver attached.
Distance
When creating travel to and from the support, you can assign the estimated distance (in kilometres) between the start point and the destination.
Duration
When creating travel to, during, and from the support, you can assign the anticipated travel time (in minutes). Any duration of time incurred by the staff member during travel will count towards the staff member's worked hours.

Participants in Vehicle
If the support being delivered is a Group Support, you will need to define which Participants (if any) will be travelling in the vehicle per Travel item.
Details
When creating travel to, during, and from the support, you can enter any details about the each of the different specified travel items.
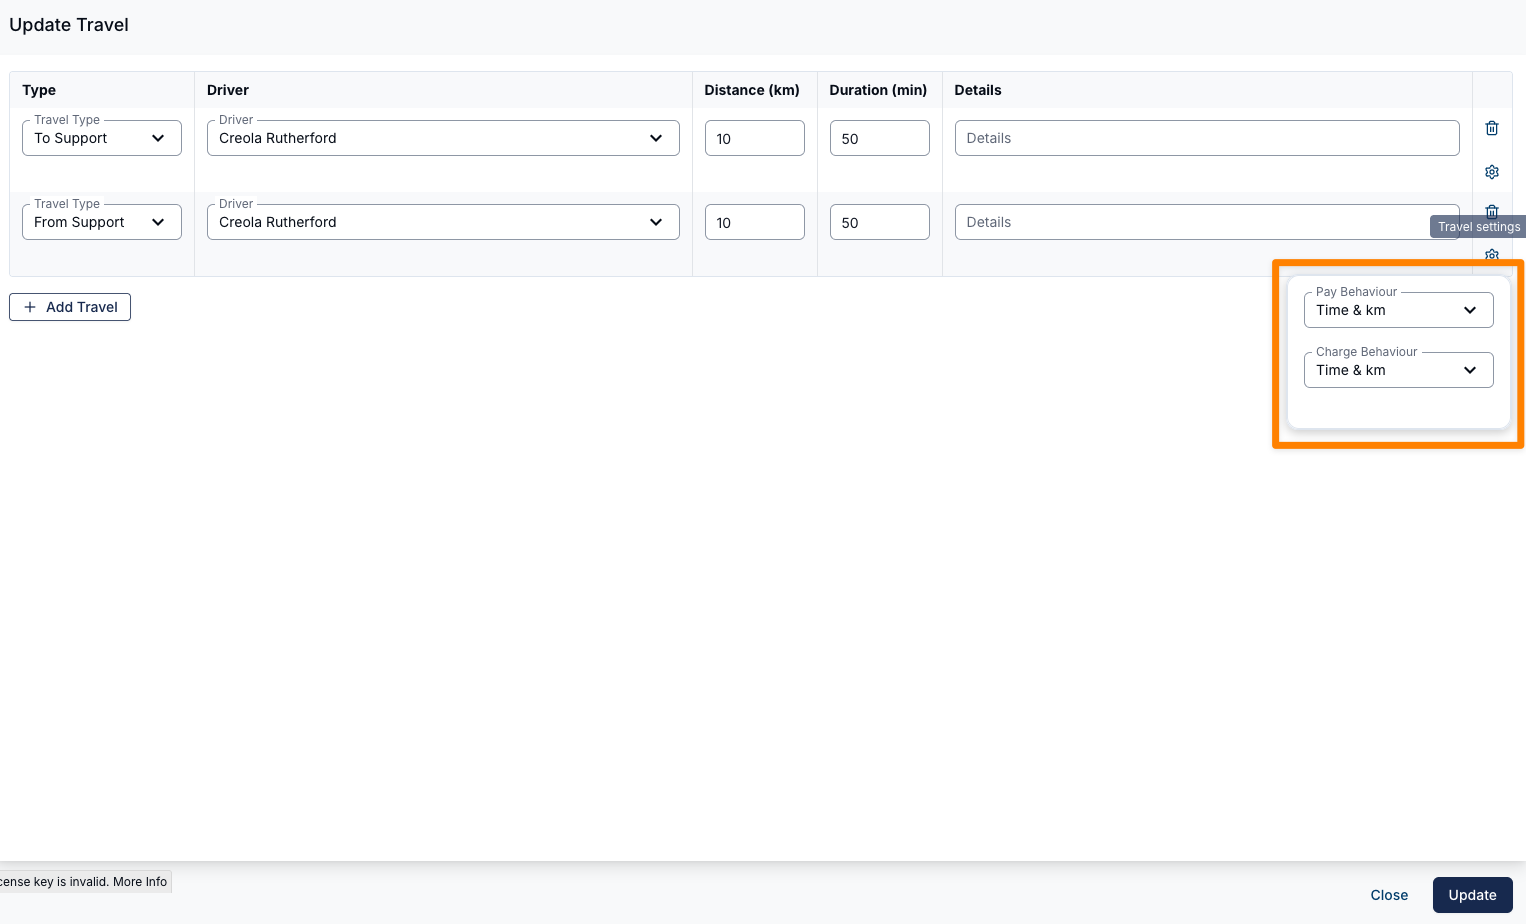
Charge Behaviour
Use Charge Behaviour to choose how attached Participants are charged for travel to, during, and from a support.
For Travel To and** From Support**:
- None
- Time only
- Kilometres only
- Time & km
For Travel During Support:
- None
- Kilometres only
Time is charged at the Charge Item Set's rate for the day the support falls on, unless the set has a separate travel rate - see Adding a Separate Travel Rate to an Existing Set.
Pay Behaviour
Use Pay Behaviour to choose how workers are paid for travel. For example, pay kilometres for a personal vehicle and omit the kilometre payment for a company or pool vehicle where that matches your payroll arrangement.
For Travel To and** From Support**:
- None
- Time only
- Kilometres only
- Time & km
For Travel During Support:
- None
- Kilometres only
Travel Between Back-to-Back Supports
Where one support finishes and the next begins straight away, the Travel From Support on the first and the Travel To Support on the second are a single continuous journey for the Support Worker. Astalty combines the two into one Travel for them to record in the app, so they enter one start odometer reading when they set off and one end reading when they arrive, rather than pulling over between the two supports to record a reading in the middle.
Two Travel items are combined only when all three of the following are true:
- The same Support Worker is the Driver on both.
- There is no gap between them - the scheduled end time of the Travel From Support matches the scheduled start time of the Travel To Support exactly.
- The Charge Behaviour and Pay Behaviour are the same on both.
Where the Charge Behaviour or the Pay Behaviour differs between the two, the trips stay separate and the Support Worker records each one on its own. This is the outcome you want when the worker changes vehicle between the two supports - finishing the first in a company vehicle that is charged to the Participant but not paid to the worker, then starting the second in their own car that is both charged and paid. A single set of odometer readings can't describe two vehicles, and the two sets of rules can't both be applied to one record.
How the Distance and Duration Are Divided
The Support Worker records the journey once, but each support is still charged and paid for its own leg. Astalty divides the actual distance and duration between the two Travel items in proportion to the Distance and Duration you scheduled on them:
- Where both carry a scheduled figure, the actual total is divided in that ratio.
- Where the two scheduled figures are equal, the actual total is divided evenly.
- Where only one carries a scheduled figure, that Travel item takes its scheduled amount and the other takes the remainder.
Scheduling a realistic Distance and Duration on each Travel item is therefore still worth doing, even though the worker only records the journey once, because those figures are what the division is based on.
To see how a combined journey is recorded in the app, see Record Travel During a Shift.
Removing Travel
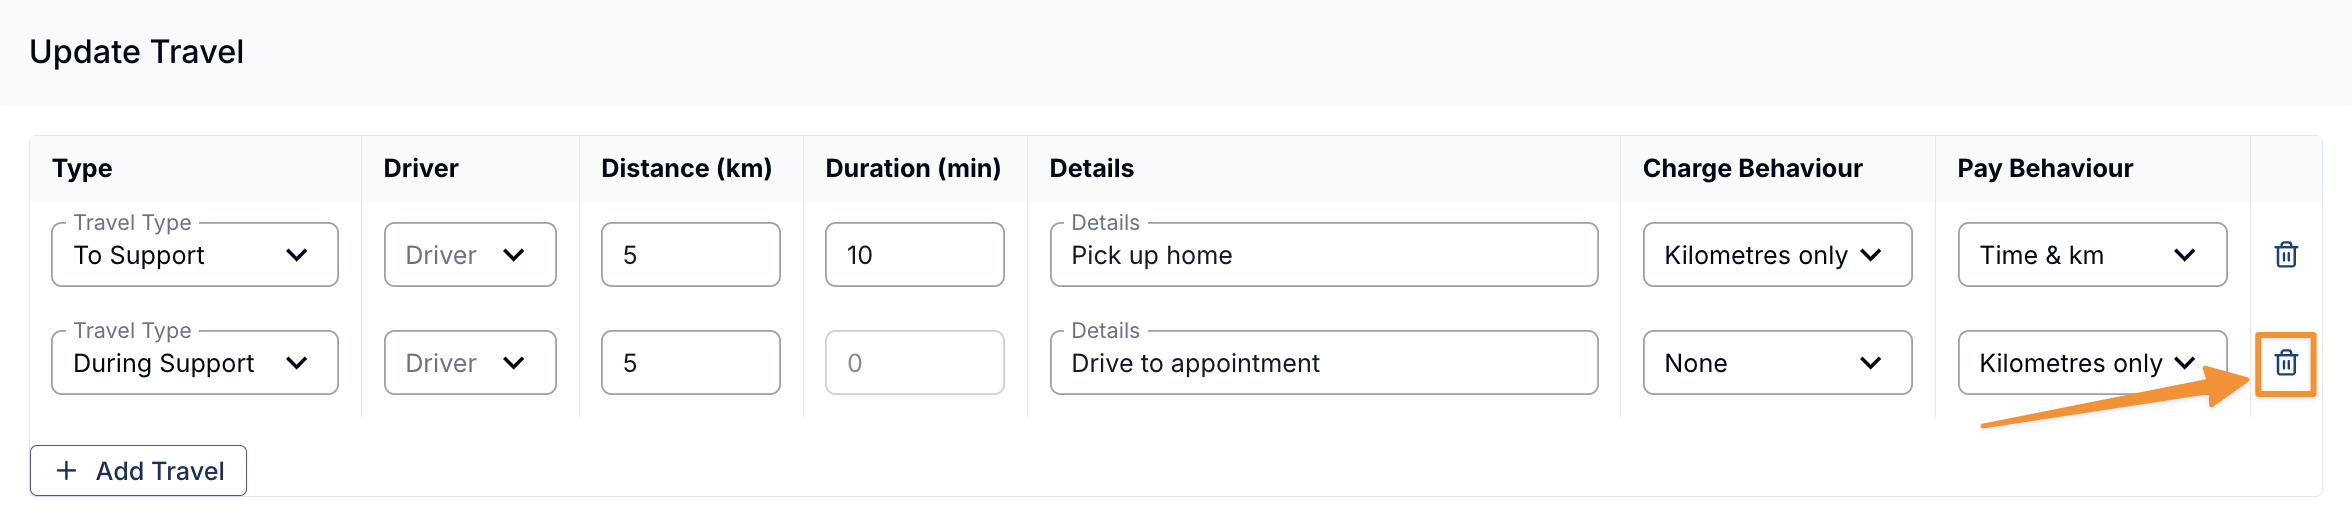
Each Travel item can be individually removed by using the Remove option at the end of the row. Removing a row takes it off the form - click Update to save the change to the support.
Confirming Removal of Recorded Travel
If a Support Worker has already recorded readings or times against a Travel item, Astalty asks you to confirm before removing it, so their record isn't lost by accident.
Select Remove on the row and the Remove recorded travel? dialog appears, showing what the worker recorded:
- Recorded by - the Support Worker who recorded the travel
- Odometer Start
- Odometer End
- Start Time
- End Time
Times are shown in the support's timezone, and anything the worker didn't record shows as a dash (-).
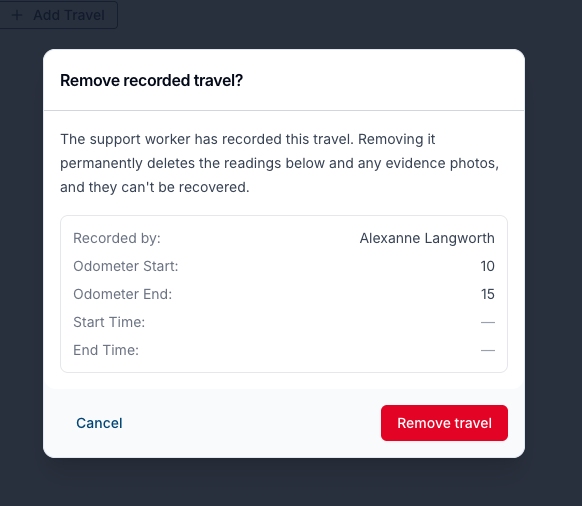
Choose Cancel to keep the travel, or Remove travel to take the row off the form. This is a confirmation, not a block - you can still remove the travel if you need to. Remember to click Update afterwards to save the support.
The same confirmation applies in both places you manage travel on an existing support:
- Update Travel on a support
- Update Group Travel on a group support
Travel items with nothing recorded against them are removed straight away, with no confirmation.
Travel Setup Errors
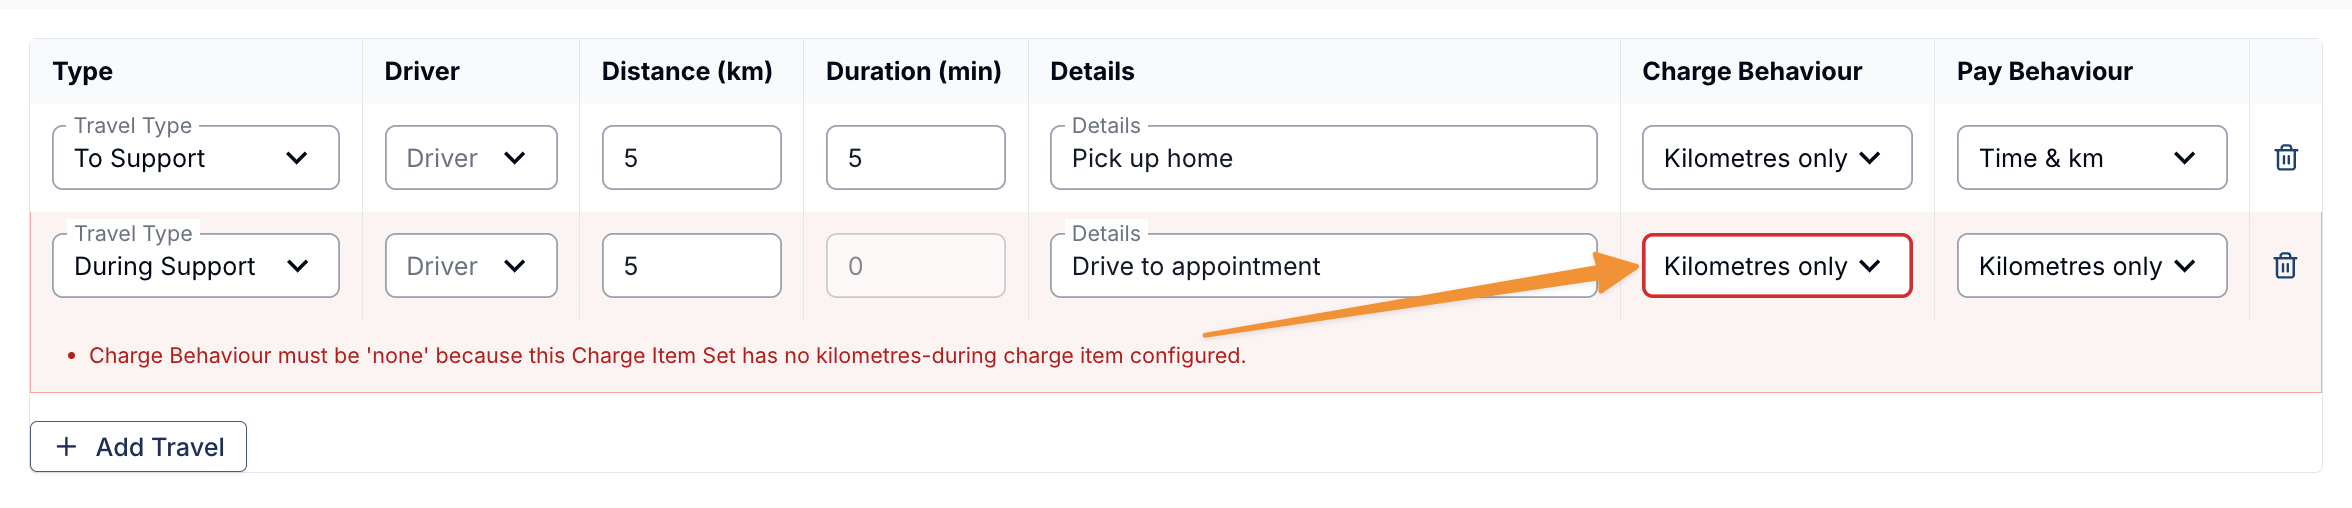
If the selected travel settings conflict, a validation message appears below the Travel items. Follow the message and correct the settings before saving the support.
Charging Kilometres Requires a Travel Charge Item
Whenever a Travel item's Charge Behaviour includes kilometres, the Charge Item Set applied to the support must hold a travel Charge Item for that type of travel. Each travel type draws on a different one:
| Travel Type | Charge Item required on the Set |
|---|---|
| During Support | Travel During Support |
| To Support and From Support | Travel Before/After Support |
Where the required Charge Item isn't configured, there is nothing for the kilometres to be billed against, and the support can't be saved until either the Charge Item Set or the Charge Behaviour changes. This is the expected outcome when a support is billed from a Support Category with no activity based travel line item - Supported Independent Living or Assistance with Self Care, for example. On a recurring support the same check runs across the series, so it is enough for one support in the series to be missing the Charge Item.
There are three ways to resolve it. Which one is right depends on where the kilometres should be billed:
- Add the travel Charge Item to the Charge Item Set - use this where kilometres should be charged from the set on every support that uses it. It resolves the error for all of them at once, with nothing to configure per support, and it is the only option that covers travel to and from a support. See Adding Travel Charge Items to a Set.
- Set a Travel During KM Charge Item Override on the support - use this where kilometres should be billed to the Participant's own transport funding rather than from the set. It applies to travel during the support only.
- Set the Charge Behaviour on that Travel item to one that doesn't include kilometres - use this where the kilometres aren't being charged to the Participant, such as travel in a company vehicle that is charged by time alone.
Company or Accessible Vehicles
When an organisation supplies a company or accessible vehicle, the worker's kilometre pay and the Participant's kilometre charge may differ. Configure each behaviour to match the service agreement, employment arrangement, and organisation policy. Astalty does not decide whether a kilometre charge is claimable.
To adjust travel behaviour for company or accessible vehicles:
- Open the shift in question.
- Locate the settings wheel on the right-hand side of the screen.
- Click the settings wheel and adjust the travel behaviour as required.
Travel During KM Charge Item Override
By default, the Charge Item used for travel kilometres is determined by the Charge Item Set applied to the support. The Travel During KM Charge Item Override lets you charge activity based transport against a Participant's transport funding line, even when the support itself falls under a different category such as Supported Independent Living (SIL) or Assistance with Self Care.
This means you can point the kilometre charge at a specific activity based transport line item (for example 04_590_0125_6_1) drawn from the Participant's Services, without changing the rest of the support's charges. It removes the need for workarounds or manual adjustments when a shift includes transport that should be billed to the Participant's transport funding.
Kilometres are resolved like this:
| Travel Type | Charge Item used for kilometres |
|---|---|
| During Support | The override, if one is set. Otherwise the Charge Item Set's kilometres-during Charge Item. |
| To Support and From Support | Always the Charge Item Set's kilometres-not-during Charge Item. The override is never used. |
Unscheduled travel recorded by Support Workers in the app always counts as travel during the support, so it uses the override too. Workers don't need to pick a Charge Item per trip - it's configured once on the support.
Scope of the Override
The override is held on the support itself, not on the Participant's profile or their Charge Item Set. There is no profile-level setting that applies it to future supports automatically, so it is configured on each support that needs it - though a recurring support can be updated as a series, and cloning a support or copying a row on the Weekly Schedule carries the override with it.
This makes the override the right tool where the transport arrangement is specific to the support being delivered. Where kilometres should instead be charged from the Charge Item Set on every support that uses it, add a travel Charge Item to the set and no override is needed or offered. See Adding Travel Charge Items to a Set.
Making the Charge Item Available to Select
The override selector lists only Charge Items assigned to a Service in the Participant's NDIS Plan, and it has no option to create one. The transport line item therefore has to exist on the Participant's plan before it can be selected on a support - an empty selector means it hasn't been added yet.
To make it available:
- Open the Participant, go to their NDIS Plan and select Services.
- Either create a Service for the transport funding, or open the Service the transport should be billed from.
- Add the transport Charge Item to that Service's Charge Items.
- Save the Service. The Charge Item is then available in the override selector on any support for that Participant.
See Plan Services for the full walkthrough of creating Services and assigning Charge Items, and Why can't I assign a Charge Item? if a Charge Item still doesn't appear.
Setting the Override on a Support
On the Create Shift Event form, once you have selected the Support Type, Participant and Charge Item Set, expand the Travel During KM Charge Item Override (optional) selector. Search for and select the transport Charge Item you want kilometres billed against.
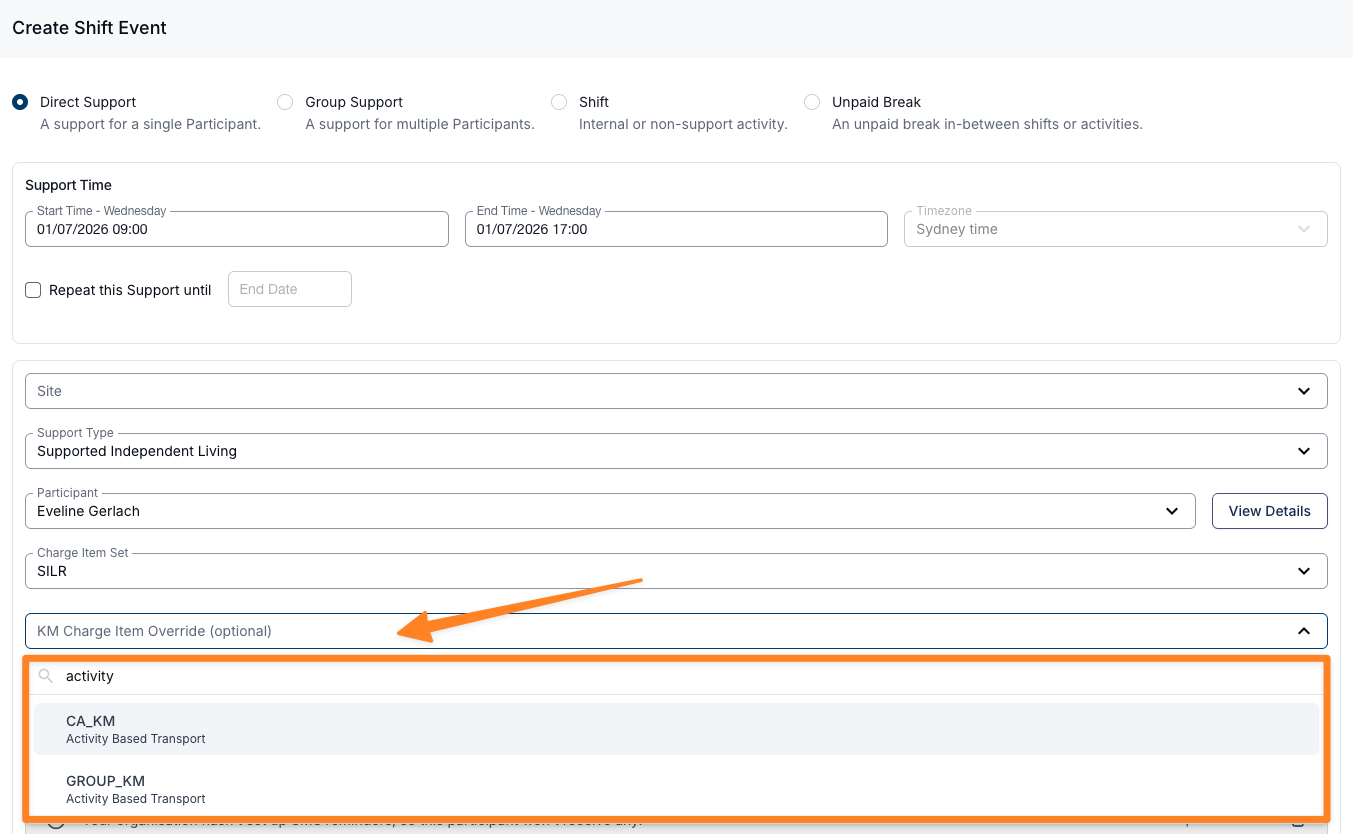
The override can be set or changed on a support that already exists just as well, from the same selector on the Update Support form. Changing it repoints the kilometre charges already recorded against travel during that support, so those charges don't need adjusting by hand. Clearing it returns those kilometres to the Charge Item Set, or drops the charge where the set has no travel Charge Item to fall back to. Kilometre charges on travel to and from the support are never repointed, since those always belong to the Charge Item Set.
Applying the Override Across a Recurring Support
Updating the override on a recurring support offers the same options as any other change to the support:
- Update this support - applies the override to that occurrence only.
- Update this and following supports - applies it to every remaining occurrence in the series.
- Update this and select following supports - applies it to the occurrences you choose.
Applying it to following supports is how an ongoing transport arrangement is set across a roster without editing each support in turn, and is generally preferable to setting the override occurrence by occurrence.
Setting the Override on a Group Support
On a group support the override is chosen per Participant, alongside that Participant's Charge Item Set, so one Participant can bill against an override while another falls back to their Charge Item Set. On a group support that already exists, a Participant's Update Charge Items action changes their Charge Item Set and their override together. See Adding a Group Shift.
Video Walkthrough for the Travel During KM Charge Item Override
Travel Evidence Policy
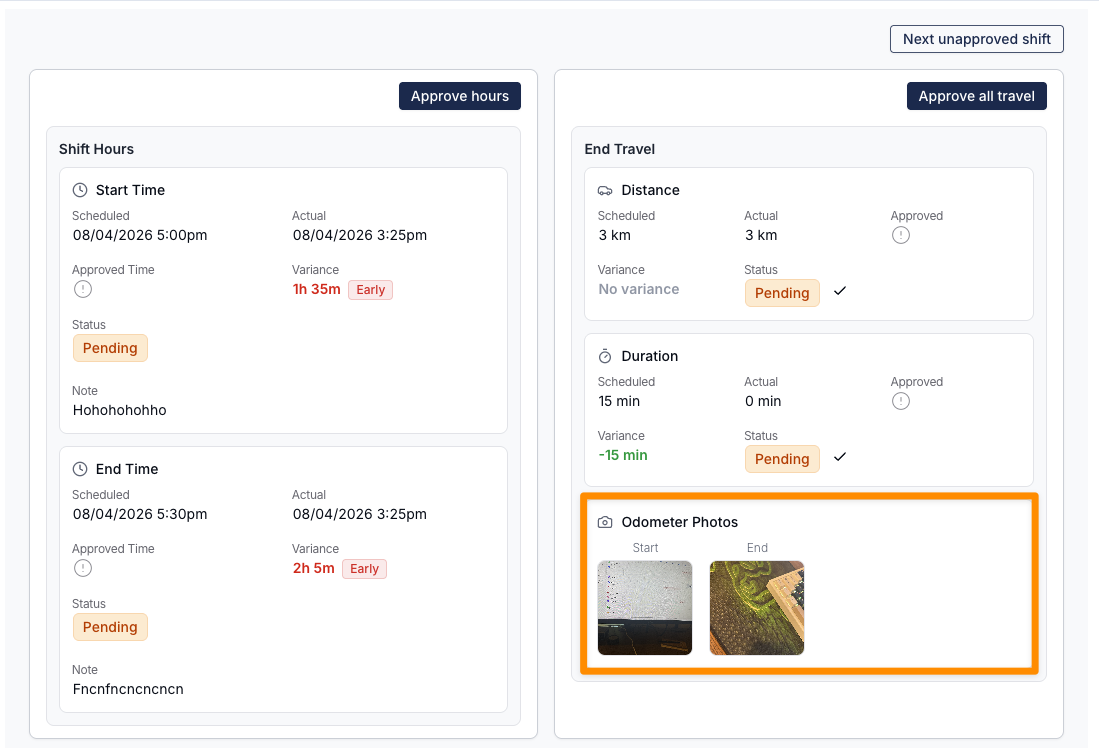
You can configure how Support Workers record travel by requiring either odometer readings only, or both odometer readings and photo evidence. This helps ensure accurate records and supports compliance requirements.
To update your Travel Evidence Policy:
- Go to Settings from the main menu.
- Select Scheduling, and click on Edit.
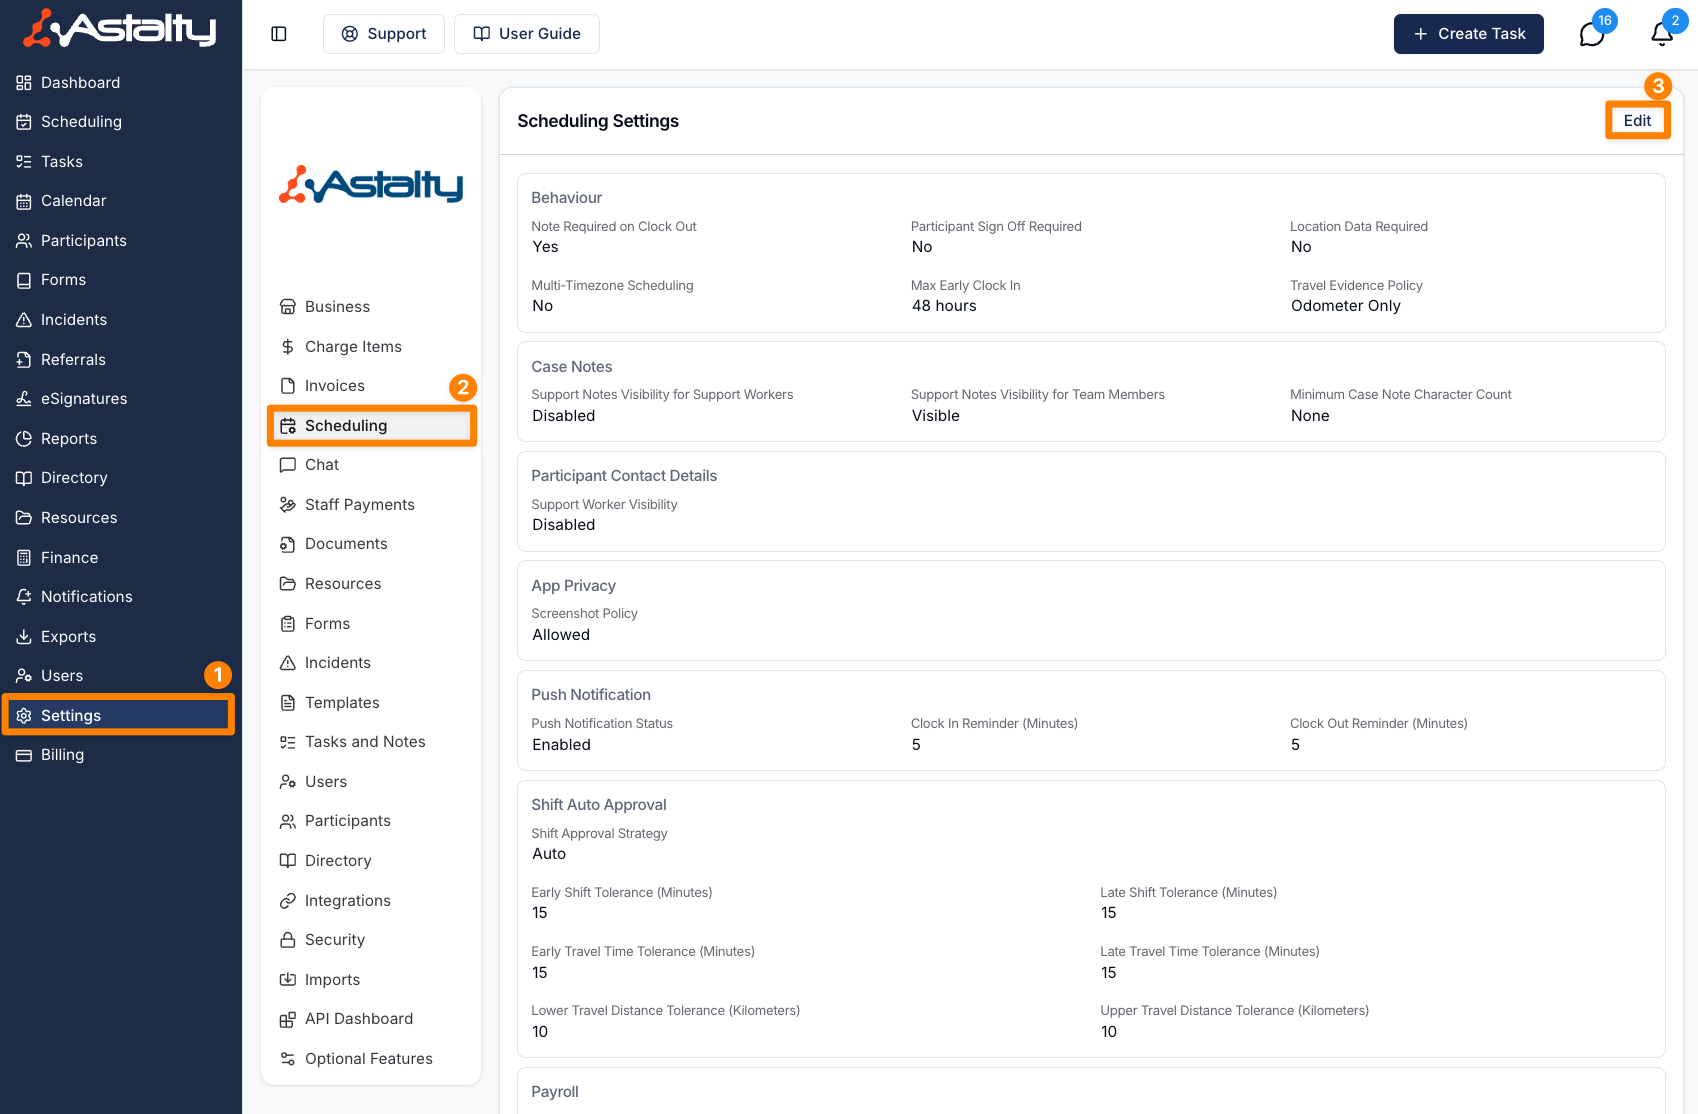
- Scroll to the Travel Evidence Policy section.
- Choose either Odometer Only or Odometer and Photos.
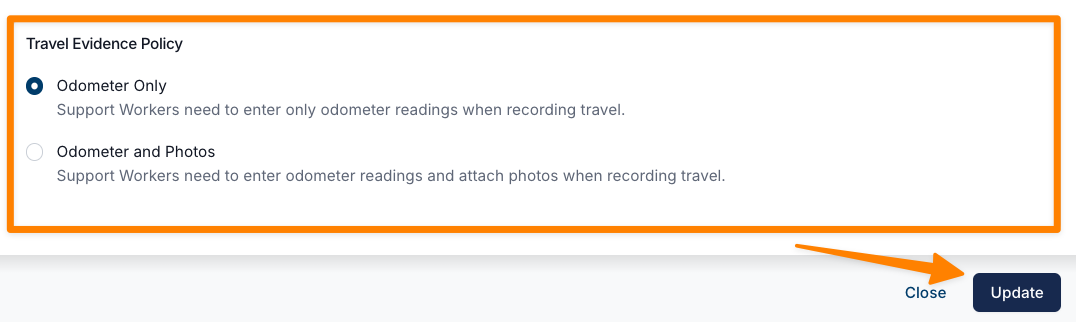
- Click Update to save your changes.
Once updated, Support Workers will be prompted to provide the required information in their app based on your selected settings.
See Record Travel During a Shift for the Support Worker workflow.
Photographic evidence will be available in the drop-down menu during Shift Approval processing.