- Scheduling
- Scheduling Settings
Scheduling Settings
Overview
The Scheduling Settings page lets you configure key options that affect how scheduling works in your organisation. Here, you can control requirements such as whether a case note must be completed before clocking out, and set how shift approvals are handled, either automatically (including with tolerances) or manually. Available controls depend on the features enabled for your account.
To access this page, click the settings wheel on the left-hand menu, select Scheduling. You can access this page here - it opens on General, and the rest of your scheduling settings sit alongside it in a submenu. You need permission to view Settings to open the page and permission to update Settings to save changes. Select Edit on the Scheduling Settings card.
Defaults for New Accounts
New accounts are created with recommended values already chosen, so there is less to work through when you first set up. Existing accounts are not affected - nothing already saved was overwritten.
| Setting | New accounts start with |
|---|---|
| Shift Auto Approval | Auto |
| Require Note on Clock Out | On |
| Require Location Data | On |
| Shift Clock In/Out Thresholds | Early window 15, Late window 15 |
| Travel Clock In/Out Thresholds | Early window 5, Late window 5 |
| Travel Distance Thresholds | Min 999 km, Max 0 km |
| Approved Hours Variance Highlight | Tolerance 5 |
| Early Clock In Limit | 12 hours |
| First Aid Allowance | Exclude cancelled shifts & provider travel |
| App Privacy | Forbid Screenshots |
| Push Notifications | On |
| Clock Reminders | Clock In 5, Clock Out 5 |
Each of these is a starting point, not a restriction - change any of them at any time.
Scheduling Settings Submenu
Your scheduling settings are split across their own pages rather than sitting together on one long page. Opening Settings > Scheduling takes you to General, and the submenu down the left-hand side moves you between the rest. All Settings at the top of the submenu takes you back to the main Settings menu.
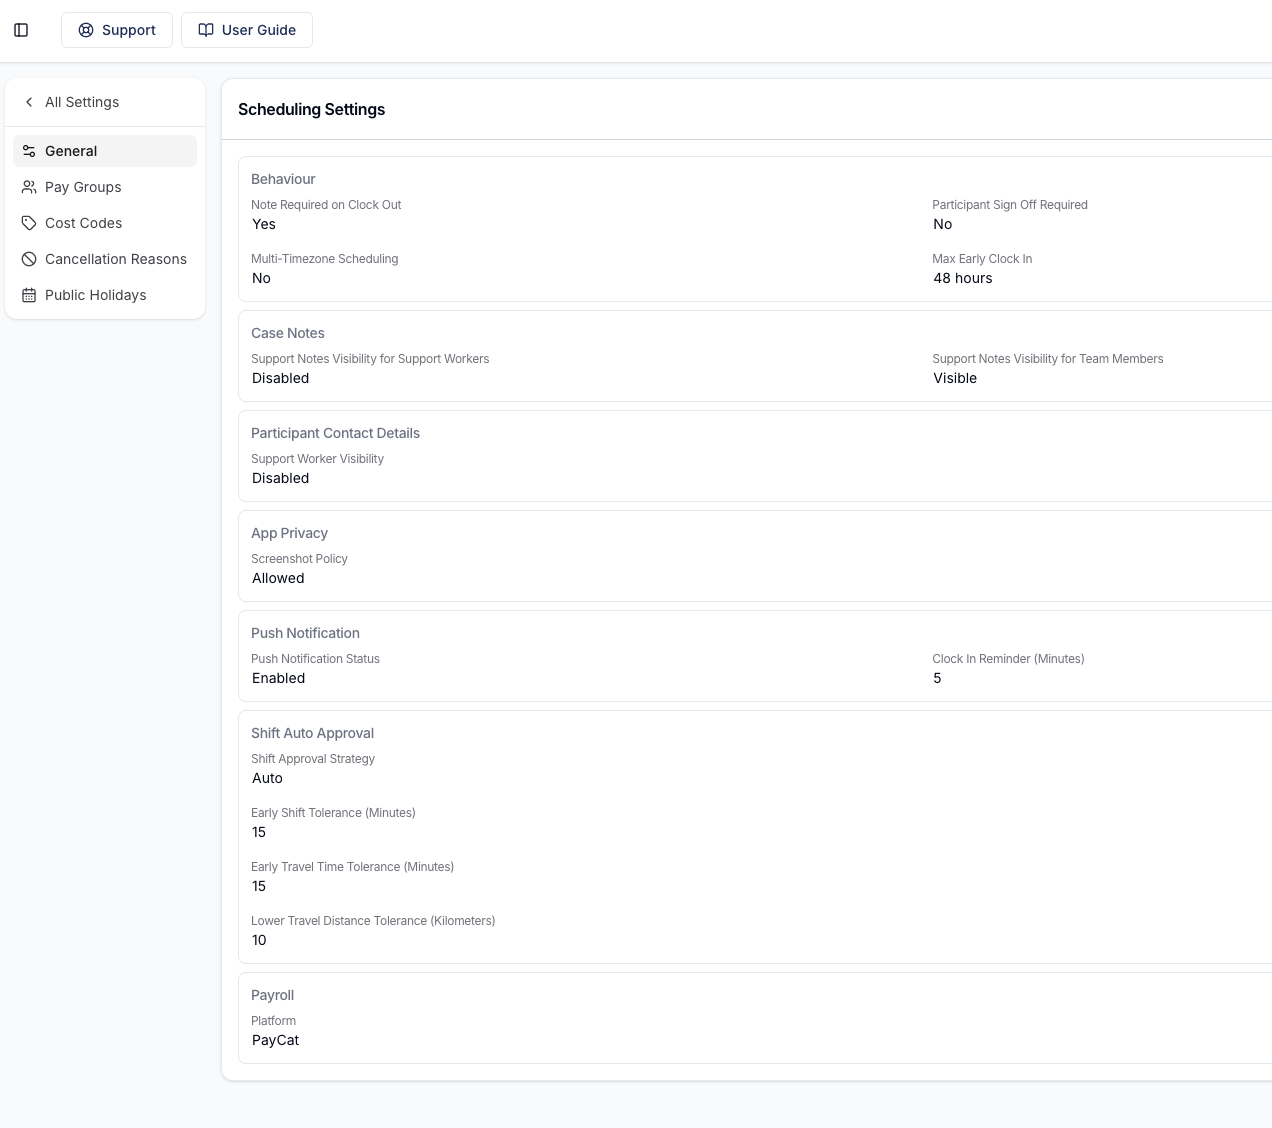
| Page | What it covers | When it appears |
|---|---|---|
| General | Everything described on this page - behaviours, notes and visibility, notice periods, approvals, notifications and payroll | Requires Settings view permission |
| Schedule Colours | Your own colours for events on the Schedule - see Schedule Colours | Requires Settings view permission |
| Pay Groups | The pay groups used to group employees for payroll - see Setup Pay Groups and Employees in Astalty | Requires Settings view permission |
| Cost Codes | Your cost codes and the rules that apply them - see Cost Codes (Advanced) | Only when Cost Codes is turned on for your account |
| Cancellation Reasons | The reasons offered when a support is cancelled - see Cancellation Reasons | Requires Settings view permission |
| Leave Types | The kinds of leave Support Workers can request - see Leave Types | Astalty Premium only |
| Public Holidays | Public holidays and Public Holiday Groups - see Public Holidays | Requires permission to view public holidays |
Finding a Setting with the Quick Action Menu
Every page in the submenu is also in the Quick Action Menu, so you can jump straight to one instead of walking through Settings. Press CMD + K (CTRL + K on Windows), start typing, and each result shows its full path underneath - for example Settings › Scheduling › Cost Codes.
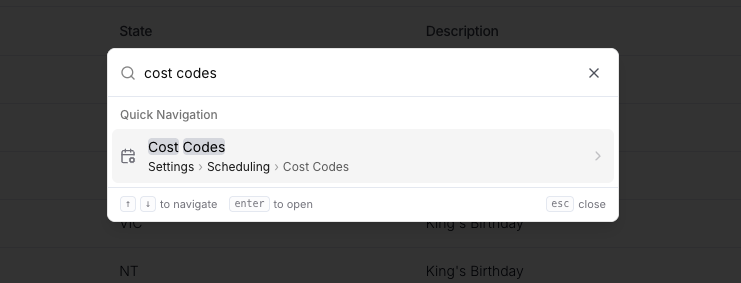
Because the menu matches the path as well as the name, typing scheduling cost narrows to the same result. These pages also answer to the words you would normally use for them, even when those words don't appear in the result:
- General - defaults, scheduling settings
- Schedule Colours - colors, colour coding, legend
- Pay Groups - payroll groups, pay items
- Cost Codes - gl codes, general ledger, tracking categories
- Cancellation Reasons - short notice, cancellation codes
- Leave Types - annual leave, sick leave, personal leave
- Public Holidays - penalty rates
Payroll Platforms
Under Payroll & Awards, the Platform setting tells Astalty which payroll system you use - Xero, Employment Hero, PayCat, QuickBooks Payroll, or Other. It controls which export and sync options appear on your timesheet batches, and which integration card is available under Settings > Integrations.
Set the platform first, then connect the matching integration: Xero, Employment Hero, PayCat, or QuickBooks Payroll.
Pay Period
Also under Payroll & Awards, the Pay Period settings tell Astalty the pay cycle used for award calculations such as overtime and period caps. These settings define the output period and its weekly or fortnightly caps. For continuous work that crosses the boundary, award reports, timesheet exports and timesheet-batch interpretation can also load adjoining work from the previous period without paying those earlier hours twice.
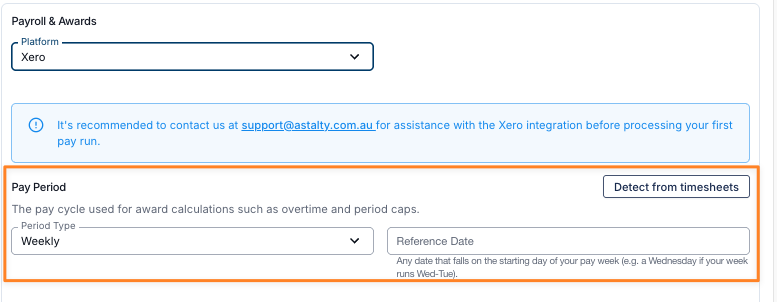
There are two fields:
- Period Type - choose Weekly or Fortnightly. If you've never set this, Astalty treats your pay cycle as Weekly.
- Reference Date - any date that falls on the starting day of one of your pay periods. Astalty reads the day of the week from this date and uses it to work out where every pay period begins.
- For a weekly cycle, pick any date on your pay week's start day - for example a Wednesday if your week runs Wed-Tue.
- For a fortnightly cycle, pick a date that is the first day of one of your pay fortnights. This is what aligns the 14-day cycle, so Astalty knows which fortnight is which.
If you leave the Reference Date blank on a weekly cycle, pay weeks start on Monday.
Detect from timesheets
If you're not sure what to enter, use the Detect from timesheets button in the top right of the Pay Period section. Astalty looks at your 20 most recent timesheet batches, takes the most common batch length, and works out your cycle from it:
- Batches around 7 days long > Weekly.
- Batches around 14 days long > Fortnightly.
- The start date of your most recent batch is used as the Reference Date.
Astalty then tells you what it found - for example, "Based on 20 timesheet batches, we detected a fortnightly pay period starting on Mondays with a reference date of 07/07/2026." - and fills in the two fields for you. Review the values and click Save to apply them; detecting alone doesn't save the setting.
If the most common batch length does not match a supported cycle, or you have no timesheet batches yet, you'll see "Not enough timesheet data to determine pay period." and the fields are left alone for you to set manually.
Where the pay period is used
Your pay period feeds several parts of Astalty, so changing it affects more than one place:
- The Award Pay Report date selector is locked to whole pay periods matching these settings.
- Overtime and period caps in award interpretation, wherever it runs - the Award Pay Report and the Award Interpretation tab of a timesheet batch.
- Scheduling Award Alerts, which measure hours against caps over the pay period while you roster.
- The Schedule Week and Fortnight views, which follow your pay period start day unless you override it with Week starts on.
- The Support Worker Hours panel on Approve Broadcast and Assign requests, which compares a worker's scheduled and contracted hours over the pay period instead of a calendar week.
Pay Award Minimum Engagement
Also under Payroll & Awards, Pay Award Minimum Engagement pays an engagement shorter than the award's minimum engagement up to that minimum. It is off by default, so pay covers the approved hours only, and it is hidden when the Platform is Employment Hero, PayCat or QuickBooks Payroll. See Pay Award Minimum Engagement for how the top-up is worked out.
Allowances
Under Payroll & Awards > Allowances, you can configure allowance behaviour. First aid applies to SCHADS; the meal setting is shared across all four supported awards.
First Aid Allowance
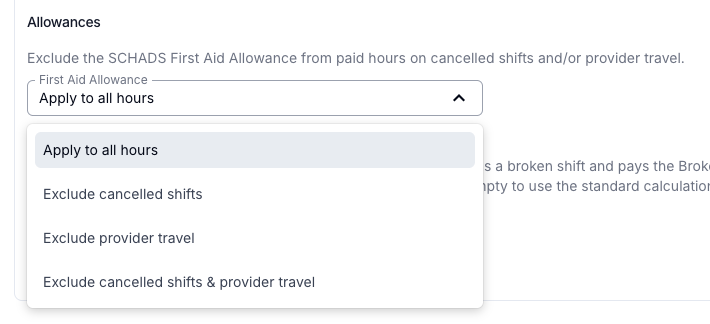
The First Aid Allowance setting controls which of a worker's paid hours the SCHADS First Aid Allowance is calculated across, so the allowance isn't paid on hours you have excluded - instead of adjusting timesheets manually every pay run.
Choose one of the following:
- Apply to all hours - the First Aid Allowance is calculated across all of the worker's paid hours.
- Exclude cancelled shifts - hours from cancelled shifts are left out of the First Aid Allowance calculation.
- Exclude provider travel - provider travel hours are left out of the First Aid Allowance calculation.
- Exclude cancelled shifts & provider travel - both cancelled-shift hours and provider travel hours are left out. New accounts start here; accounts created before this option existed are set to Apply to all hours until you change it.
Meal Allowance
Meal Allowance is off by default. Choose Create automatically for overtime to generate allowance quantities from the implemented overtime thresholds. Check meal provision and notice conditions separately. The SCHADS meal allowance reference links to the rules for all four awards.
Settings do not update the rates in your payroll system. Check Maintaining Award Rates after a published change.
Support Worker Compatibility
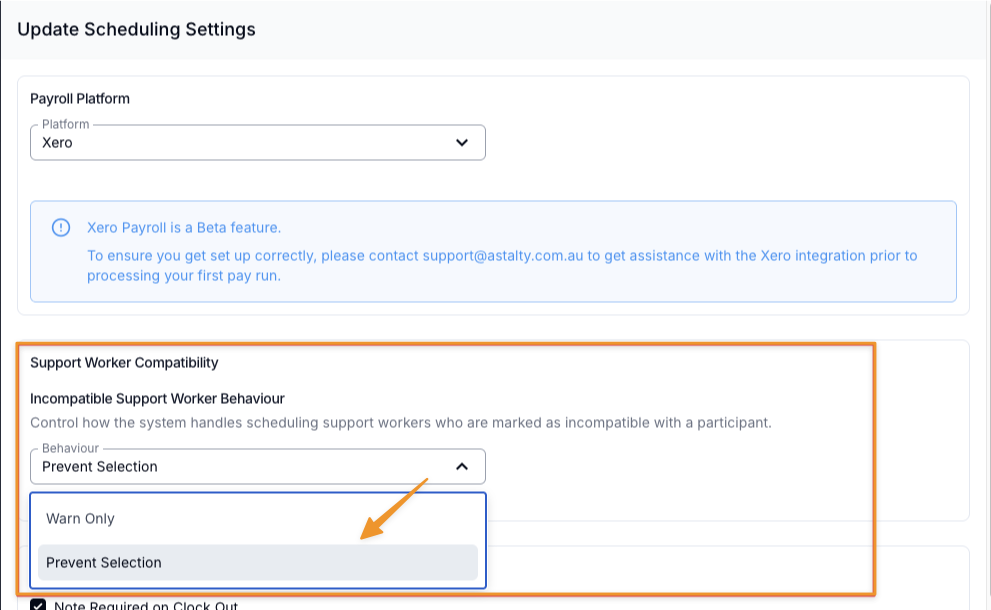
Incompatible Support Worker Behaviour
The "Incompatible Support Worker Behaviour" option within Scheduling Settings, allows you to choose how the system responds when a Support Worker is marked as incompatible with a Participant. You can select between:
Warn only
- Incompatible workers will still appear in selection results and can be chosen, but a warning will be displayed. This is the default behaviour.
Prevent selection
- Incompatible workers will be greyed out and disabled within the selection list, preventing them from being scheduled.
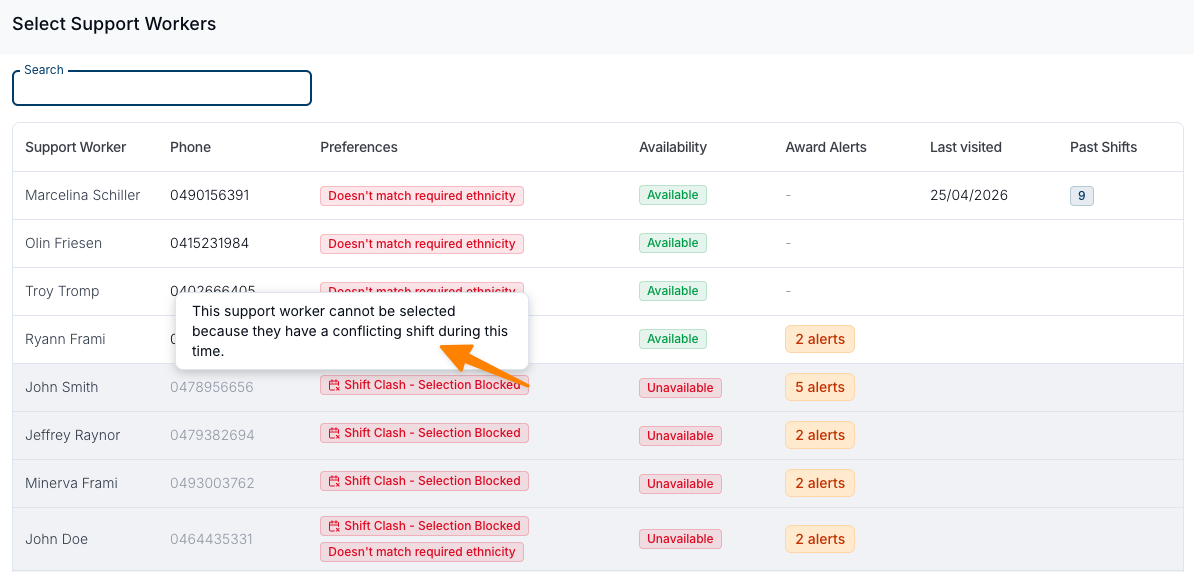
When 'Prevent Selection' is enabled, Support Workers who are incompatible, the incompatible marker will be updated to display that selection has been blocked, and the ability to assign a worker to this shift will be removed.

Conflicting Shifts
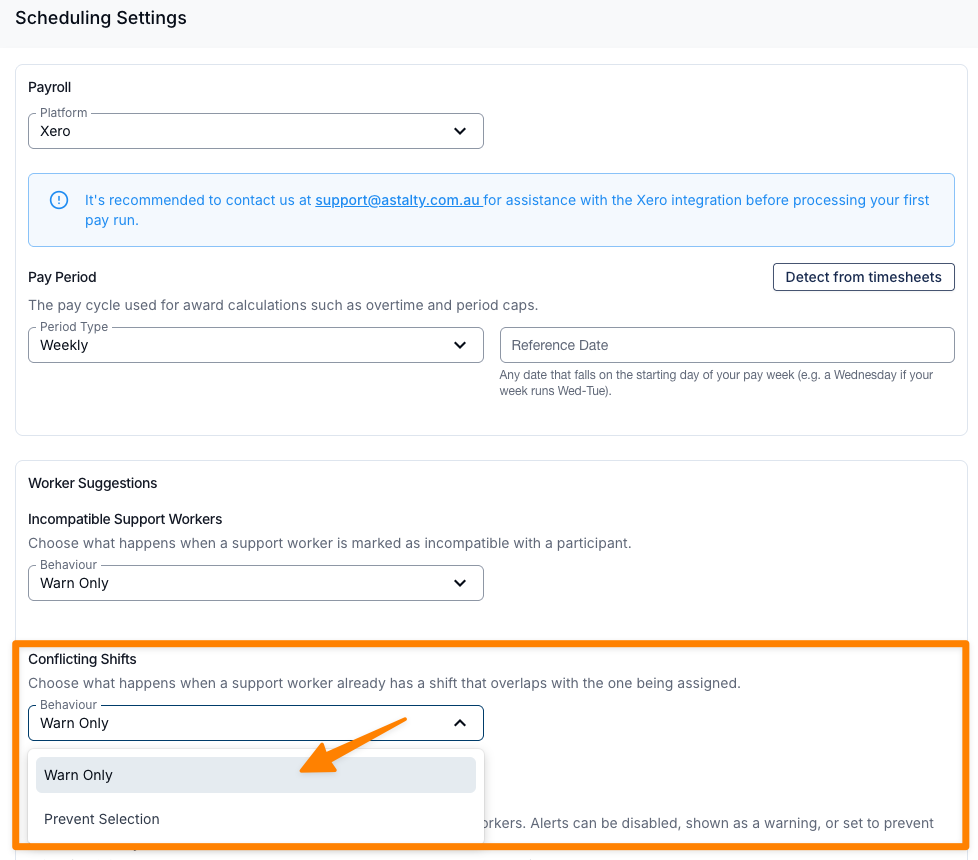
The Conflicting Shifts setting lets you adjust the selection behaviour for Support Workers who already have a support scheduled at the same time as the new support you're creating. You can choose to Warn Only, which lets schedulers go ahead and assign the worker after seeing a warning, or Prevent Selection, which blocks the assignment entirely. You can select between:
Warn only
- If Warn Only is selected, an icon will be displayed advising the Support Worker is unavailable. You'll still be able to create the support.
Prevent selection
- If Prevent Selection is selected, you won't be able to create the support with the relevant Support Worker.
When you create a new shift from the Participant view of the Schedule, the Support Worker selection pop-out will indicate whether each worker is unavailable or blocked from selection, depending on the setting you've chosen.
Schedule Week
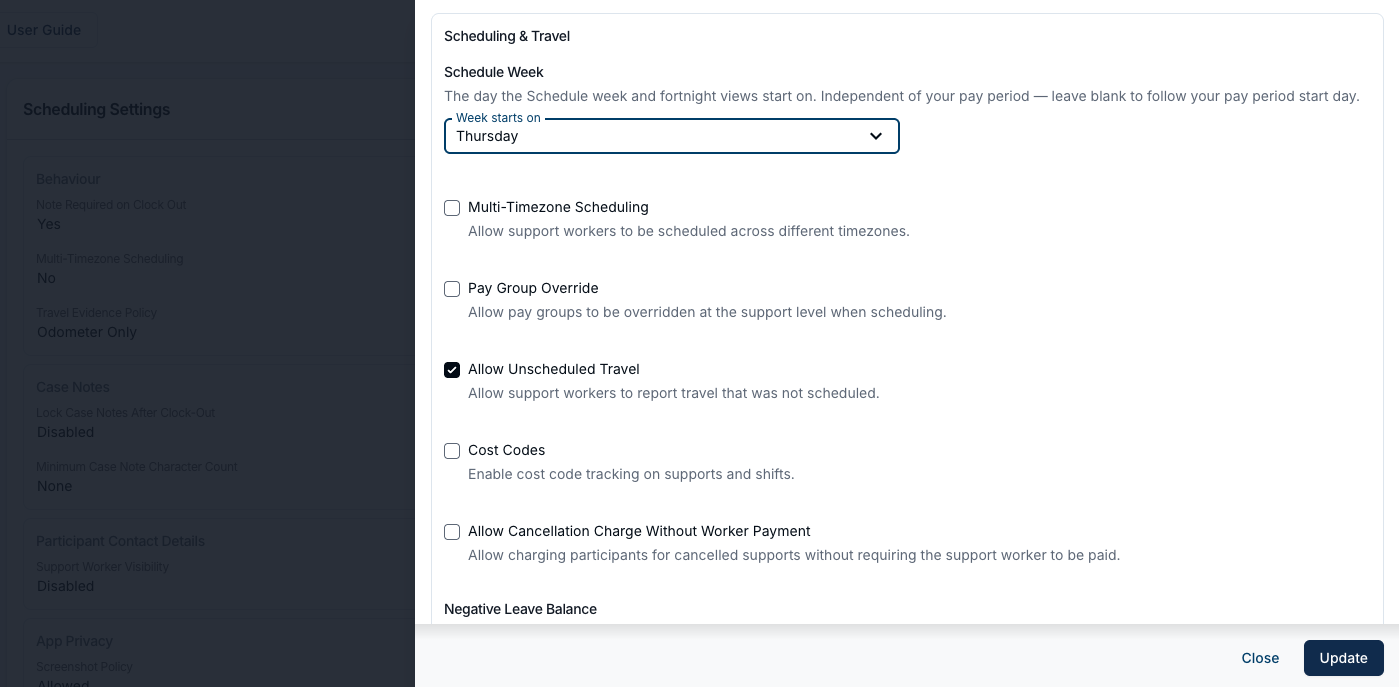
The Schedule Week setting controls which day the Schedule Week and Fortnight views begin on. By default these views follow your pay period start day. The Week starts on option lets you choose any day of the week for the Schedule view instead - independently of your pay period - so you can line the Schedule up with how your team plans their week without changing anything about payroll.
- Choose a day (Monday-Sunday) from Week starts on to have the Week and Fortnight views always begin on that day.
- Leave it blank to keep the current behaviour, where the Schedule week follows your pay period start day. (If you haven't set a pay period either, the week starts on Monday.)
This setting is optional and blank by default, so nothing changes on your Schedule until you set it. While it's blank, the Scheduling Settings summary shows Follows pay period for this option.
Schedule Colours
The Schedule Colours page in the scheduling settings submenu lets you choose your own colours for events on the Schedule - base colours for each event type, plus status colours (Past, Cancelled, Unassigned, and more) that override the base colours. Colours apply to everyone in your organisation. For the full breakdown of how colours are decided, see Schedule Colours.
Managing Scheduling Behaviours
The Clock In/Out section controls note, sign-off, location and early-clock-in requirements. Select Edit on that card to change any of them.
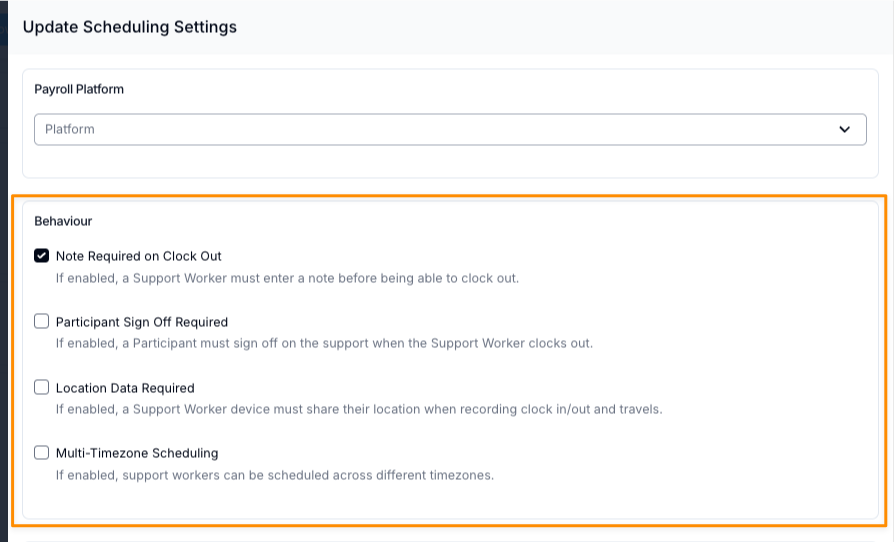
Note Required on Clock Out
When enabled, the assigned Support Worker must have a support note before clocking out of a direct or group support. Internal shifts and unpaid breaks are exempt. An early/late clocking reason is a separate field and does not replace the support note.
To enable this behaviour, tick the Require Note on Clock Out checkbox.
Participant Sign Off Required
Enable Require Participant Sign Off to request a signature at clock-out. If the Participant cannot sign, the worker can clear Can the Participant sign off on this support? and enter a reason of at least 10 characters.
To enable this behaviour, tick the Require Participant Sign Off checkbox.
Require Location Data
Use the Require Location Data behaviour if a Support Worker device must share their location when recording clock in/out and travels.
Turn on Require Location Data to enable this behaviour. New accounts start with it on.
To exempt one worker from this requirement without turning it off for everyone, see Exempting a Worker from Location Data.
Early Clock In Limit
Early Clock In Limit stops Support Workers clocking in more than a set number of hours before their scheduled start. New accounts start at 12 hours. Existing accounts retain their saved value.
Set it to 0 to disable the limit entirely, so a worker can clock in at any time before their shift.
Clock In/Out Radius
Once enabled, Clock In/Out Radius only appears while Require Location Data is ticked, and blocks a Support Worker from clocking in or out of a shift unless their device is within a set distance of the support's location. Turning off Require Location Data hides the field and clears any radius you had set.
Enter a Radius (km) from 0.01 up to 999. Leave it empty to allow clocking from anywhere - the default, so no existing account is affected until a radius is set.
A worker exempt from location data skips the radius check regardless of what it's set to.
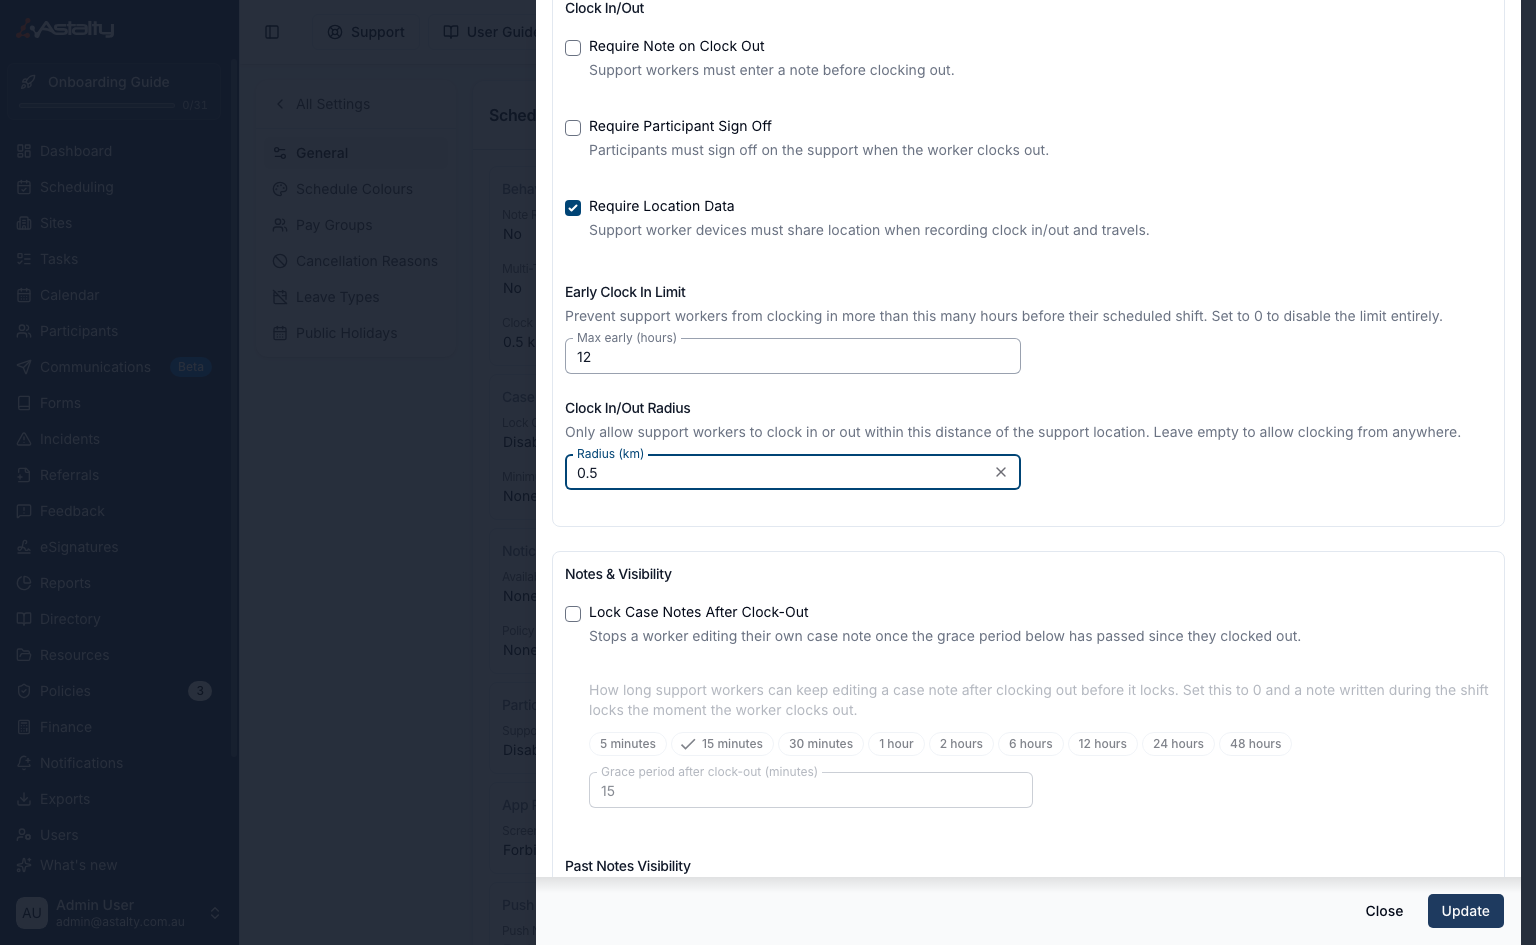
The distance is measured in a straight line from the worker's submitted location to the support's address - the same address and calculation used by Clock Location Variance. For a Group Support, it falls back to the group's address. A support with no address, or an address with no coordinates, is never restricted.
See Clocking In and Out of a Shift for what a Support Worker sees when they're outside the radius.
Multi-Timezone Scheduling
Use the 'Multi-Timezone Scheduling' behaviour if Support Workers need to be scheduled across different timezones.
To enable this behaviour, tick the Multi-Timezone Scheduling checkbox.
Show Pending Leave on Schedule
The Show Pending Leave on Schedule setting controls whether pending (unapproved) leave and unavailability requests appear on the Schedule alongside approved leave. This setting lives in Settings > Scheduling and is on by default for all accounts.
- When enabled (the default), pending requests show on the Schedule with a distinct colour and dashed outline (versus the solid block used for approved leave), so schedulers can see what's still awaiting a decision while they plan. Clicking a pending request opens the review panel inline, where it can be approved or declined without leaving the Schedule.
- When disabled, only approved leave and unavailability appears on the Schedule. Pending requests are hidden from the Schedule and are actioned from the Unavailability Requests page instead.
To turn it off, untick the Show Pending Leave on Schedule checkbox and save.
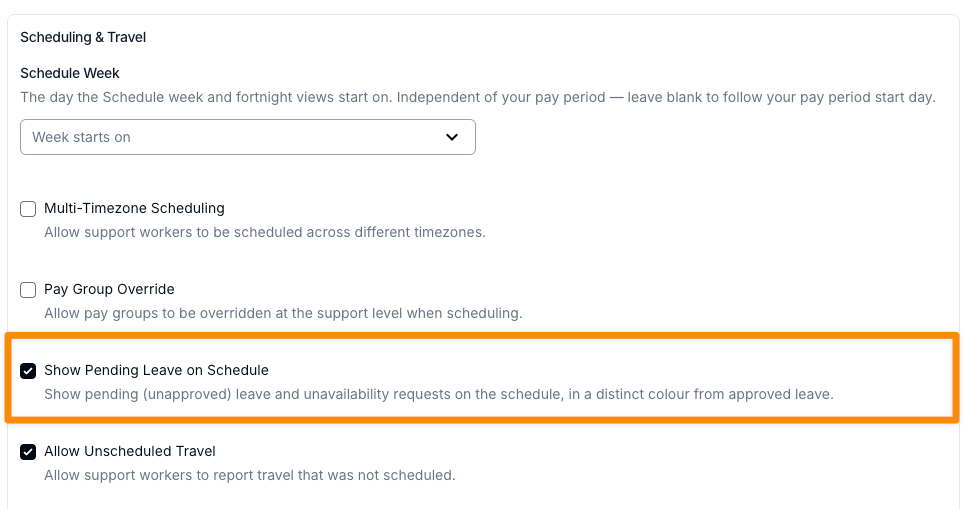
For more on how pending requests appear and are reviewed, see Pending Leave & Unavailability on the Schedule.
Unscheduled Travel
Allow Unscheduled Travel lets Support Workers report travel in the app that wasn't scheduled on the shift. When you tick it, an extra option appears beneath it: Allow Reporting Unscheduled Travel after Clocking Out.
Allow Reporting Unscheduled Travel after Clocking Out
By default, Support Workers can only report unscheduled travel while they are clocked in to a shift. Tick Allow Reporting Unscheduled Travel after Clocking Out to let them report unscheduled travel on a completed shift as well - that is, after they've already clocked out.
- This setting only appears once Allow Unscheduled Travel is ticked, and it sits indented beneath it.
- Ticking Allow Unscheduled Travel ticks this option for you. Untick it before saving if you only want travel reported while workers are clocked in.
- Astalty pre-ticks it once only. If you untick it and save, it stays unticked - turning Allow Unscheduled Travel off and on again will not tick it a second time.
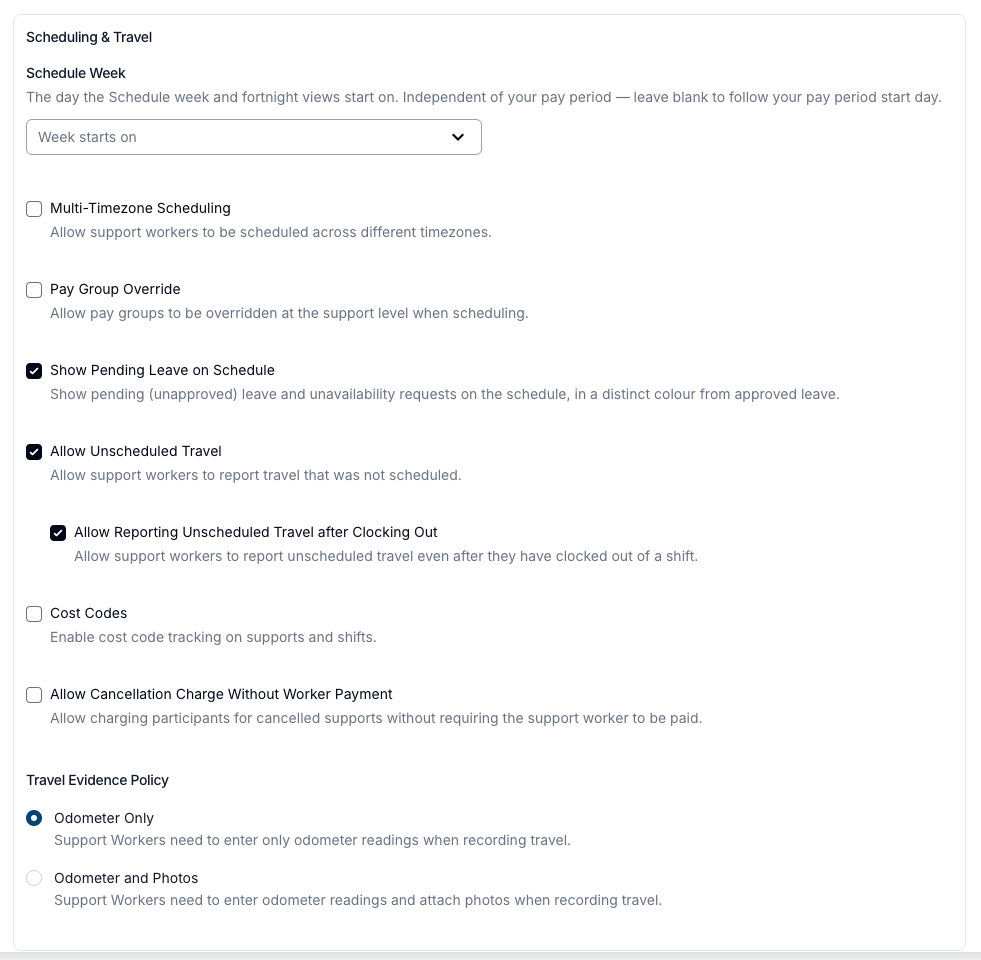
To see how Support Workers report unscheduled travel in the app, see Record Travel During a Shift.
Leave Policy
The Leave Policy section groups the settings that govern how Support Workers request time off and update their availability: Negative Leave Balance, Notice Periods, and the Policy message shown when a request breaks your rules. These options were previously mixed in with Scheduling & Travel - they now sit in their own section to make them easier to find. No settings were removed or changed in that move.
Which fields appear depends on whether Leave is available to your organisation:
- Availability notice period and Policy message are always available.
- Negative Leave Balance and Leave notice period only appear on the Astalty Premium plan, which is what Leave requires.
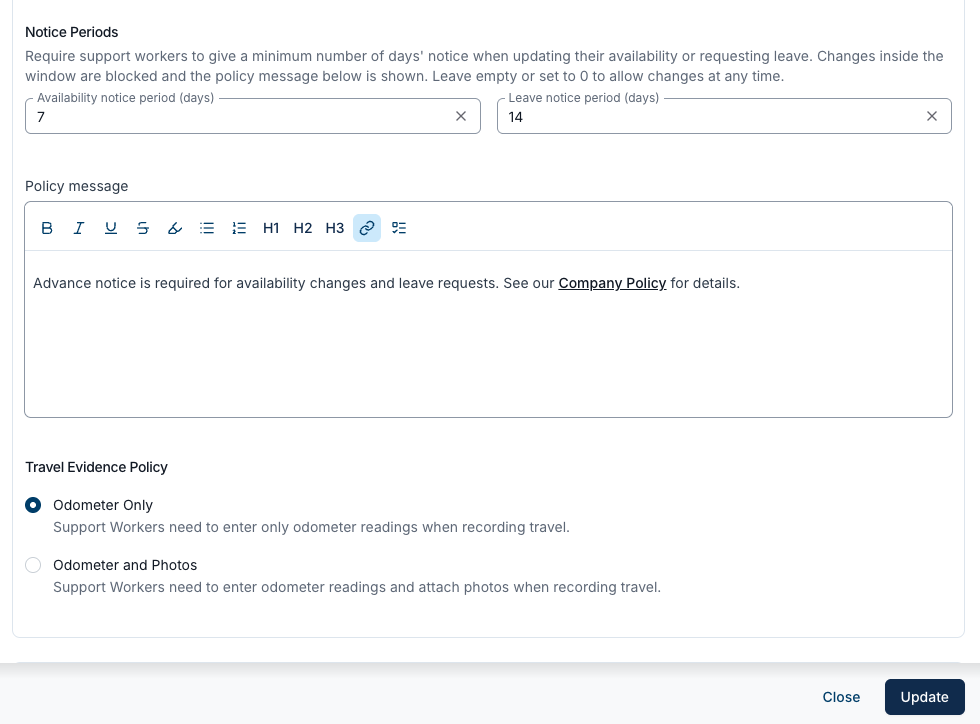
Notice Periods
Use Notice Periods to require Support Workers to give a minimum number of days' notice before the start date of an availability change or a leave request. A worker who tries to create or edit a request that starts inside the notice window is blocked from saving it, and the policy message below is shown instead.
You can set two separate periods:
- Availability notice period (days) - applies when a worker creates or updates an unavailability.
- Leave notice period (days) - applies when a worker creates or updates a leave request. This field only appears on the Astalty Premium plan.
Leave a field empty or set it to 0 to allow changes at any time for that type.
Policy message
The Policy message is the explanation shown to Support Workers when they try to make a change inside a notice window. Use it to point workers to your organisation's leave and availability policy, or to tell them how to request an exception (for example, "call the office"). The field supports basic formatting and links.
If you leave the Policy message empty, workers see a default message instead - This change requires at least X days' notice., where X is the relevant notice period.
Negative Leave Balance
Negative Leave Balance controls what happens when approving leave would take the worker's balance below zero - that is, the requested hours exceed the balance they have available. Choose Allow to let the leave be approved anyway, or Prevent to block approval until the worker has enough balance. This setting only appears on the Astalty Premium plan.
What Support Workers see
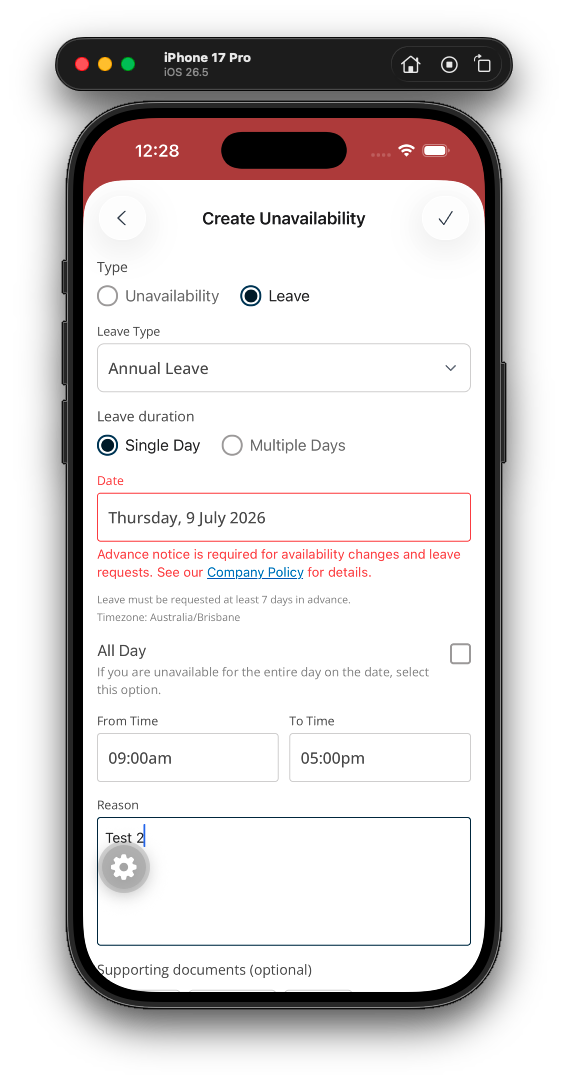
When a Support Worker on the mobile app tries to create leave or unavailability that starts inside the notice window, the date field shows a validation error made up of two parts:
- Your Policy message (or the default message if you haven't set one).
- A line confirming the requirement - for example, "Leave must be requested at least 7 days in advance." for leave, or "Availability changes must be submitted at least X days in advance." for an availability update.
The worker cannot submit the request until they choose a date outside the notice window.
Locking Case Notes After Clock-Out
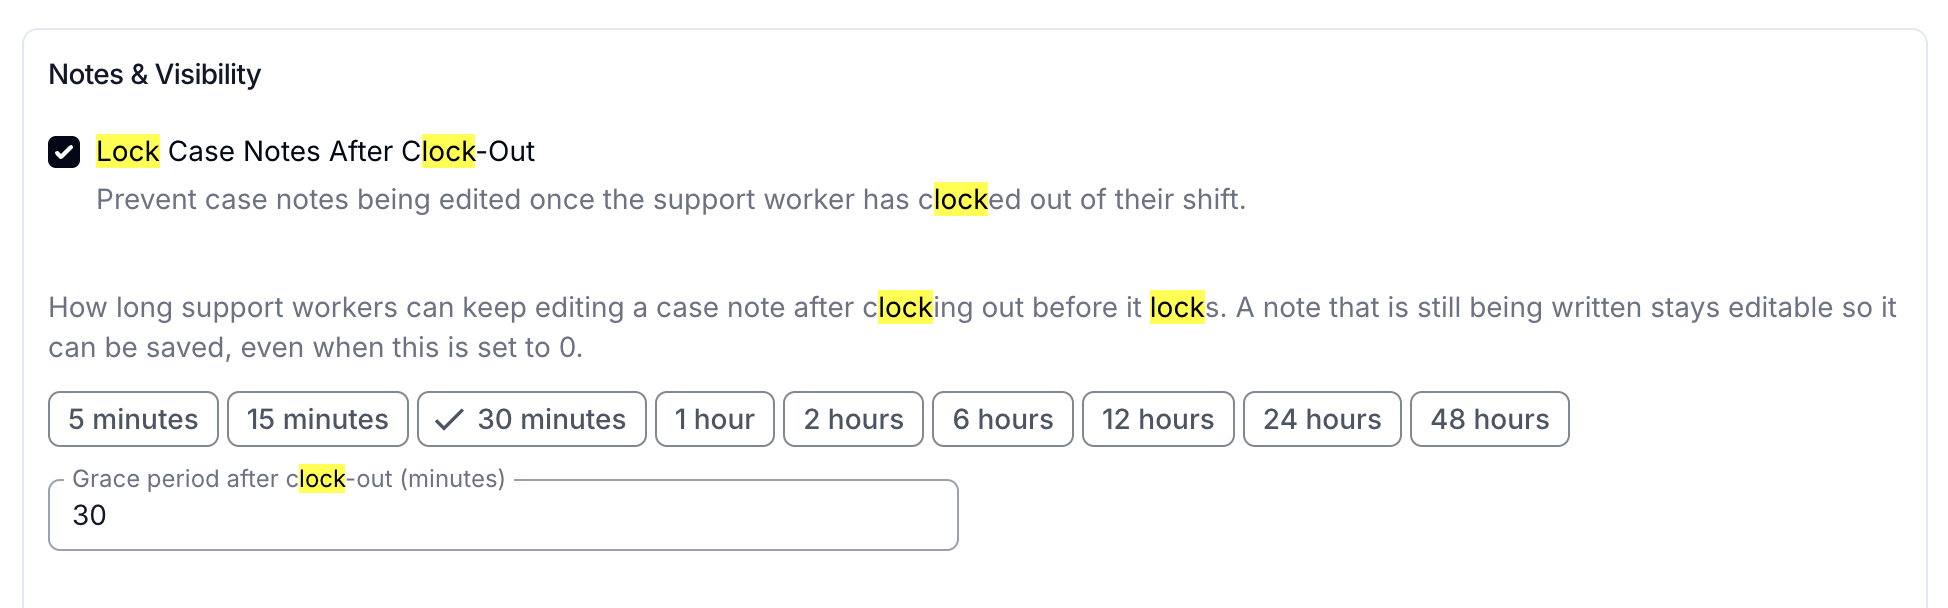
The Lock Case Notes After Clock-Out setting stops case notes from being edited once a Support Worker has clocked out of their shift. This helps keep a reliable record by preventing notes from being changed after the fact, while still giving workers a short window to finish and tidy up their note before it locks.
To turn it on, tick Lock Case Notes After Clock-Out under Notes & Visibility.
Grace period after clock-out
The Grace period after clock-out (minutes) value sets how long Support Workers can keep editing a case note after clocking out before it locks. You can set anything from 0 minutes up to 48 hours (2880 minutes), giving the note author time to finish before it locks.
The quick-select buttons above the field fill in a common value with a single click:
- 5 minutes
- 15 minutes
- 30 minutes
- 1 hour
- 2 hours
- 6 hours
- 12 hours
- 24 hours
- 48 hours
Selecting a preset fills the grace period field for you, or you can still type any custom number of minutes (up to 2880) directly into the field.
The clock-out lock stops the Support Worker who wrote the Note from editing or deleting it. A different User with the required delete permission may still delete it when Case Note Deletion is enabled and the Note passes the other visibility and editability checks.
Managing Note Visibility
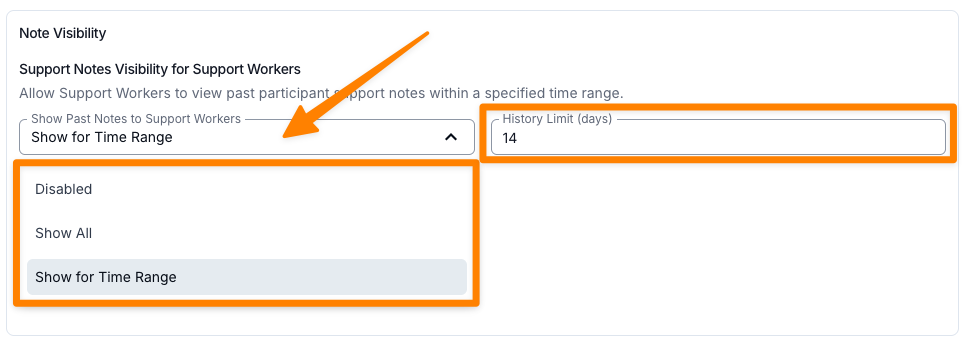
Support Note visibility settings to give organisations greater control over how historical Support Notes are shared, helping Support Workers feel more prepared and informed before heading into a shift.
Support Worker visibility options include:
- Disabled - Support Workers will not be able to view any Support Notes for their Participants that were created by other Support Workers.
- Show All - Support Workers will be able to view all Support Notes for their Participants from all Support Workers, providing full historical context.
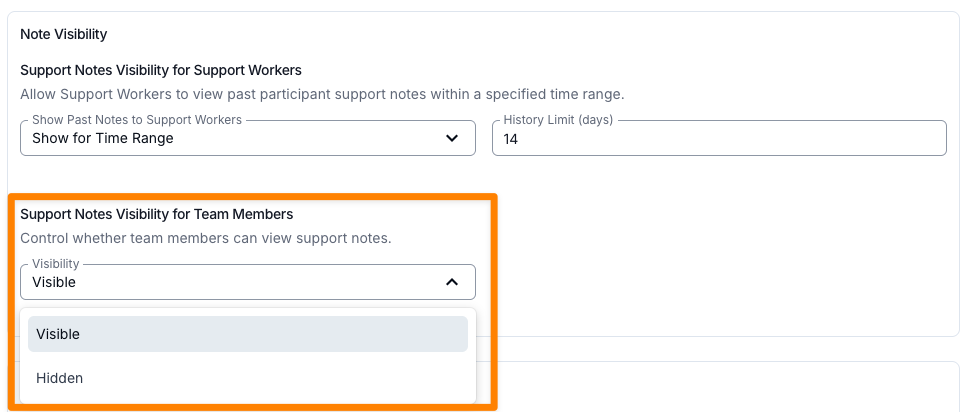
- Show for Time Range - Support Workers will be able to view previous case Notes for their Participants from all Support Workers within the defined History Limit (set in days). This allows organisations to tailor how much historical information is shared, based on what best suits their operational preferences.
In addition, organisations can control Support Note visibility for users with the Team Member role. Team Members may include roles such as Support Coordinators or other administrative or clinical staff who may find it useful to review Support Notes for oversight, planning, or continuity purposes.
Team Member visibility options include:
- Visible
- Hidden
No history limits apply to Team Member visibility settings.
Participant Date of Birth
The Show Participant Date of Birth setting, under Notes & Visibility, controls whether Support Workers can see a Participant's date of birth in the About section of their profile in the mobile app. It's off by default - tick it and save to turn it on.
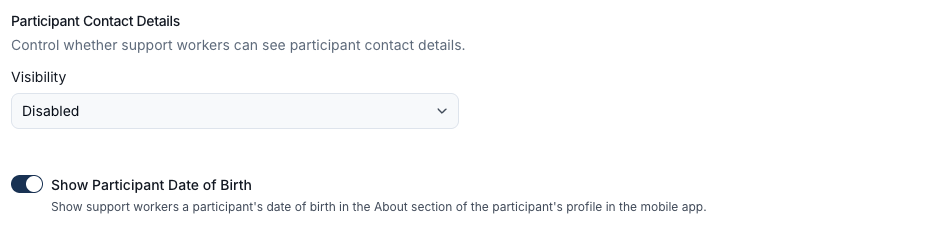
The date of birth only appears for a Participant who has one recorded - see Participant Details.
Managing Push Notifications
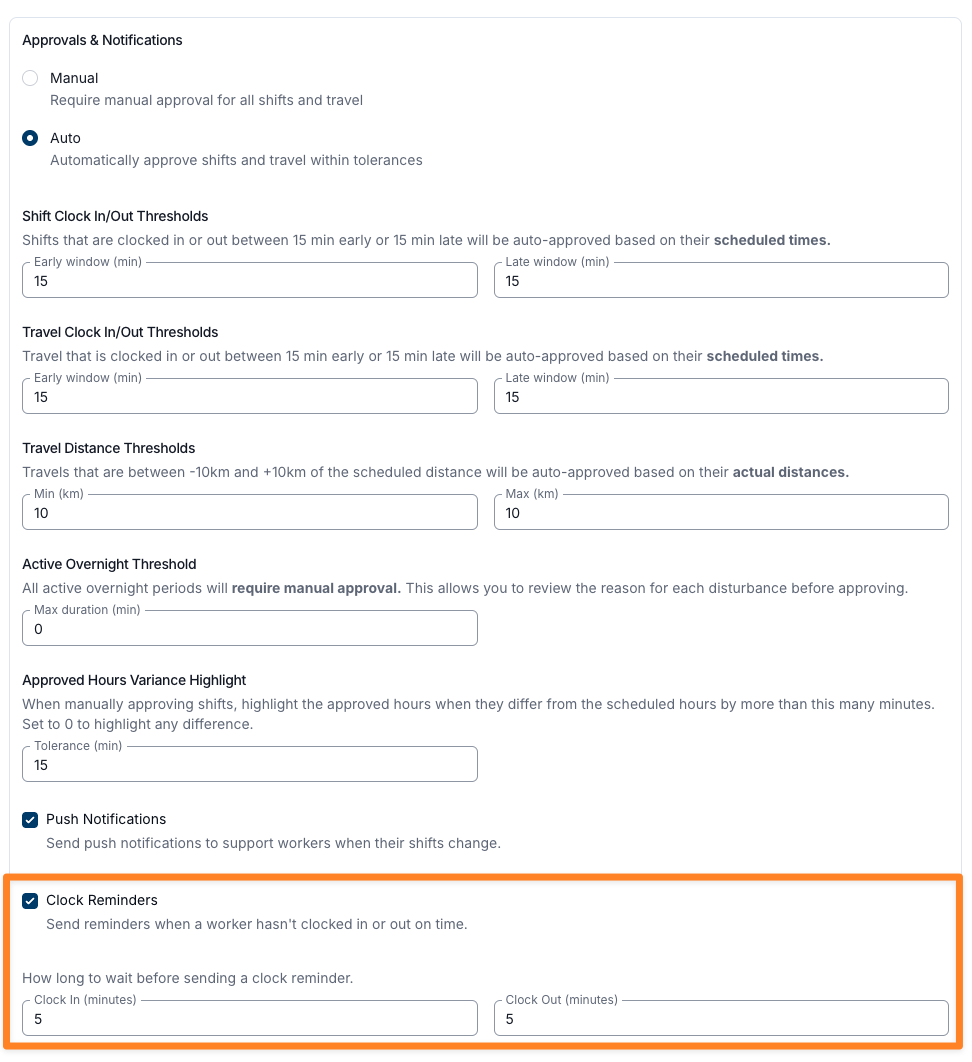
Both notification settings live in the Approvals & Notifications section of the Scheduling Settings card. Select Edit on that card to change them.
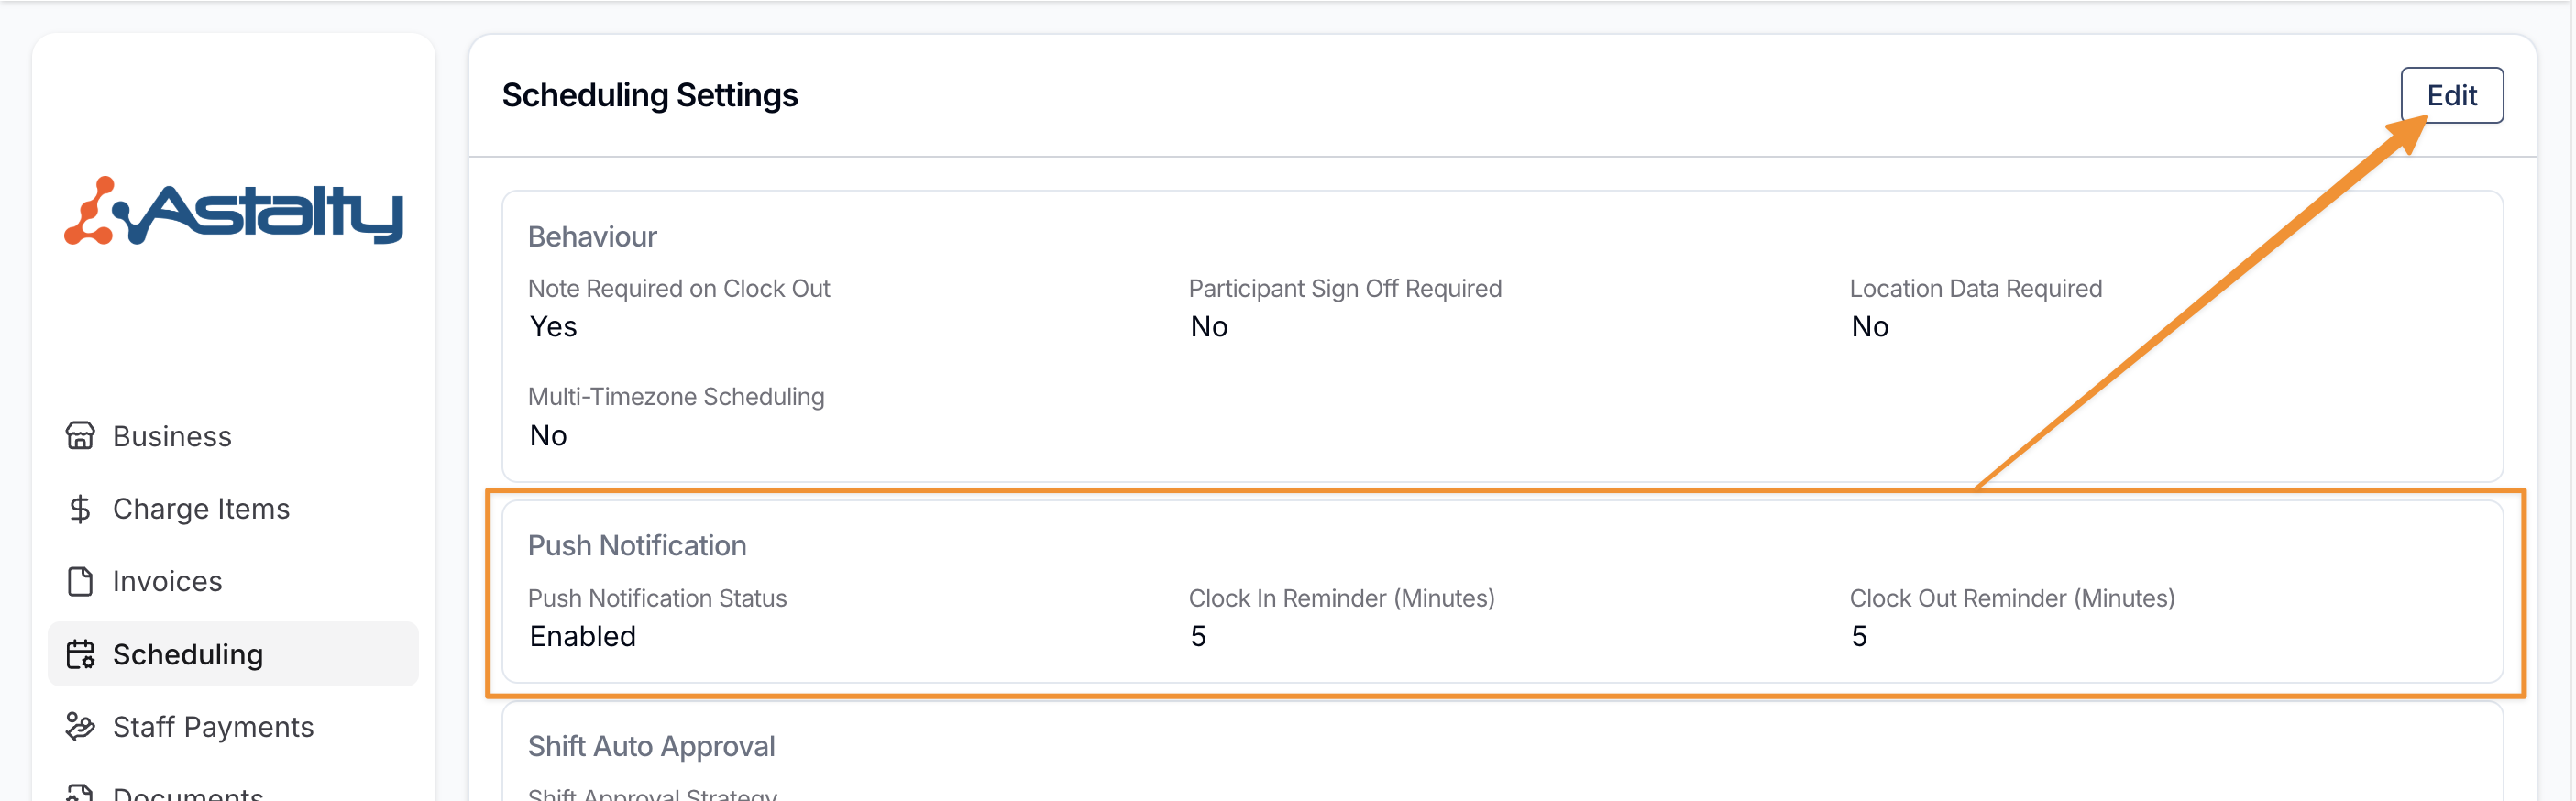
The read-only view of the card summarises these options under Push Notification, showing the current Push Notification Status along with the two clock reminder values.
Enabling Notifications on the Astalty App
Push notifications keep Support Workers up to date by alerting them whenever changes are made to their shifts.
- To disable notifications, leave the Push Notifications checkbox unticked. No push notifications will be sent to Support Workers when shifts are updated.
- To enable notifications, tick the checkbox. Support Workers will then be notified of any roster changes.
Note: Enabling push notifications is recommended to ensure Support Workers always have the most current schedule information.
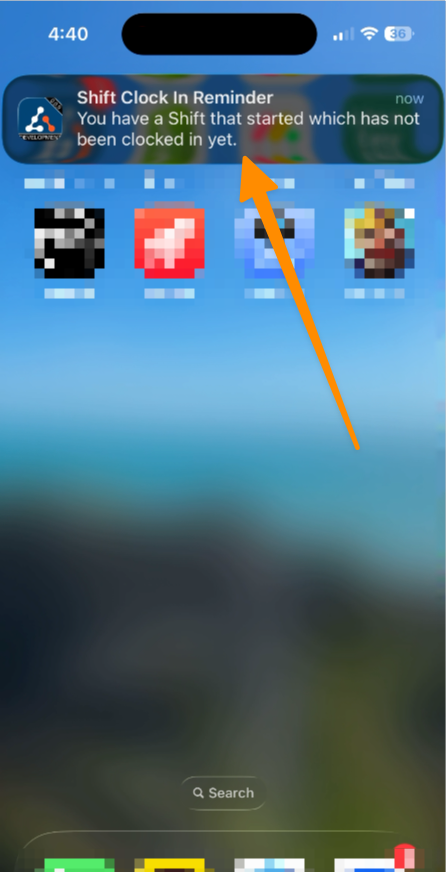
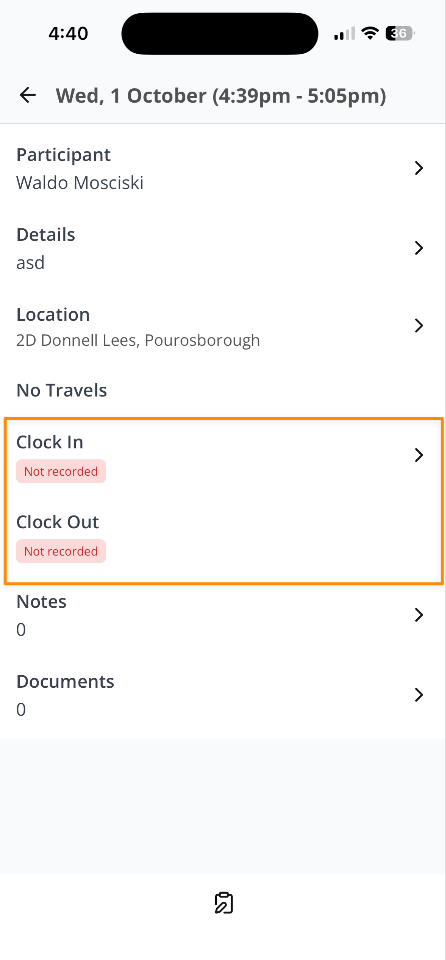
Enabling Notifications for not Clocking In or Out of a Support
Beneath Push Notifications in the Approvals & Notifications section, the Clock Reminders checkbox controls whether Support Workers are reminded when they haven't clocked in or out on time.
You can:
- Turn reminders on or off by ticking the Clock Reminders checkbox.
- Set how long Astalty waits before sending a reminder using the Clock In (minutes) and Clock Out (minutes) fields - for example, 5 minutes after the support was due to start, and 5 minutes after it was due to end.
Both fields default to 5 minutes and accept any whole number from 0 to 999. The reminder is measured from the shift's scheduled start and end times, not from when the worker actually clocked in or out.
Reminders are only sent for published shifts that have a Support Worker assigned. Cancelled supports and unpaid breaks are skipped.
Support Worker Notification
When switched on, the staff member will receive a push notification for a missed clock in/out. They can select it and it will navigate them to the shift that they need to action.
Shift Auto Approval
Overview
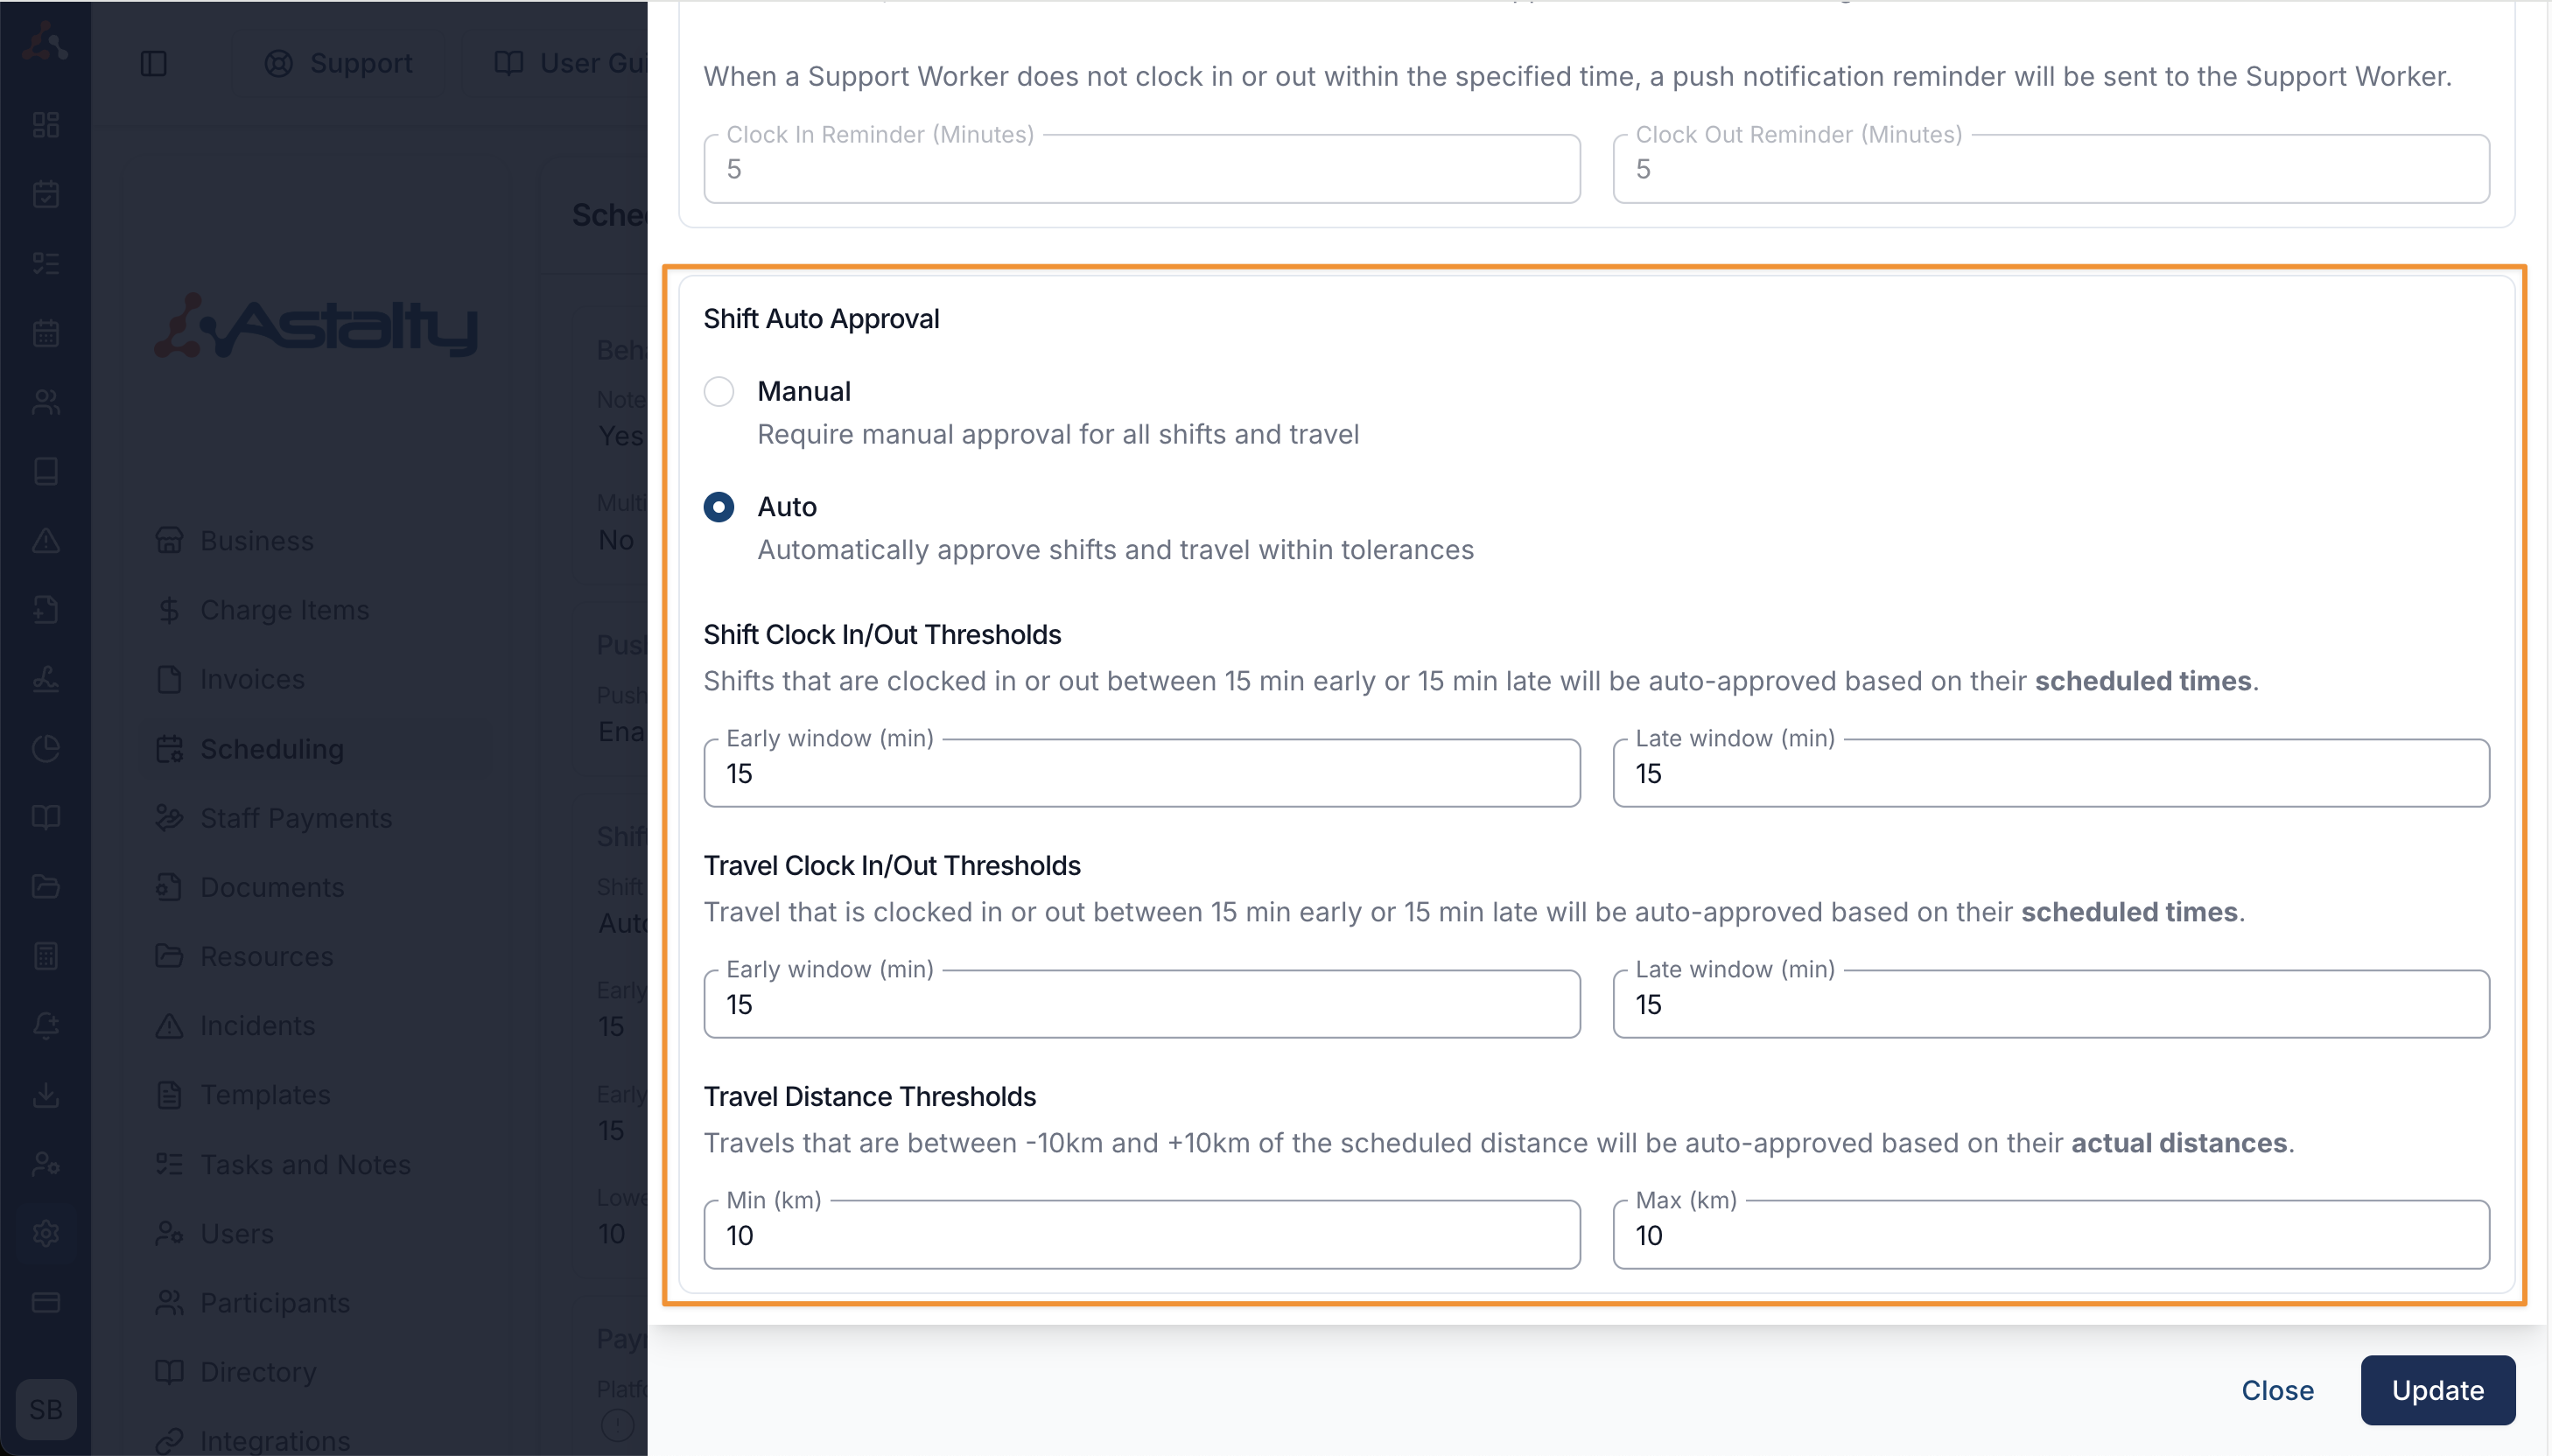
The shift approval setting controls whether shifts and travel must be approved manually or if they can be approved automatically within certain tolerances. This helps reduce admin time while still giving you control over exceptions. It sits at the top of the Approvals & Notifications section, above the notification settings.
Manual Approval
If Manual is selected, every single shift and travel entry must be approved manually. Nothing will be approved automatically.
Automatic Approval
If Auto is selected, eligible shifts and scheduled travel are approved when they fall within tolerance. Shift hours use the scheduled start and end times, rather than the exact clocked times. Scheduled travel duration and distance are assessed separately; distance uses the recorded amount. Unscheduled travel requires manual approval, even when it is within tolerance. A scheduled journey marked as not travelled is approved with zero duration and distance.
Shifts and travel have separate clock in/out thresholds, set in two blocks one above the other. They do not have to match, and on a new account they don't - see Defaults for New Accounts.
Shift Clock In/Out Thresholds
- Early window (min) - How many minutes early a worker can clock in or clock out of a shift and still be automatically approved.
- Late window (min) - How many minutes late a worker can clock in or clock out of a shift and still be automatically approved.
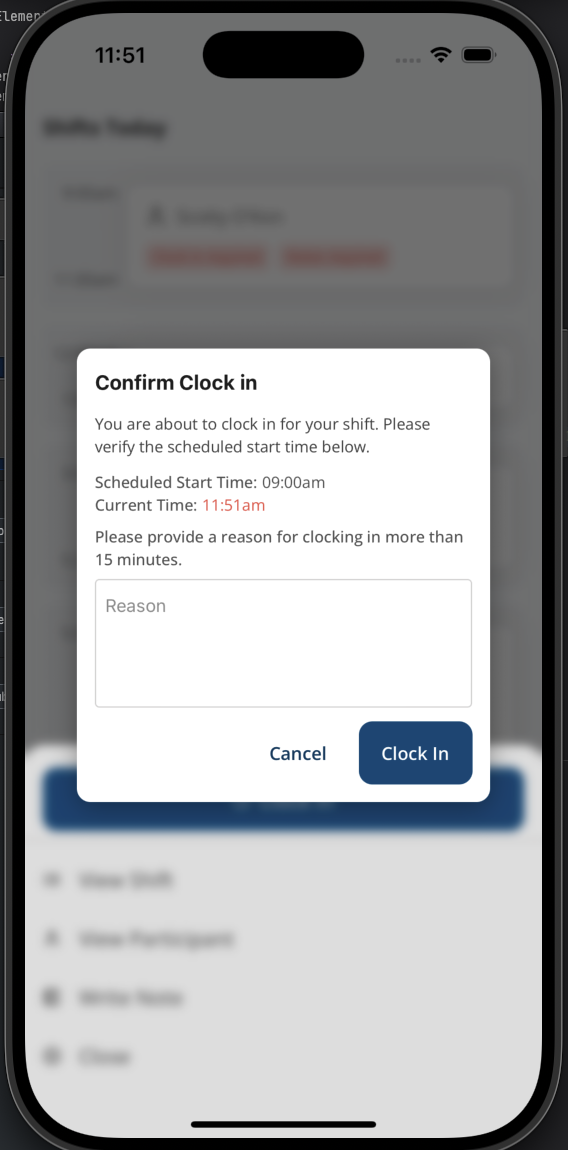
Example: If the late window is set to 5 minutes, a worker who clocks in up to 5 minutes late will be approved automatically. If they clock in later than 5 minutes after the scheduled start time, that will require manual approval and the Support Worker will receive a pop up on the screen to confirm the reason. Set one early tolerance and one late tolerance for shift clocking.
This same window also decides when an early/late clocking reason is compulsory. That reason is separate from the support case note. The early and late values apply to both ends of the shift; they are not independent clock-in and clock-out settings.
Travel Clock In/Out Thresholds
The Early window and Late window values in the travel threshold block compare the recorded journey duration with its scheduled duration. They allow a journey to be shorter or longer by the configured number of minutes. New accounts start at 5 minutes each side.
For example, a scheduled 30-minute journey can have a recorded duration from 25 to 35 minutes and pass the duration check. Starting the journey late does not by itself fail this check. When approved automatically, its approved duration remains the scheduled 30 minutes; distance is assessed separately.
Travel Distance Thresholds
- Min (km) - How many kilometres below the expected or budgeted distance can be auto-approved.
- Max (km) - How many kilometres above the expected or budgeted distance can be auto-approved.
Example: If a trip is budgeted for 20 km and you set a max tolerance of 10 km, then claims up to 30 km will be auto-approved. Anything above 30 km will require manual approval.
New accounts start at Min 999 km and Max 0 km. That pairing allows recorded distance up to 999 km below budget, with no distance above budget automatically approved.
Approved Hours Variance Highlight
When shift hours are approved manually, Astalty compares the approved hours against the scheduled hours and highlights the difference where it is big enough to be worth a second look. This setting controls how large that difference has to be before it is flagged.
It sits in the Approvals & Notifications section, below the auto approval settings, and applies to anything approved by hand regardless of whether your approval strategy is set to Manual or Auto.

- Tolerance (min) - How many minutes the approved hours may differ from the scheduled hours before the variance is highlighted. New accounts start at 5. The previous default was 15, so an account created earlier sits there unless someone has changed it.
The difference has to exceed the tolerance to be flagged, so at a tolerance of 5 a 5-minute difference passes quietly while a 6-minute difference is highlighted. Set the tolerance to 0 to highlight any difference at all.
Scheduling Settings Overview
The following video provides an overview of the Scheduling Settings.
Other Approval and Travel Controls
When Active Overnight Periods is available, Max duration (min) sets the auto-approval threshold for each completed active overnight period on a sleepover shift. Longer or incomplete periods need review.
The Broken shift minimum gap (minutes) setting affects the implemented Broken Shifts alerts and Broken Shift Allowance. Review Scheduling Award Alerts before changing it.
Where enabled, Travel Evidence controls supporting evidence for travel records. Allow Cancellation Charge Without Worker Payment is a separate permission-sensitive option, not a general rule that every cancellation may be charged. Review Support Cancellations and the applicable service agreement before using it.