- Administration
- Employment Hero
Employment Hero

The Employment Hero integration connects Astalty to your payroll so an approved timesheet batch can be validated and sent directly, or exported as a compatible CSV.
What It Does
- Sync timesheet batches directly to Employment Hero, or export them as a compatible CSV.
- Link your team to their Employment Hero profiles, and assign their pay groups in bulk.
- Map pay groups so each shift is paid at the right rate - including per-shift pay group overrides and separate pay items for work either side of a sleepover.
- Map cost codes to Employment Hero locations so wages are split across your business.
- Sync approved leave into payroll when Leave is available, leave types are mapped and Sync leave automatically is enabled.
- Configure sleepover shift export behaviour to match your payroll requirements.
- Send custom allowances from shifts as their own timesheet lines, each mapped to a work type.
How It Works
Once connected and configured, the integration is driven from timesheet batches. When you export or sync a batch, Astalty uses the pay group attached to each shift and its optional cost code mapping. When automatic leave sync is enabled, approved Astalty leave is queued for creation in Employment Hero.
Astalty reuses the mappings on every sync. After setup, approve timesheets and send the batch.
Astalty sends the hours as they were worked - start and end times, paid breaks, travel, and sleepover work types - and doesn't classify them into penalty or overtime rates. Employment Hero decides how each line is paid, using the award or agreement you have configured there.
On-call is the exception. Astalty interprets the standby allowance and the time worked while on call itself, and sends each rate on its own on-call work type: standby as a number of allowances, and time worked as hours. See On-Call below.
Connecting It
Choose Employment Hero as the payroll platform before connecting the integration.
- Set Employment Hero as your payroll platform. Go to Settings > Scheduling and, under Payroll & Awards, set the Platform to Employment Hero.
- Connect the integration. Go to Settings > Integrations - the Employment Hero card now appears. Select Connect and follow the prompts to authorise the connection. Once authorised, choose the Employment Hero business Astalty should sync with. The list shows payroll businesses only, not employing entities; see Businesses and employing entities.
- Configure it. Once connected, select Configure to link your employees, map your pay groups, cost codes, and leave types, and to set your sleepover export behaviour.
Cost Codes appears only when cost codes are enabled for the account.
Businesses and Employing Entities
When you connect the integration, Astalty asks you to choose a business. The list contains every Employment Hero business that the Employment Hero user who authorised the connection can access. Each business is a separate payroll file, with its own employees, settings and pay runs. Astalty syncs with one business, and everything else on this page (employees, pay groups, cost codes, leave types and timesheet batches) works within it.
Additional Employing Entities Are Part of the Business
An additional employing entity is a second ABN that pays some of the employees within the same payroll file. Employment Hero keeps it inside the business, and each employee is assigned to an employing entity on their Employment Hero employee record.
Because the entity belongs to the employee rather than to the connection, there is nothing to choose in Astalty:
- The business list never shows employing entities, so a business with two entities appears as a single option.
- Timesheets and leave sync to the employee, and Employment Hero pays them under whichever entity that employee is assigned to.
- Staff from every entity in the business appear on the Employees page, ready to be linked.
Checking Your Entities on the Integration Card
Once a business is selected, the Employment Hero card on Settings > Integrations shows the connected Business and, below it, an Additional employing entities section. Each entity is listed by name, with its ABN where Employment Hero holds one, so you can confirm the entity you are looking for is already covered by the connection.
This section appears only when the connected business contains additional employing entities. A business with one ABN shows no list.
Employees
Timesheets sync only for team members linked to an Employment Hero employee profile, so configure this after connecting and selecting a business.
Open it from Settings > Integrations > Employment Hero > Configure > Employees. Each row shows the person's name and email, their Pay Group, their Employment Basis, and whether they are Linked to an Employment Hero profile.
The page opens with the Employment Hero Employee filter set to Linked, so anyone still to be linked is hidden until you switch the filter to Not Linked. You can also search the list and use a row's actions menu to link one person or update their employment details.
Two bulk actions sit behind the Bulk Actions button in the top-right. Both open a drawer that lists up to 1,000 people, so on a team larger than that some people will not appear in either drawer and have to be handled from their own row on the page instead.
Bulk Link Employees
Bulk Actions > Bulk Link Employees opens a drawer listing your team with an Employment Hero Employee dropdown on each row. Anyone whose Astalty email address matches an Employment Hero email address is matched for you and flagged as auto-matched, so usually you only need to fill the gaps.
Check the matches, set or clear any row that is wrong, then select Link Employees.
Bulk Update Pay Groups
Bulk Actions > Bulk Update Pay Groups opens a drawer listing your team with their current pay group, so you can set pay groups in one pass instead of editing profiles one at a time. You need access to update HR details to use it.
To give several people the same pay group:
- Choose the pay group from the Pay group dropdown at the top of the drawer.
- Tick the rows you want it applied to - the checkbox in the header row ticks everyone.
- Select Apply to Selected, which fills the chosen pay group into those rows.
Ticking rows only drives Apply to Selected; it does not decide what gets saved. Any row can also be set straight from its own Pay Group dropdown without ticking anything, and Apply to Selected can only set a pay group, never remove one - to take a pay group off someone, clear their own dropdown.
When the list looks right, select Update Pay Groups to save.
The drawer builds its own list, so the filter and search on the Employees page behind it make no difference to what appears in it - there is no need to filter the page first. Anyone the drawer does not list still needs their pay group set from their own profile. If there is nobody to show, the drawer shows No employees found.
To see who still has no pay group at all, the Pay Groups report lists every pay group with its assigned employees, and gathers anyone unassigned into an Unassigned row.
Pay Item Mapping
When you configure a pay group, Edit Pay Item Mapping links each Astalty pay item to the matching Employment Hero work type. When a timesheet batch is exported, each line's hours are sent using the mapped work type so Employment Hero applies the correct rate.
Open it from Settings > Integrations > Employment Hero > Configure > Pay Groups, then select Edit Pay Item Mapping on the pay group. Rows marked Optional only need a work type when you use that pay item.
Sleepover Work Either Side of the Night
Two optional rows - Pre-Sleepover (work before a sleepover) and Post-Sleepover (work after a sleepover) - let you send the shifts on each side of a sleepover as their own Employment Hero work types.
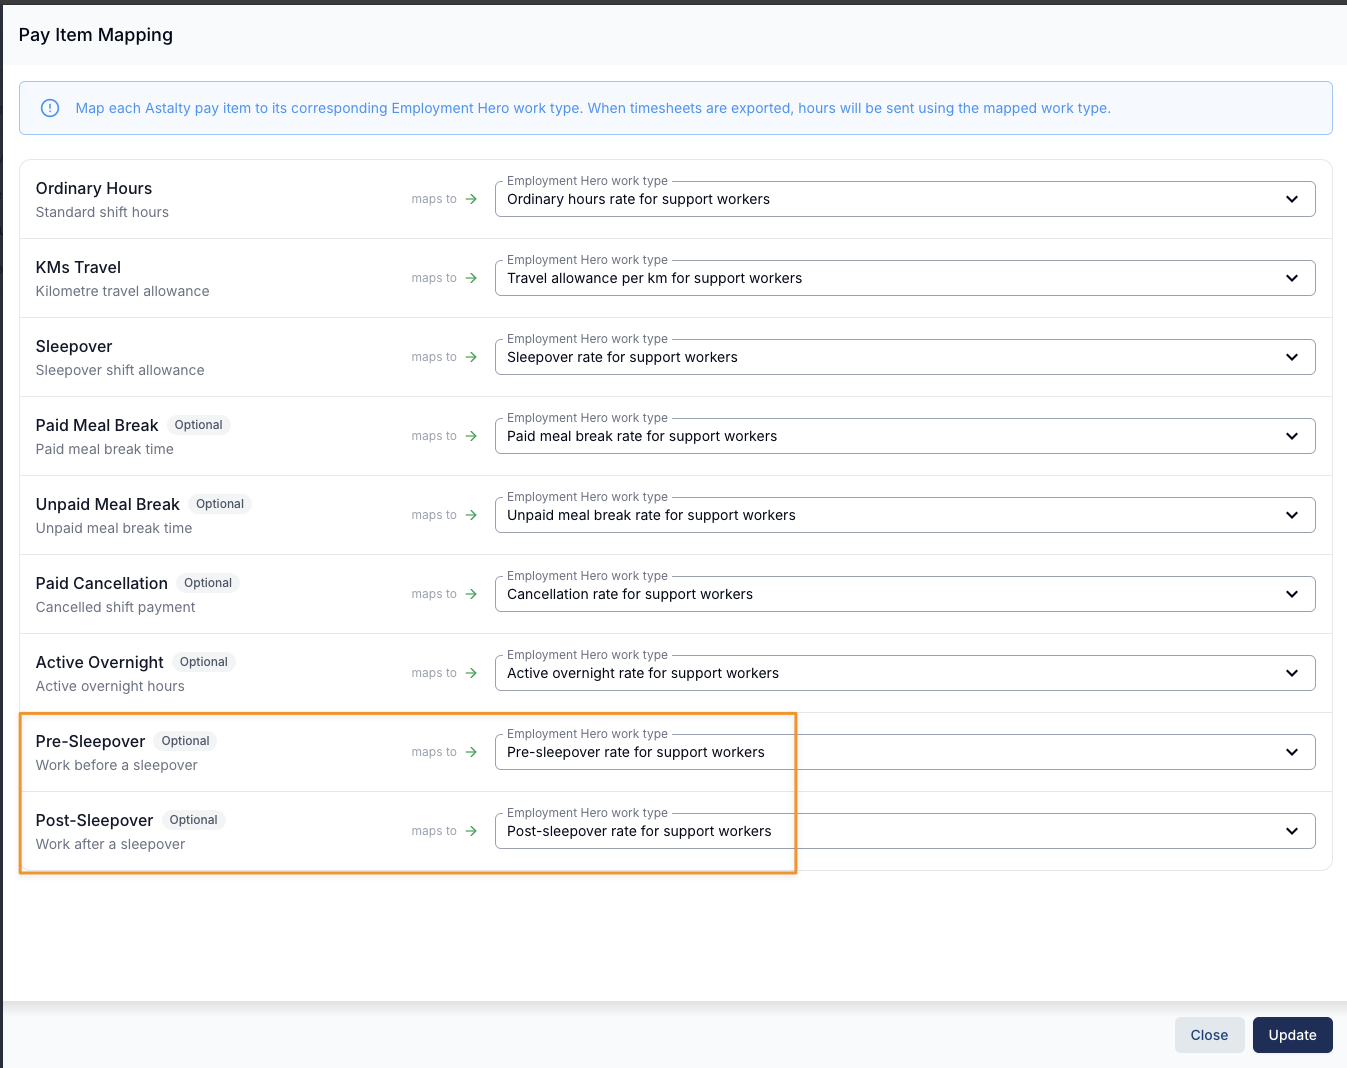
Under SCHADS, classify the active work on each side of a sleepover using its actual start and finish, weekend/public holiday status and overtime rules. It is not always afternoon pay before and ordinary pay after. Previously the whole overnight engagement was sent using the sleepover work type, so Employment Hero applied night-shift rates across it and you had to re-type the pay categories by hand each pay run. When these rows are mapped, Astalty tags the shifts on either side of the sleepover with the mapped work types, so Employment Hero can apply the rules you configure for each side.
24-Hour Care
The optional 24-hour Care row is for SCHADS home care workers on 24-hour care shifts. It appears once you have, or have had, a worker on a SCHADS home care classification.
For each of these shifts, Astalty sends 8 units of the mapped work type instead of the hours worked. Configure the corresponding work type and rate in Employment Hero, then verify the resulting pay run. Approved time past the 24-hour period is sent as a separate Ordinary Hours line with its own start and finish. A 24-hour care shift cancelled with pay sends the same 8 units, with any time past the 24-hour period on Paid Cancellation instead of Ordinary Hours.
Shifts Cancelled With Pay
A shift cancelled with pay sends the same lines it would have sent had it been worked. Lines that carry hours, such as ordinary hours and the work either side of a sleepover, use the Paid Cancellation work type so payroll can see the cancellation. Sleepover, active overnight, 24-hour care, travel and kilometre lines keep their own work types.
On-Call
A pay group whose workers use the On-Call Roster has on-call rows for its award: the standby allowance rows, the SCHADS Remote Work rows, On Call Overtime, On Call Ordinary for nurses at RN levels 4 and 5, and On Call Overtime Adjustment.
- Map each standby row to a work type on a fixed-rate pay category.
- Map the Remote Work, On Call Overtime and On Call Ordinary rows to a custom work type that pays a pay category of its own, or one of Employment Hero's own work types on a fixed-rate pay category. Weekday remote work and weekday on-call ordinary hours may instead use a custom work type on the employee's primary pay category. On a casual pay group, give those rows pay categories carrying the full casual percentage on the base rate, under Casual - Ordinary Hours: for example 175% rather than 150% for SCHADS, or 187.5% for Nurses and Health Professionals.
- Map On Call Overtime Adjustment to a work type on a pay category of its own with no loadings, super or leave accrual, under the employee's ordinary hours category (Casual - Ordinary Hours for casuals). When on-call hours move a later shift's hours into overtime, the extra pay is sent there as hours at the base rate.
On-call is sent as units per day on each row's work type, not as timed lines. Validating a batch names any on-call row the batch needs that is not mapped, and any work type that cannot price those units. See Mapping On-Call Pay Items.
Custom Allowances
When custom allowances are in use, each allowance on a shift is sent as its own timesheet line: a number of units on the work type the allowance is mapped to, dated on the shift's approved start date, with the allowance name as the comment. Employment Hero pays the units at that work type's rate.
Map each allowance from Settings > Integrations > Employment Hero > Configure > Custom Allowances. Choose a work type that pays its own pay category, not the employee's primary pay category. A timesheet batch with an unmapped allowance on any of its shifts cannot be sent to Employment Hero or exported as an Employment Hero CSV. See Mapping an Allowance to a Payroll Work Type.
Sending Timesheet Batches
After employees and pay groups are mapped, open an approved timesheet batch and use Actions:
- Send to Employment Hero validates the batch and creates timesheets. The sync results show completed lines and employee-specific failures.
- Replace in Employment Hero appears after the batch has been sent and resends it using replace mode.
- Export Employment Hero Timesheet (CSV) validates the batch and creates a file for manual import.
Validation runs before an API send. Blocking errors stop it. Warnings can be reviewed before selecting Export anyway. Sending the same batch again can create duplicate entries; use Replace in Employment Hero when correcting a prior send.
Switching From Another Payroll Platform
Changing Settings > Scheduling > Payroll & Awards > Platform changes labels and the authorisation host, but it does not remove the saved payroll credentials or selected business.
- Open the existing payroll integration under Settings > Integrations and select Disconnect.
- Change Platform to the new payroll provider.
- Connect the new provider, choose its business and review every employee, pay group, cost code and leave mapping before sending a batch.