- Insights
- Clock Location Variance Report
Clock Location Variance Report
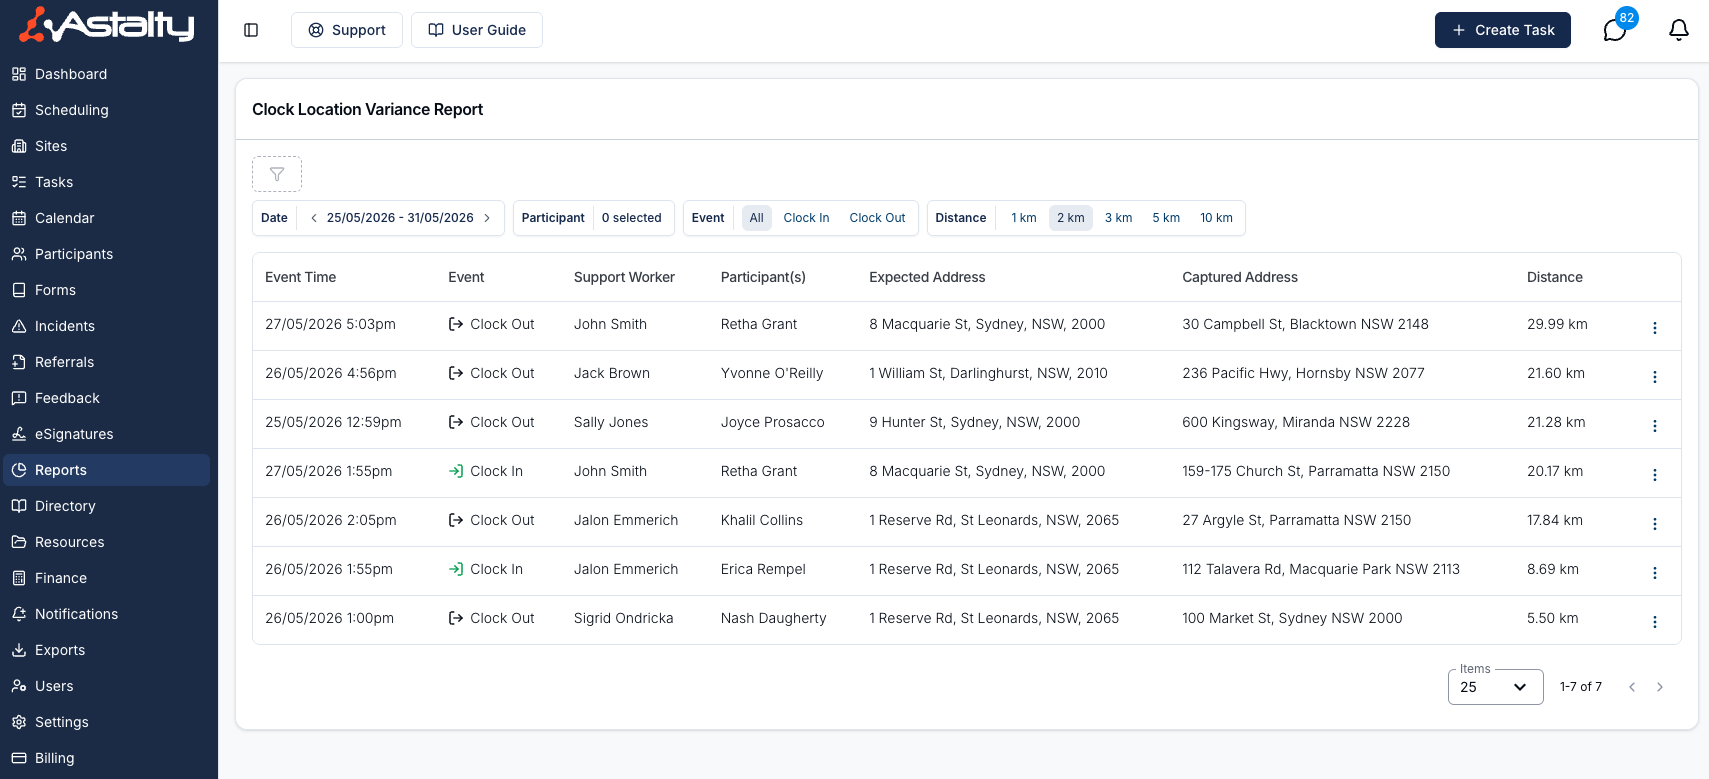
Use the Clock Location Variance Report to find clock events recorded farther than an allowed distance from the support address.
Overview
This report compares the location captured when a Support Worker clocked in or out with the address on the support (or group support) the shift belongs to. When the straight-line distance between the two is more than your selected Distance threshold, the event appears in the report.
Use it to investigate:
- clock-ins that happened before the worker arrived at the address
- clock events recorded from an unexpected location
- patterns across your team that may need follow-up with staff
Before you start
For this report to return useful results, a few things need to be in place:
- You need permission to view shifts for all users. Admins have it. Managers have it only when Can access Scheduling is turned on for them, which is off by default. Team Members and Support Workers can't open the report. See Roles & Permissions.
- Support Workers need to be clocking in and out with Require Location Data enabled in the Scheduling Settings. A worker marked Exempt from location data on their user profile doesn't send a location, so their clock events never appear.
- The support or group support needs an address that Astalty could place on a map. That address is the Expected Address the clock event is measured against.
If location data is missing, or the support has no usable address, the event doesn't appear in the report. Internal shifts have no support address, so their clock events never appear.
Where to find it
To open the Clock Location Variance Report:
- From the left-hand menu, select Reports.
- Under Scheduling, select Clock Location Variance.
Filters
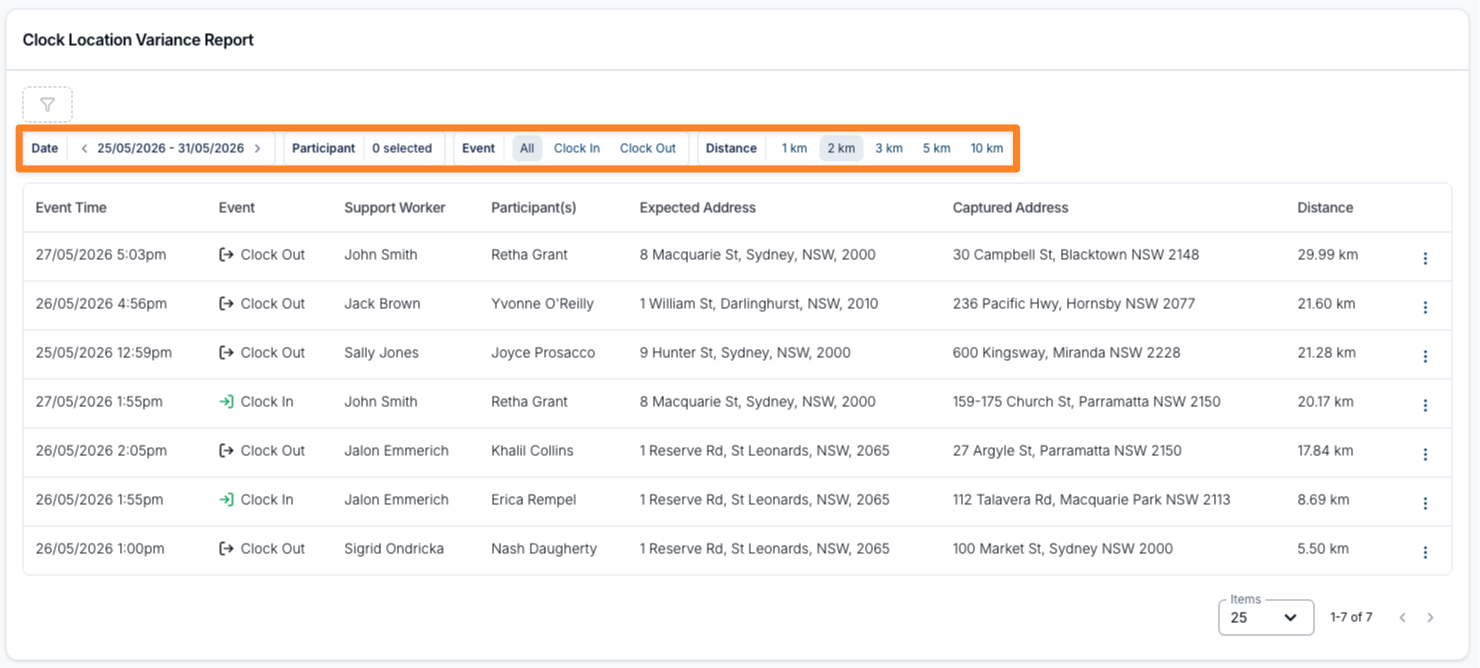
The report includes these preset filters:
- Date - the date range to report on. Defaults to the current week (Monday to Sunday).
- Participant - one or more Participants.
- Staff - one or more Support Workers.
- Event - All (the default), Clock In or Clock Out.
- Distance - 1 km, 2 km (the default), 3 km, 5 km or 10 km.
Date
Choose the date range you want to review. The range is matched against each shift's scheduled start, not the time of the clock event, and includes the whole of the end date. A clock-out recorded after midnight still appears under the day the shift was scheduled to start.
Participant
Use this filter to narrow the report to one or more Participants. A group support's clock events appear when any selected Participant is in the group. Leave it blank to view results across all Participants.
Staff
Use Staff to narrow the report to the clock events of one or more Support Workers. The list includes deactivated users.
Event
Use the Event filter to choose which type of clock event to display:
- All
- Clock In
- Clock Out
This is particularly useful when you want to focus on one event type at a time. Many providers choose to review Clock In events separately, as they are often most relevant for attendance and compliance checks.
Distance
Use the Distance filter to set the minimum location variance you want to review:
- 1 km
- 2 km
- 3 km
- 5 km
- 10 km
Only events where the captured location is more than that distance from the expected address are shown, so an event exactly 2 km away does not appear at the 2 km threshold. Increasing the threshold is a practical way to focus on the most significant exceptions first before reviewing lower-level variances.
How to use the report
- Open the Clock Location Variance Report from Reports > Scheduling.
- Select the date range you want to review.
- If needed, select one or more Participants to narrow the results.
- Choose the Event type - All, Clock In, or Clock Out.
- Select the distance threshold you want to apply.
- Review the results in the table.
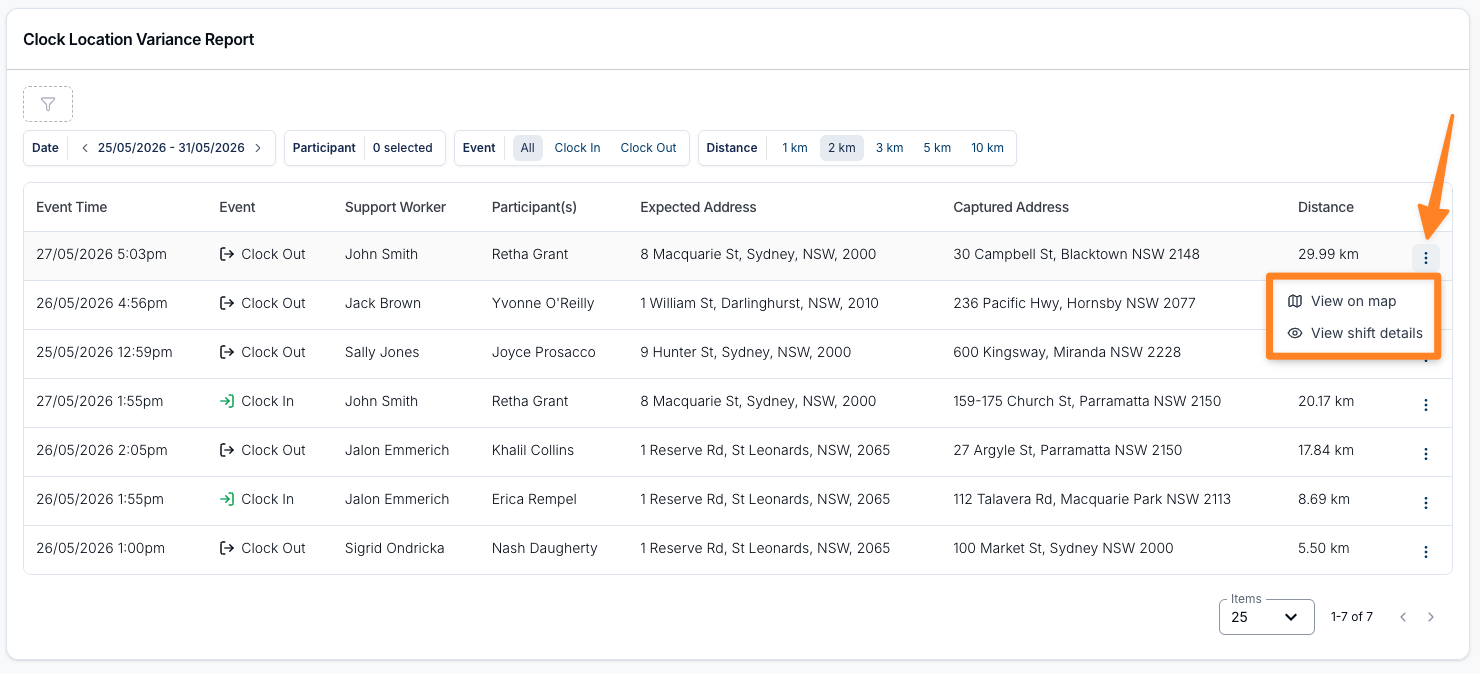
- Open any row that looks unusual to investigate further by clicking on the three dot menu to select from:
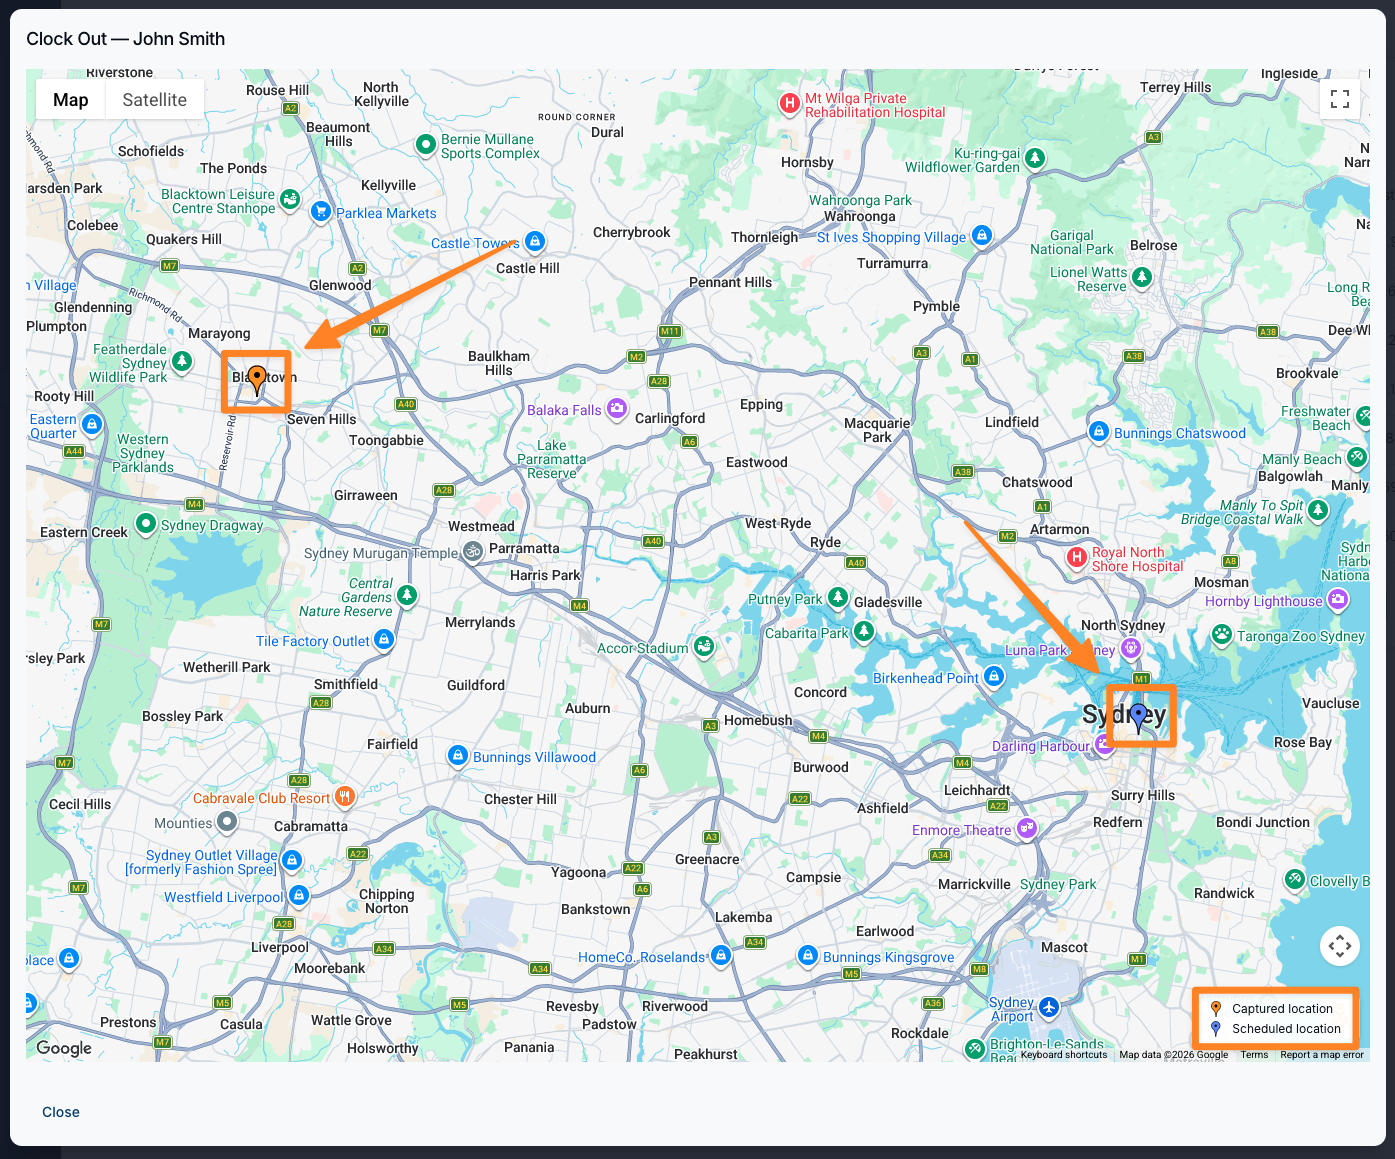
- View on map - compare the expected and captured locations visually on a map
- View shift details - open the related shift to review the full context of the support
- Rows can also be opened directly to access the underlying shift details.
Understanding the results
Report table
The results table includes these columns:
- Event Time - when the clock event was recorded
- Event - whether it was a Clock In or Clock Out
- Support Worker - the Support Worker on the shift
- Participant(s) - the Participant on the support, or every Participant in the group support
- Distance - the straight-line distance between the two locations
- Expected Address - the address on the support, or on the group support for a group support shift
- Captured Address - the location recorded when the Support Worker clocked in or out. When it couldn't be turned into a street address, the coordinates are shown instead
Results are sorted by Distance, furthest first. You can also sort by Event Time or Distance in either direction.
Review the largest distances and any missing locations first.
Things to keep in mind
- The distance shown is a straight-line distance, not road travel distance. A clock-in may appear in the report even if the worker was nearby in real travel terms.
- Clock In and Clock Out events are assessed separately and may show different results for the same shift.
- If Astalty cannot convert GPS coordinates into a readable address, Captured Address shows the latitude and longitude instead.
- The expected address comes from the support, not the Participant's profile. If a support was booked at a different address, that is the address the clock event is measured against.
- If no events match, widen the date range or adjust the distance threshold.
- Astalty remembers your filters in this browser for your next visit.
This report gives your team a practical way to review whether clock events were recorded where they were expected to happen. The Event filter makes it easier to separate Clock In and Clock Out activity - which is especially useful when you want to focus reviews on the most meaningful exceptions.