- Scheduling
- Adding Shifts
- Adding a Group Shift
Adding a Group Shift
Overview
You can add different types of shifts in Astalty, including
- Direct supports (1:1 Supports),
- Group supports (Supports with multiple Participants),
- Shift (internal/non-support activities),
- Breaks (Meal breaks).
Each shift can be configured with time, Participant, and Support Worker details, along with travel, charges, and other relevant information.
Understanding Group Supports
Before creating a Group Support, it helps to understand how they are structured and how billing ratios work — so you can set up the support in a way that best reflects how it will be delivered.
Structure
A Group Support is made up of one or more shifts — one shift per Support Worker involved in the support. All shifts share the same session time, location, and Participant list.
You can assign a Support Worker to a specific Participant within the group. This is for coordination purposes — it lets the Support Worker know which Participants they should focus their attention on during the session. It does not affect the billing ratio.
One Group Support, multiple Support Workers
When multiple Support Workers are delivering the same support to the same group of Participants, set this up as a single Group Support with multiple shifts — one shift per Support Worker.
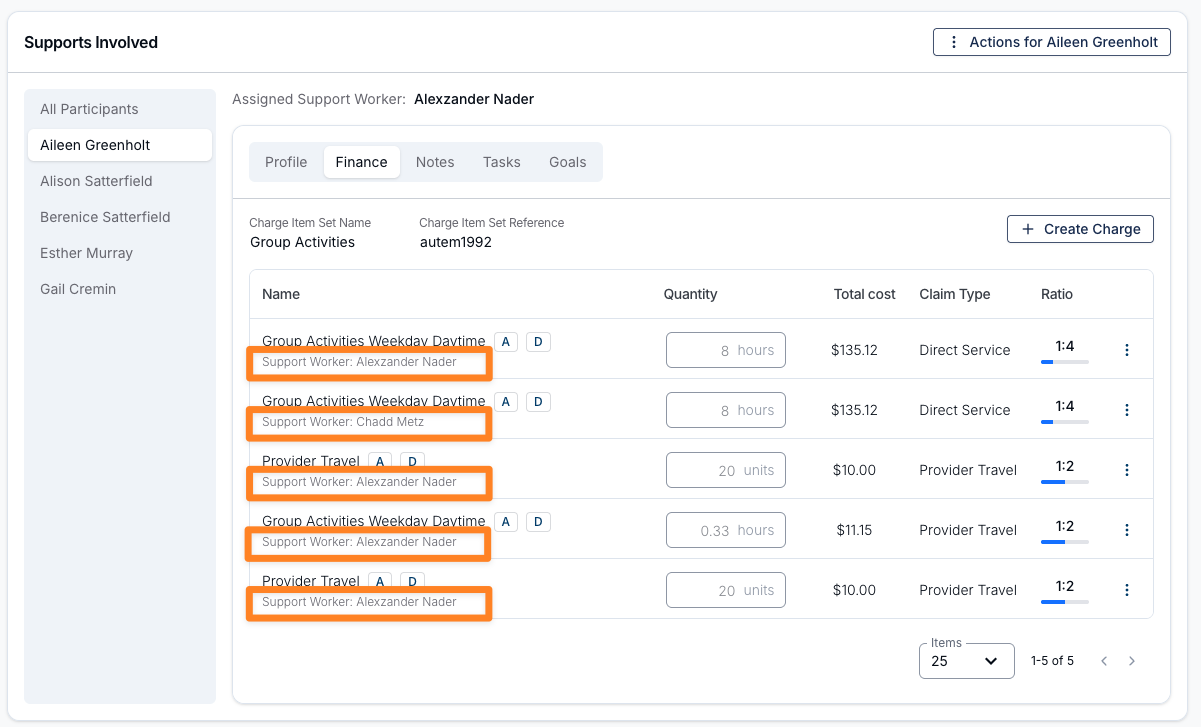
For example, two Support Workers and five Participants is created as one Group Support with two shifts. Each shift generates charges at a 1:5 ratio — one for each Support Worker — so each Participant's Finance tab will show two 1:5 charges, effectively totalling a 2:5 ratio across the support.
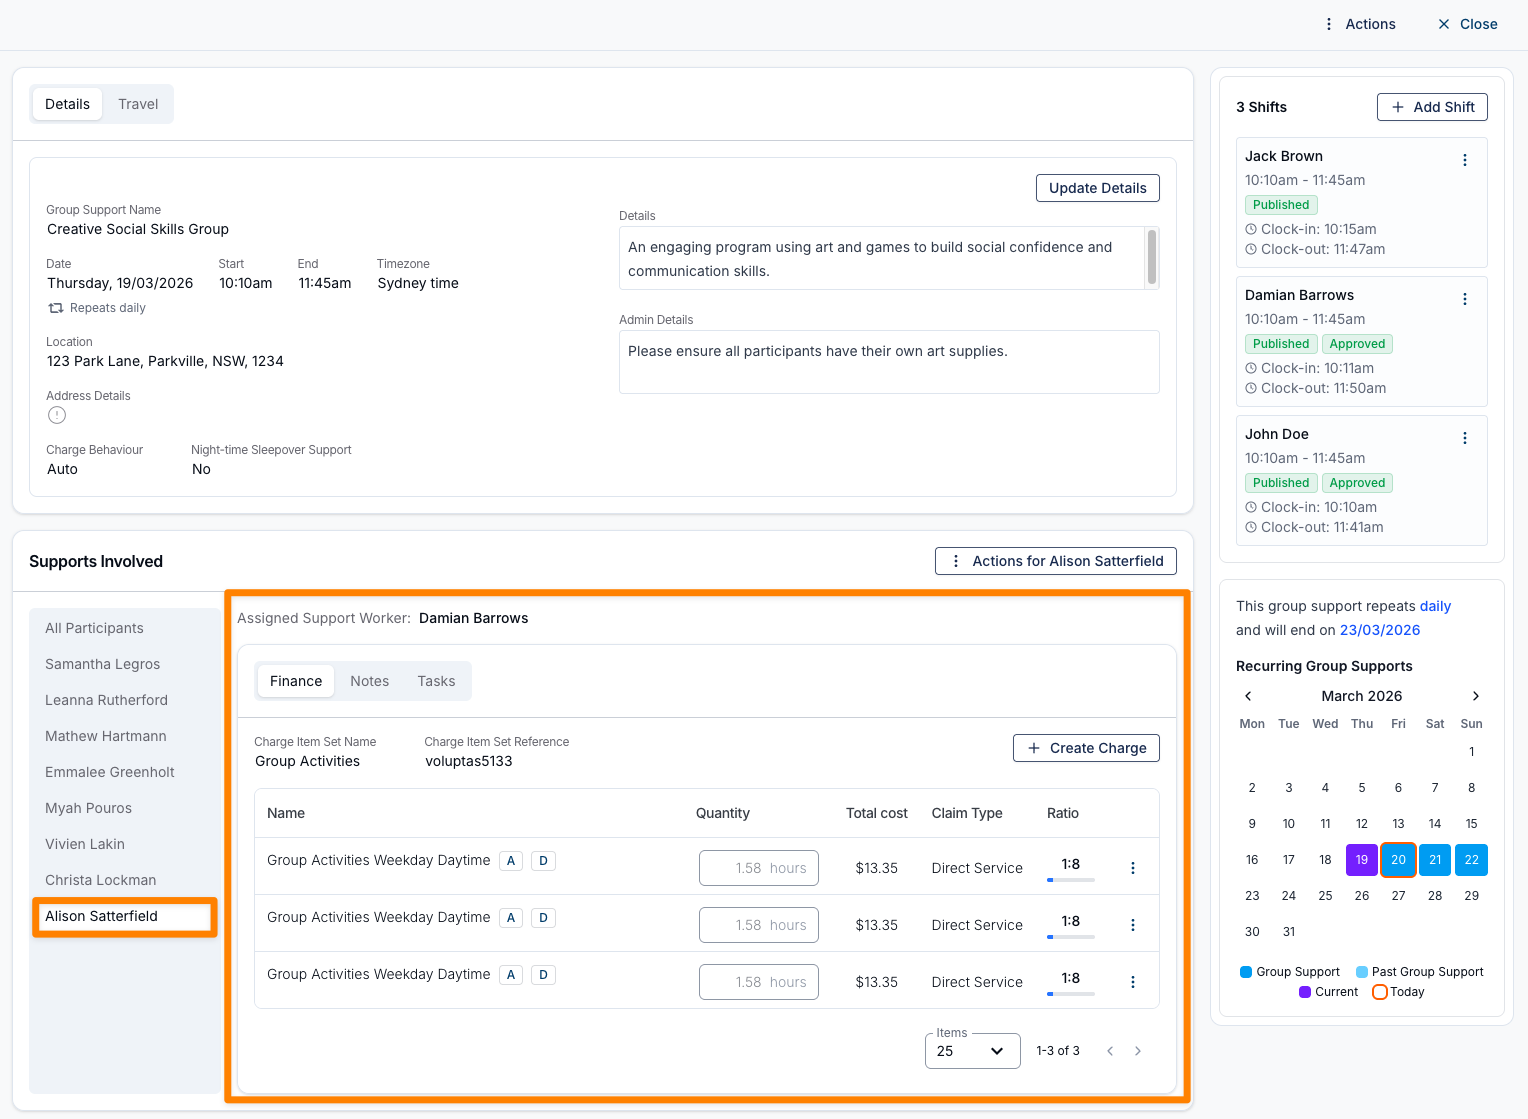
Astalty makes it easy to see which Support Worker the charge relates to by identifying their name on each row of the Participant's Finance page in the Support.
Two separate Group Supports
If two Support Workers are each exclusively supporting their own distinct group of Participants at different ratios, these need to be created as two separate Group Supports on the schedule.
For example, if Support Worker 1 is supporting three Participants at a 1:3 ratio and Support Worker 2 is supporting two Participants at a 1:2 ratio, you would create:
- Group Support 1 — Support Worker 1, with their three Participants assigned
- Group Support 2 — Support Worker 2, with their two Participants assigned
Each support has one shift, one Support Worker, and only the Participants that Support Worker is directly responsible for.
Billing Ratios
When a Group Support uses automatic charging, Astalty calculates the billing ratio for each Participant based on the total number of Participants and Support Workers assigned to the support. If a Participant or Support Worker is cancelled or removed, the ratio adjusts automatically.
In most cases, this is the expected behaviour. There are two situations where you may want to override the automatic ratio:
- The agreed ratio needs to stay fixed regardless of attendance — for example, a support agreed at 1:6 where a Participant cancels and the auto-ratio drops to 1:5, but you still want to bill at 1:6.
- Participants in the same group have different funded ratios — for example, in a Supported Independent Living (SIL) home where one Participant has funding for 1:2 and another for 1:3.
You can manage both of these scenarios directly on the support after it has been created. See Updating Charge Ratios below.
How to Add a Group Support
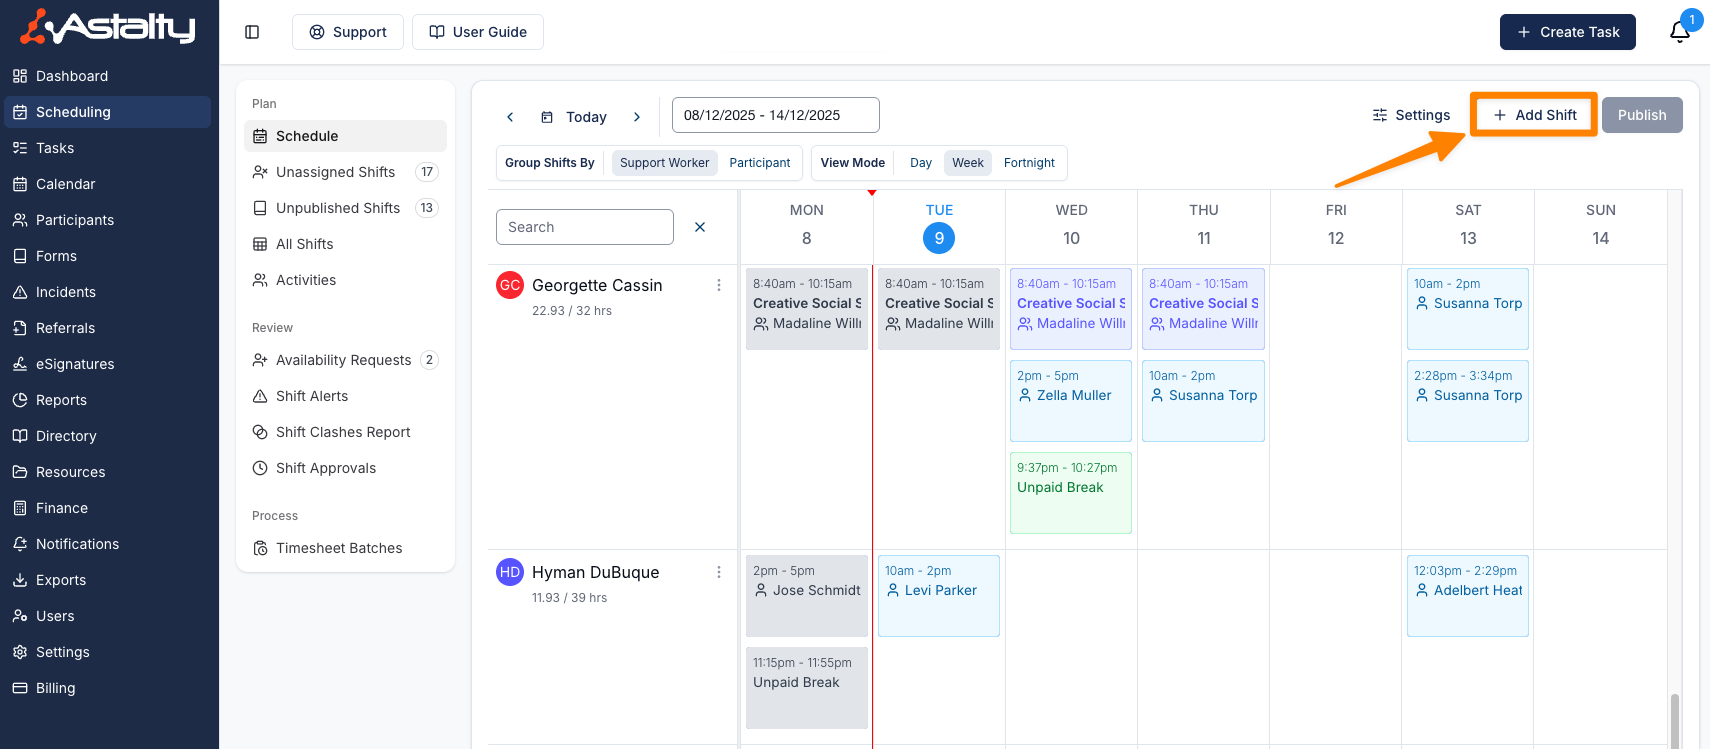
Navigate to the Schedule
- From the left-hand menu, click Schedule.
- On the right-hand side of the screen, click Add Shift.
Select the Event Type
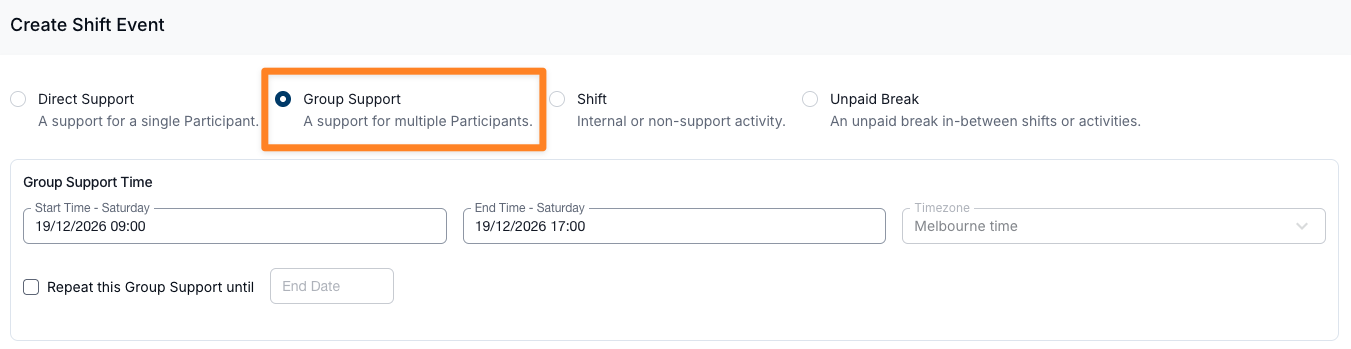
Choose from the following options:
- Direct Support – For one-on-one supports.
- Group Support – For supports involving multiple Participants (choose this option to create your group support).
- Shift – For internal or non-support activities (e.g., administrative work in the office).
- Break – For meal breaks or other scheduled breaks.
Set the Time and Date of the Scheduled Support
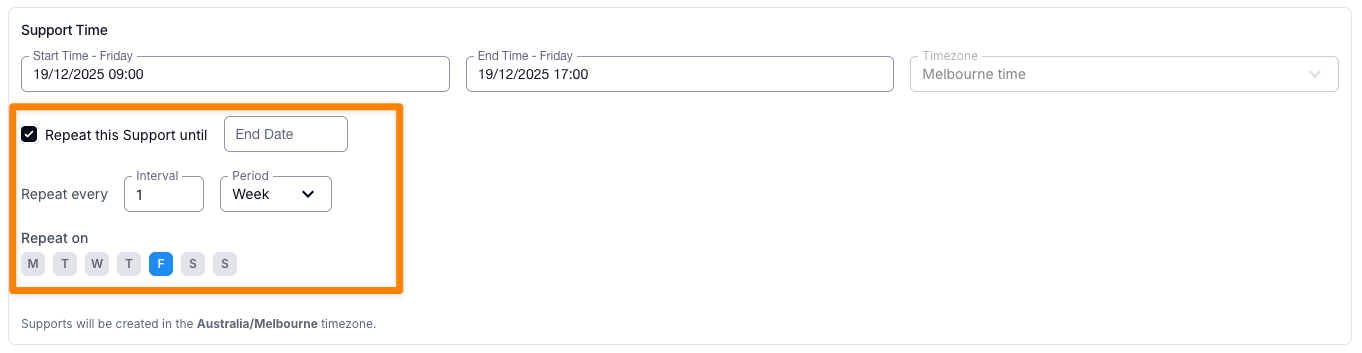
- Use the date and time picker to select the start time and date.
- Choose whether the support repeats (weekly, fortnightly, or monthly) and set an end date.
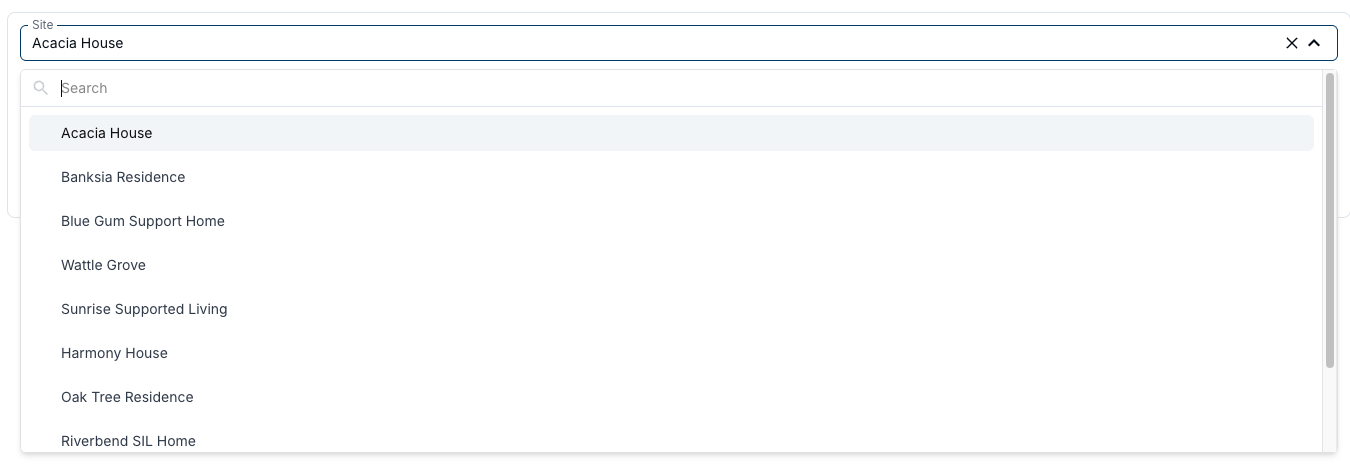
Select the Site
Select the Site from the drop-down menu. Choosing a Site will automatically apply the Support Type and restrict the Participant list to only those Participants assigned to that Site.

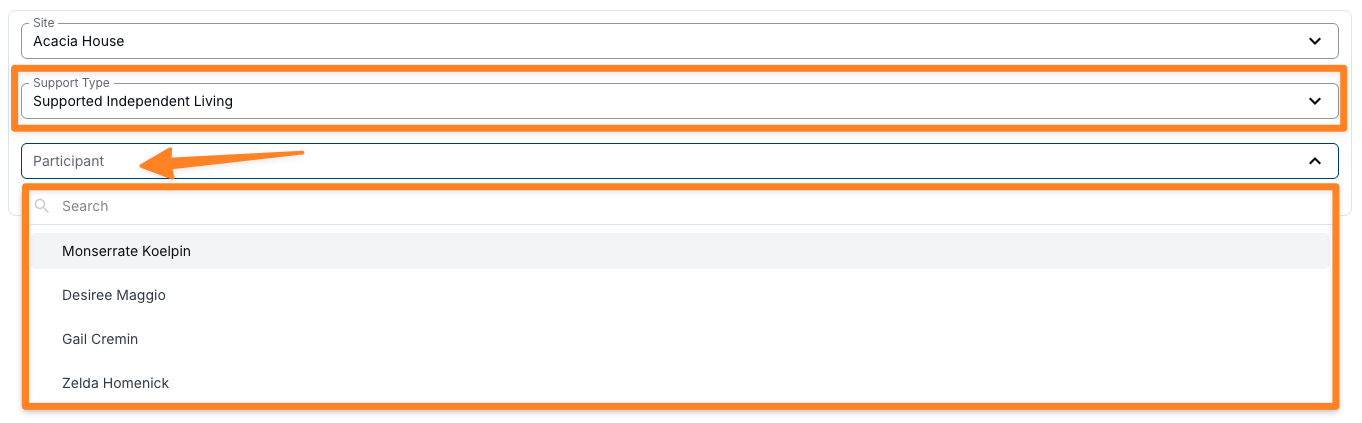
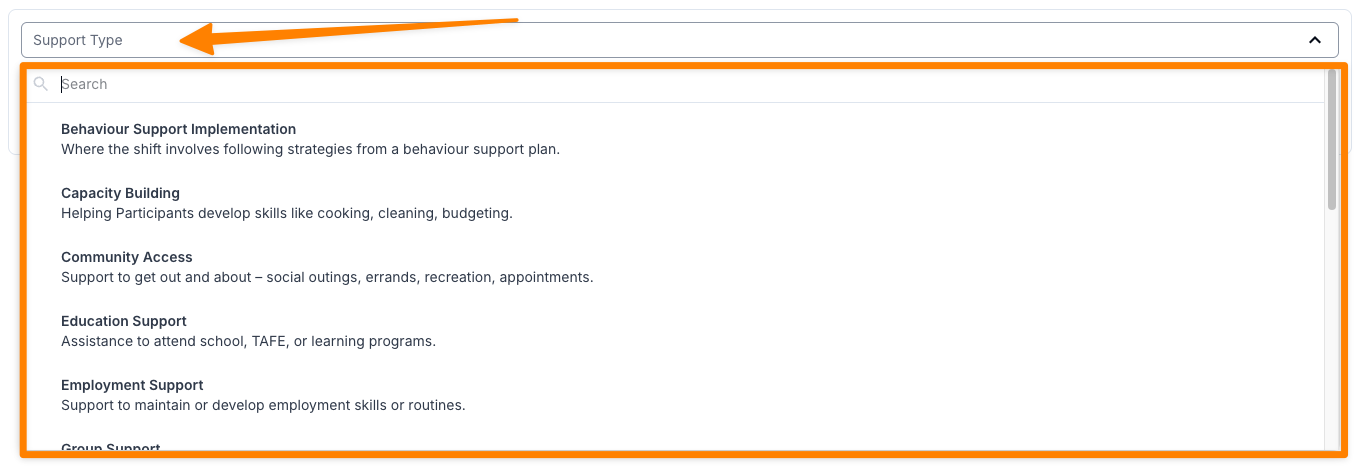
Select the Support Type
Options include Personal Care, Community Access, In-Home Support, Training and more. The dropdown is searchable, and each option shows a short description of when to use it. See Support Types for the full list.
Select the Group Support Name
After choosing the support type, write in the name of group. Example: “Craft Group” as shown in the image below.

Set the Charge Item Set
Choose the Charge Item Set that contains the Charge Items you’ll be billing from for this group. This determines how the support will be invoiced.
Select the Group Support Address
Pick the address where the group is actually located.
- This will be different from the Participant’s address.
- Use the location of the group venue, not the individual Participant’s home address.
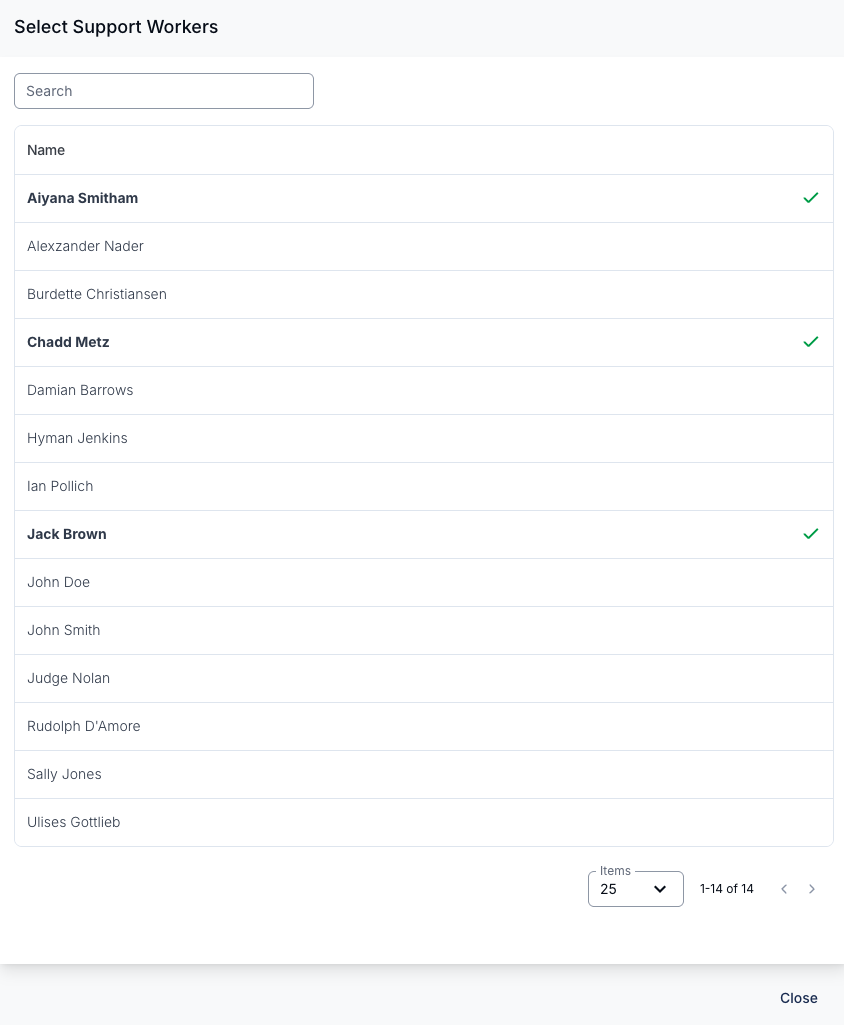
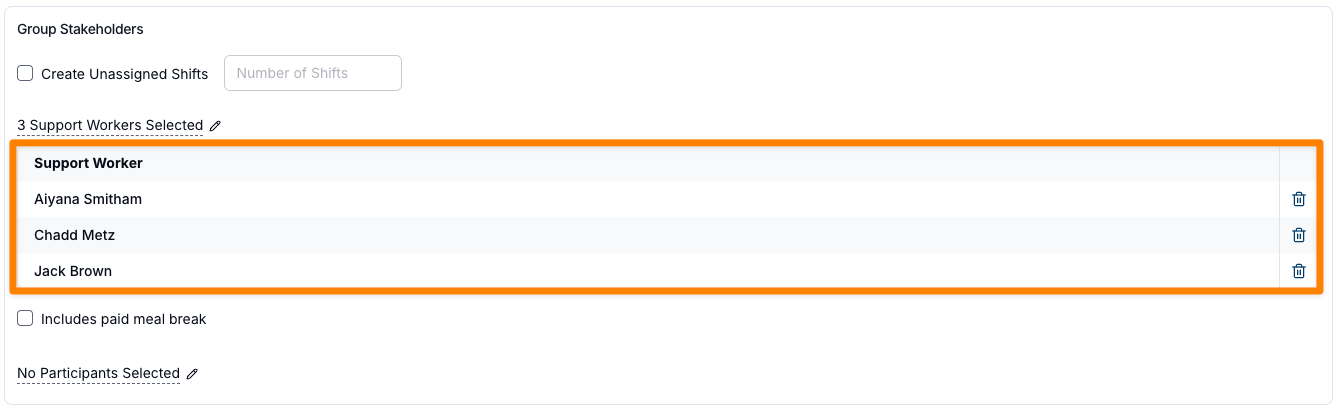
Assign Support Workers
Supports can be created without assigning Support Workers by selecting Create Unassigned Shifts and entering the Number of Shifts. This ensures there are enough shifts available to be allocated to Support Workers later.
Select the worker or workers delivering the support. Each Support Worker added here will have their own shift created within the Group Support, and each shift will generate charges at the group ratio. For example, adding two Support Workers to a group of five Participants creates two shifts, each charged at 1:5 — effectively a 2:5 ratio across the support.
You can also assign a Support Worker to a specific Participant at this step or in the Participants step below. This is for coordination purposes — it lets the Support Worker know which Participants they should focus their attention on. It does not affect the billing ratio.

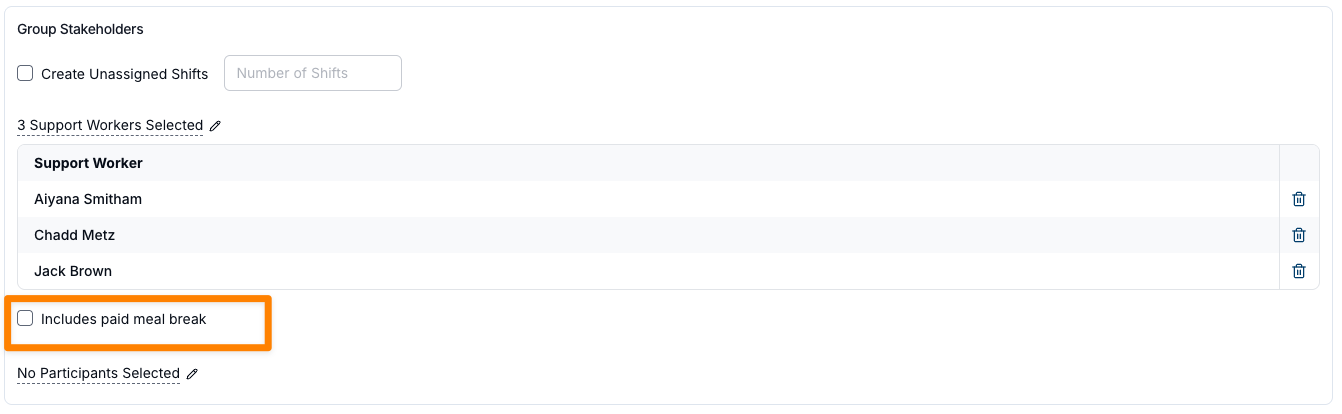
Meal break
Indicate if there is a paid meal break; if selected, this will appear in the shift details for the Support Worker(s).
Selecting Participants
When scheduling a group support, you can choose from all Participants in your Astalty account. Participants will appear in a list, and you can use the search function to quickly find and add specific individuals to the group. If the Group Support has been assigned to a Site, only Participants assigned to that Site will appear in the list.
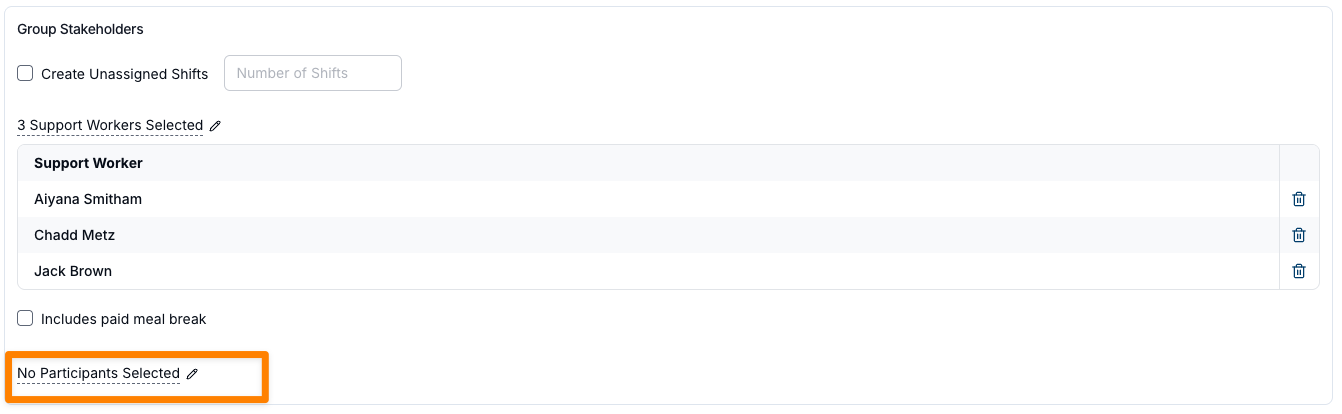
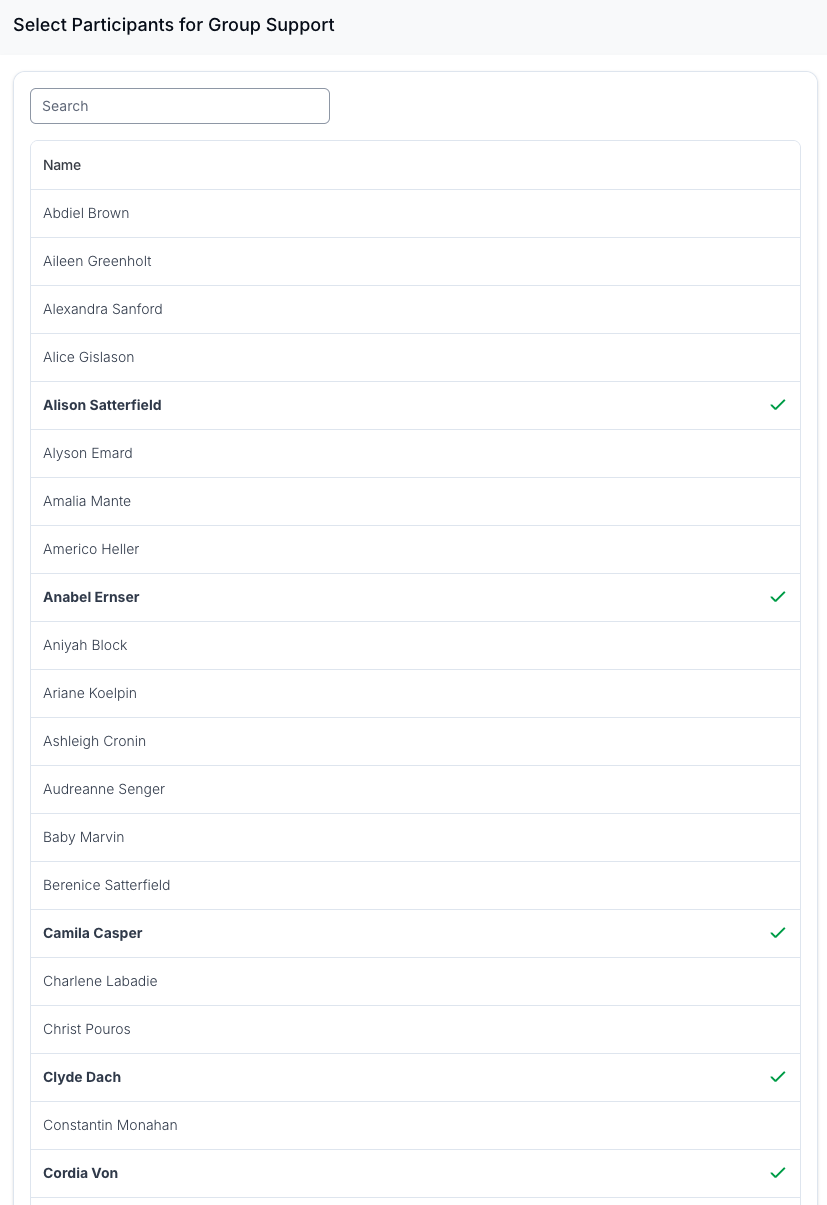
Once the Participants have been selected, you can assign Support Workers from the drop down menu next to each Participant (assuming Support Workers have been assigned to the Support in the earlier steps).
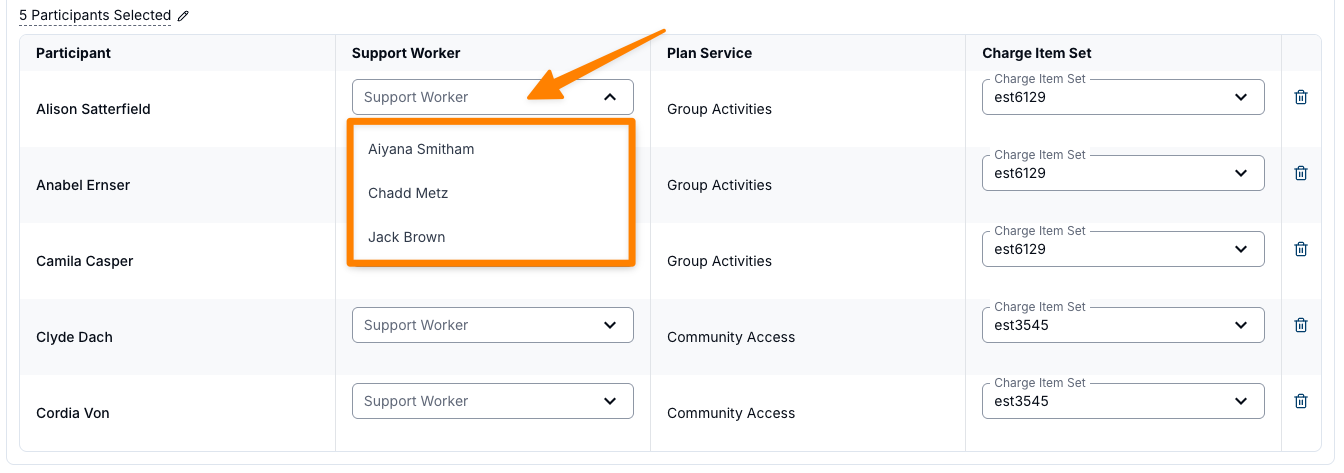
When Support Workers are assigned to Participants, this is for coordination purposes only and does not affect the billing ratio. Astalty automatically calculates the charge ratio for each Participant based on the total number of Participants and Support Workers in the Group Support.
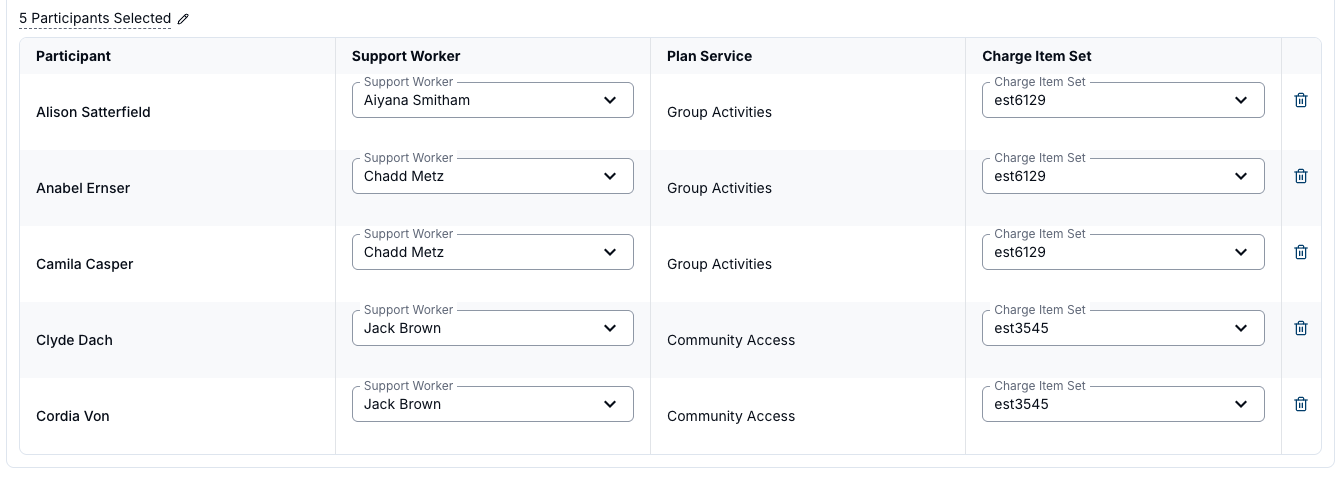
Each Participant also has their own Charge Item Set, which defaults to the one you chose for the group. Where that Participant's Charge Item Set has no kilometres-during Charge Item, a Travel During KM Charge Item Override selector appears on their row as well.
Group Travel
Configure Travel (Optional)
To add the various types of travel, simply press Add Travel.
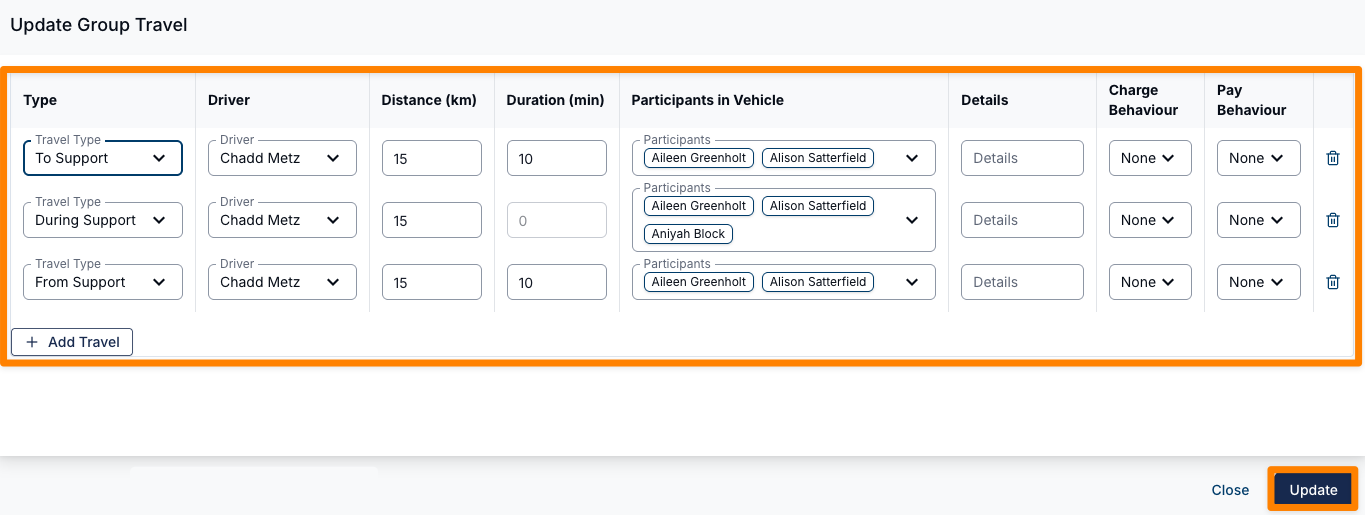
You have the option to set travel to the support, during the support, and from the support. As well as specify the driver, distance, and estimated duration.
When creating travel to and from the support, you can assign both:
- Duration – The anticipated travel time (in minutes).
- Distance – The estimated distance (in kilometres) between the start point and the destination.
Travel type – To Support
Used to record travel from the starting point (e.g., the worker’s location or first Participant’s home) to the support venue. Includes both duration and distance fields.
Travel type – During Support
Used to record travel that occurs while the support is taking place (e.g., between activities or locations). This field only allows you to enter distance in kilometres. It helps when budgeting for kilometres per shift and gives the Support Worker a clear indicator of expected travel during the shift.
Any travel recorded under Travel Type – During Support will be automatically shared between all Participants assigned to that travel type.
Travel type – From Support
Used to record travel from the support venue to the final destination (e.g., a Participant’s home). Includes both duration and distance fields.
For group supports, travel can be configured for complex arrangements. For example, a Support Worker might pick up one Participant on the way to the group, transport all four Participants during the group, and then drop home two Participants afterwards. You can also assign different Support Workers to handle specific Participants for pick-up and drop-off, which is especially useful for larger, more complex groups.
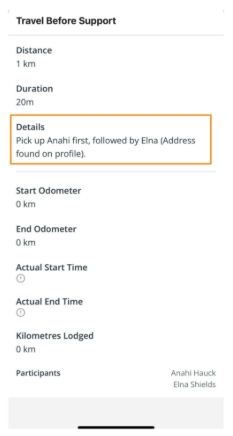
See the image below for an example of how this can be organised. In this example, three of the five Participants are to be transported to and from the group, with details added for additional context.

The image below shows how travel details appear in the Support Worker app.
Add Support and Admin Details
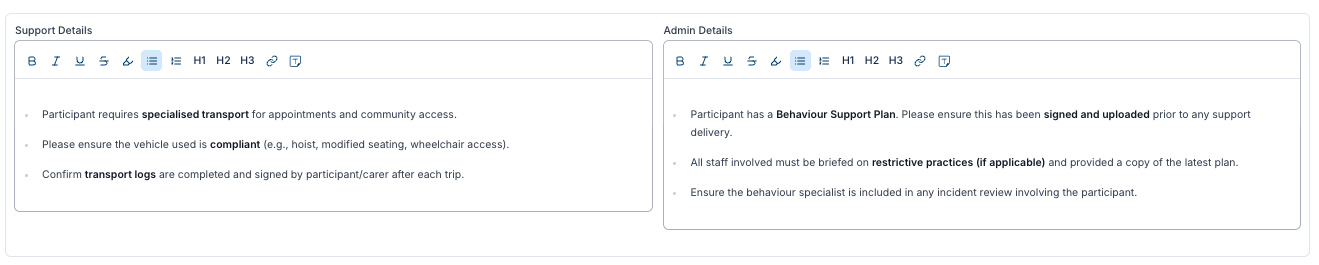
- Support Details – Visible to Support Workers.
- Admin Details – Visible only from the desktop application.
Set Charges
- If billing from a Charge Item Set, configure automatic charges. For example, you would like to bill from the Community Access 04, Charge Item Set.
- For respite, bill from a Short Term Accommodation Charge Item Set — see How to Claim for Respite?.
- For other billing types (e.g., SIL), you may wish to set up manual charges.
- If Centre Capital Costs apply to this support, select the option in this list. There's more information on Centre Capital Costs here.

Additional Charges
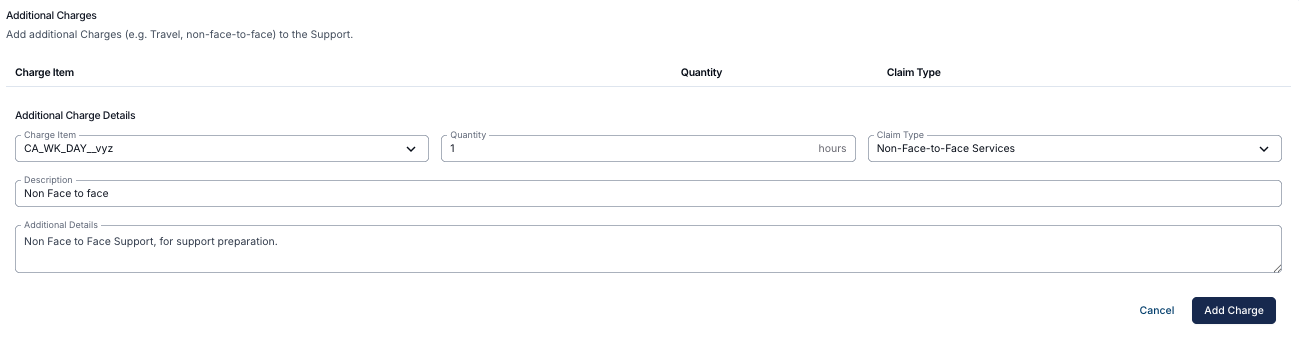
Add any Additional Charges (e.g., non-face-to-face work) using the drop-down. Enter details such as quantity, claim type, description, and any extra notes, then click Add Charge.

Manual Charges
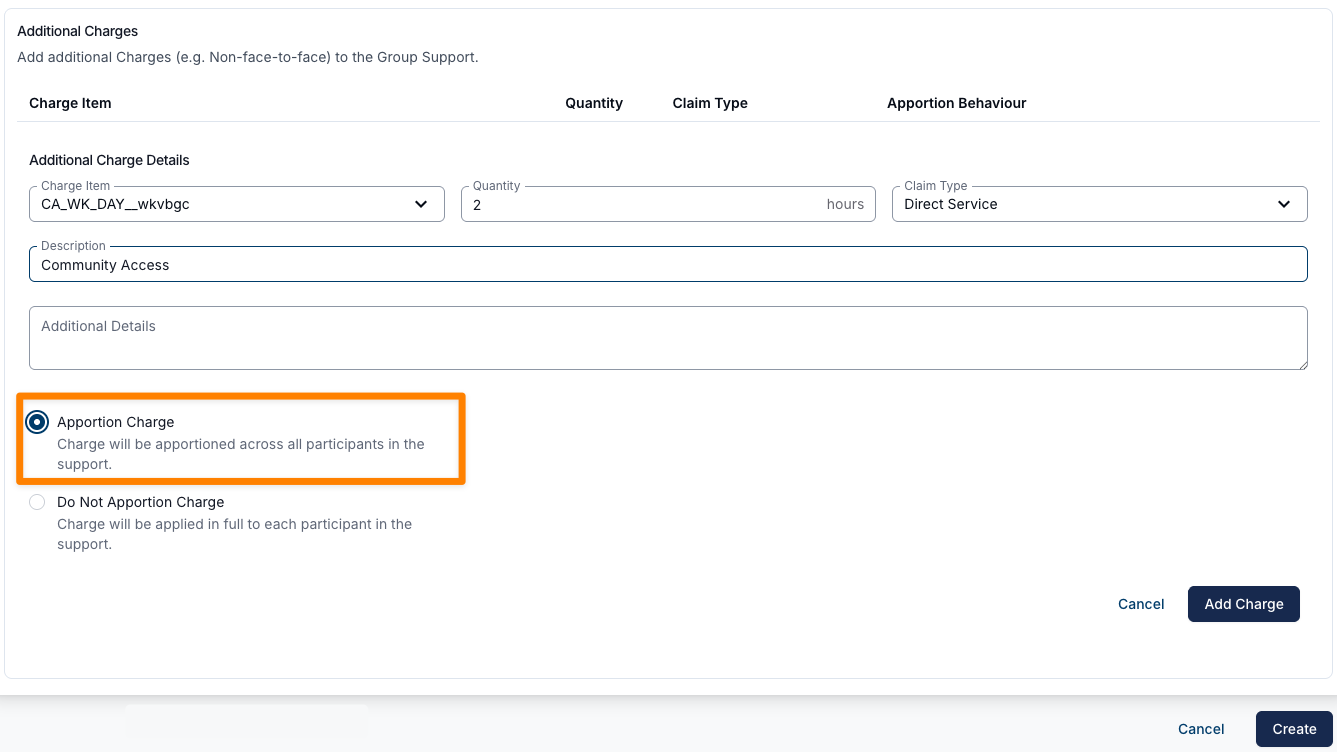
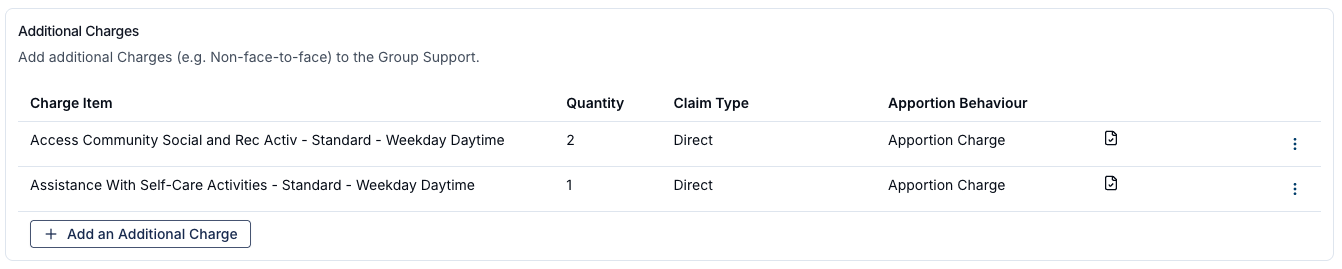
There may be occasions where more than one type of support is delivered within a single shift—for example, 2 hours of Community Access and 1 hour of Assistance with Self Care. Instead of using Charge Item Sets (which would require creating separate shifts), you can use Manual Charges to record multiple supports within the same shift.
To do this, create the support as usual and complete all required details, but leave the Charge Item Set field blank. Scroll down to the Charge Option section and select Manual Charges.

From here, select Add an Additional Charge and choose the appropriate Charge Item from your existing list. This allows you to allocate specific hours within the shift to the correct Charge Item. You can continue adding additional Charge Items as needed until all supports delivered during the shift are accounted for.
When using Manual Charges for Group Supports, you will be prompted during shift creation to confirm whether the Charge Items should be apportioned across all Participants. Please note that once the shift has been created, manual charges cannot be apportioned or edited.
To see more on this, check out the video walk-through.
For more information on Managing Manual Charges, visit the guide here.
Create the Shift
- Once all details are complete, click Create to save the shift.
Duplicating a Group Support
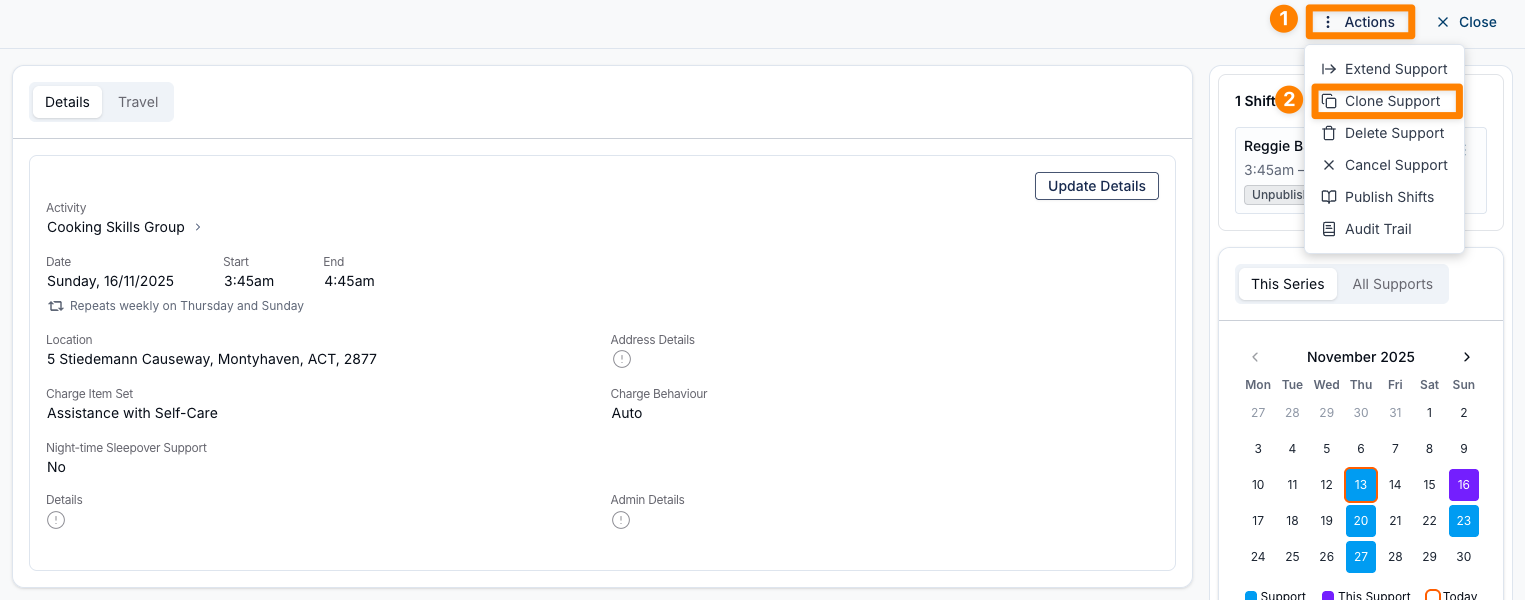
Cloning Support allows you to quickly create a duplicate of an existing scheduled event, including all shift details and uploaded Documents. This is especially helpful when adding a new activity for an existing group while keeping the same Support Workers and any consistent information — such as transport, support ratios, and location.
- Open the Support you want to duplicate
- Click Actions
- Select Clone Group Support
- Update any details that need to be changed (such as date, time, location, etc.)
- Once all updates are complete, click Create at the bottom of the pop-out
Support Workers Who Can No Longer Be Assigned
A clone brings across the Support Workers from the original Support, and one of them may no longer be assignable on the new date — a worker whose required qualification has lapsed, or one who is marked incompatible with a Participant on the group. Astalty tells you before you click Create.
A warning sits above the selected Support Workers, one line per worker, naming the reason:
Sally Jones is missing First Aid Certificate, Police Check, Midazolam Training and cannot be assigned to this support.
Daniel Roberts is marked as incompatible with Addie Nikolaus and cannot be assigned to them.
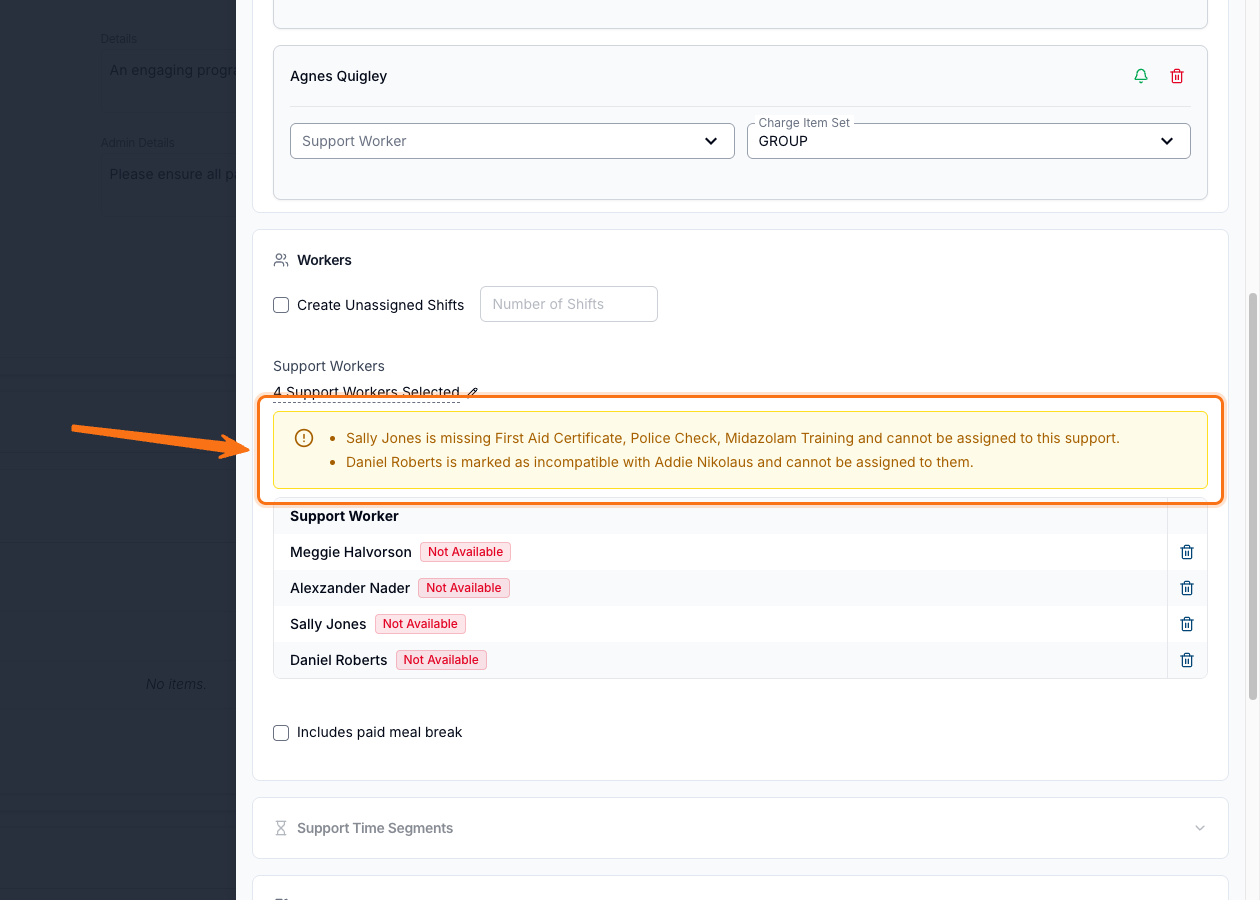
There are two ways to take the worker off the Support:
- Click the bin icon on their row in the table below Support Workers, or
- Click Support Workers, find them in the list, and untick them.
A worker who is already on the Support can always be unticked, even though they can't be added back. Their row stays highlighted with a working tick and the chip reads Qualification Not Met rather than Qualification - Selection Blocked. Untick them and the row greys out, so they can't be re-selected.
If you click Create with a blocked worker still selected, the Support isn't created and an error appears against the Support Workers field:
Sally Jones cannot be assigned without the required qualification(s): First Aid Certificate.
Removing that worker clears the error straight away — you don't need to click Create a second time to make it go.
Editing a Group Shift
Editing Shift Details
To make changes to a Group Support, open the relevant Support and select Update Details.
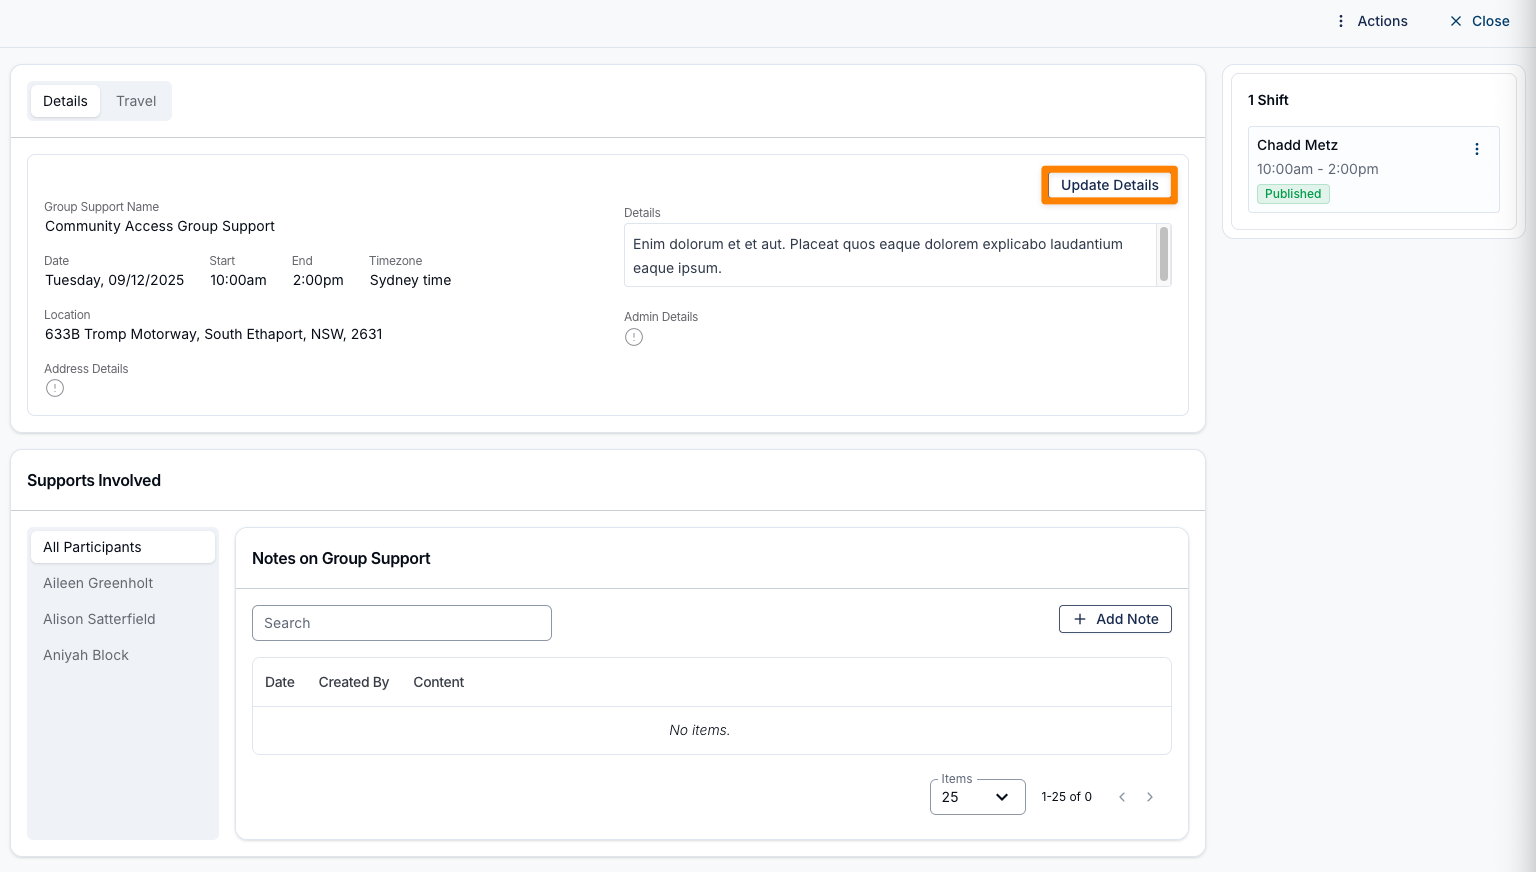
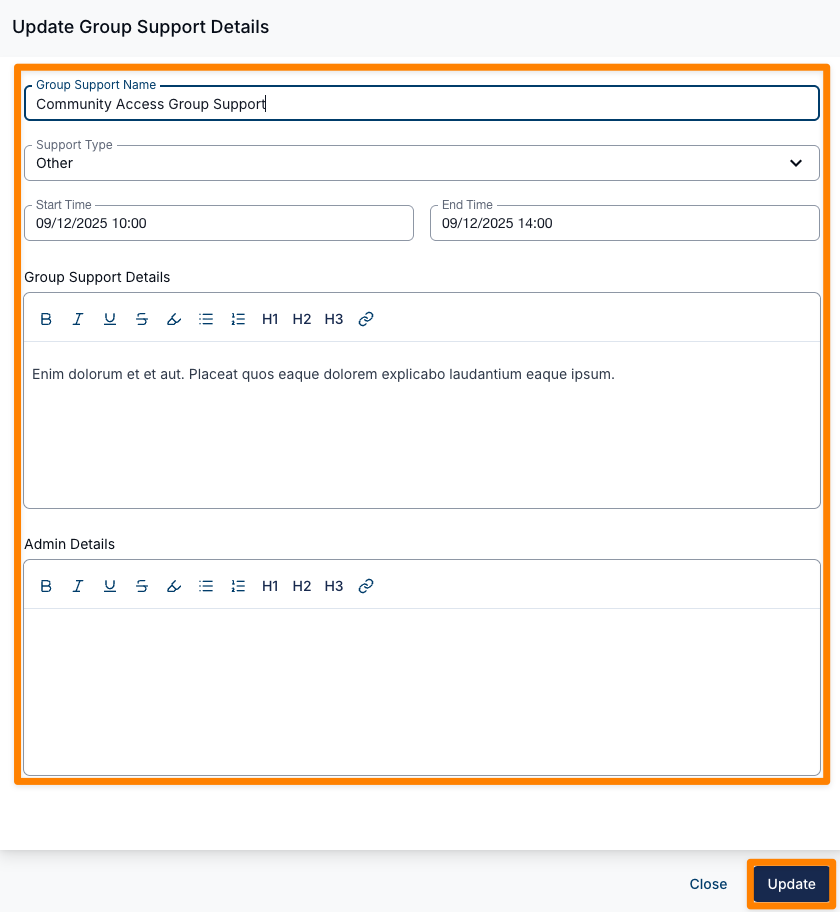
You can edit the following fields:
- Group Support Name
- Support Type
- Start and End Times
- Group Support Details
- Admin Details
- Charge Option
After updating the required information, click Update to save your changes.
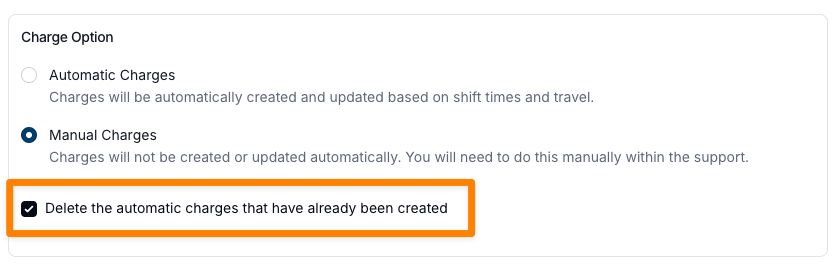
Changing the Charge Option
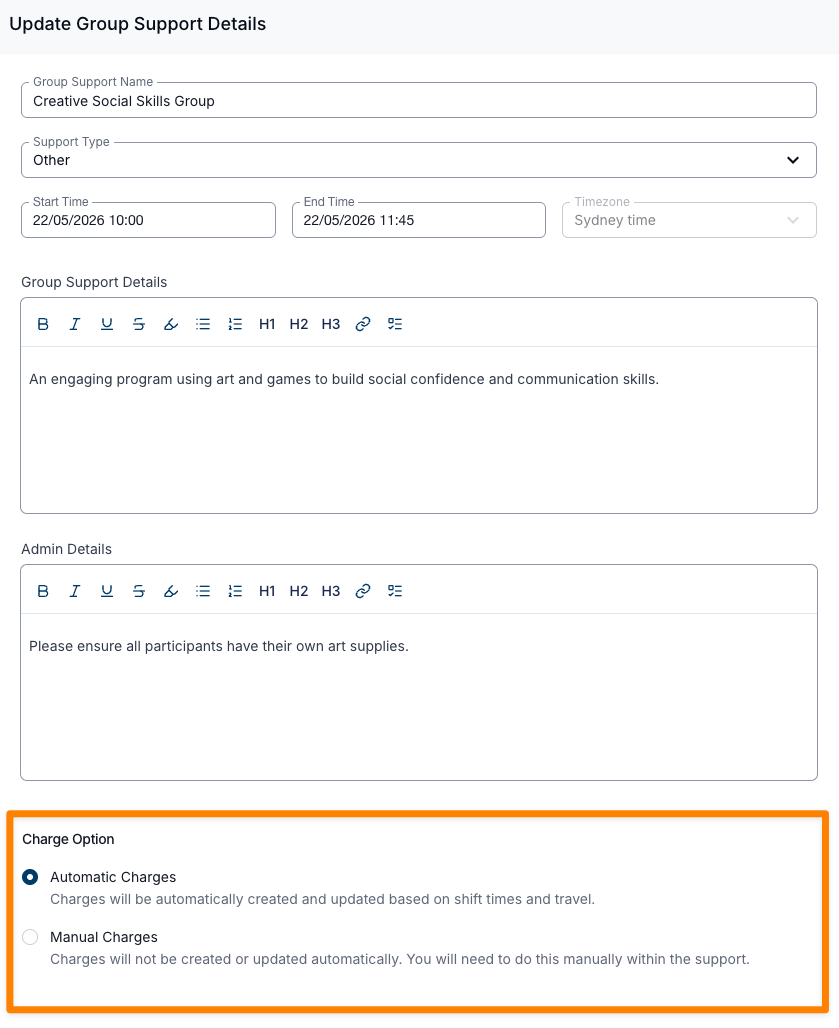
After a Group Support has been created, you can change the Charge Option from Automatic Charges to Manual Charges at any time. This is useful when you realise after the fact that a shift covers more than one type of support and needs to be billed manually.
To change the Charge Option:
- Open the relevant Support and click Update Details.
- Scroll down to the Charge Option section.
- Switch between Automatic Charges and Manual Charges as required.
- Click Update to save your changes.
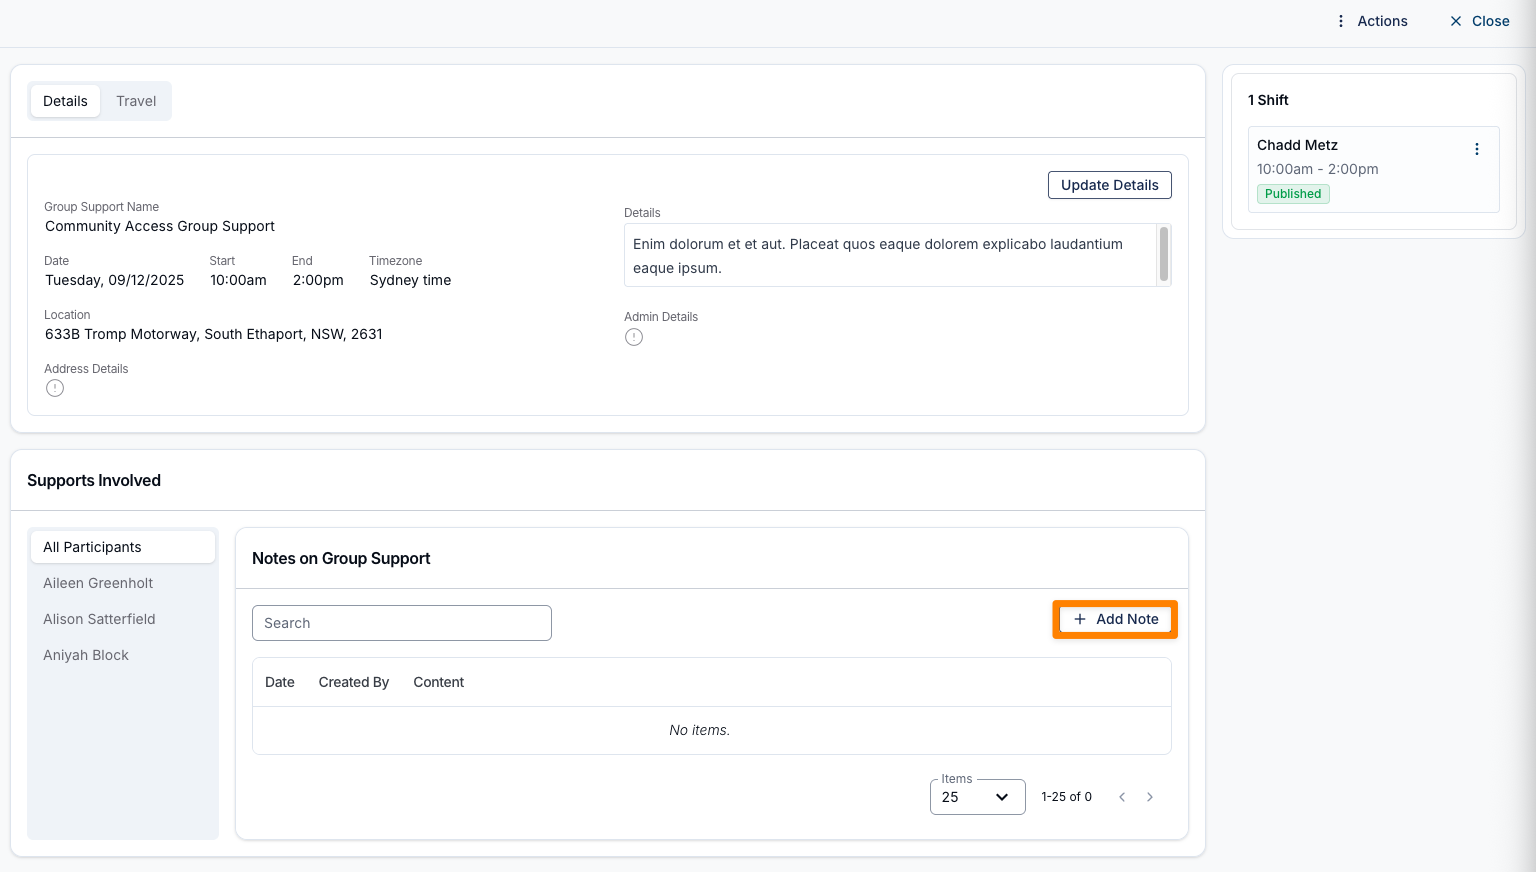
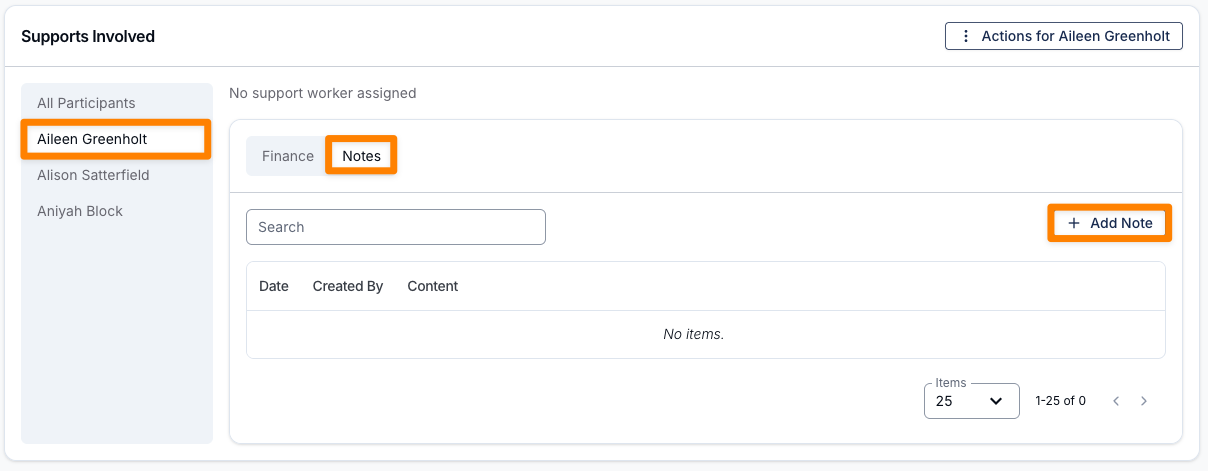
Adding Notes to a Support
You can add Notes to a Support by selecting Add Note.
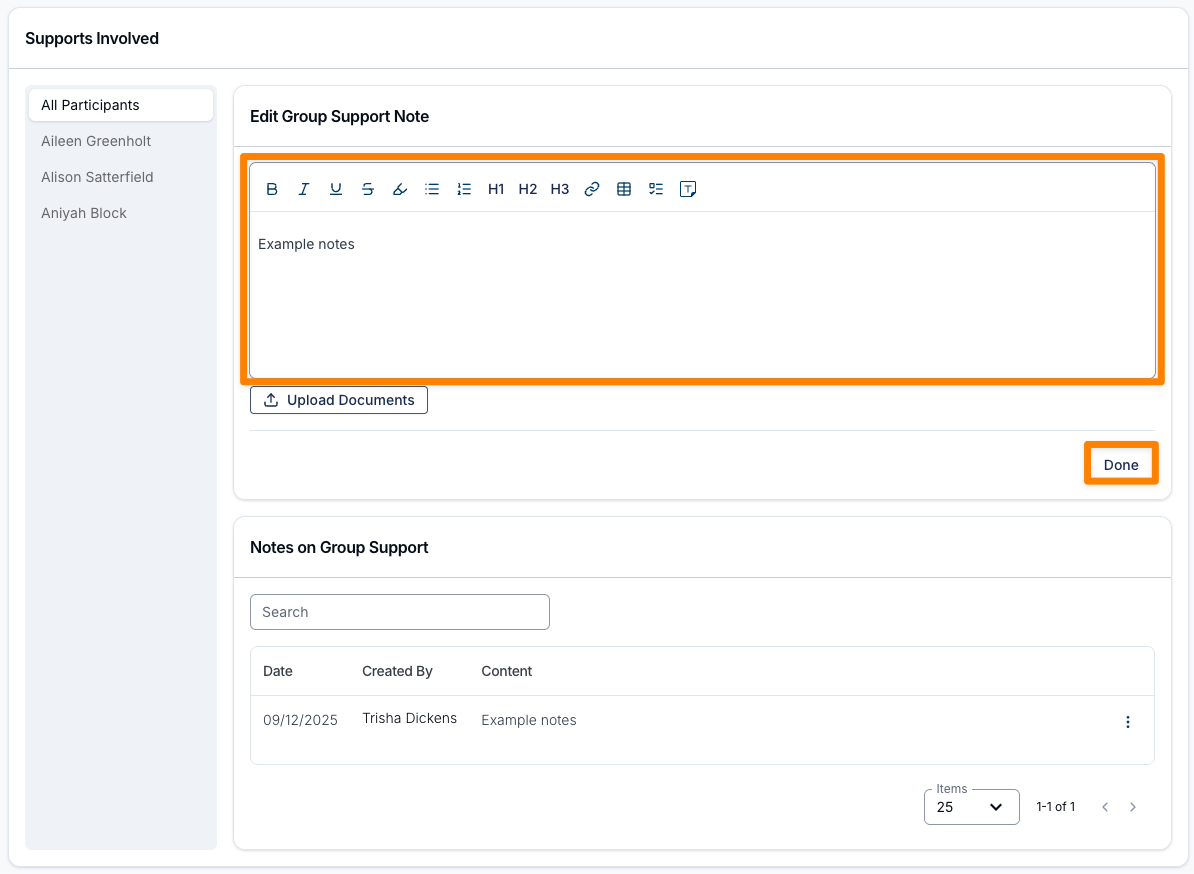
Enter the required information (you can also upload documents if needed) in the space provided, and then click Done.
The Note will now appear under Supports Involved.
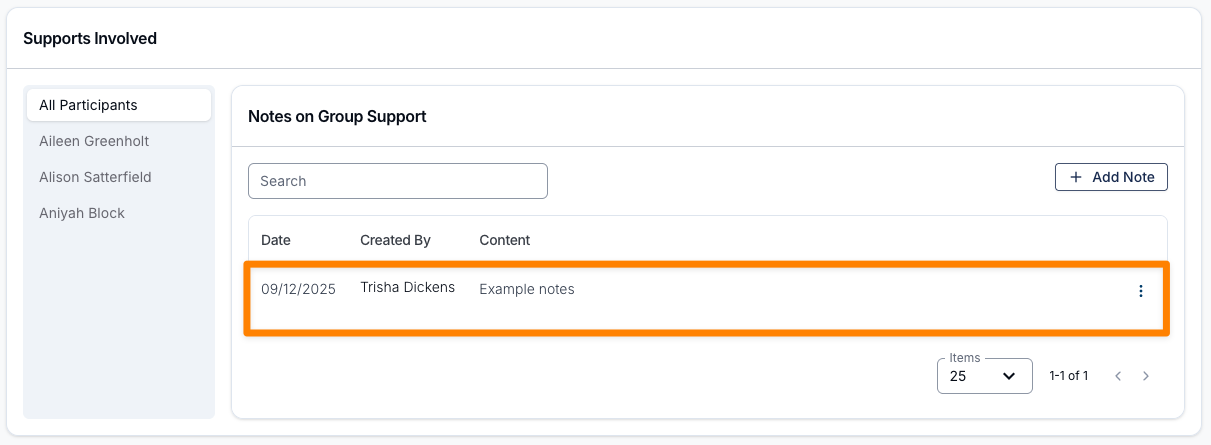
If any changes need to be made to the Note after it has been added, you can click on the three dots next to the Note and select Edit Note.
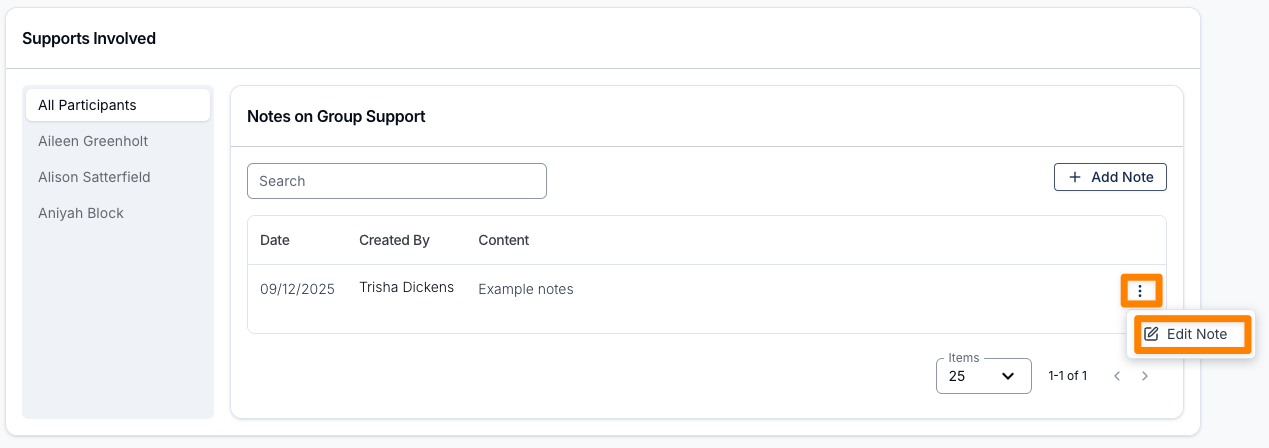
You can continue to add more Notes if required by following these steps again.
Adding Support Workers after the Support is Created
If Support Workers were not assigned to Participants when the Group Support was created, you can assign them later by following these steps:
- Open the support.
- In Supports Involved, select a Participant to check whether a Support Worker has been assigned.
- If no Support Worker is assigned, click Actions for {Participant Name}.
- Select Assign Support Worker.
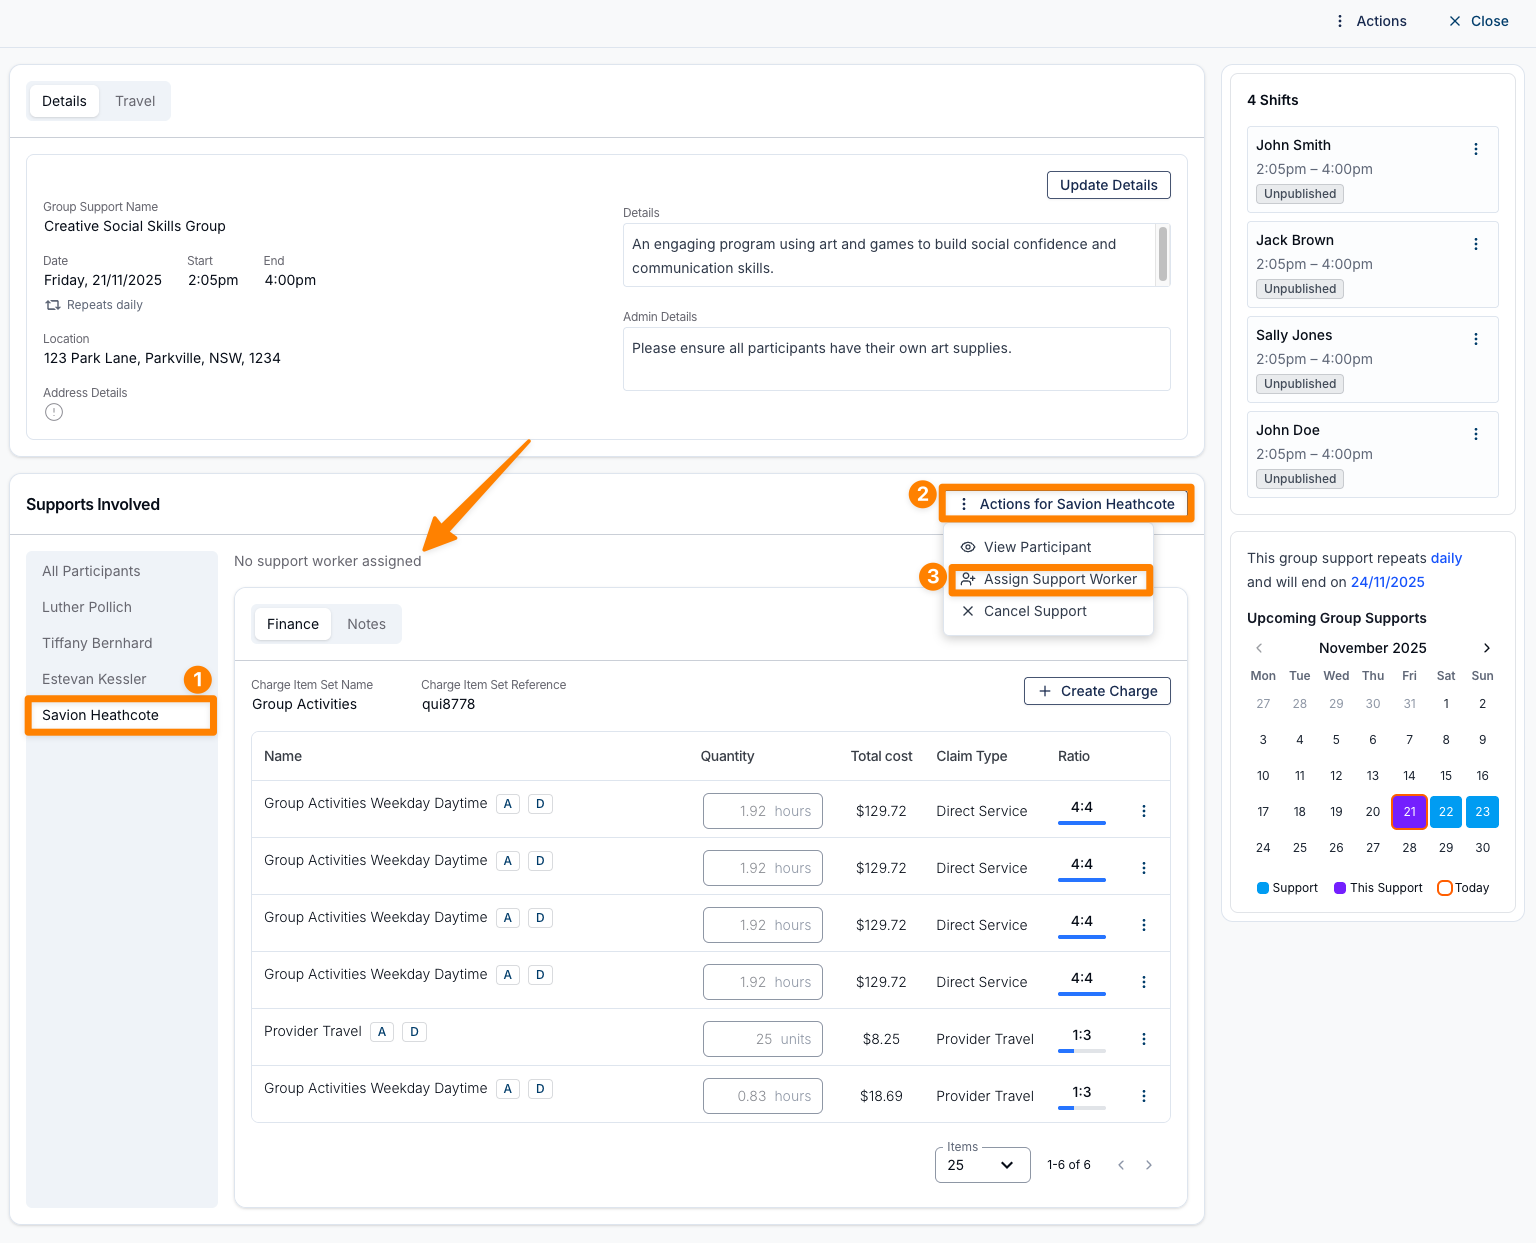
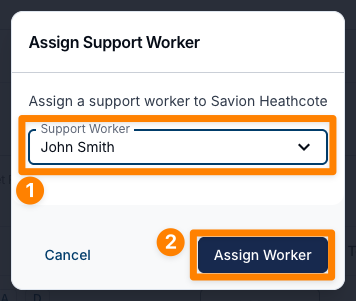
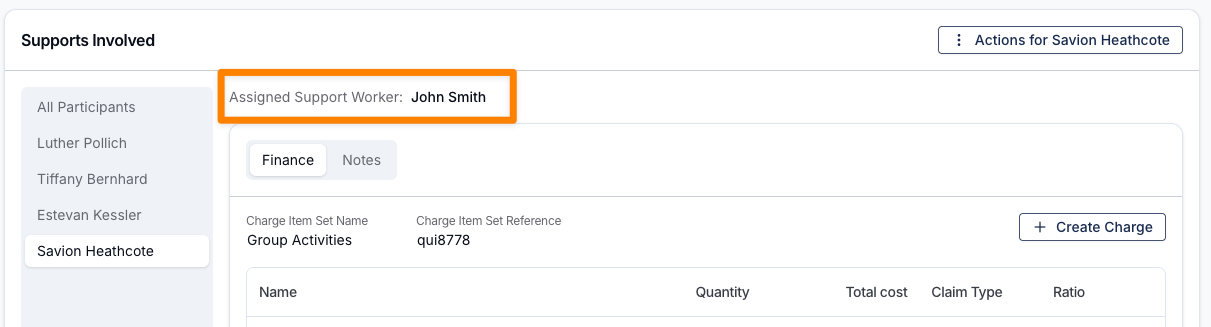
- Choose a Support Worker from the dropdown list (limited to those already assigned to the shift), then click Assign Worker. The Support Worker will then be displayed on the Supports Involved for the Participant.
- To reassign a Participant to a different Support Worker, click Actions for {Participant Name} again and select Update Support Worker.
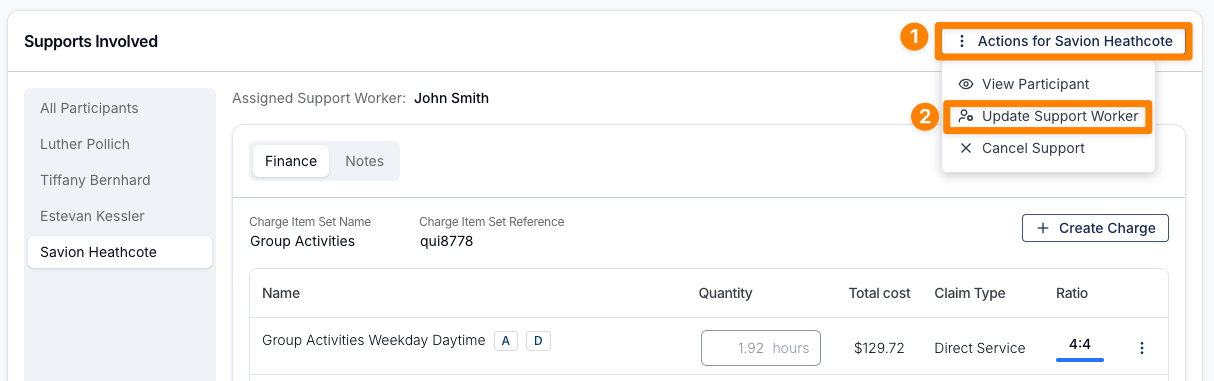
- A pop-up will show the current assignment. Select a new Support Worker from the dropdown list and click Update Worker to save your changes.
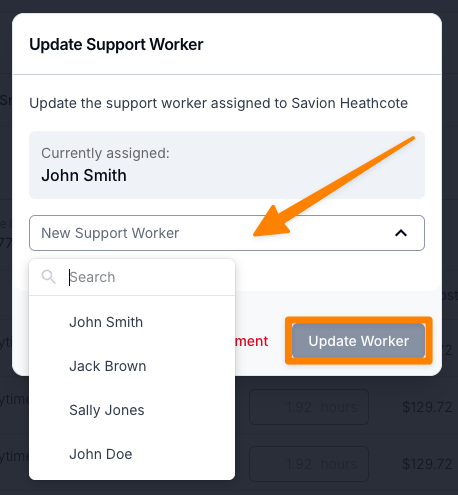
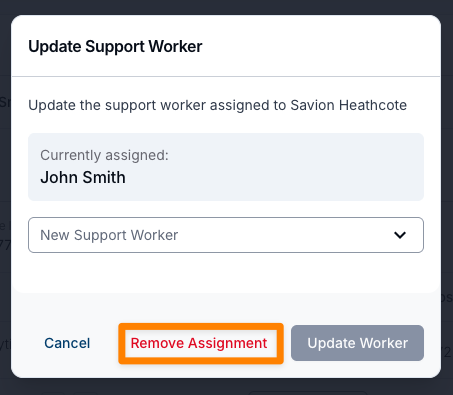
- You can also remove the Support Worker and leave the Participant unassigned by selecting Remove Assignment.
Updating Participant Specific Details
Each Participant in a Group Support can be managed individually.
To update their details, select the Participant’s name and click the Actions button. Which options appear depends on that Participant's support, but the full list is:
- View Participant — open their Participant profile
- Message via SMS
- Assign Support Worker / Update Support Worker
- Update Charge Items — change that Participant's Charge Item Set, and their Travel During KM Charge Item Override where one applies
- Update SMS Reminder — see SMS Reminders
- Update Support Time Segments — see Support Time Segments
- Cancel Support / Reinstate Support — these apply only to the selected Participant
- Remove from Group Support
- Delete Support — see Removing a Cancelled Participant
Most of these are greyed out once the Participant's support is cancelled.
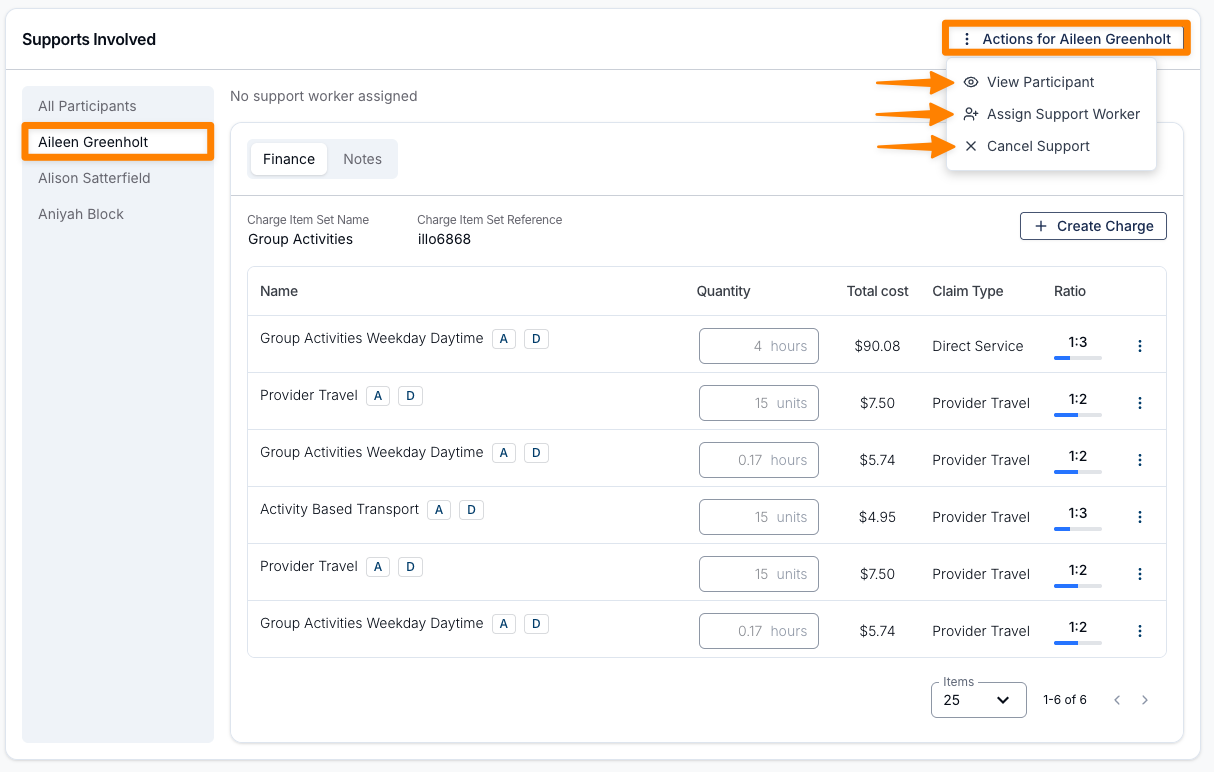
You can also add Notes specific to this Participant by selecting the Notes tab, and entering a Note following the same process as listed above for adding Notes to a Support.
Updating a Participant's Charge Item Set
You can move one Participant onto a different Charge Item Set without touching how anyone else in the group is billed — and apply the same change across future sessions in a recurring series. Use it when a Participant's funding moves to a different set, for example when a new plan starts partway through a booking.
- Open the Group Support.
- In Supports Involved, select the Participant.
- Click Actions for {Participant Name} and select Update Charge Items.
- Choose the new Charge item set. The list only offers sets that sit on the Participant's plan for that support's date.
- Where it appears, set the Travel During KM Charge Item Override (optional). This field only shows when an override is already in place, or when the set you picked has no during-support travel Charge Item of its own.
- Click Update Charge Items.
If the Group Support is part of a recurring series, the Update Recurring Group Support window opens next. The current session is always included and can't be unticked; tick any future sessions you also want to change, then click Update {n} Group Supports.
Removing a Cancelled Participant
When a Participant's support in a Group Support has been cancelled, you can remove them from the Group Support entirely so they no longer appear as a red cancelled entry on the support or the schedule.
A Delete Support action appears in the Participant's Actions menu, but only when the Participant has no invoiced items on that support. If any of the Participant's items have already been invoiced, the cancelled entry stays in place for your records and Delete Support is not available.
To remove a cancelled Participant:
- Open the Group Support and select the cancelled Participant.
- Click Actions for {Participant Name} and select Delete Support.
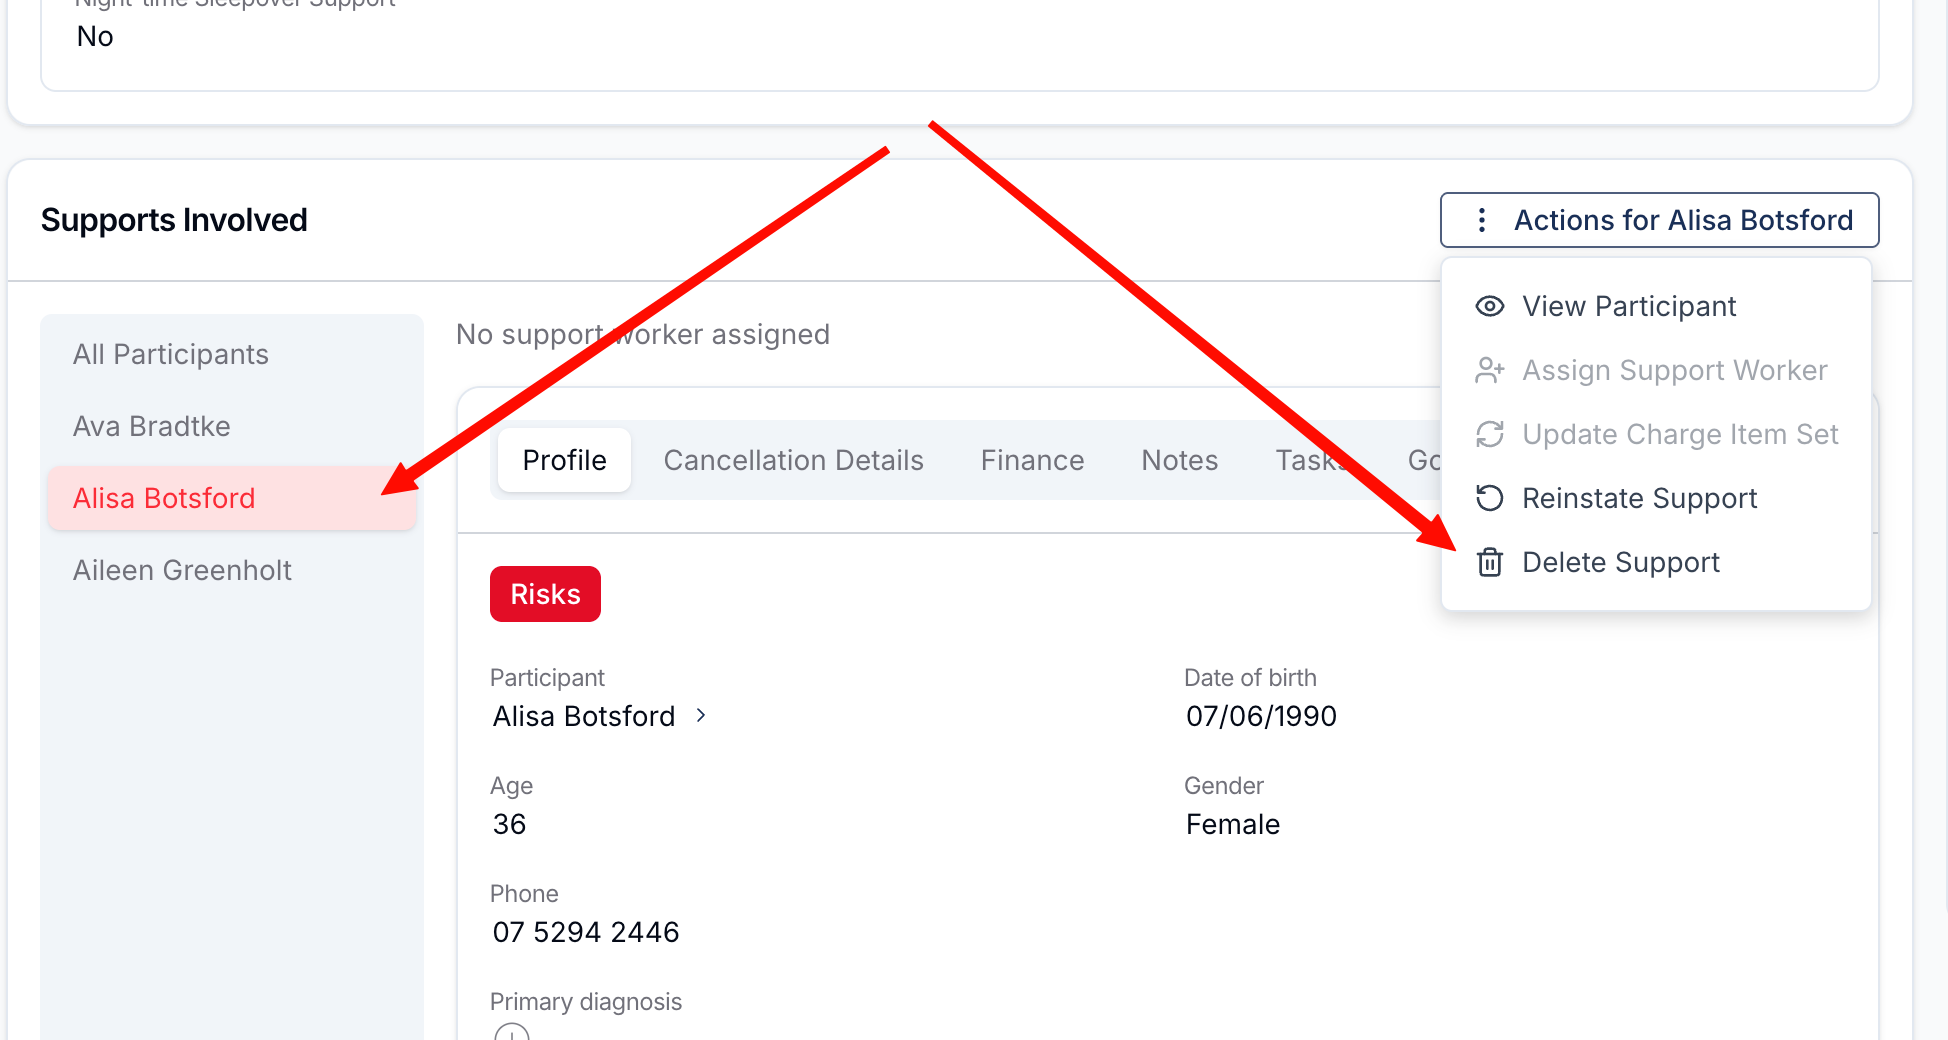
- Confirm the removal. The Participant's support is removed from the Group Support along with its shifts, notes and travel. Other Participants keep their bookings.
Repeating Group Supports
If the Group Support is part of a repeating series, selecting Delete Support opens the Remove {Participant Name}'s Recurring Supports window. The Participant is removed from the current session, and you can tick any future cancelled sessions to remove them from those in the one action.
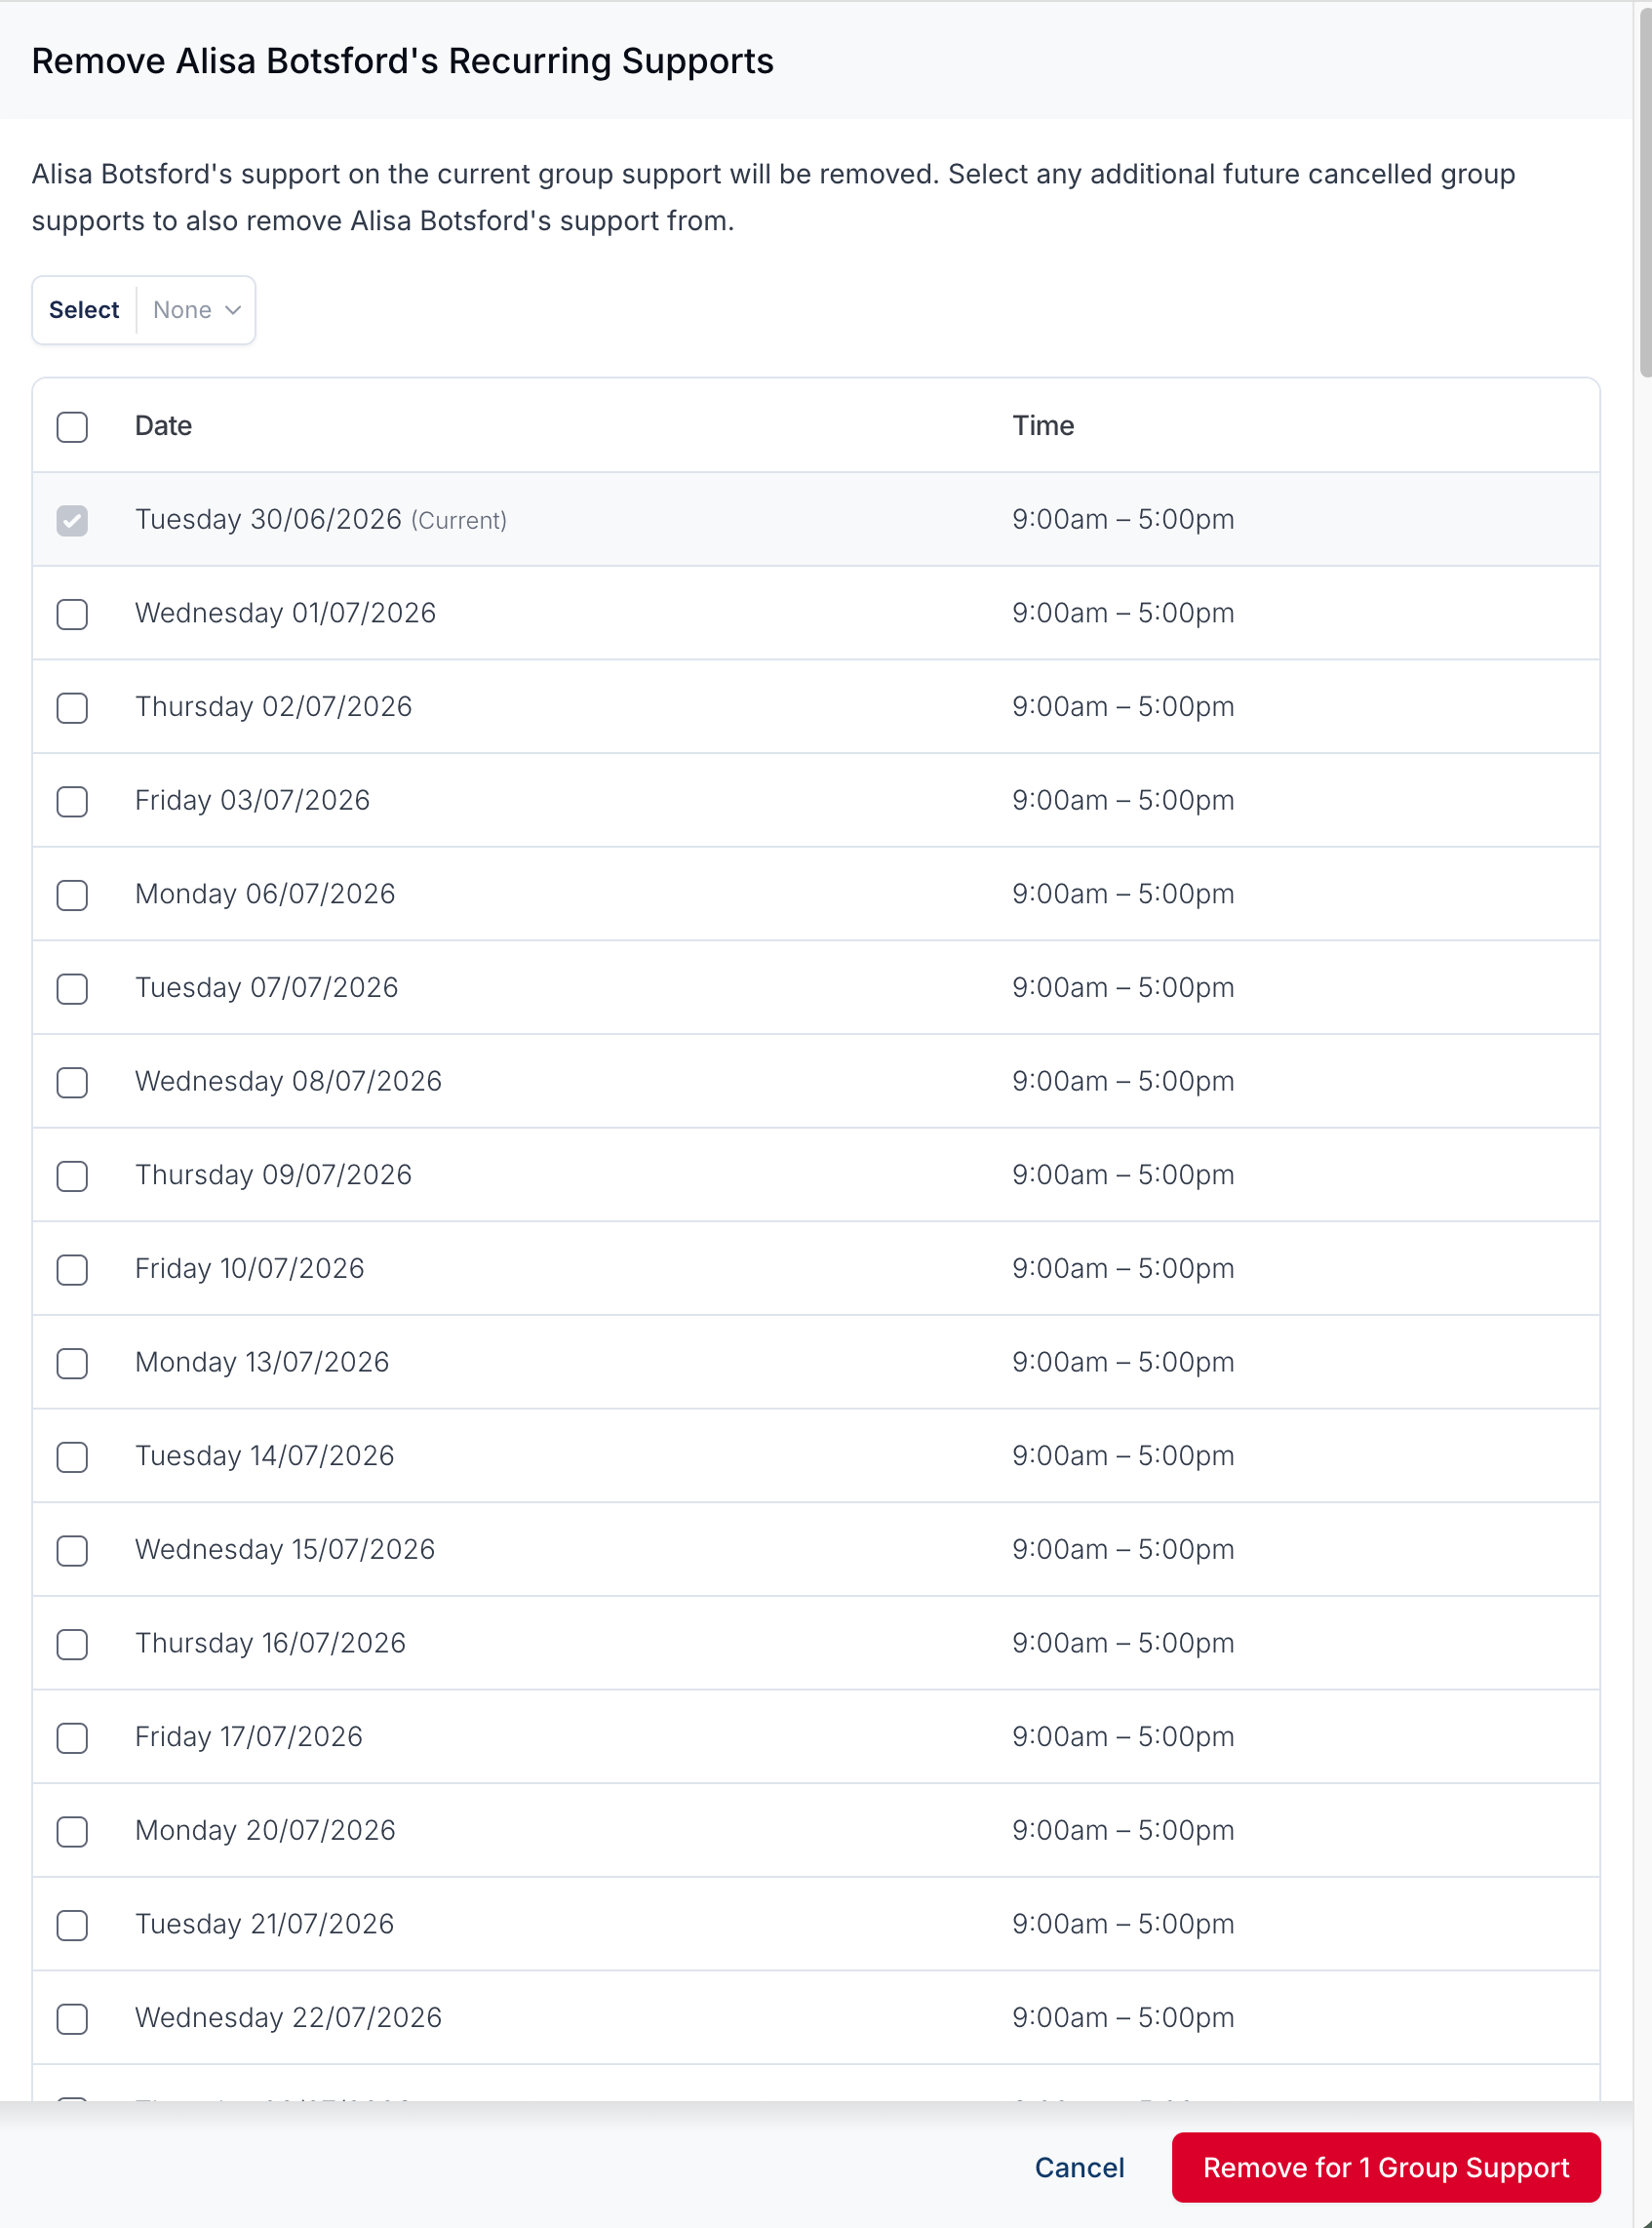
Only future sessions where the Participant is already cancelled (and has no invoiced items) can be selected. Tick the sessions you want, then click Remove for {n} Group Support(s).
Managing Charges for a Participant
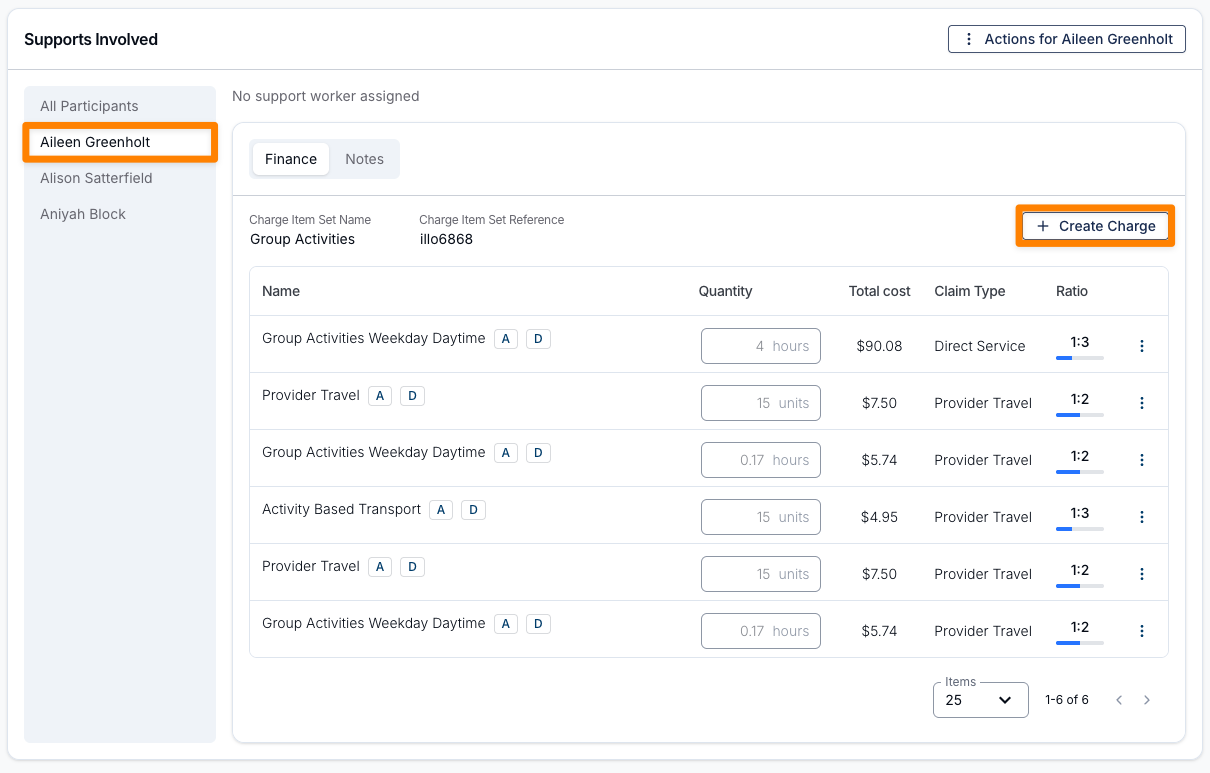
You can delete individual line items within the Group Activity if they are not relevant to a Participant by clicking the three dots next to the Charge and selecting Delete.
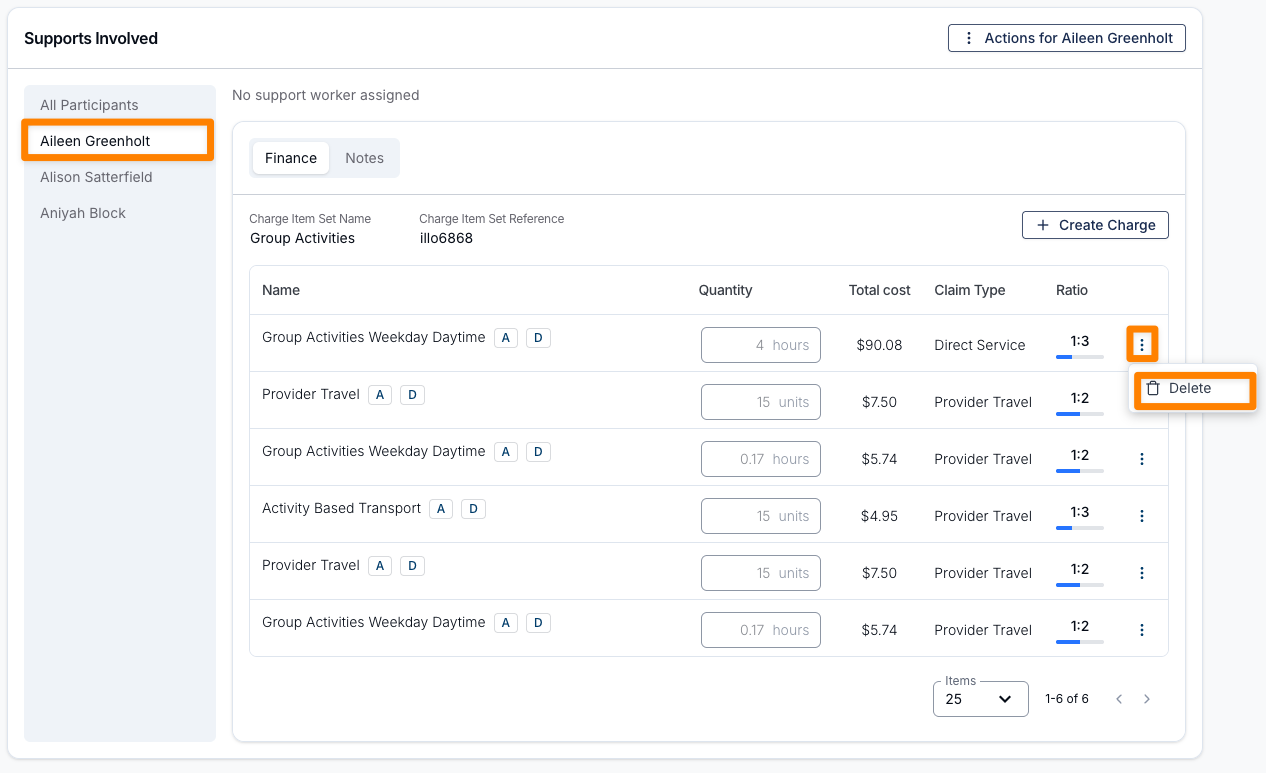
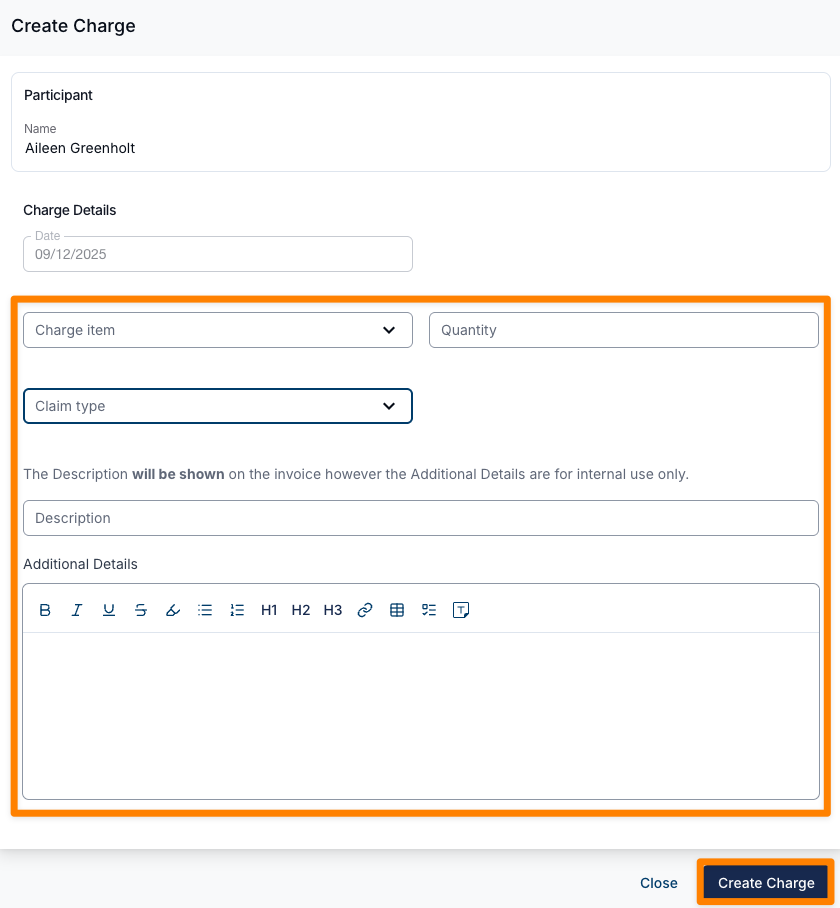
To set custom Charges for a Participant, select Create Charge. This opens a pop-out window where you can choose specific Charge Items from within the Participant’s current Services. This is especially useful when a Participant requires billing from a different funding category.
Updating Support Worker Shift Details
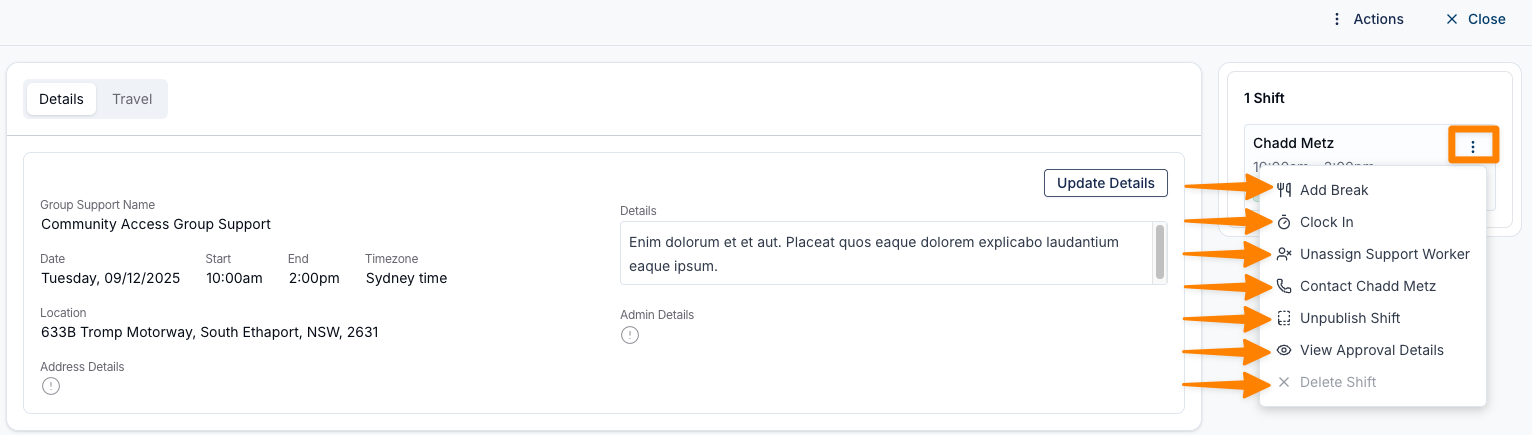
Once a Support Worker has been assigned to the Support, you can update additional shift information. Available actions include:
- Add Break
- Clock In
- Unassign Support Worker
- Contact Support Worker
- A pop-out will display their mobile number, allowing calls directly from your device (if supported).
- Publish / Unpublish Shift
- View Approval Details
- Delete Shift
- You cannot delete the last shift - Shifts can only be deleted if it is not the last remaining shift assigned to a support.
Updating Travel for a Support
To adjust the Travel associated with a Support, select Travel at the top of the Support. Then click Update Group Travel to make any required changes.
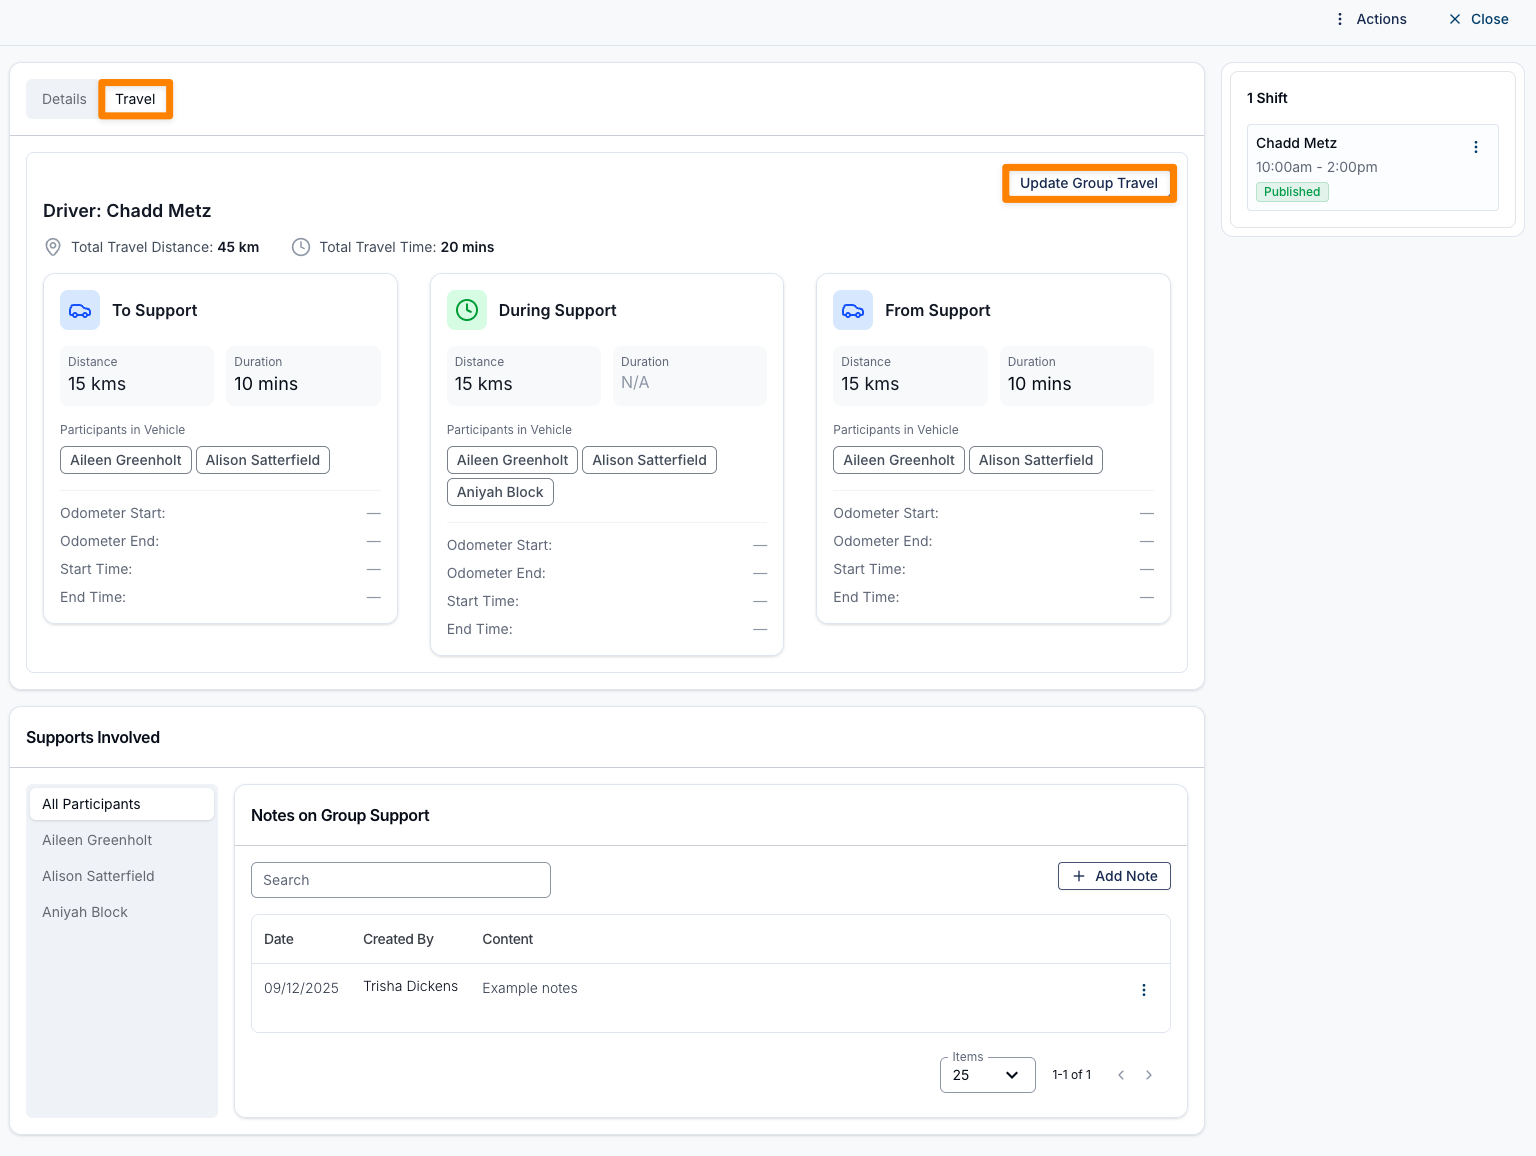
Once you’ve finished editing the details, click Update to save your changes.
Updating Charge Ratios
You can adjust how hourly charges are split in a Group Support without needing to create separate supports. There are two ways to do this — you can update the billing ratio for the whole Group Support, or update the ratio for an individual Participant's auto-created charges.
Update the Billing Ratio for the Whole Group Support
Use this when you want the group's billing ratio to stay fixed — for example, when the agreed ratio was 1:6 but a Participant cancellation has caused Astalty to automatically adjust the ratio to 1:5.
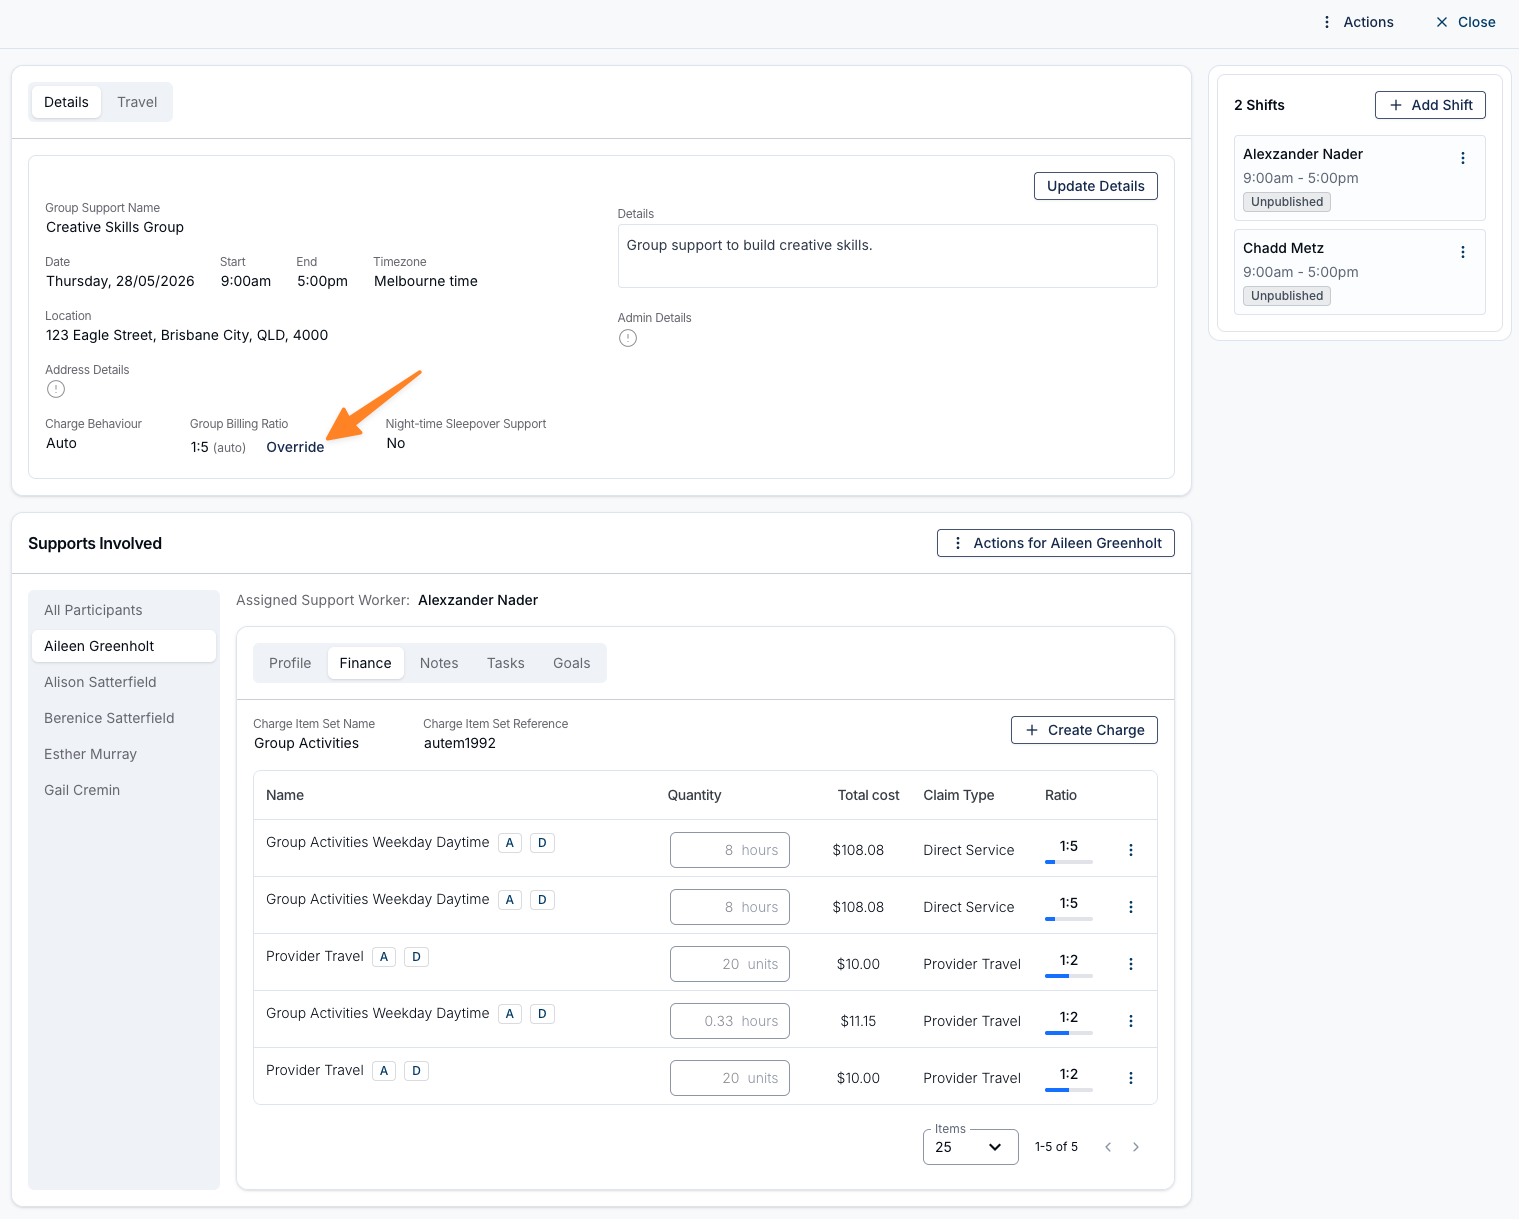
- Open the relevant Group Support.
- Go to Group Support Details.
- Find the Group Billing Ratio field.
- Click Override (or Edit if an override already exists).
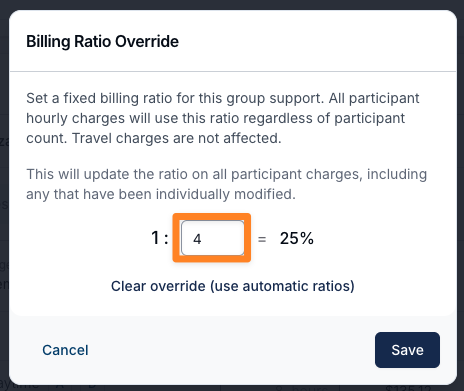
- Enter the new denominator for the group billing ratio.
- Review the preview to confirm the ratio is correct.
- Click Save.
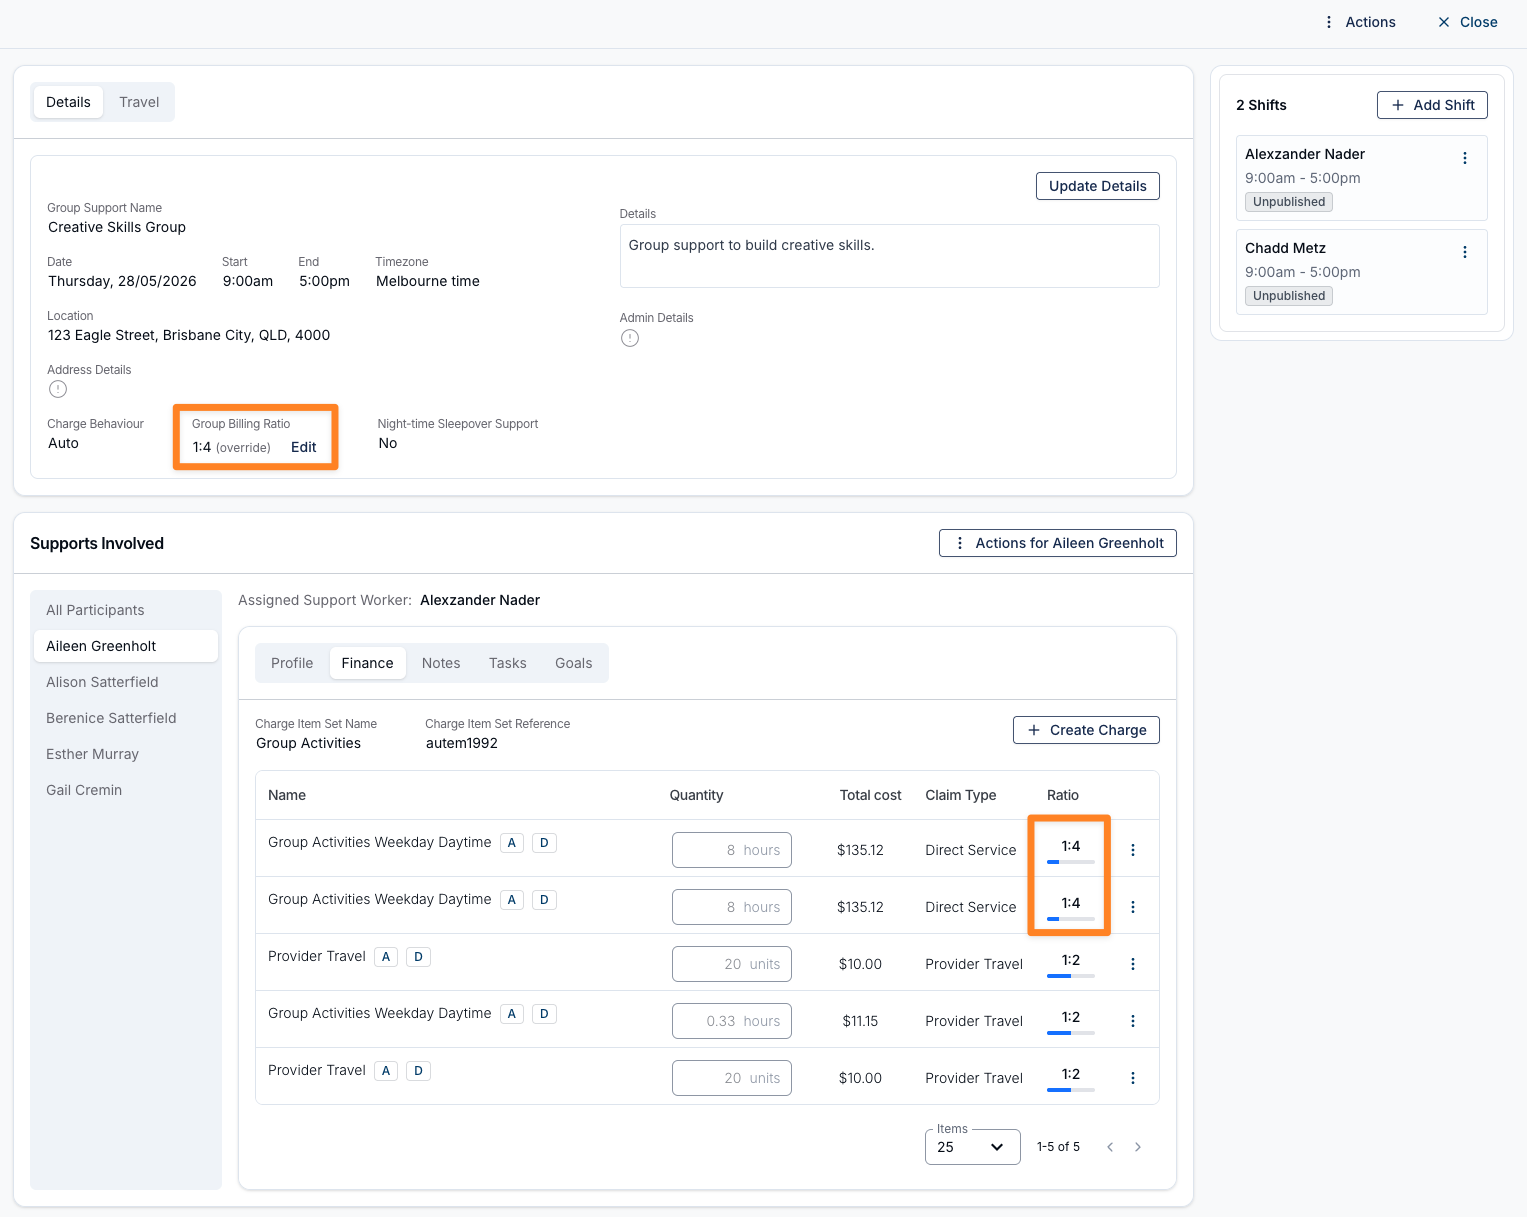
For recurring Group Supports, you'll be asked which supports in the series should be updated.
To return to automatic billing ratios at any time, open the same window and select Clear override (use automatic ratios).
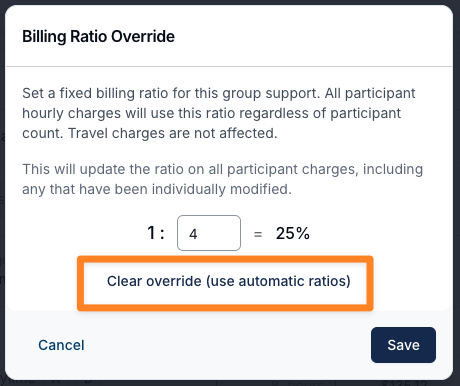
Update the Ratio for an Individual Participant
Use this when one Participant needs a different billing ratio from the rest of the group — for example, in a SIL home where one Participant has funding for 1:2 and another for 1:3, and you need each Participant's Finance tab to reflect their actual funded rate.
- Open the relevant Group Support.
- Go to the Participant's Finance tab.
- In the charges table, find the hourly charge you want to update.
- Click the value in the Ratio column.
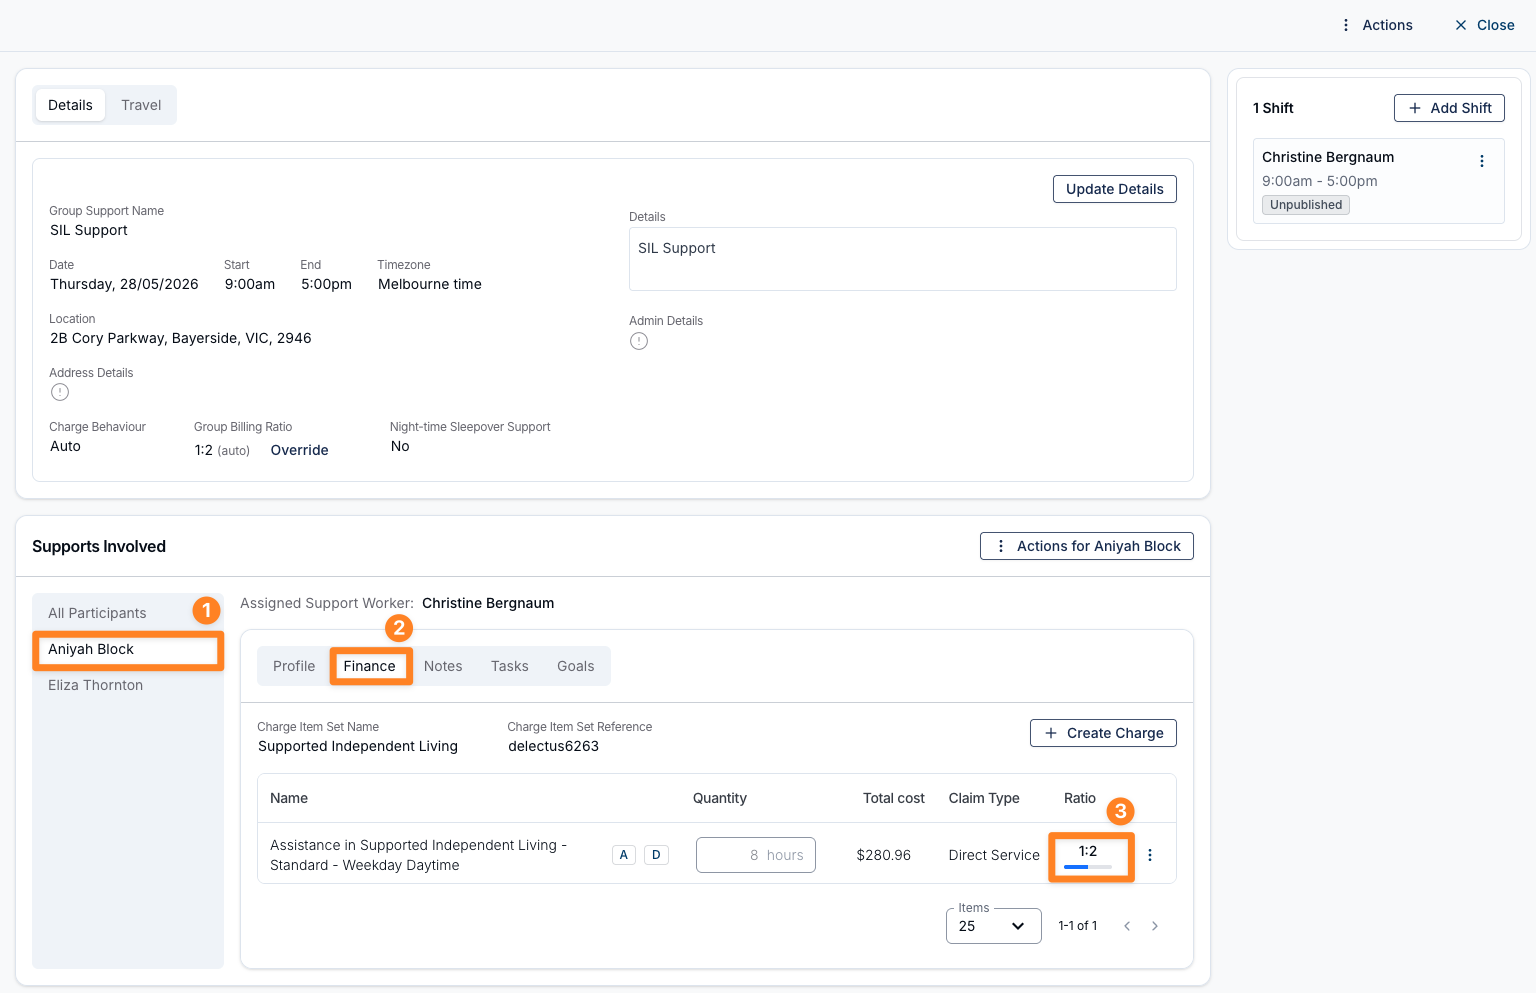
- In the Update Charge Ratio window, enter the new Numerator and Denominator.
- Check the percentage preview to confirm the ratio is correct.
- Click Update Hourly Charges.
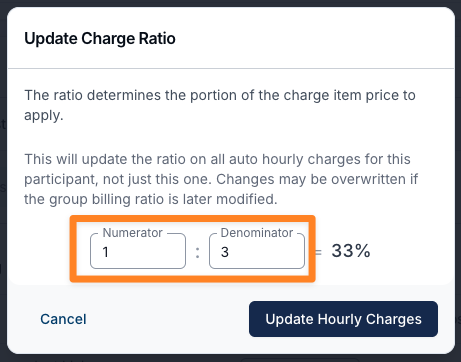
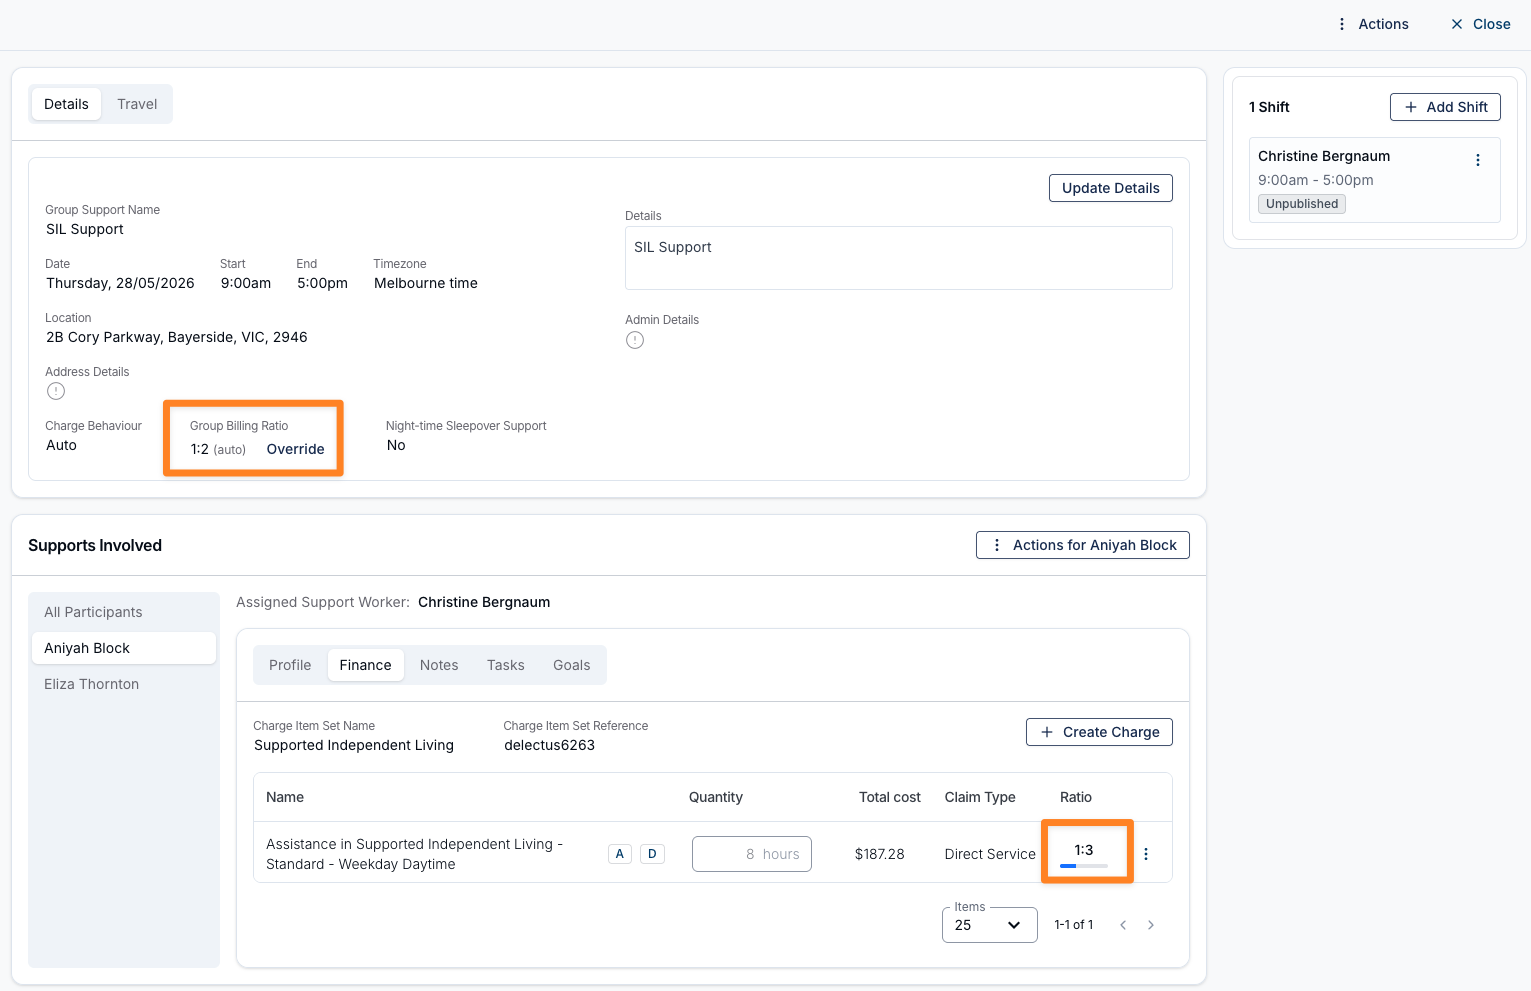
For recurring Group Supports, Astalty will ask which supports in the series should receive the change. You can apply the update to just this support or across the recurring series.
Support Time Segments
Support Time Segments split one Participant's time into windows that each bill their own way — through a different Charge Item Set, or not at all. On a Group Support they also let you set a Charge ratio for part of a session, which the ratio overrides above cannot do.
Group Supports work differently to direct supports in four ways.
Segments belong to each Participant, not the group. There are no group-level segment rows. Open the Group Support, select Update Details, then select Edit Segments against the Participant you want to change. One Participant's time can be marked No charge while everyone else on the same Group Support bills normally.
A Group Support with segments can have only one Support Worker. This is enforced, not advisory — Astalty blocks adding a second worker, changing a shift's Support Worker, approving a shift broadcast, and adding Participants, with the message "Support time segments are only available for group supports with a single support worker." Where two workers are already assigned, Edit Segments is disabled. If the group genuinely runs with two workers, set it up as two separate Group Supports.
A charge ratio can be set per segment. Leave it blank and the segment uses the group ratio. Enter one and it applies to that segment only — and unlike a per-Participant override, a later change to the Group Billing Ratio will not overwrite it. A No charge segment cannot carry a ratio.
A Participant can be billed through their segments only. Ticking Bill only through Support Time Segments on a Participant's row means time outside their segments is not billed at all, rather than falling back to a primary Charge Item Set. That Participant's Charge Item Set must then be left blank. When every Participant on the Group Support uses it, the segments must cover the full session without gaps, and travel cannot be charged. It cannot be used on a sleepover Group Support — "Segment-only billing cannot be combined with a sleepover support."
On a sleepover Group Support, ordinary segments are available once a Sleepover Window is set — the Support Time Segments section stays hidden until the window is filled in, and each segment must sit outside it.
For the full procedure, validation rules and billing behaviour, see Support Time Segments.
Adding Participants After a Group Support has Ended (before Invoice or Timesheet Batching)
If a Participant was not added before or during the group support, you can still add them after the support has ended.
Steps
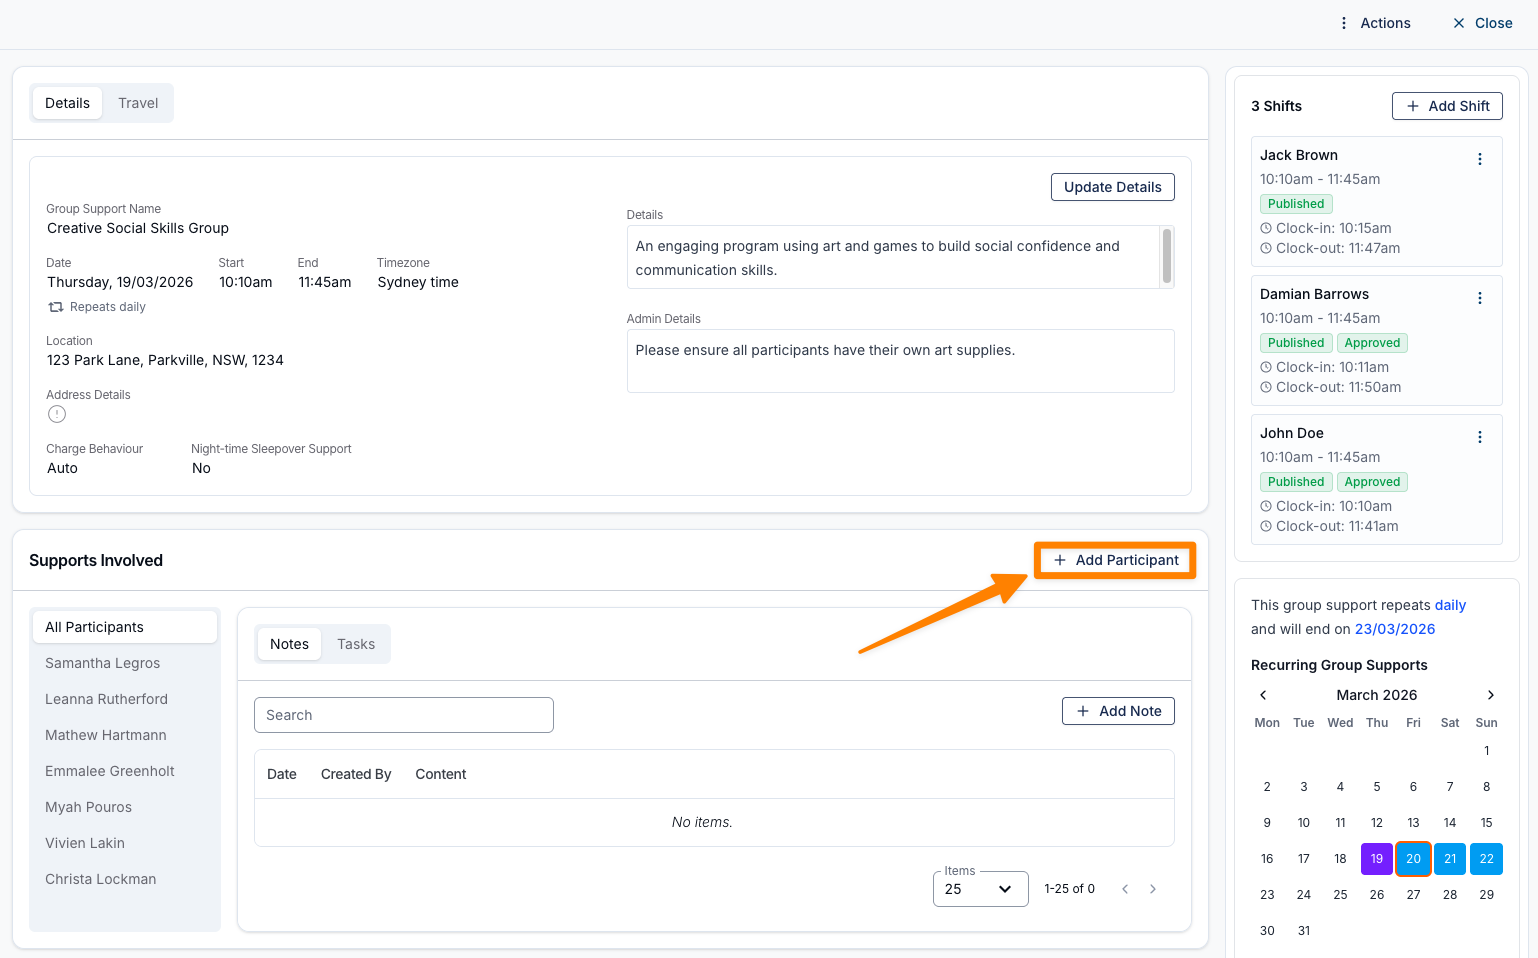
- Open the relevant Group Support.
- Navigate to the Supports Involved section.
- Click on Add Participant.
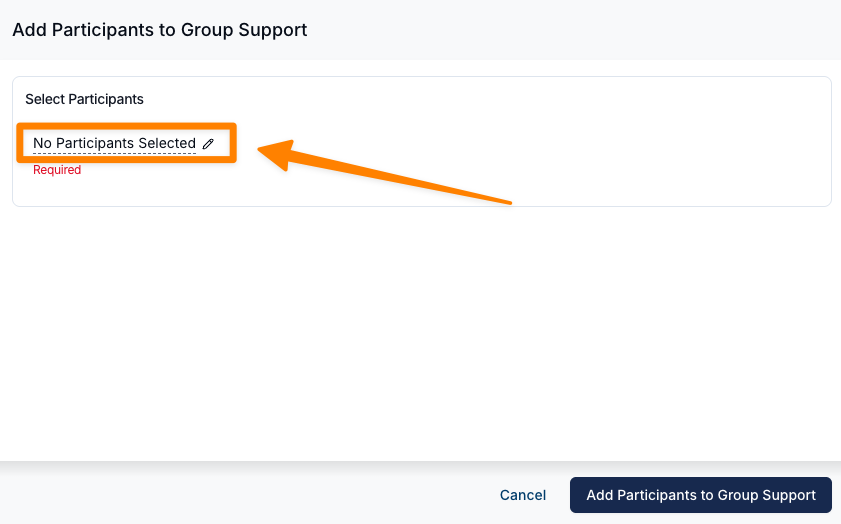
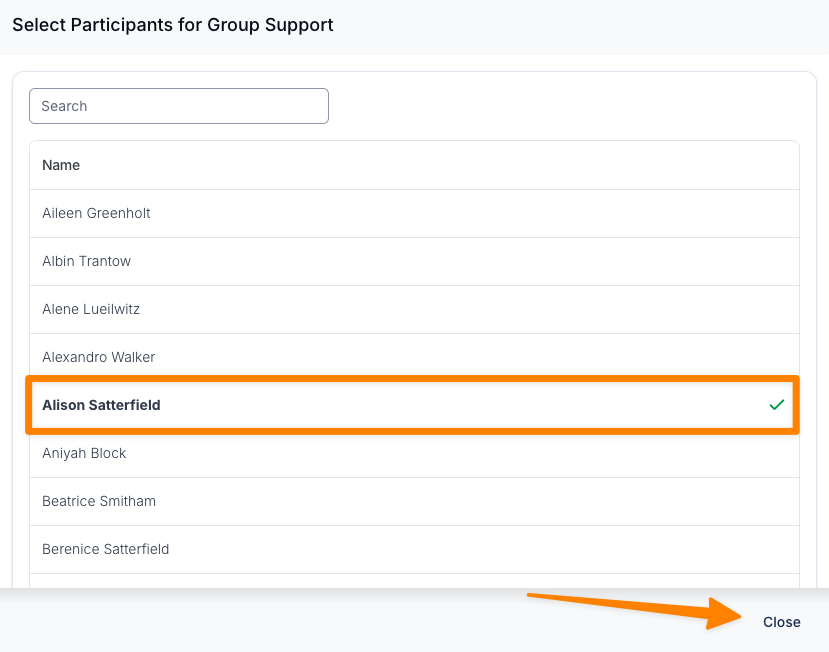
- Select the relevant Participant from the available options.
- Click Close to update the Participant’s support details.
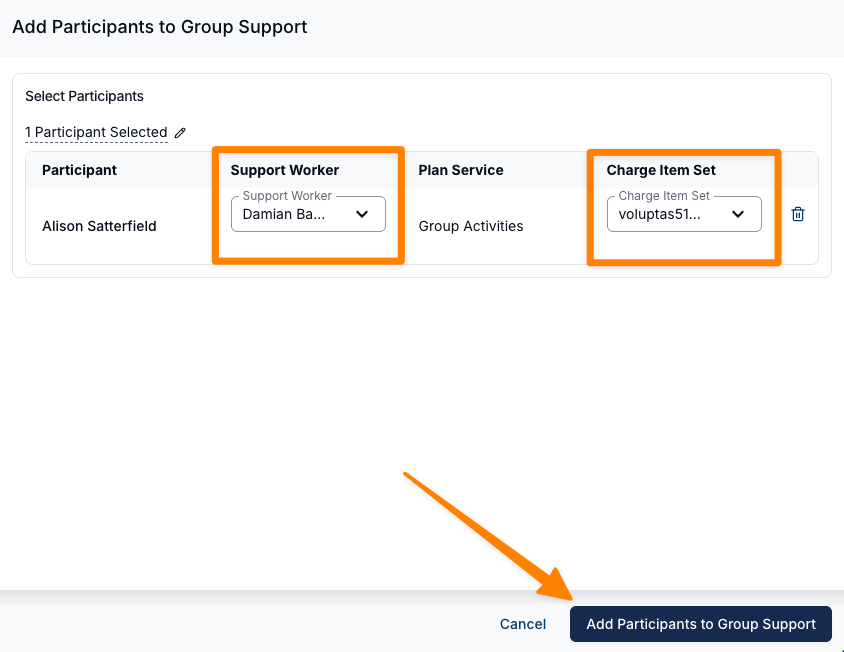
- Assign a Support Worker and select the appropriate Charge Item Set.
- Click Add Participants to Group Support once you have finished selecting additional Participants.
Recurring Supports
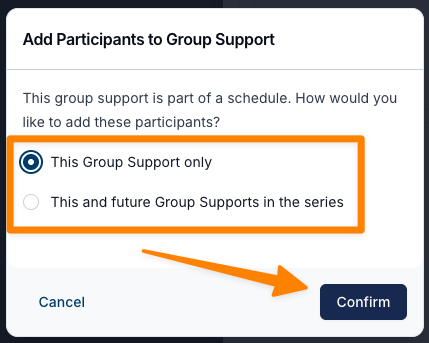
If the group support is part of a recurring series, you will be prompted to choose whether the change applies to:
- This group support only, or
- This and all future group supports in the series
Select the appropriate option and click Confirm.
Important Notes
- The support ratio will automatically update based on the number of Participants added.
- Charges will be recalculated and distributed accordingly across Participants.
- If the selected Charge Item Set is not configured in the Participant’s profile, it must be set up before completing this process.
- For group supports linked to an Activity, the Participant details will also update within the associated Activity records.
Adding a Group Support Video
This video walks through how to add group support.