- Administration
- Managing Charge Item Sets
- Creating & Updating Charge Item Sets
Creating & Updating Charge Item Sets
Overview
Create sets of rates for scheduled services. You need permission to create Charge Item Sets to create or clone one, and permission to update sets to change an existing set. See the Charge Items Overview for how sets connect to services.
To manage Charge Item Sets, navigate to the Charge Items settings page.
Creating a Charge Item Set
To create a Charge Item Set click Add Charge Item Set towards the top right of the Charge Item Sets table.
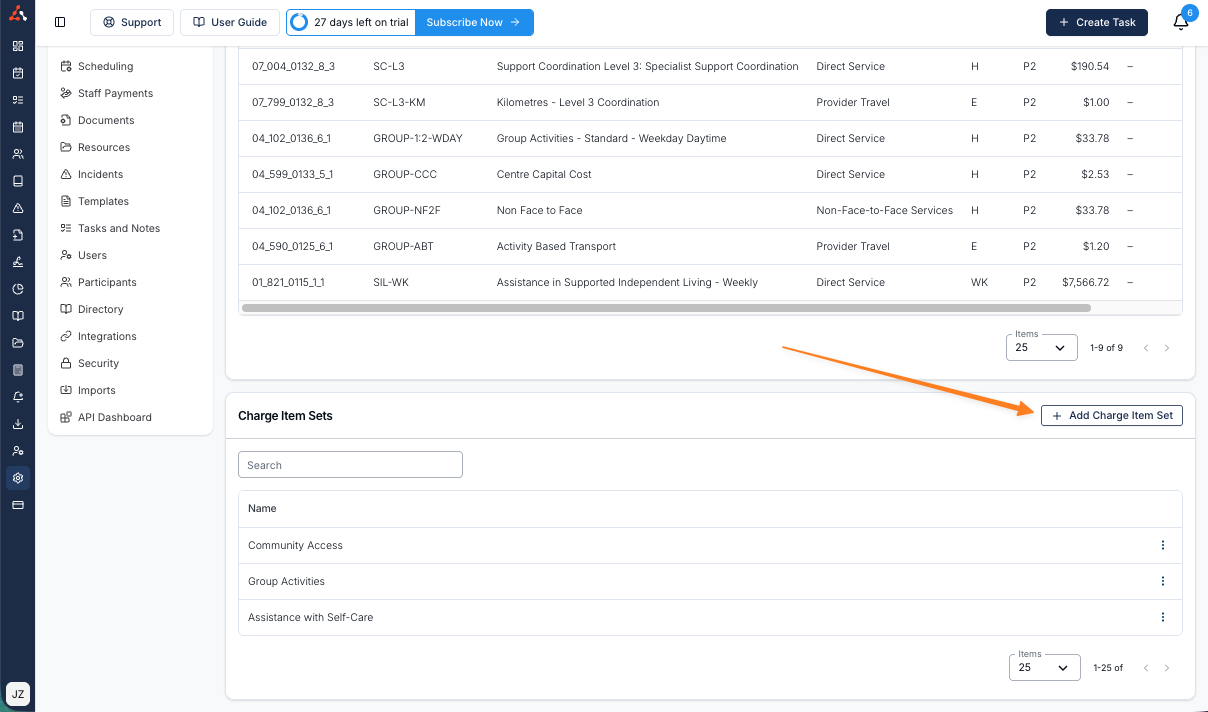
Once you do this you will be presented with two options;
- Preset Charge Item Set - Using a preset that we have created to quickly get started
- Manual Charge Item Set - Build your own Charge Item Set from scratch
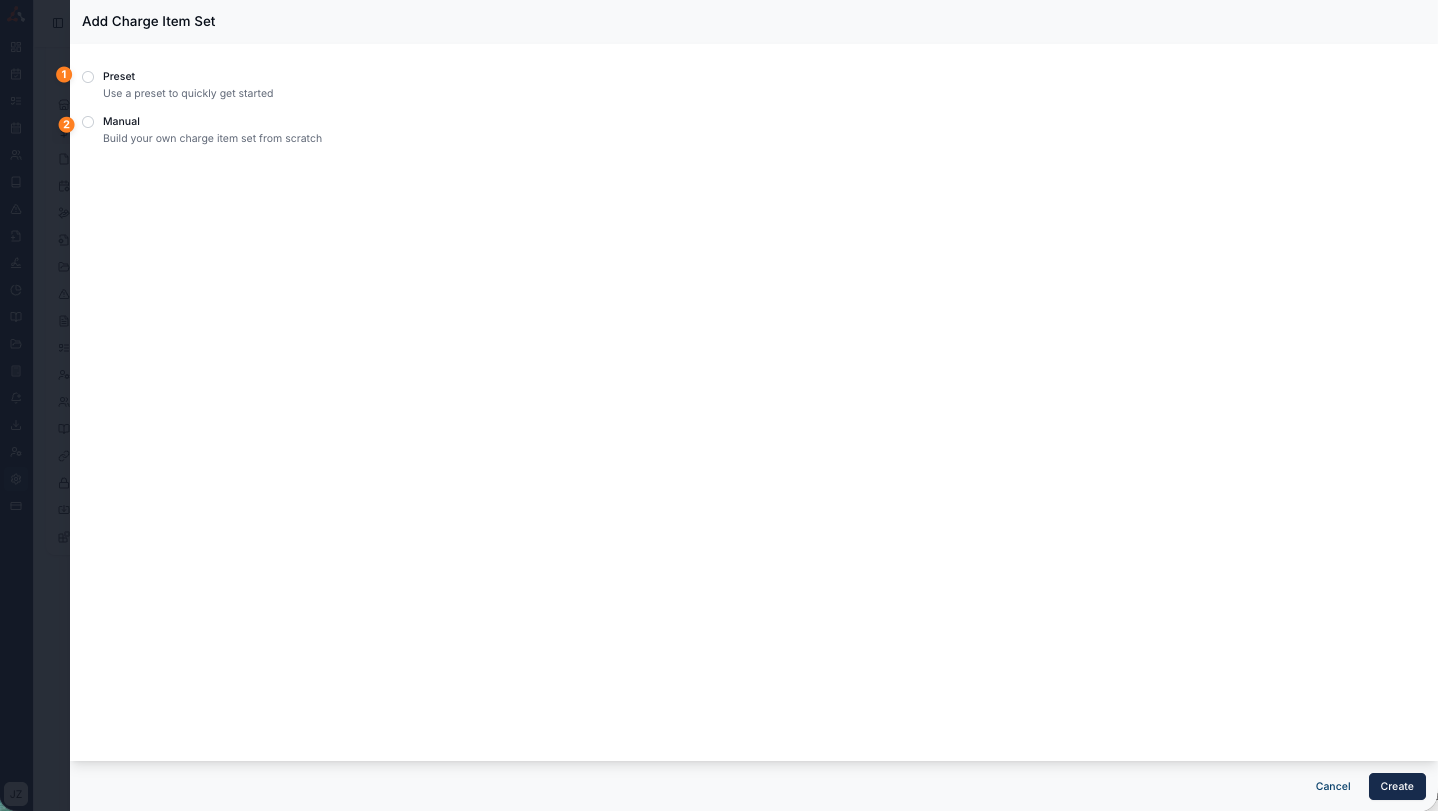
Preset
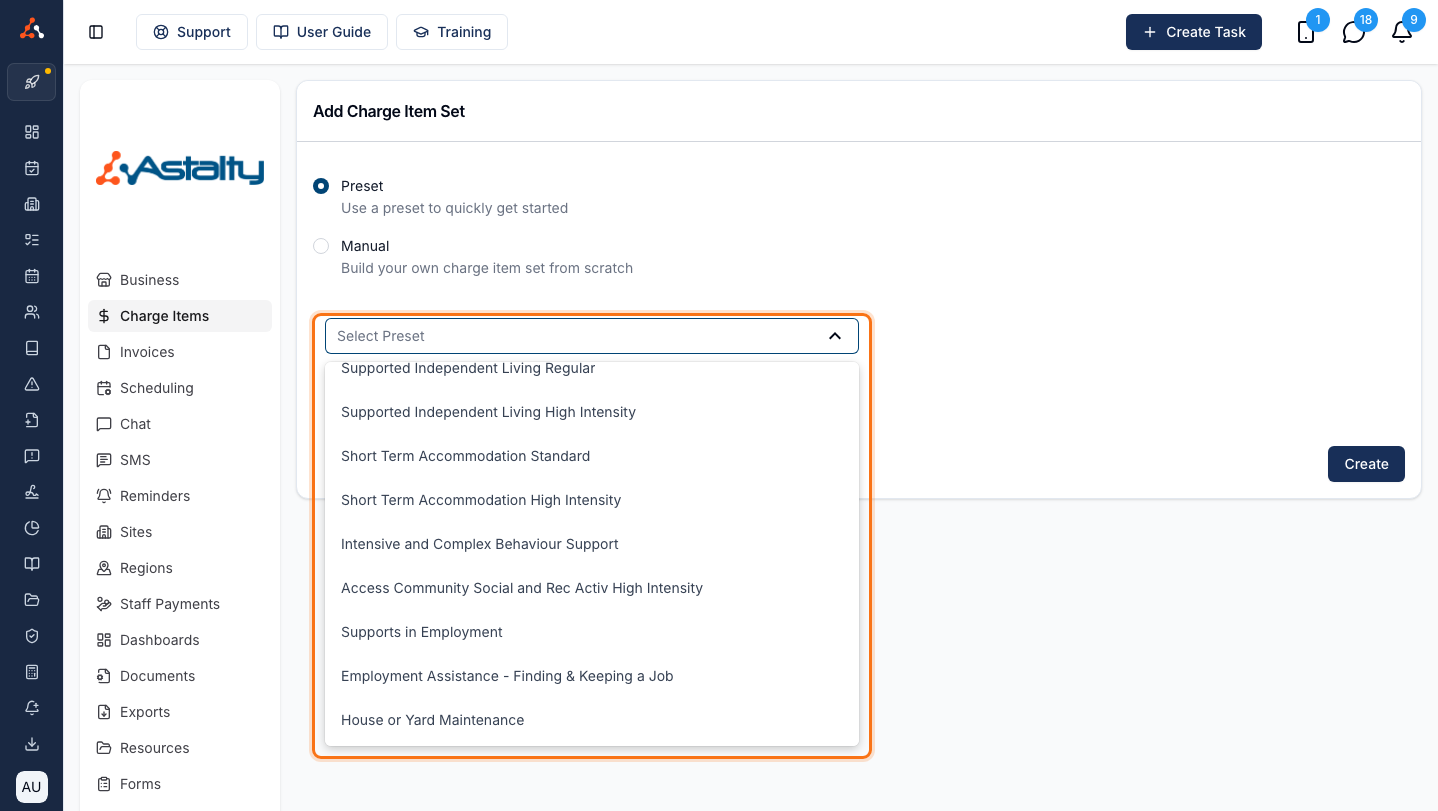
When you select preset you will see a Select Preset drop down menu appear where you can choose from our premade Charge Item Sets. The presets available are;
- CB Social - Life Transition Planning
- CB Social - Skills Development and Training
- Community Access
- Group Activities
- Assistance with Self Care
- Assistance with Self-Care - High Intensity
- Supported Independent Living Regular
- Supported Independent Living High Intensity
- Short Term Accommodation Standard
- Short Term Accommodation High Intensity
- Intensive and Complex Behaviour Support
- Access Community Social and Rec Activ High Intensity
- Supports in Employment
- Employment Assistance - Finding & Keeping a Job
- House or Yard Maintenance
- Community Nursing - Nurse Practitioner (Core)
- Community Nursing - Nurse Practitioner (Capacity Building)
Each preset name is prefixed with its support category number. The drop down is searchable. Start typing part of a preset name to filter the list.
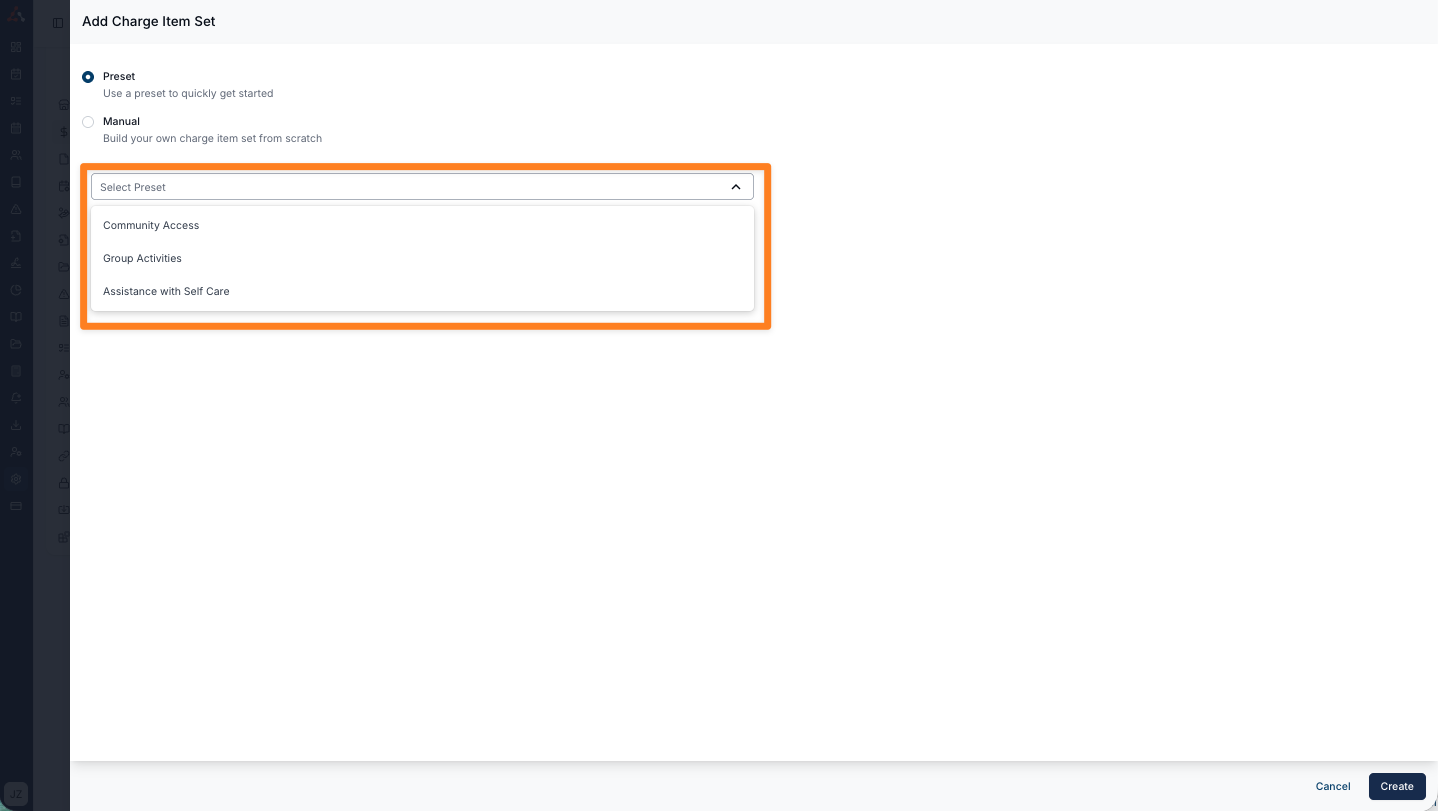
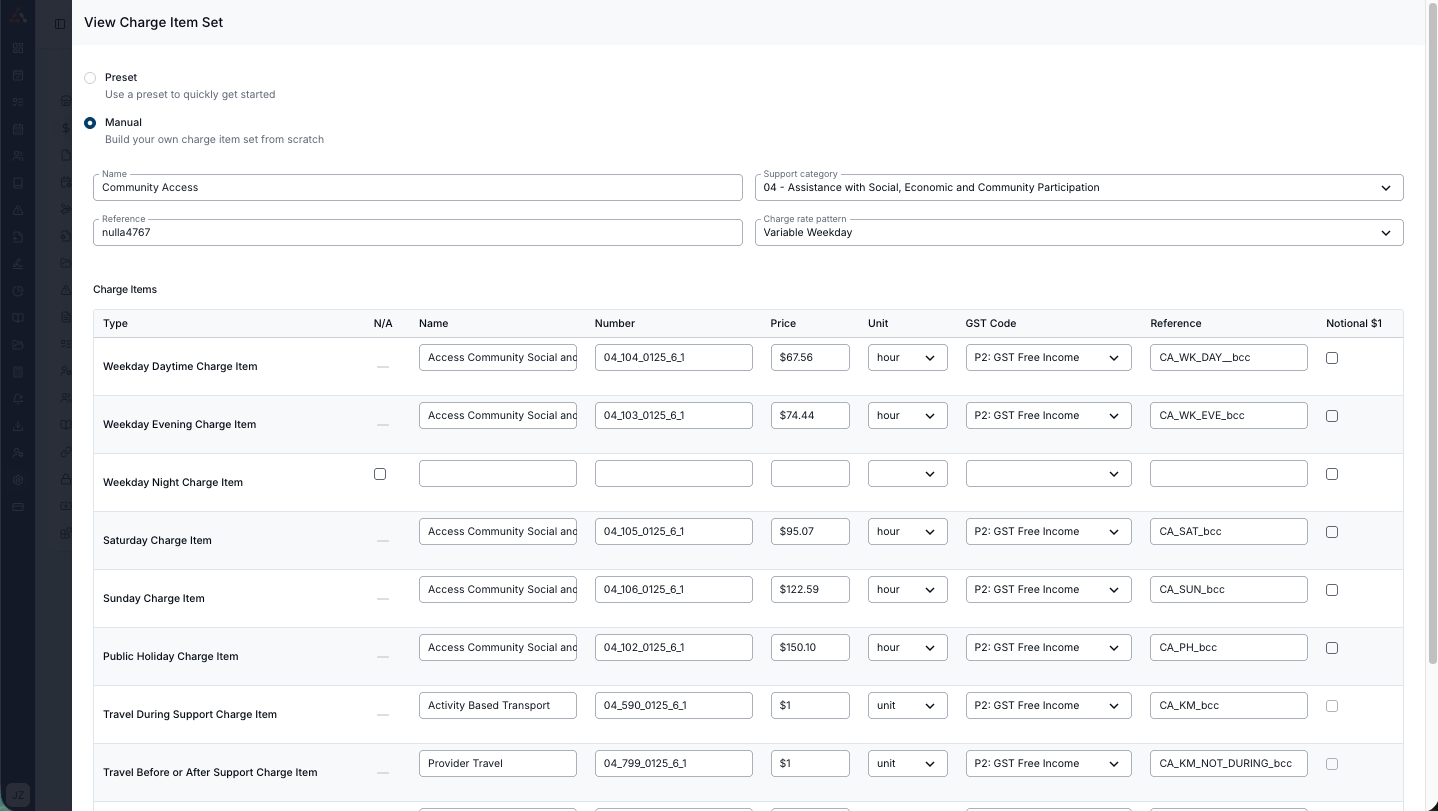
By selecting a preset Charge Item Set you will see the Charge Item Set appear prefilled with the associated Charge Items as seen below in the example of the Community Access preset Charge Item Set. Astalty has prefilled the relevant Type with the associated 'Community Access' line item including the;
- Support Category
- Charge Rate Pattern
- Name
- Number
- Price (which is customisable)
- Unit
- GST Code
- Reference
- Notional $1
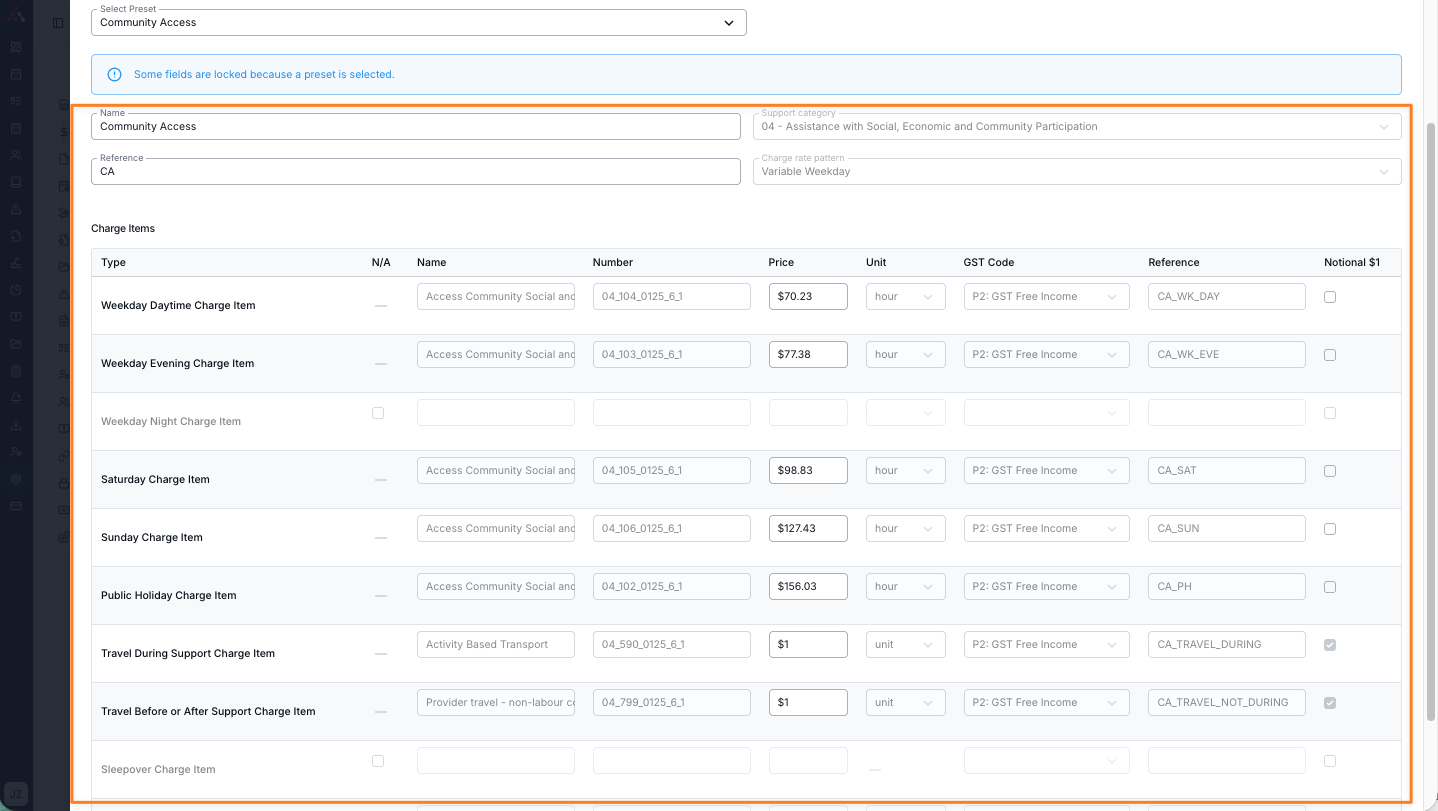
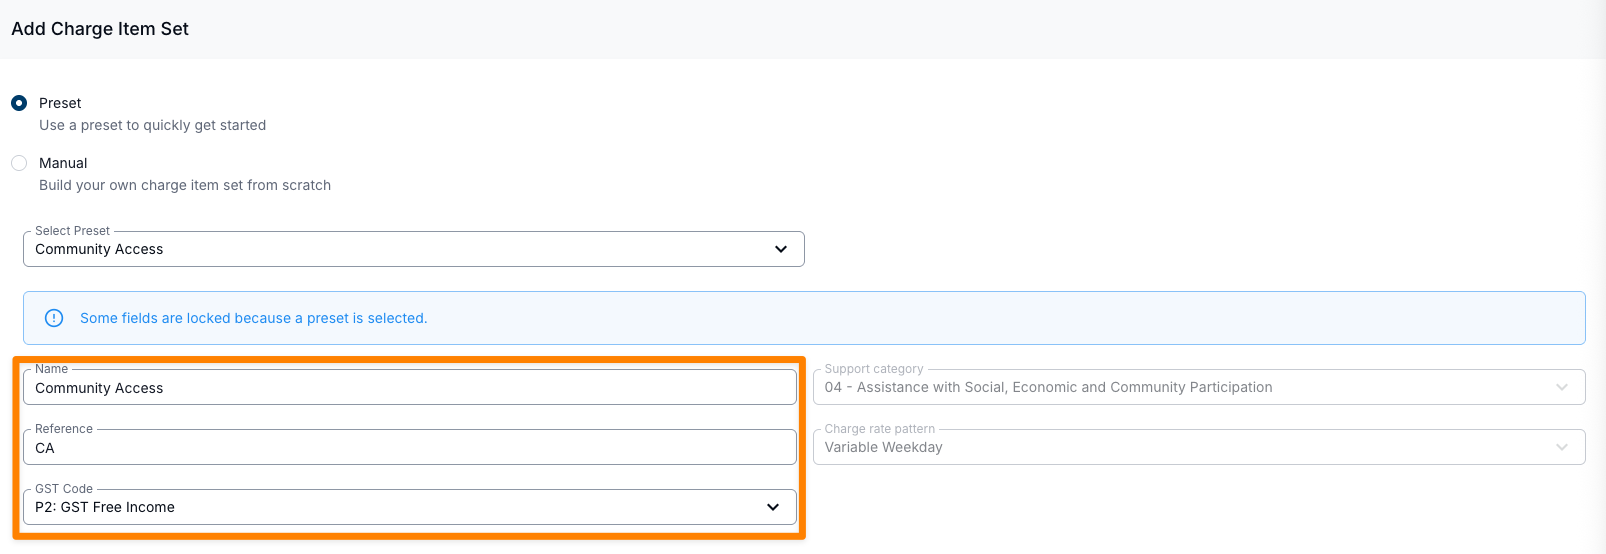
You can update the Name of the Charge Item Set, as well as the Reference and GST Code if required, to ensure these details align with your organisation's preferences.
How preset prices are set
Every price in a preset comes from the current NDIS price guide, using the rates for your organisation's Region. That includes the higher Remote and Very Remote rates. If your business region is set to one of those, the preset fills in the remote pricing rather than the standard state rate.
When the NDIS releases a new price guide and Astalty loads it, the presets pick up the new prices automatically. New sets use the newly loaded prices. Existing sets keep their prices unless you update them manually or they receive an eligible automatic update.
Preset specific notes
Most presets follow the same shape: a Charge Item for weekday daytime, weekday evening, weekday night (where the support type has one), Saturday, Sunday and public holidays, plus travel items. A few are worth calling out.
Short Term Accommodation Standard and Short Term Accommodation High Intensity set up hourly rates for weekday daytime, weekday evening, weekday night, Saturday, Sunday and public holidays, plus a sleepover Charge Item charged per night rather than per hour.
Beyond the STA presets, a sleepover Charge Item is also included on Assistance with Self Care, Supported Independent Living Regular and Supported Independent Living High Intensity. No other preset has one.
Supports in Employment charges a different rate for each part of the week - weekday evening, Saturday, Sunday and public holidays each use their own support item with the relevant loading applied, so a Sunday shift is charged at the Sunday rate automatically.
Employment Assistance - Finding & Keeping a Job works the other way. It uses the single Employment Assistance support item for every day of the week, so the same hourly rate applies whether the support is delivered on a Tuesday morning or a public holiday. There are no weekend or public holiday loadings on this preset.
The CB Social presets and House or Yard Maintenance behave the same way as Employment Assistance - one support item and one rate across the whole week.
House or Yard Maintenance
House or Yard Maintenance builds a set for house and yard maintenance supports in one step, instead of entering each line by hand. Selecting it fills in:
- Name: House or Yard Maintenance
- Reference:
HYM, which is then applied to each Charge Item in the set asHYM_WK_DAY,HYM_SAT,HYM_SUN,HYM_PHandHYM_TRAVEL_NOT_DURING - Support Category: 01 - Assistance with Daily Life (Includes SIL)
- Charge Rate Pattern: Fixed Weekday
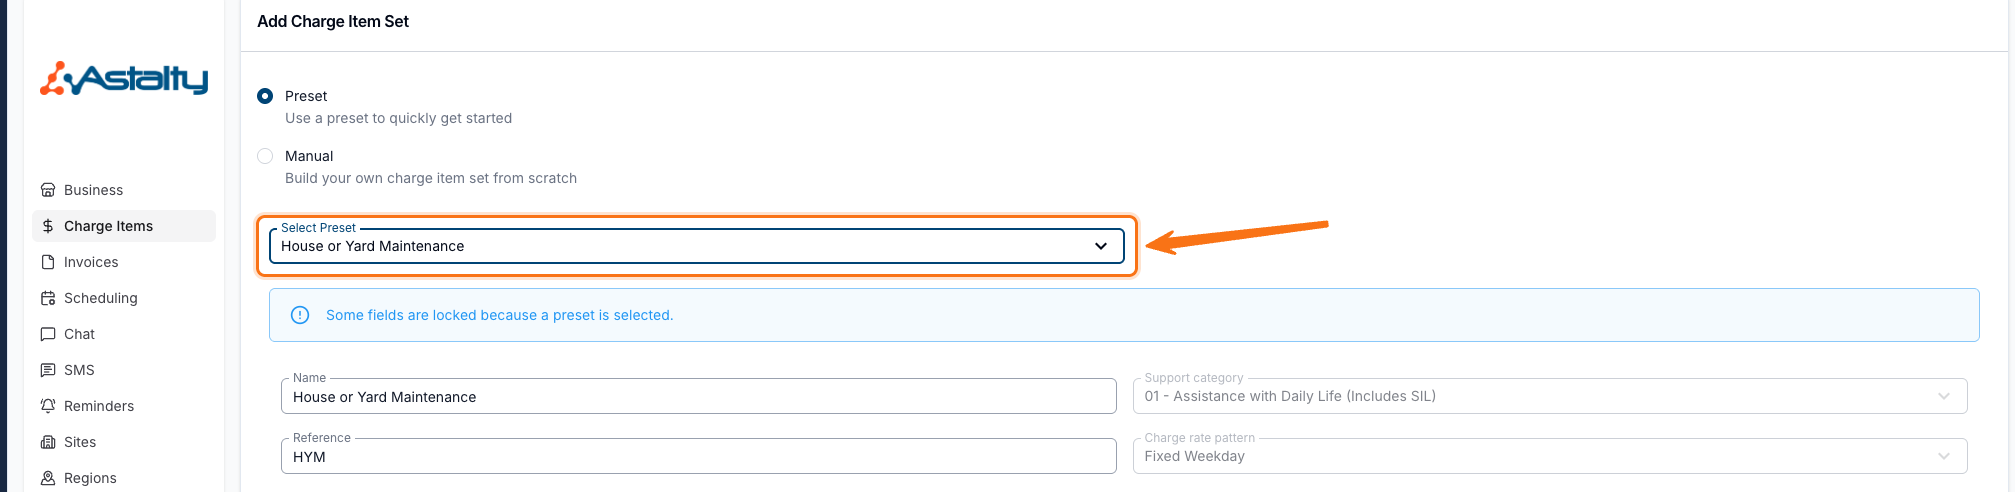
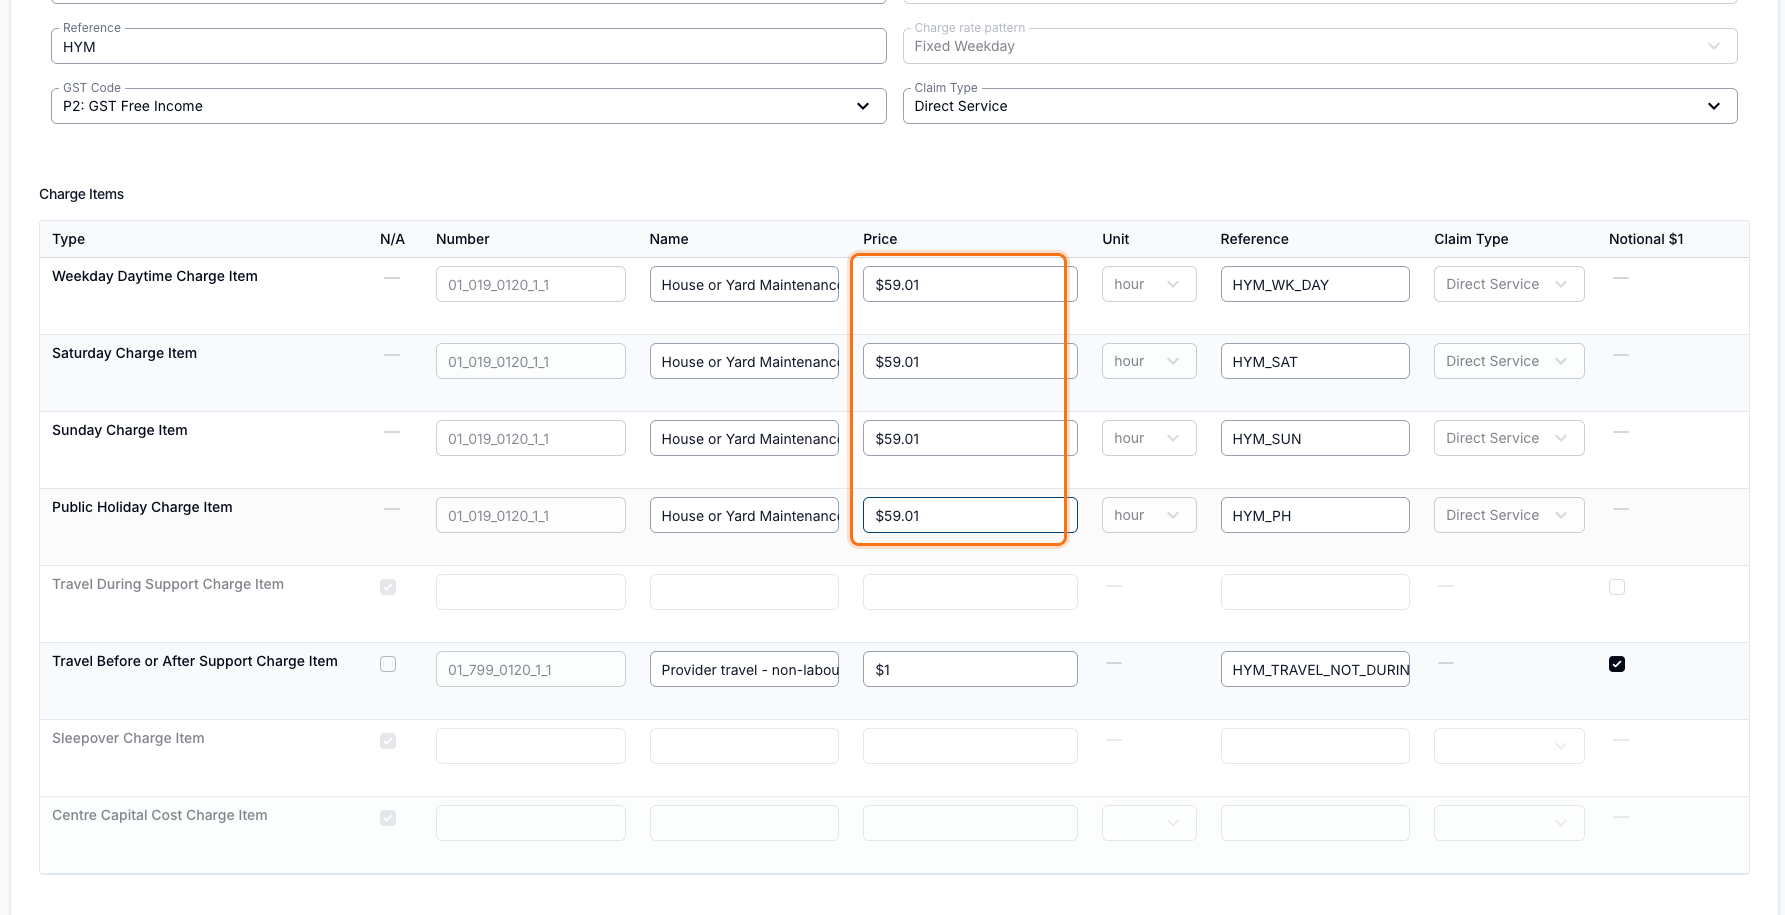
The House or Yard Maintenance preset fills weekday daytime, Saturday, Sunday and public holiday slots with the same support item and price. Its Fixed Weekday pattern also removes the weekday evening and night rows. Other Fixed Weekday presets can have different weekend and public holiday prices.
Travel Before or After Support is included as a provider travel - non-labour costs Charge Item with the notional $1.00 unit price ticked. Travel During Support, Sleepover and Centre Capital Cost are marked N/A.
Manual
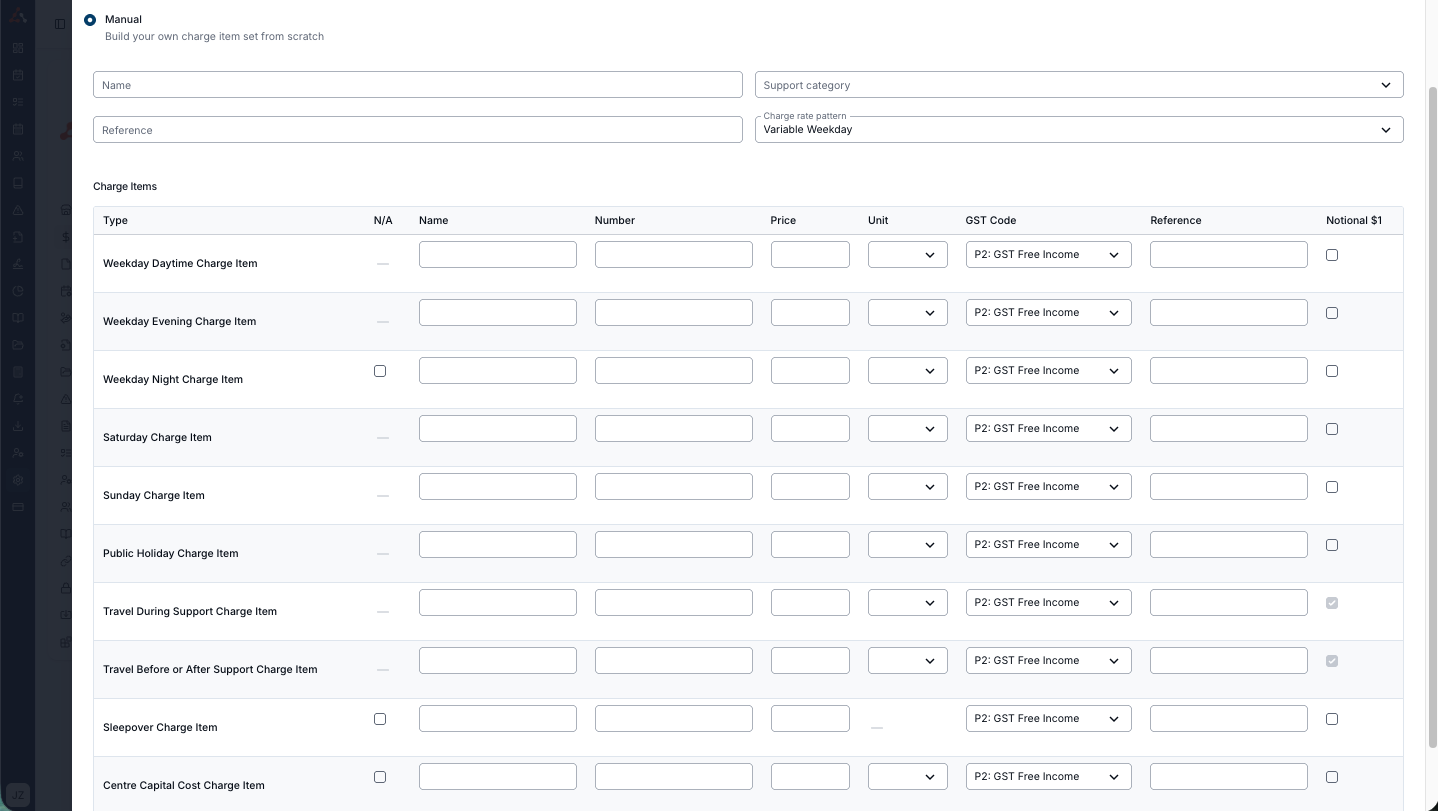
When you select manual you will see a blank table where you can enter each of the Charge Item types where the information has been pre filled within the preset Charge Item Set.
Once completed the set will look something similar to this.
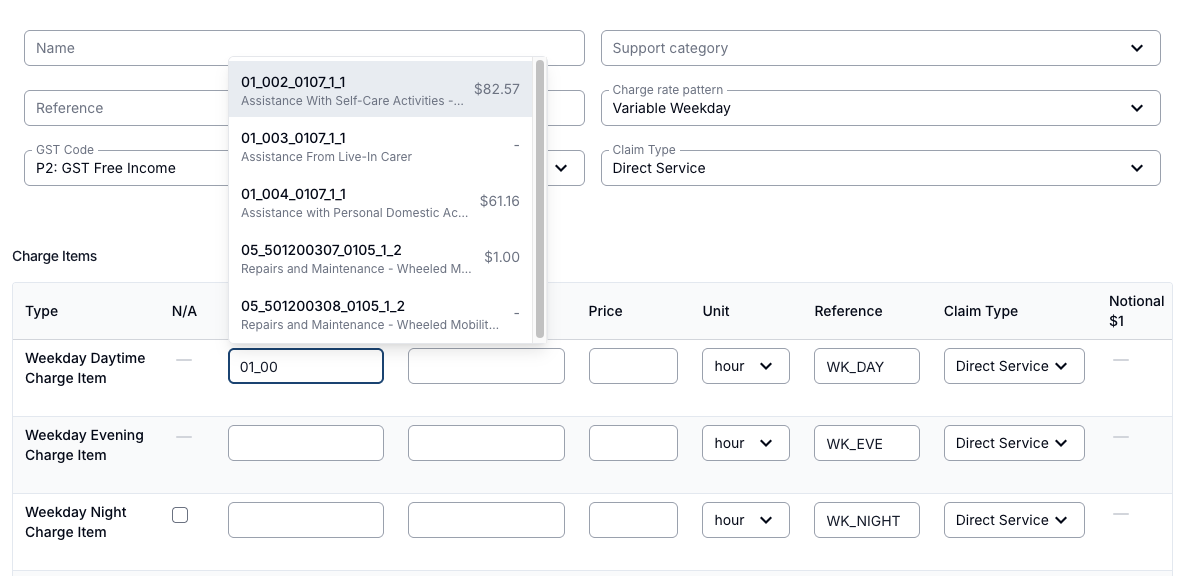
Search the NDIS Price Guide from the Number field
You don't need to type each line item out by hand. The Number field on every Charge Item row (it now sits before Name) searches the current NDIS price guide as you type - matching on either the support item number or the item name.
Each result shows the support item number, its name, and the current price. Selecting a result auto-fills that row's Number, Name, Price and Unit, so there's less manual copying and fewer typos.
Excluding Charge Items from Sets
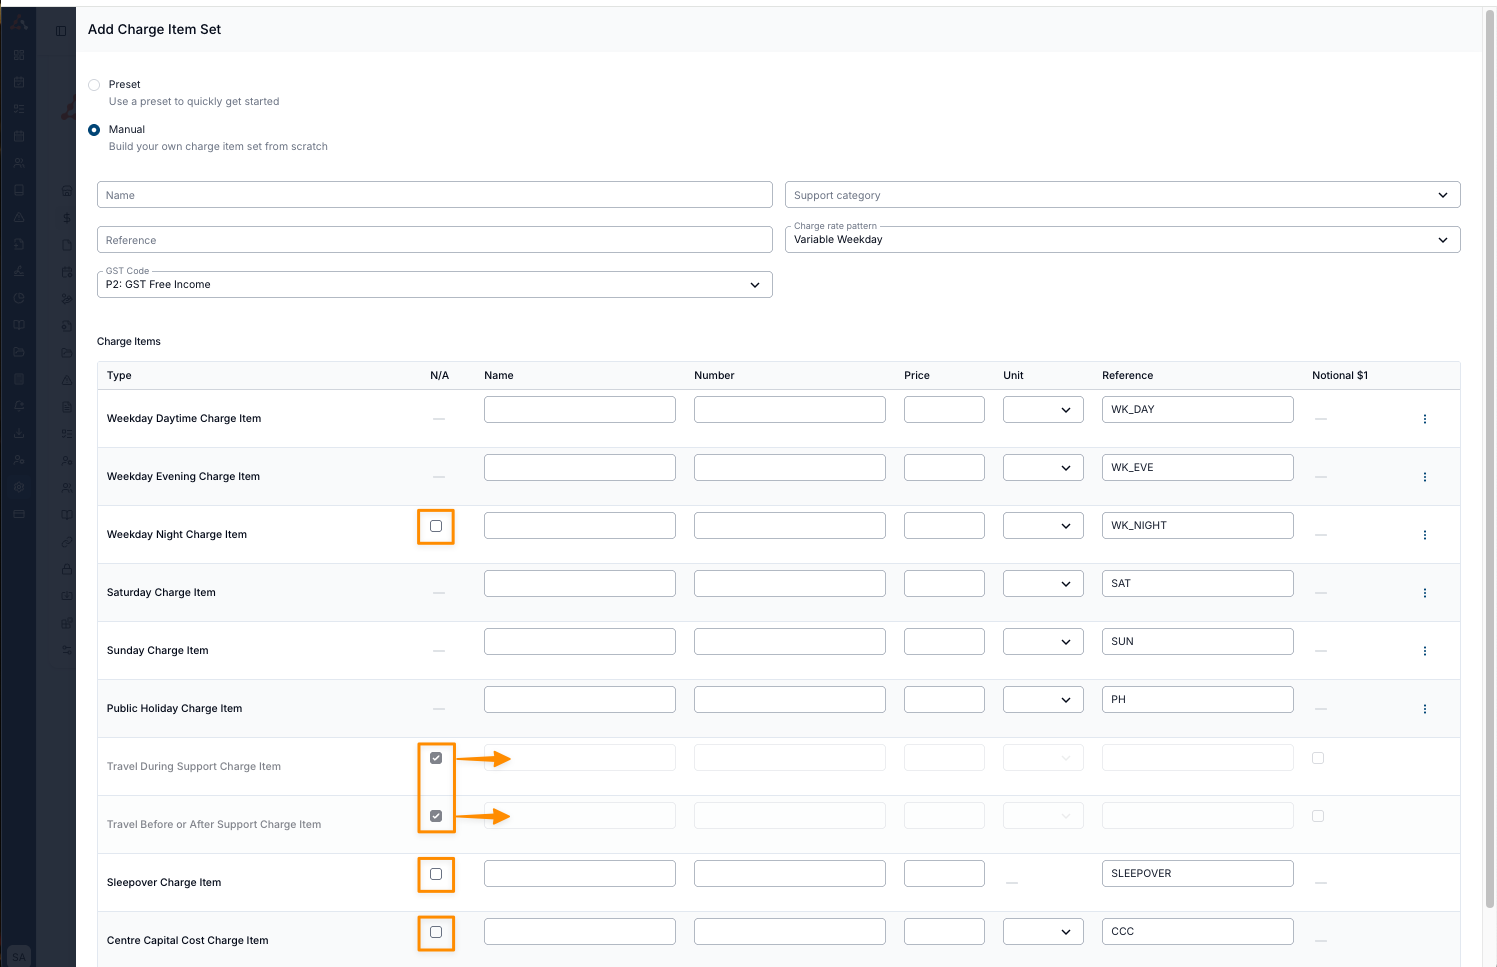
When manually adding in the Charge Items types, some Charge Items can be excluded by using the provided checkbox to mark as N/A. Once marked as N/A the relevant fields for that Charge Item type will become un-selectable and not be required to create the Charge Item Set.
Copy Charge Item into remaining Charge Items
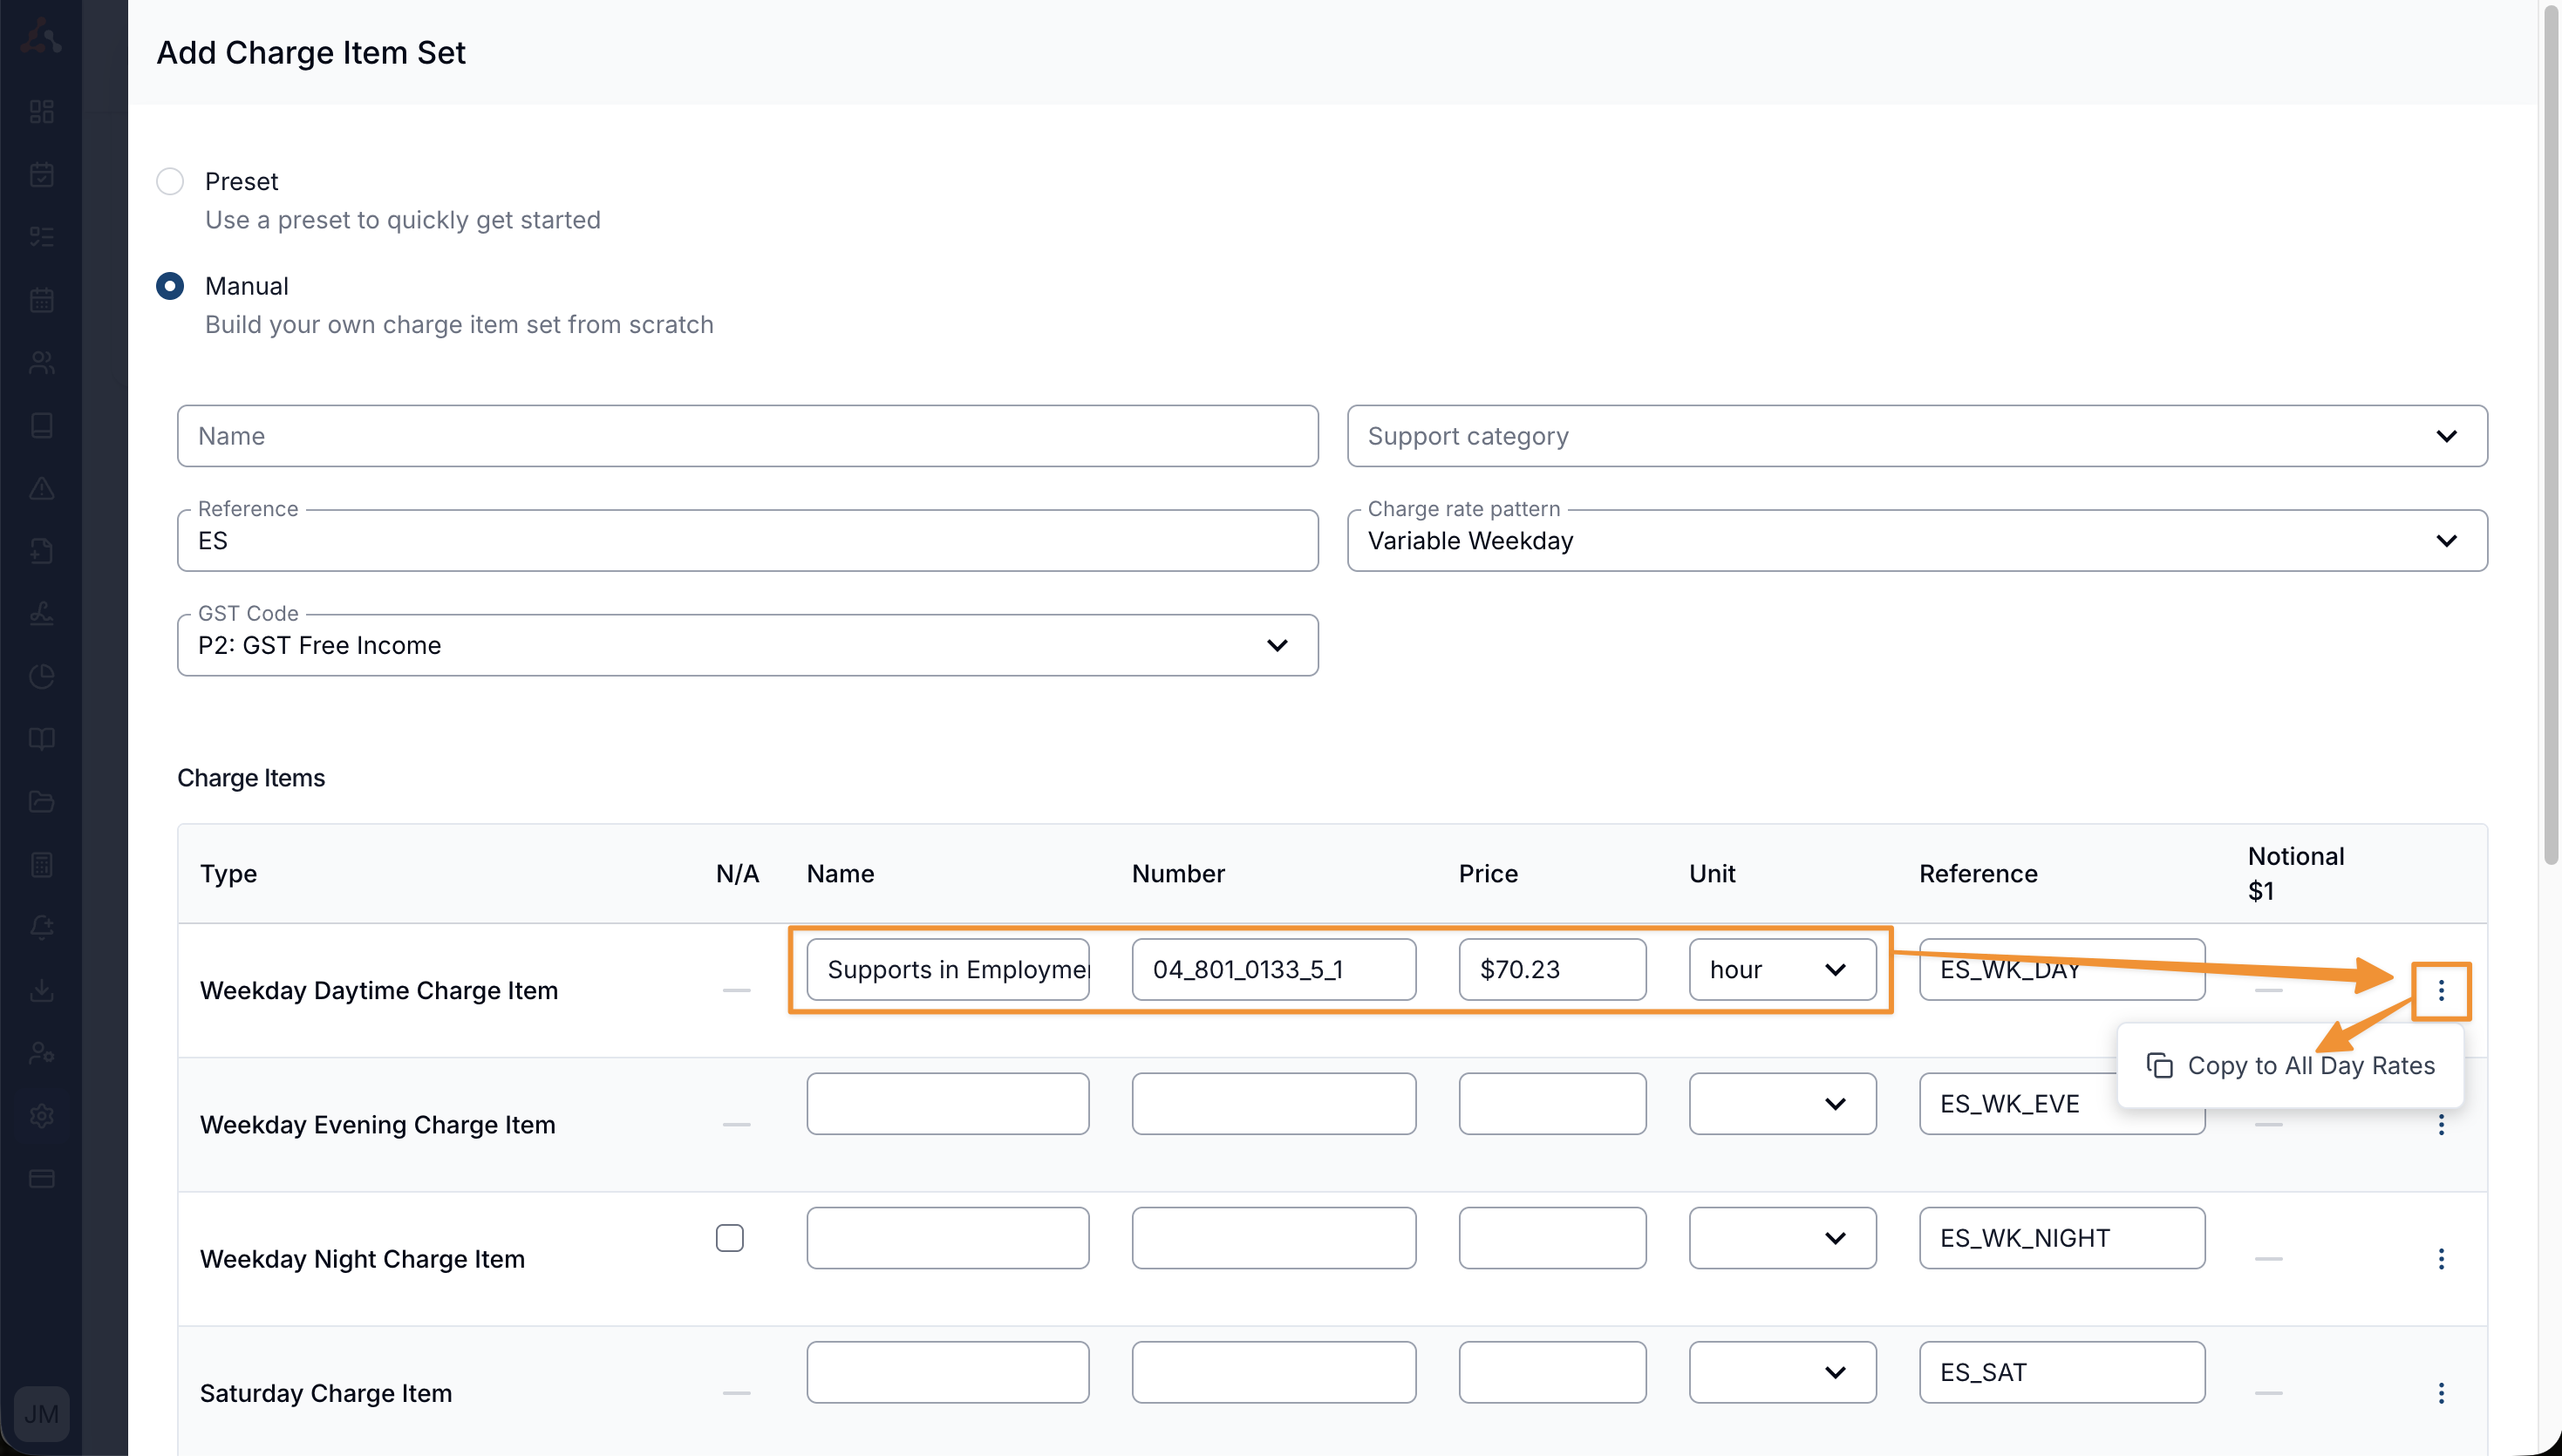
If you are completing a Charge Item Set where the Charge Item doesn't have variable charges for time of day or week, you can use the Copy to All Day Rates option to apply it to all remaining day rates.
Simply complete the Name, Number, Price and Unit fields of a day rate and select the Copy to All Day Rates option within the 3 dot menu.
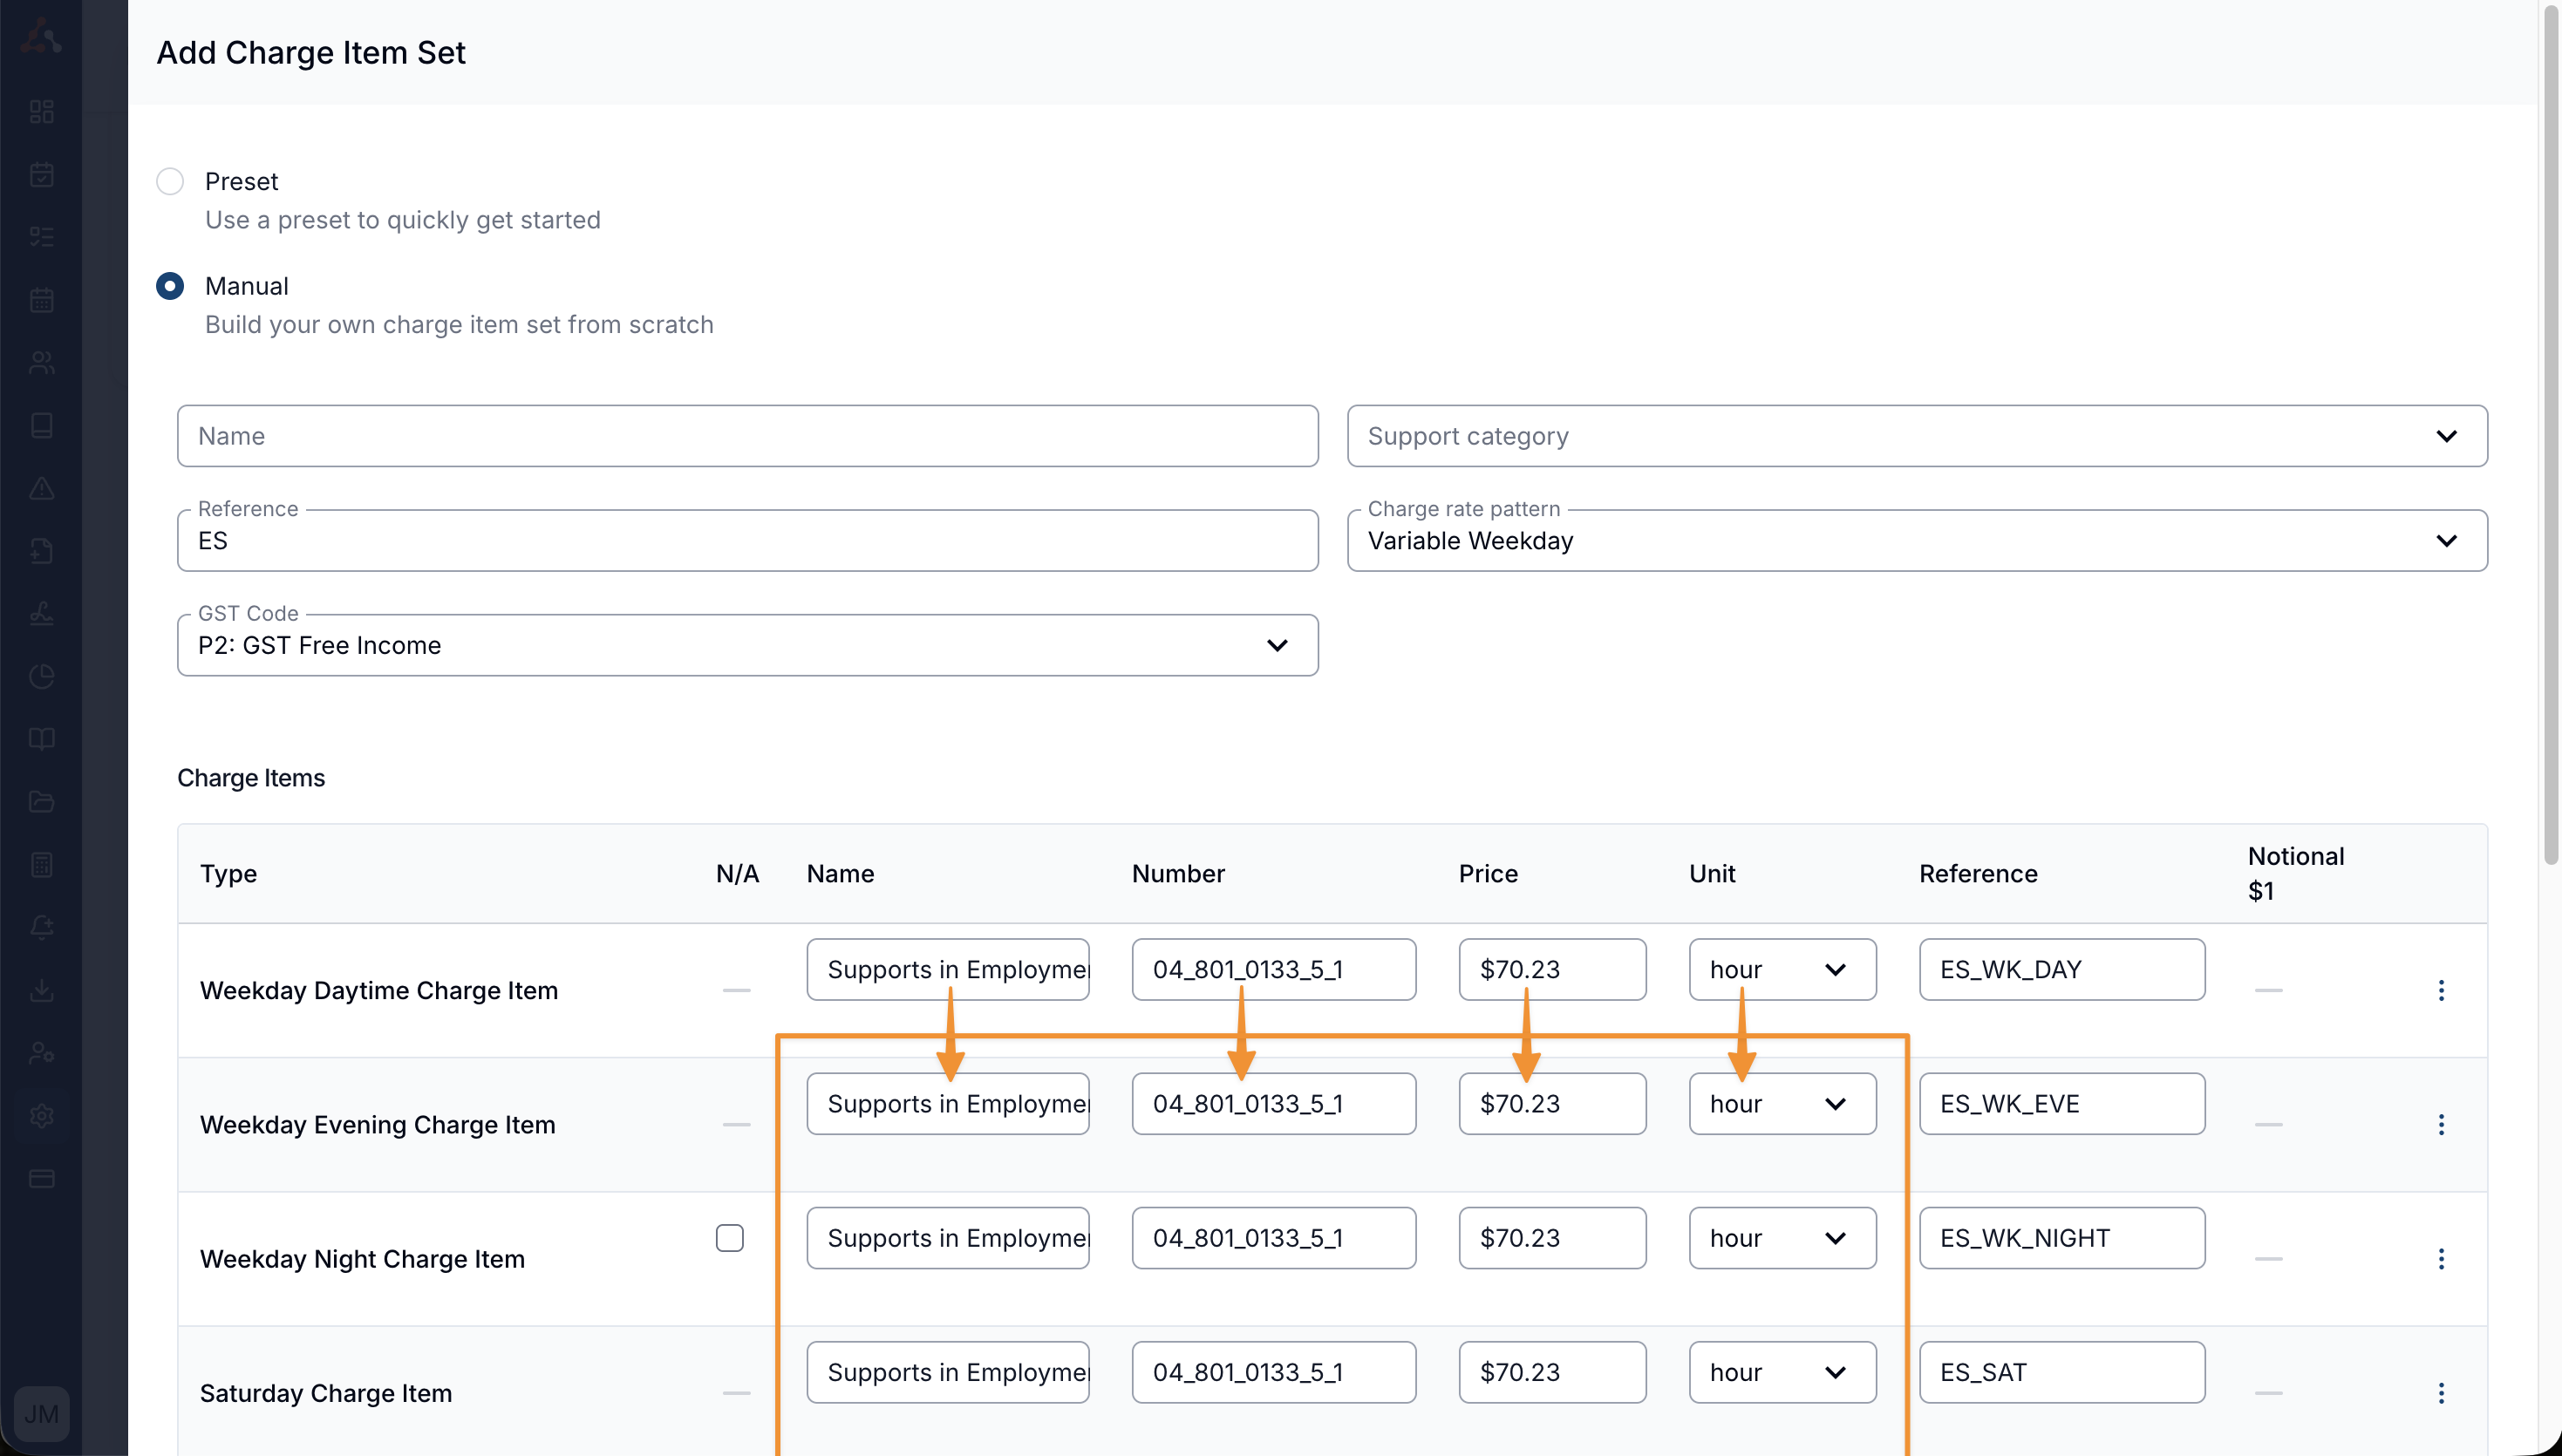
After selecting Copy to All Day Rates, the other day rates will be pre-populated with the same detail.
Prefill Reference into Each Charge Item Within a Set
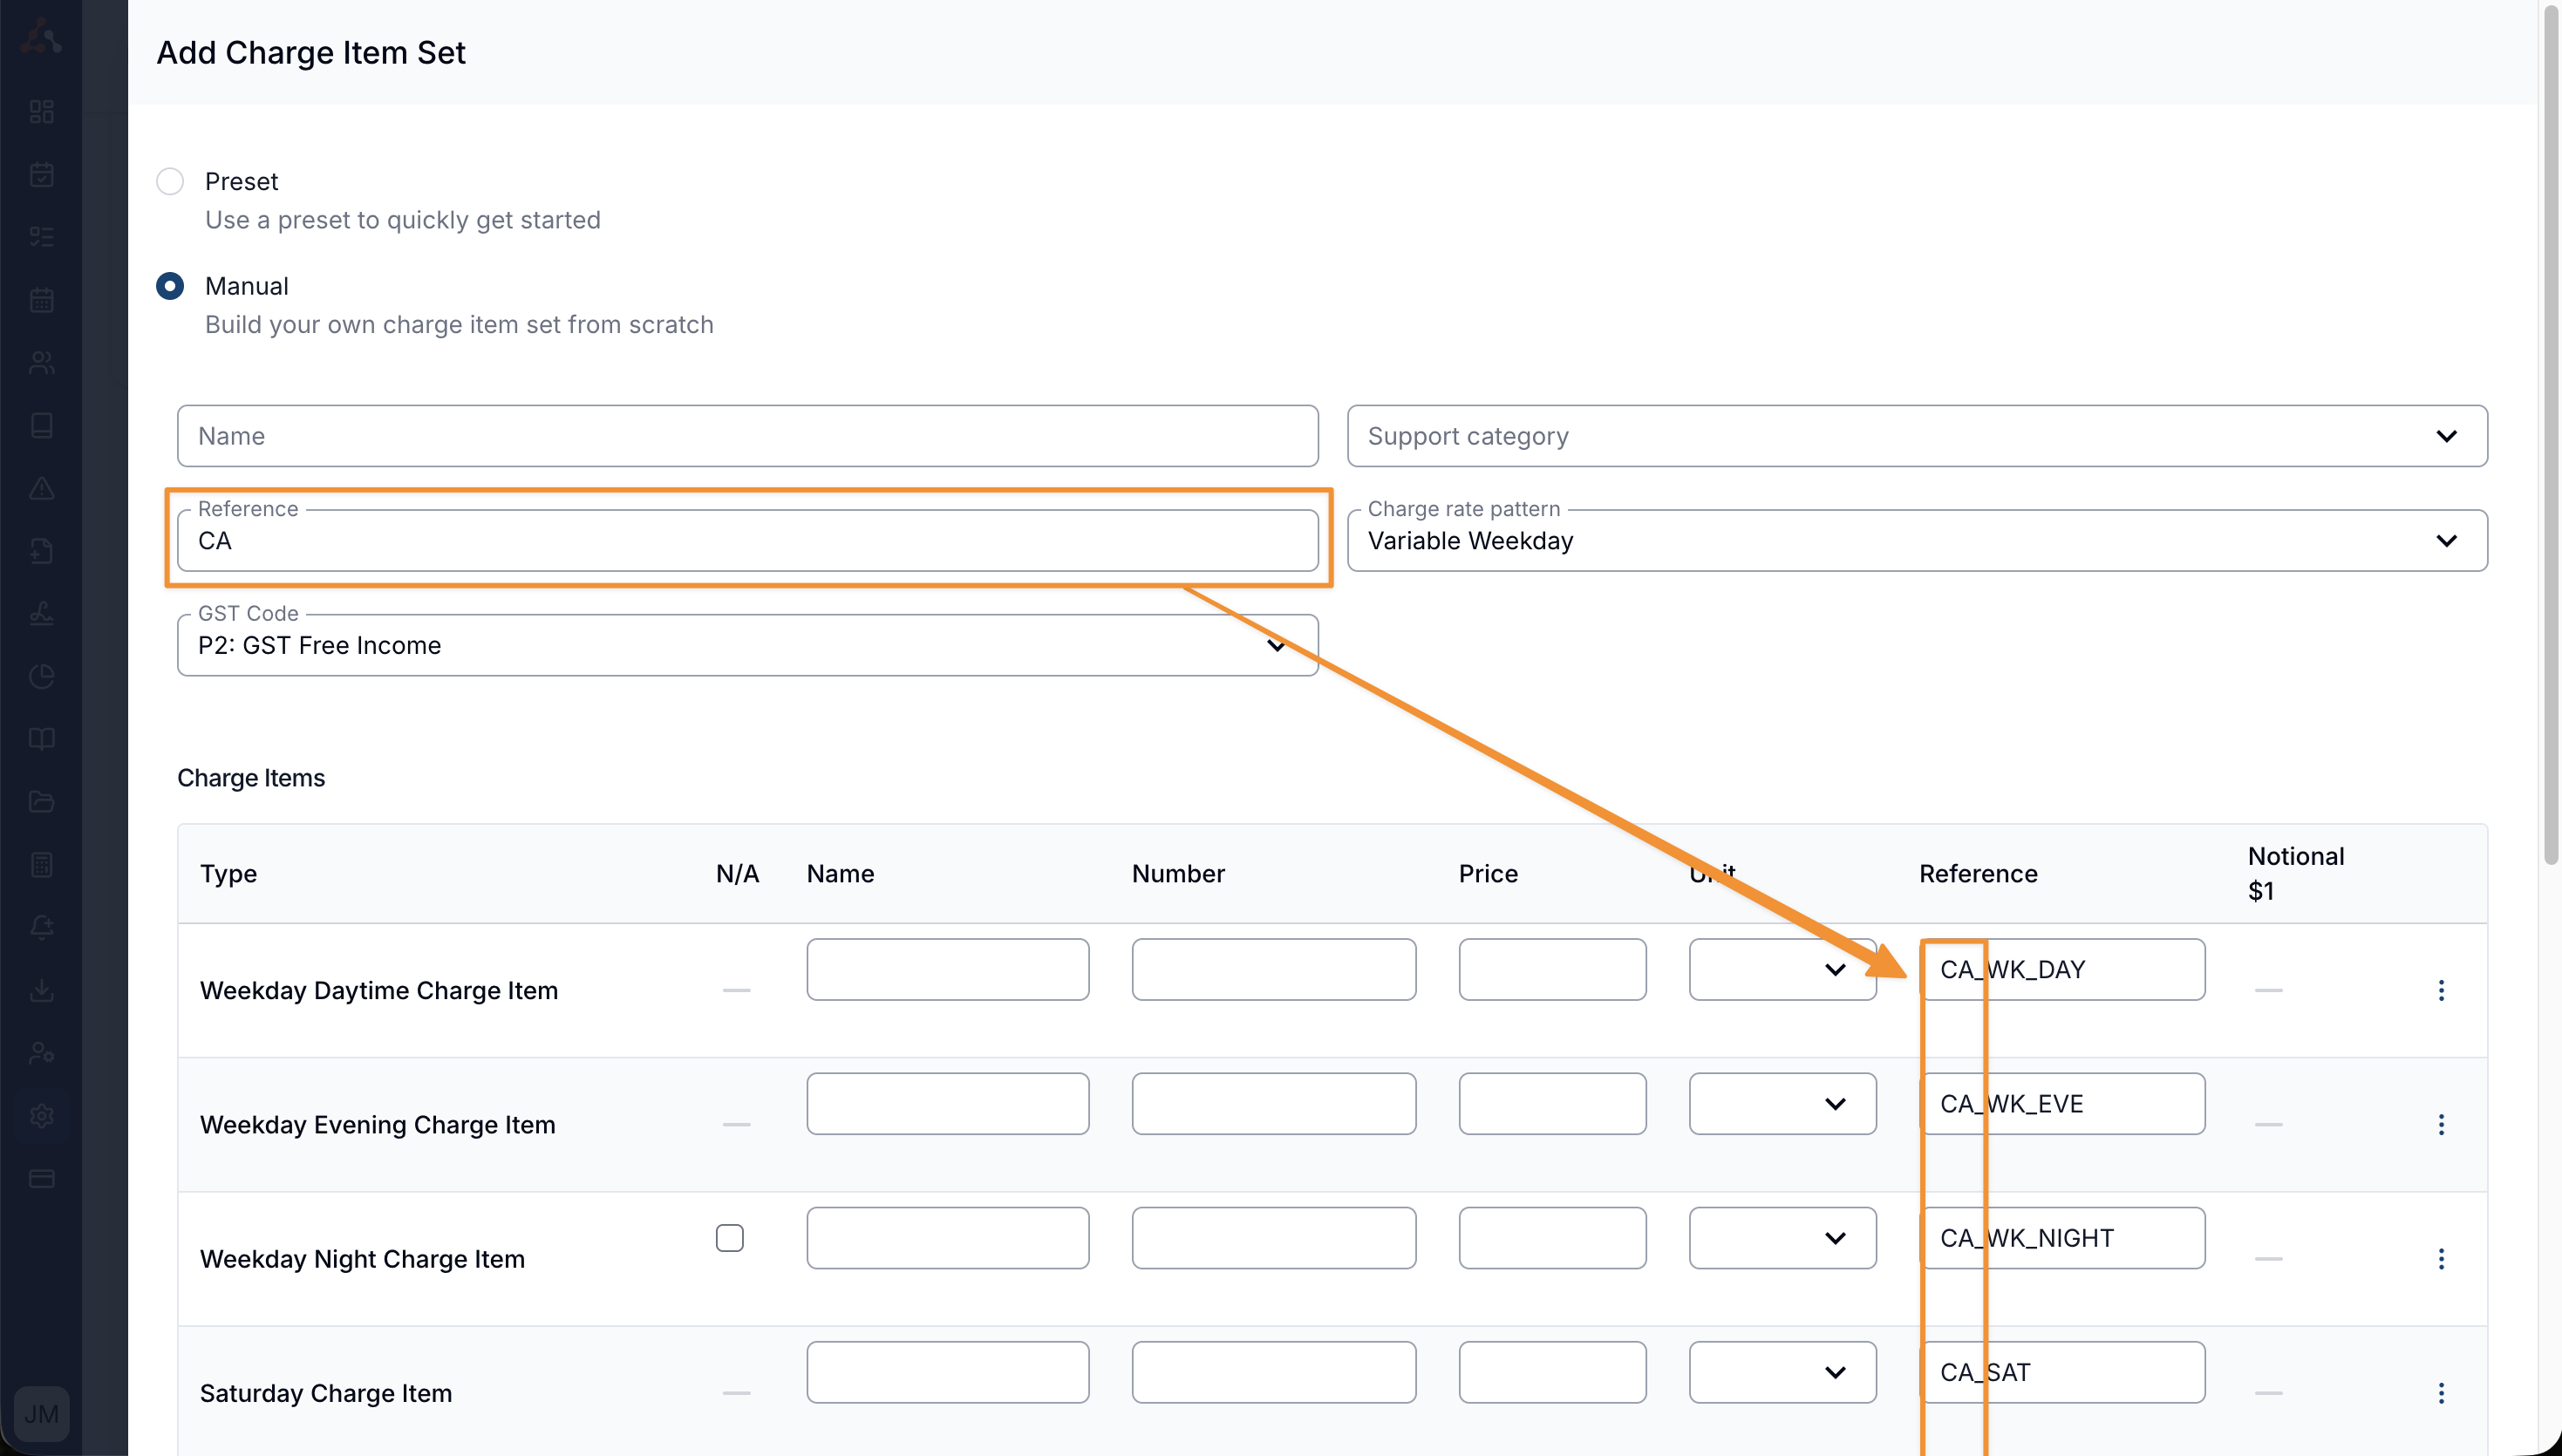
When the Reference field is completed with a phrase or acronym to describe a Charge Item Set, that reference will automatically populate the Reference field of each individual Charge Item within the set.
Add Weekday Daytime Travel Charge Item to Set
This separate travel-time rate requires Astalty Premium as well as Scheduling.
Where travel time should be charged at a different hourly rate to the support itself - Therapy Assistant, for example - the set can hold a Weekday Daytime Travel Charge Item. Click the three-dot menu beside the weekday daytime Charge Item and select Charge different travel rate.
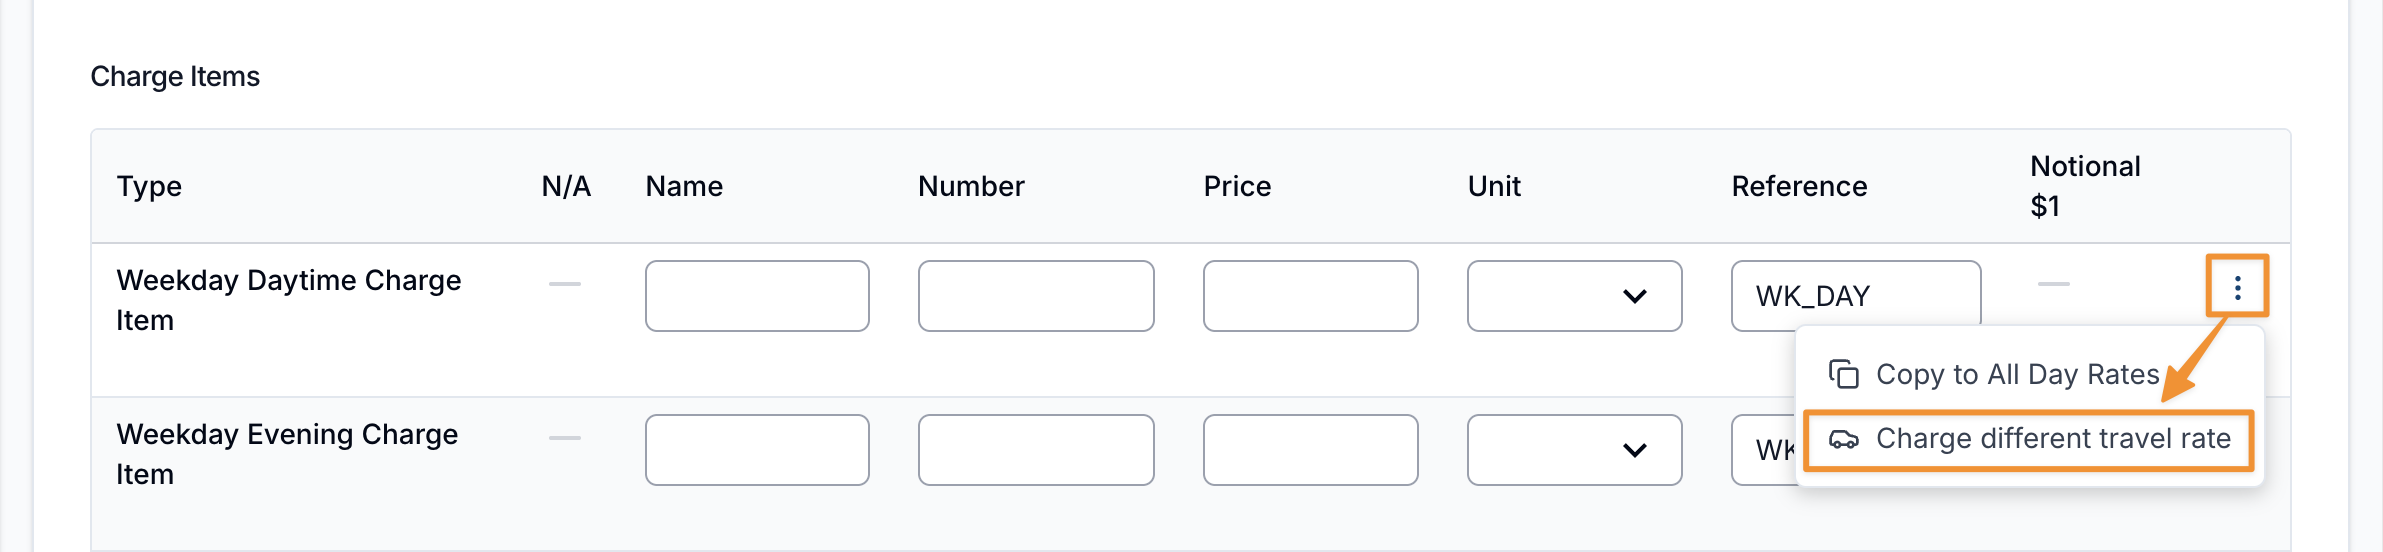
A row appears below the weekday daytime Charge Item where you enter the travel Price. Remove travel rate in the same menu takes it back off.
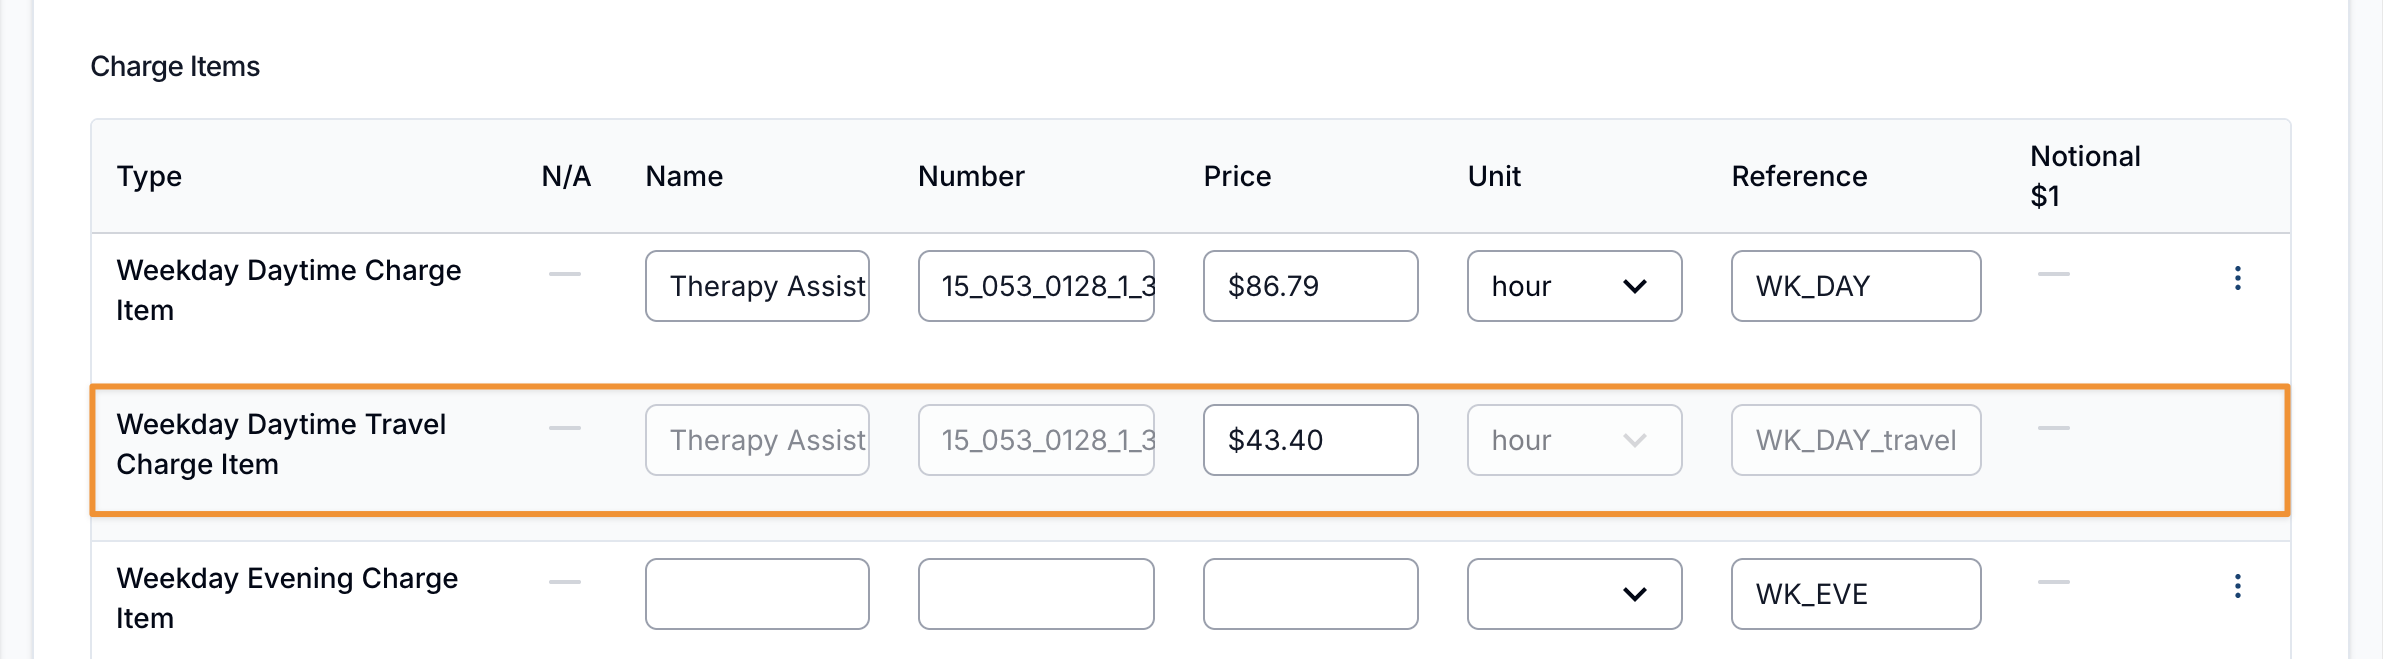
The option isn't offered while a preset is selected. To add a separate travel rate to a set you have already created, see Adding a Separate Travel Rate to an Existing Set, which also covers what the rate applies to.
Choosing a Claim Type
When you create a Charge Item Set - whether from a preset or manually - you can choose the NDIS Claim Type it should use. The Claim Type selector sits alongside GST Code at the top of the form and offers:
- Direct Service (default)
- Irregular SIL Supports
- Non-Face-to-Face Services
- NDIA Required Report
- Telehealth Supports
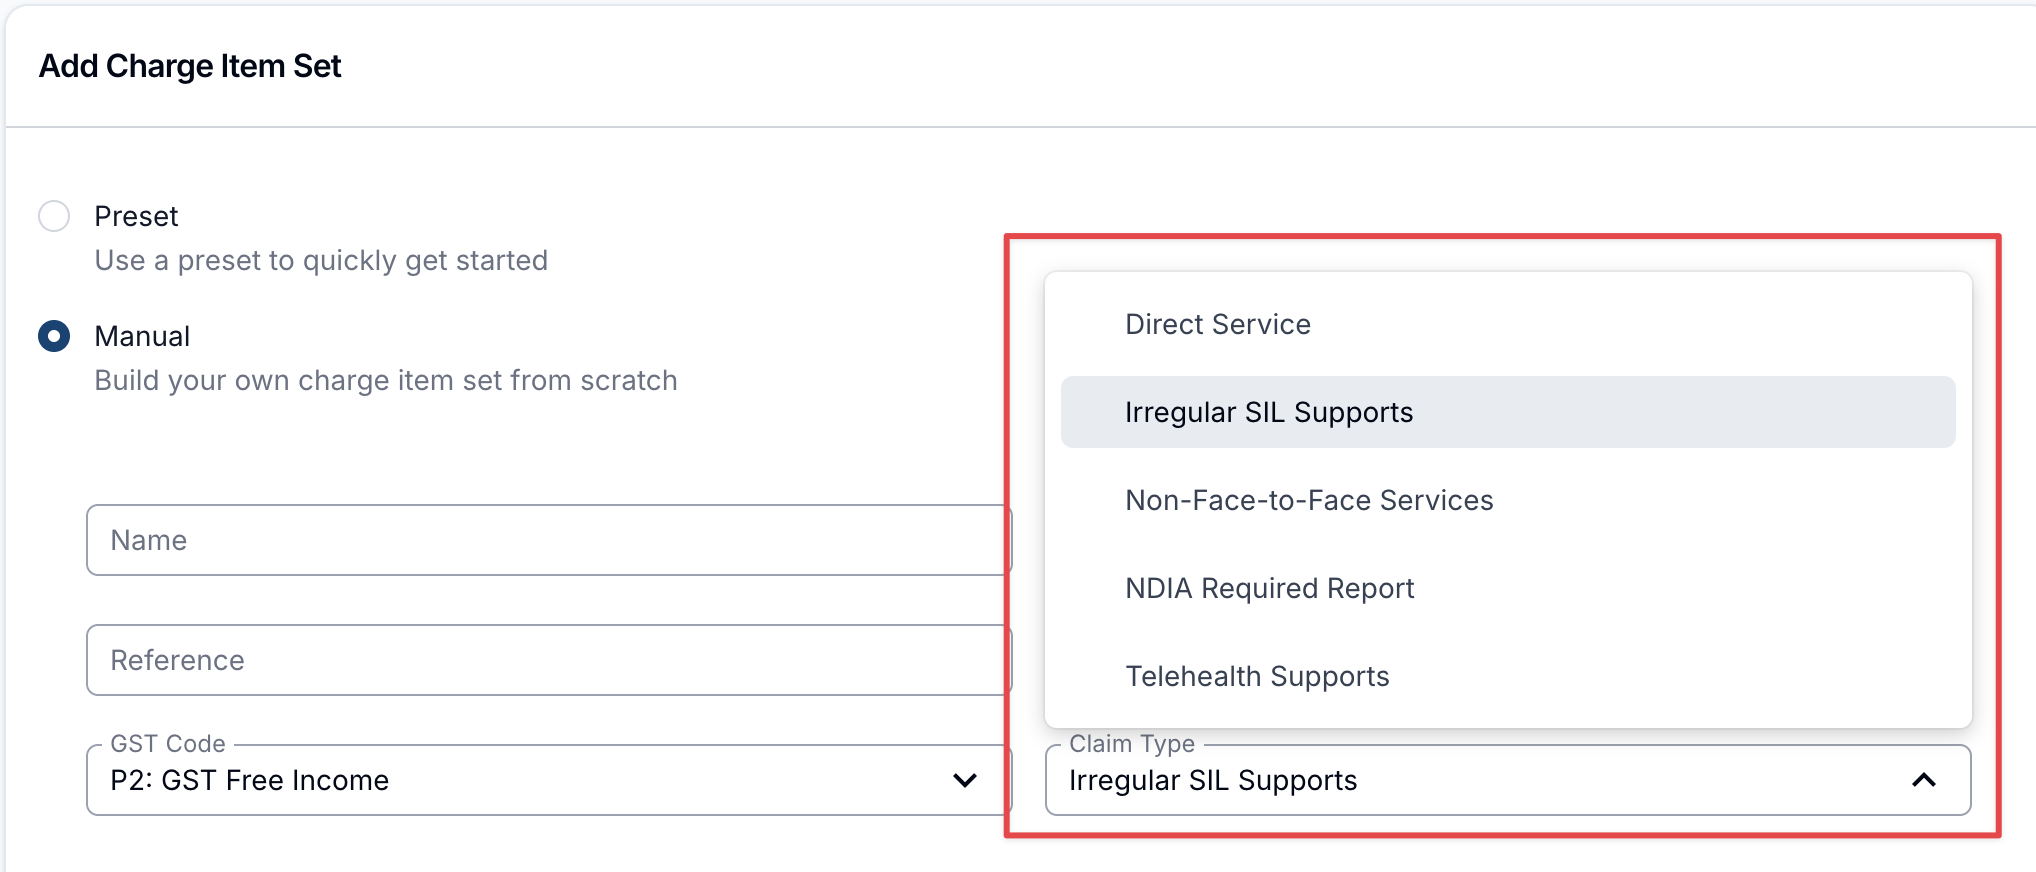
Charges automatically generated from the set are then claimed under the chosen Claim Type, so you no longer need to change the claim type on each charge by hand.
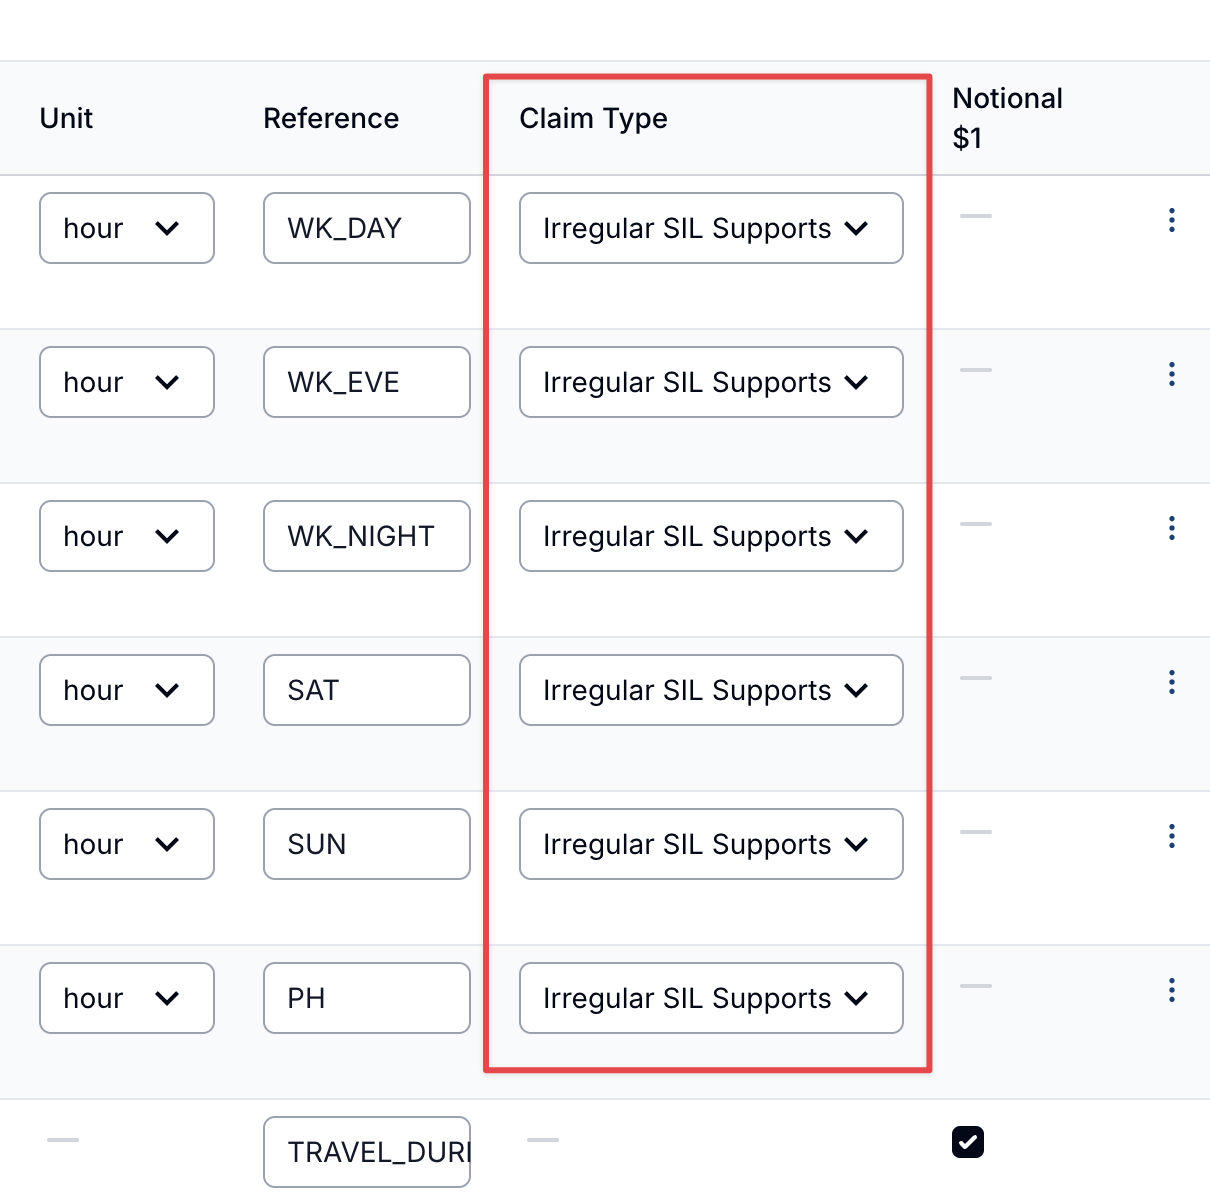
The set-level Claim Type is applied to every Charge Item in the set as a default. If you need different claim types within the same set, each Charge Item row has its own Claim Type column that you can adjust individually. (Travel Charge Items don't use a claim type, so they don't show this column.)
Updating Charge Item Sets
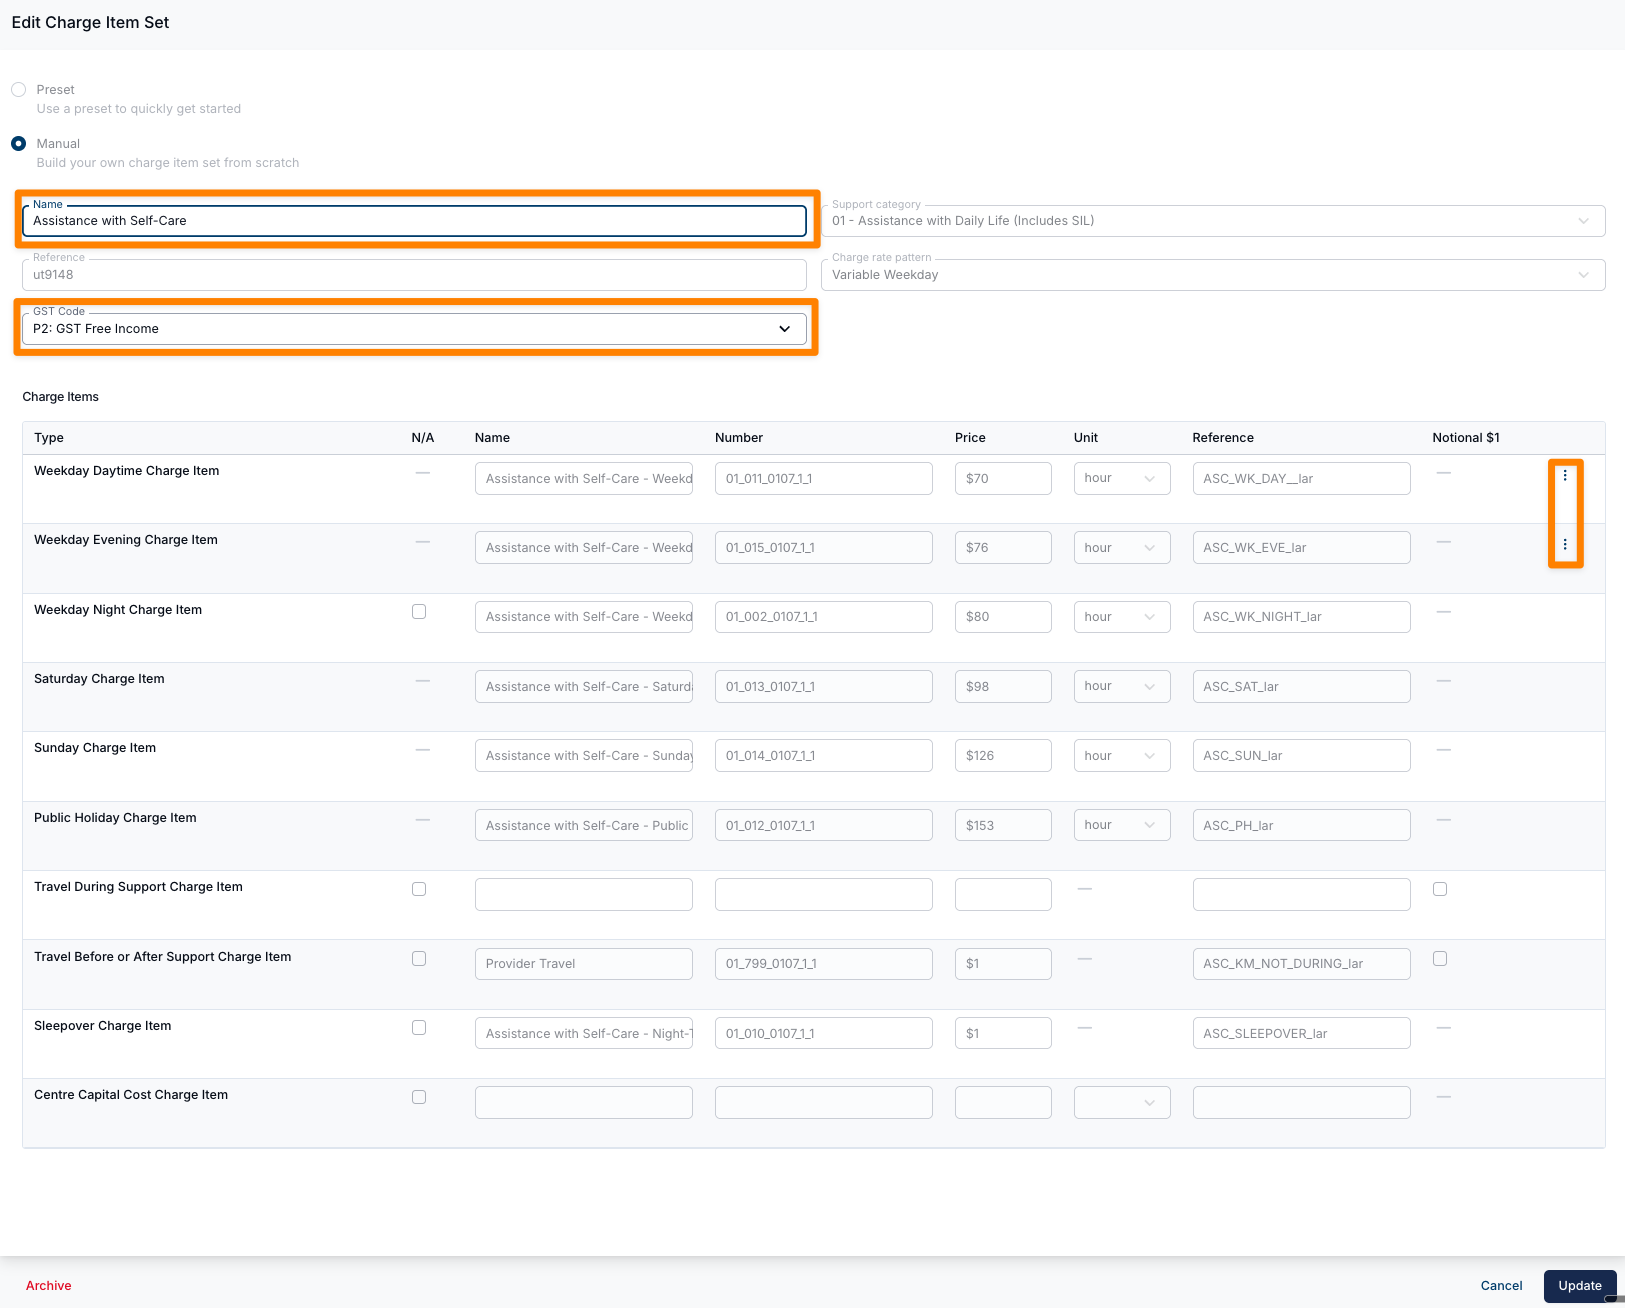
To update a Charge Item Set, click the three-dot menu to the right of the entry and select Edit as seen below.
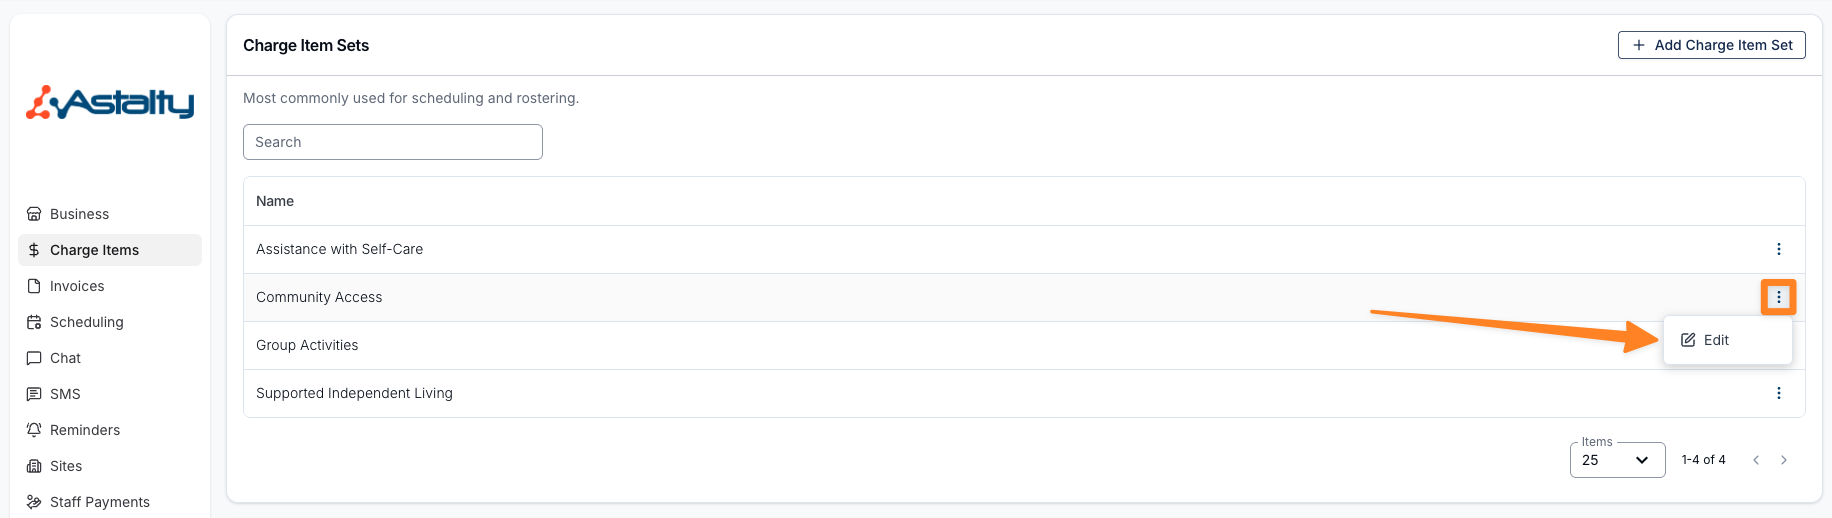
From here you can update any of the editable set-level fields, such as the Name, Reference and GST Code.
Checking which preset a Set came from
Open a Charge Item Set and the Charge Item Set Details card shows a Preset Type field naming the preset it was built from. Sets you built manually, and clones of any set, have no preset type, so the field isn't shown at all.
The preset type records where the set started. It is not a live link. Changing a Charge Item in the set doesn't clear it, and the set doesn't pick up later changes to the preset.
Editing individual Charge Items within a Set
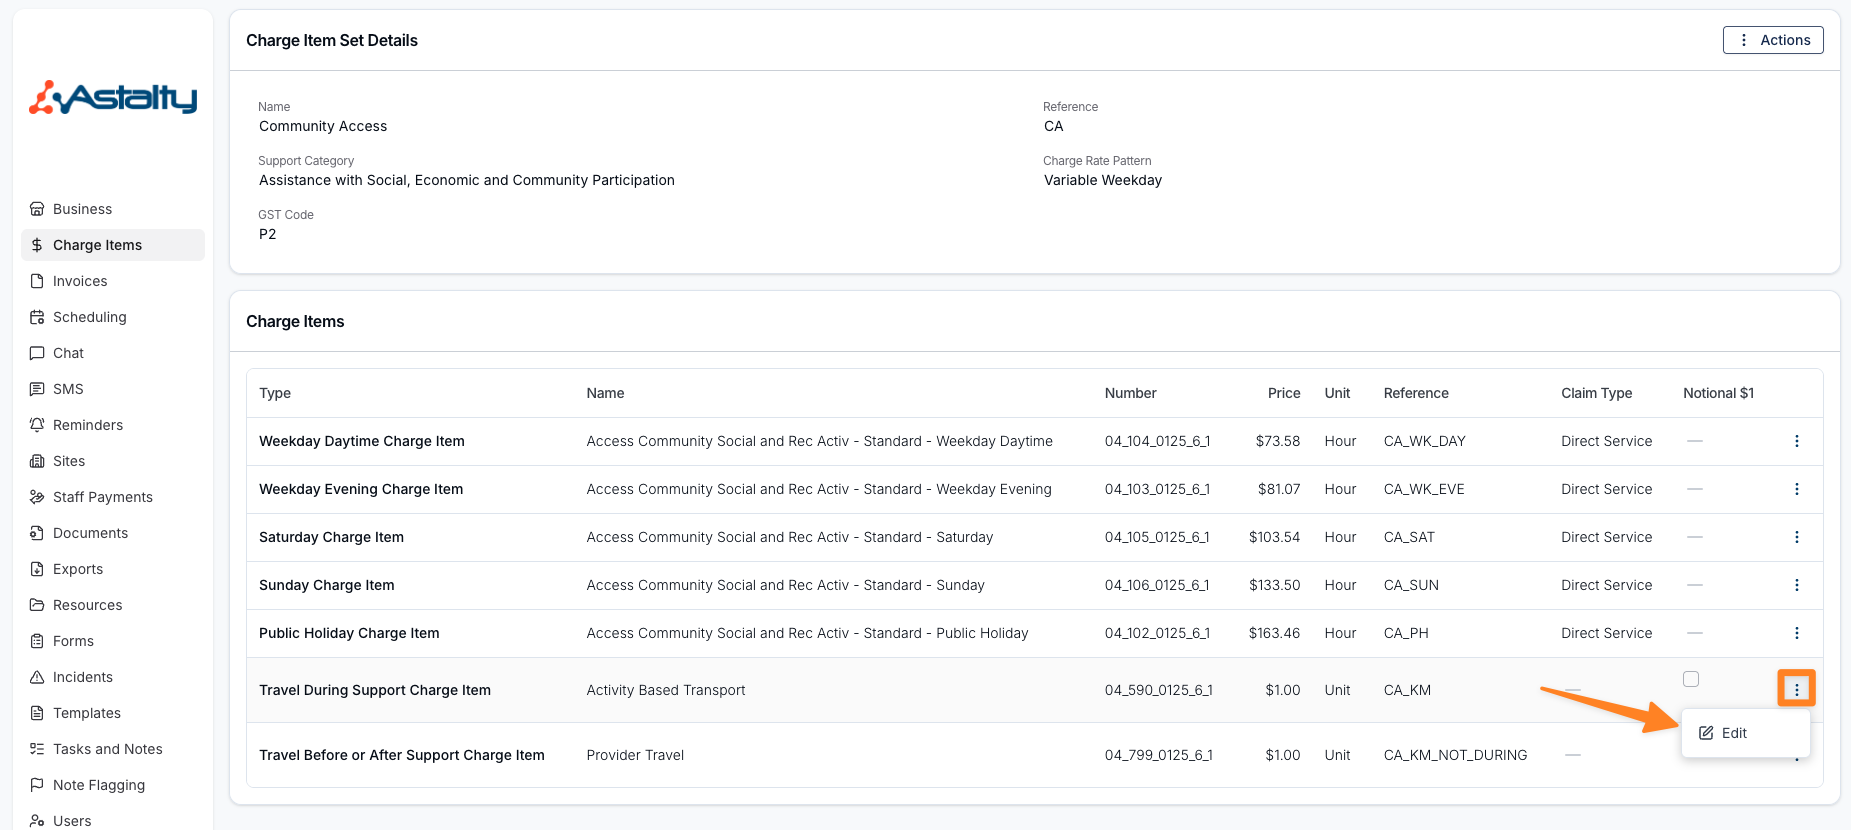
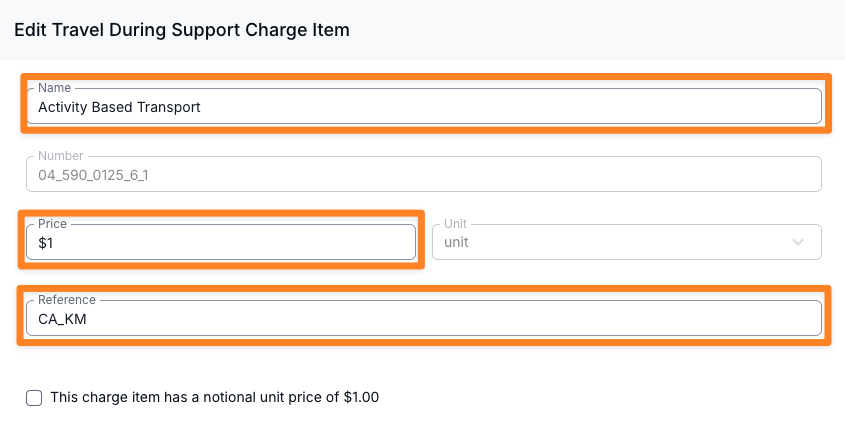
You can edit the Name, Price and Reference on individual Charge Items, including those created from presets. Number and Unit remain locked. Kilometre items also expose the notional-price checkbox.
- Open the Charge Item Set, then in the Charge Items table click the three-dot menu beside the Charge Item you want to change and select Edit.
- Update the Name, Price or Reference as required. The Number and Unit fields remain locked.
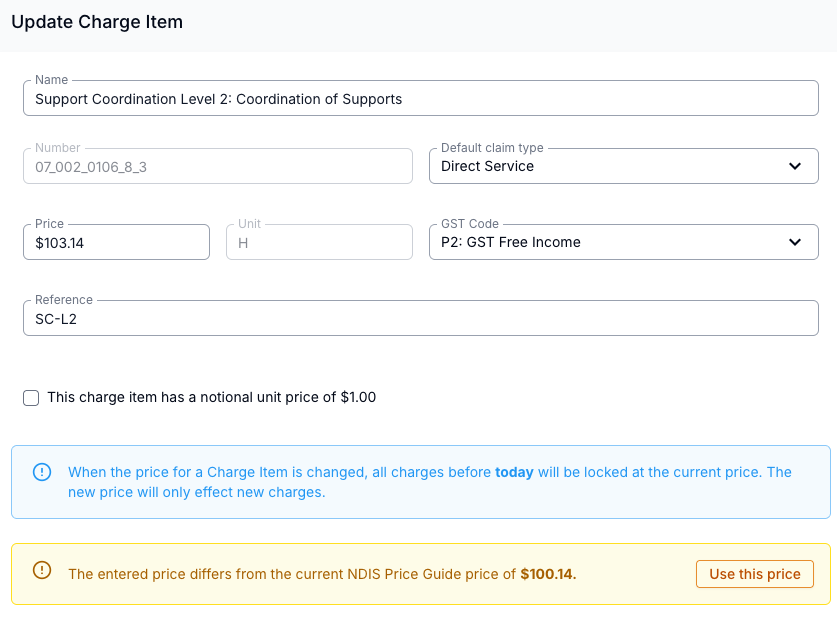
If the Price you enter doesn't match the current NDIS Price Guide price for your business region, Astalty shows a prompt with the current Price Guide amount. Select Use this price to fill the field with the Price Guide amount, or keep your own price.
- Click Save Changes.
If significant changes are required, you will need to archive the existing Charge Item Set and create a new version. For more on this, see Archiving & Restoring Charge Item Sets.
Adding Travel Charge Items to a Set
A Charge Item Set holds two travel Charge Items, one for each type of travel that can be charged against it:
- Travel During Support - used for kilometres on travel recorded as Travel Type - During Support.
- Travel Before/After Support - used for kilometres on travel to and from the support.
Either can be absent. Only the two Short Term Accommodation presets include neither.
Other Assistance with Daily Life presets include Travel Before/After Support but omit Travel During Support. Both Nurse Practitioner presets also omit Travel During Support. Check the rows on the selected set before enabling travel charging.
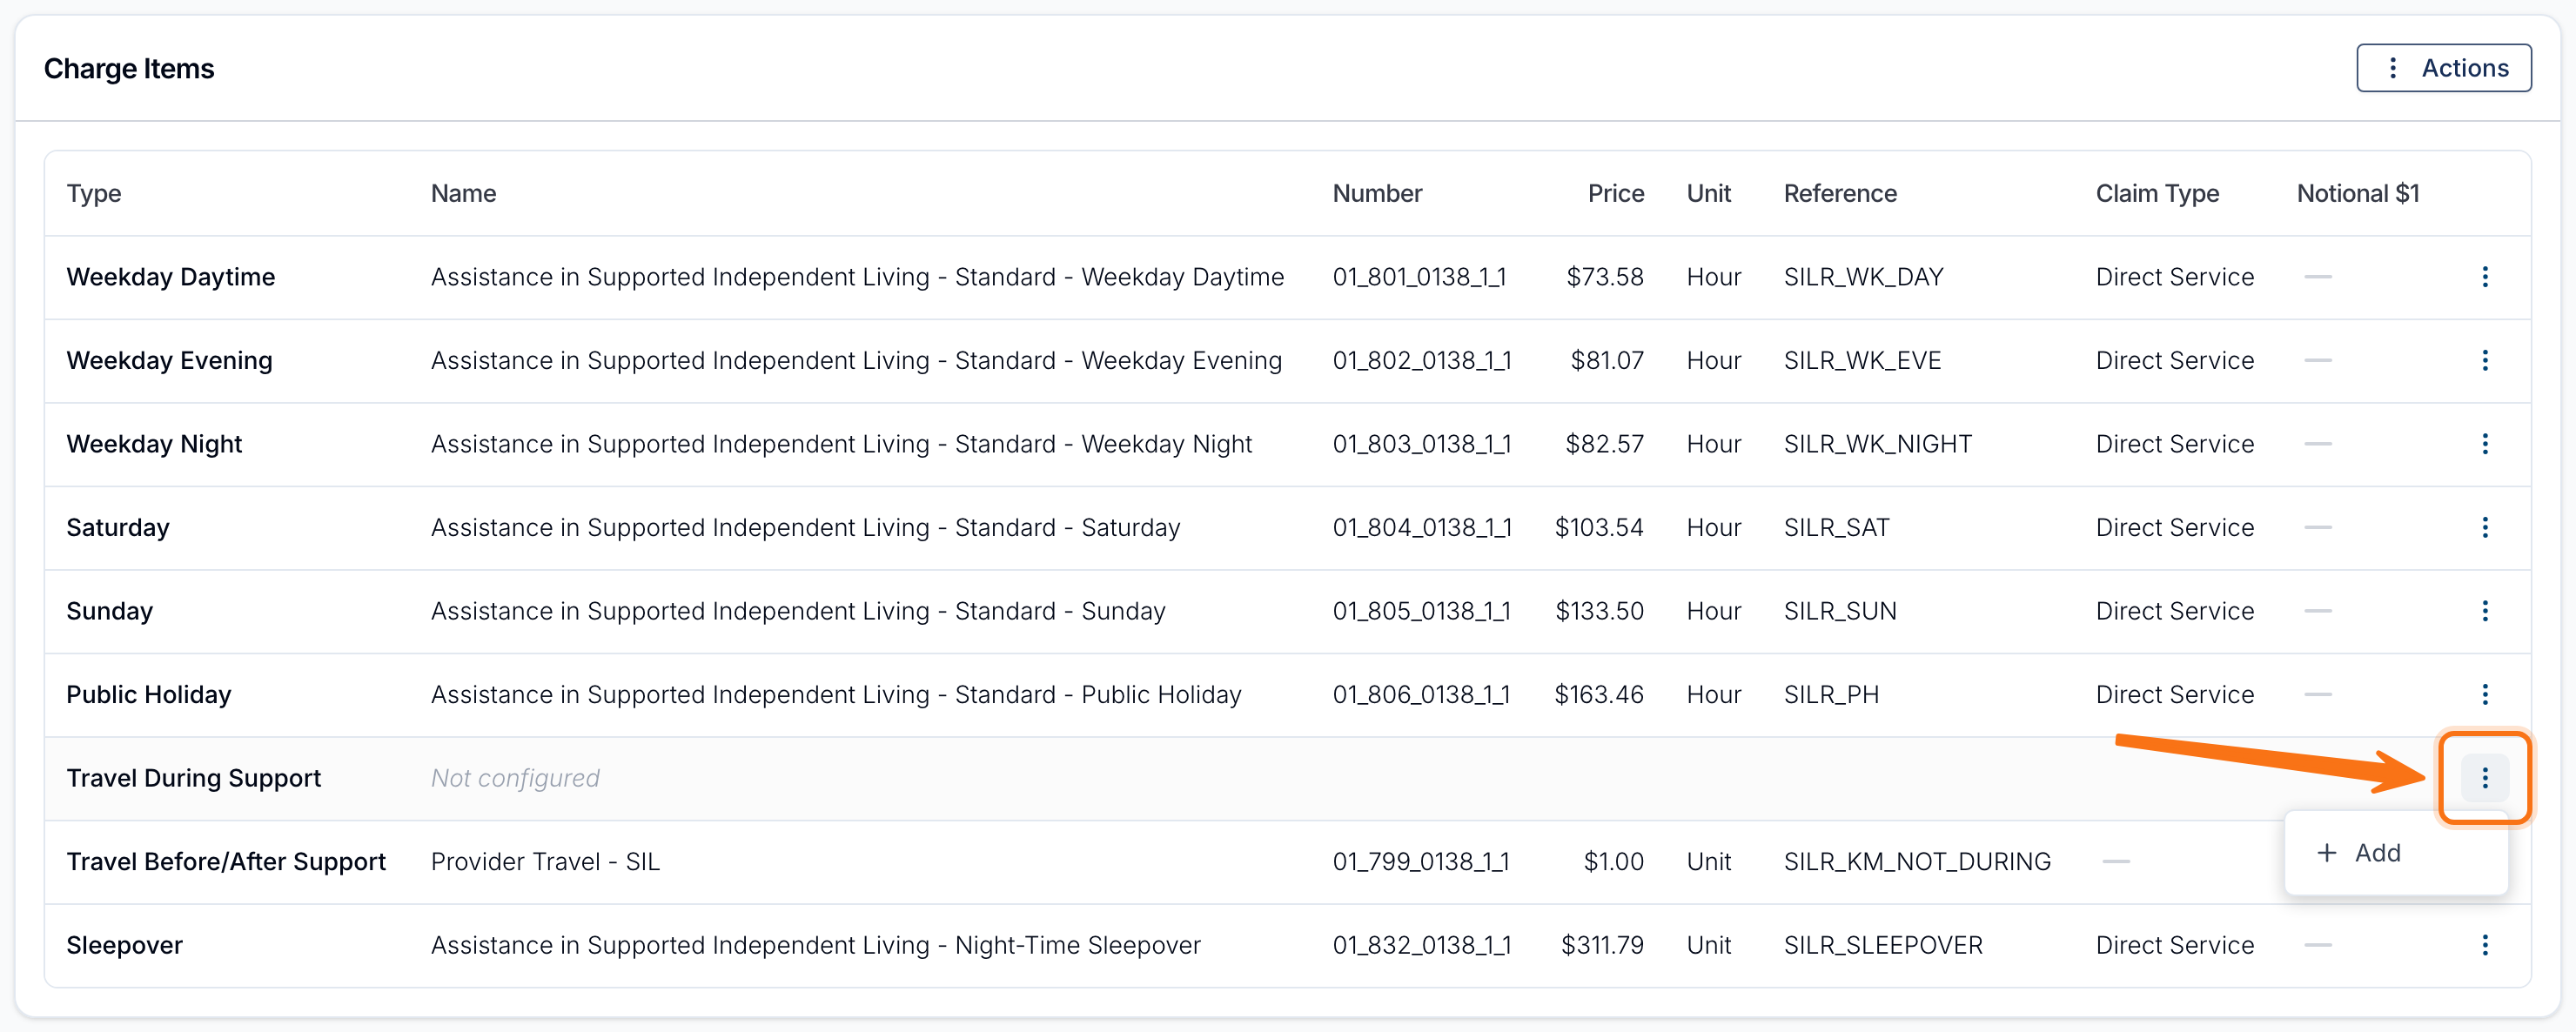
Where one is missing, the Charge Items card shows that row as Not configured, and kilometres can't be charged for that type of travel on any support using the set. See Travel Setup Errors for how this presents when rostering.
Adding the Charge Item to the set applies it to every support that uses the set, both existing and future, with nothing to configure per support.
To add one:
- Go to Settings, select Charge Items, and open the Charge Item Set.
- In the Charge Items card, click the three-dot menu at the end of the Not configured travel row and select Add.
- Enter the Name, Number and Price for the travel line item. The Reference is prefilled from the set's own reference and can be changed.
- Tick This charge item has a notional unit price of $1.00 where the NDIA has set a notional unit price for the line item. See Notional Charge Items.
- Click Add Charge Item.
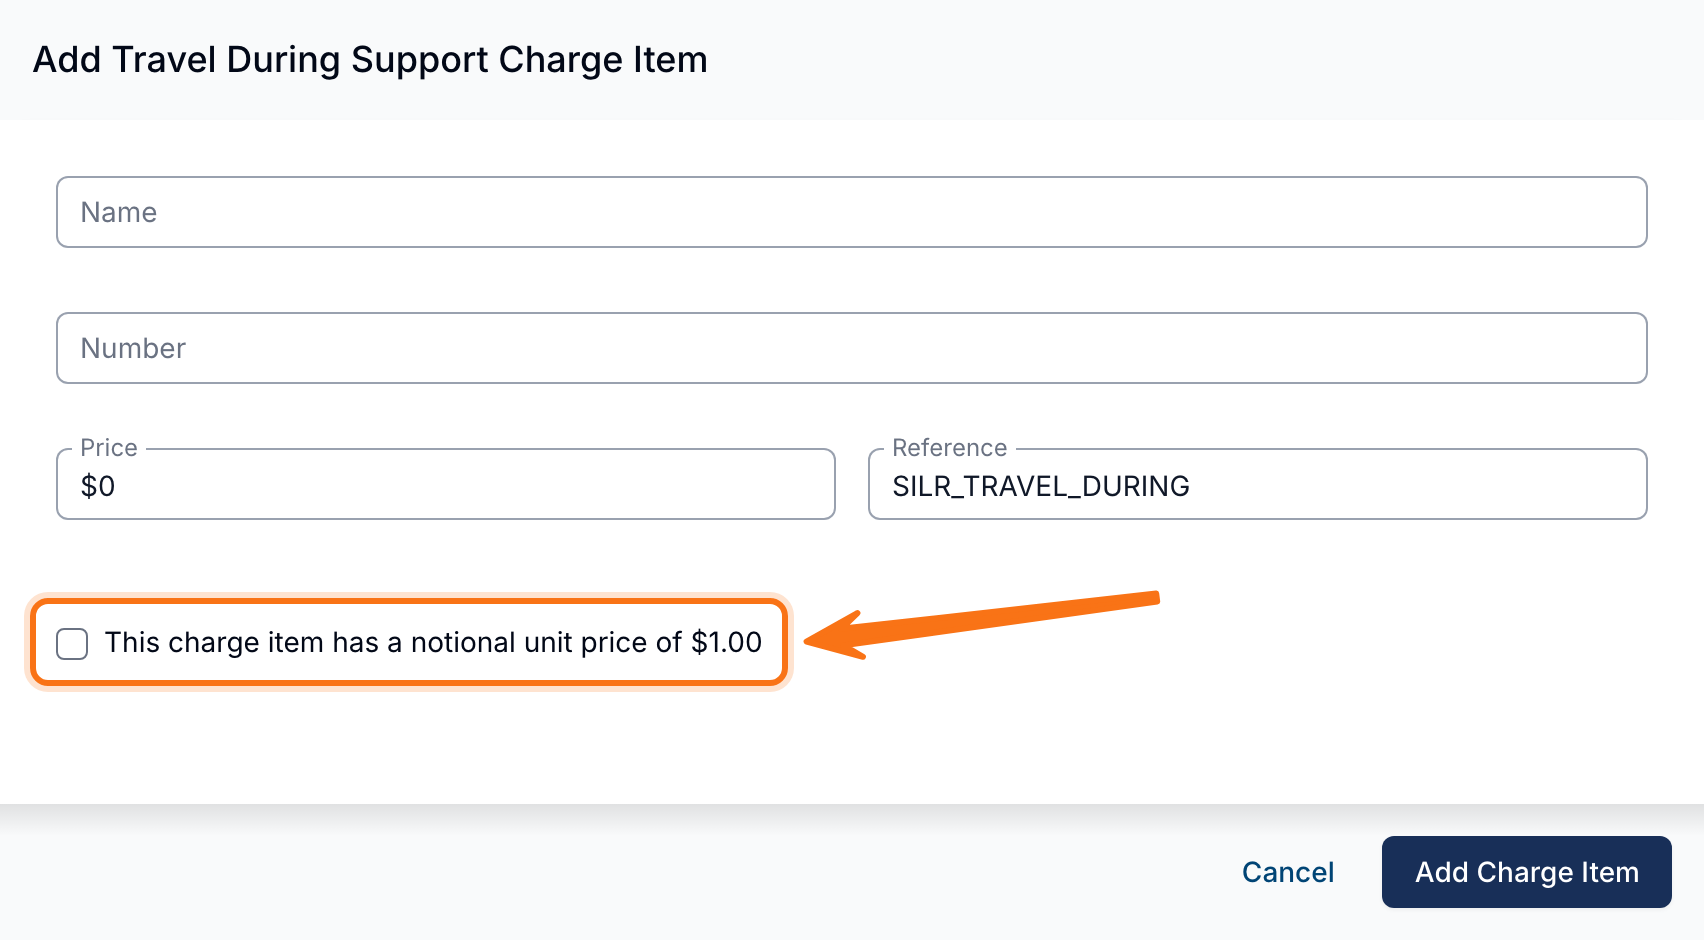
The Unit is set to kilometres for you, and travel Charge Items don't use a Claim Type, so neither is asked for. Once added, the Charge Item can be edited like any other in the set - see Editing individual Charge Items within a Set.
Adding a Separate Travel Rate to an Existing Set
This option requires Astalty Premium as well as Scheduling.
A Charge Item Set can charge travel time at its own hourly rate rather than at the day's support rate - useful where travel is billed lower than the support, as it is for Therapy Assistant. You can add that rate to a set already in use, without rebuilding the set or reassigning Participants.
This is the Weekday Daytime Travel Charge Item, and it covers the time component of travel - the Charge Behaviours Time only and Time & km. It has nothing to do with kilometres, which stay on the two Charge Items covered in Adding Travel Charge Items to a Set.
- Go to Settings, select Charge Items, and open the Charge Item Set.
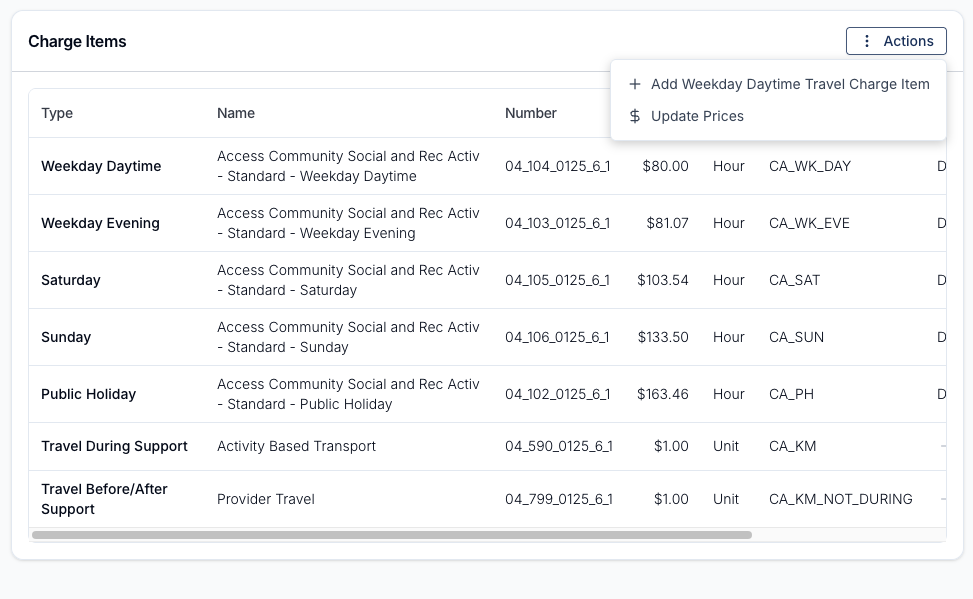
- In the Charge Items card, click the Actions menu and select Add Weekday Daytime Travel Charge Item.
- Enter the Price - the hourly rate for travel time.
- Click Add Charge Item.
Name, Number, Unit and Reference are taken from the set's weekday daytime Charge Item and locked: the name gains (Travel), the number is the same support item number, the unit is hours, and the reference gains _travel. Once added, the Charge Item shows as the Weekday Daytime Travel row and can be edited like any other in the set - see Editing individual Charge Items within a Set.
When the Option Isn't in the Actions Menu
Add Weekday Daytime Travel Charge Item appears only while all of these hold:
- Your account has Astalty Premium and Scheduling enabled.
- The set has no Weekday Daytime Travel Charge Item yet. A set holds one, and it can't be swapped from this menu - edit its Price instead.
- The set wasn't created from a preset. Manually built sets qualify, and so do clones, which are always manual sets. To put a separate travel rate on a preset-built set, clone it and use the clone from then on. Checking which preset a Set came from tells you which you have.
- You can update Charge Item Sets. Without the permission the Actions menu isn't shown at all.
Which Travel Charges Use the New Rate
Adding the Charge Item does not immediately change existing travel charges. New travel charges select the new travel item:
| Travel | Rate used |
|---|---|
| New supports and group supports | The new travel rate |
| Existing supports whose travel isn't charged yet - future shifts, or travel not yet recorded or approved | The new travel rate, the next time the travel charge is created |
| Travel already charged | No immediate change; an uninvoiced charge can select the new item when recalculated |
Recalculating an uninvoiced travel charge can select the new item, for example when travel duration is reviewed or support times are changed. An invoiced charge keeps its item. Review any stored unit price or override as well; changing the selected item does not remove a stored rate.
Updating all prices in a Set at once
Instead of editing each Charge Item one by one, you can update every price in a Charge Item Set from a single screen - and pull the latest amounts straight from the NDIS Price Guide.
- Open the Charge Item Set, then in the Charge Items card click the Actions menu (top right) and select Update Prices.
- The Update Prices screen lists every Charge Item in the set with an editable Price field. Type new prices directly, or click Fill from NDIS Price Guide to populate each price with the latest amount from the current NDIS Price Guide for your business region.
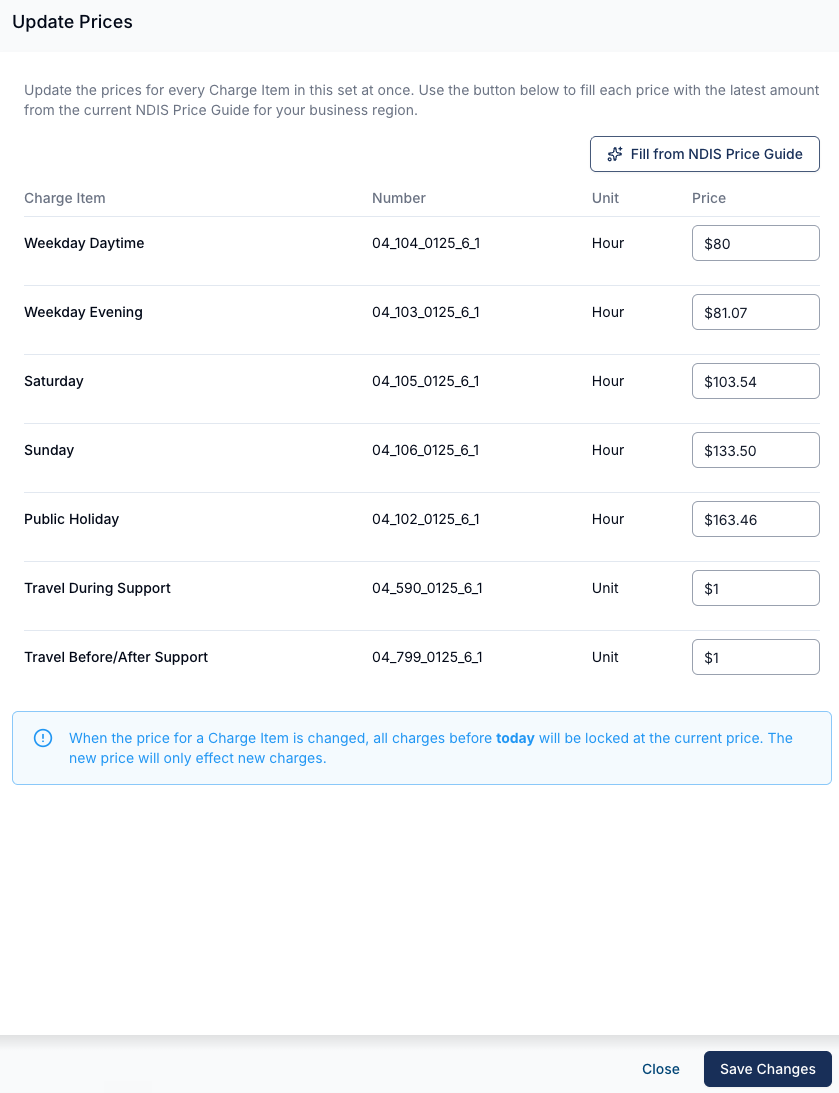
- Click Save Changes.
Video Walkthrough
Watch the following video for a walkthrough on how to update the prices within a Charge Item Set.
Cloning a Charge Item Set
If you need a Charge Item Set that is similar to one you already have - the same support items at different prices, or the same rates claimed under a different Claim Type - you can clone the existing set instead of building a new one from scratch.
To clone a set, click the three-dot menu to the right of the entry in the Charge Item Sets table and select Clone.
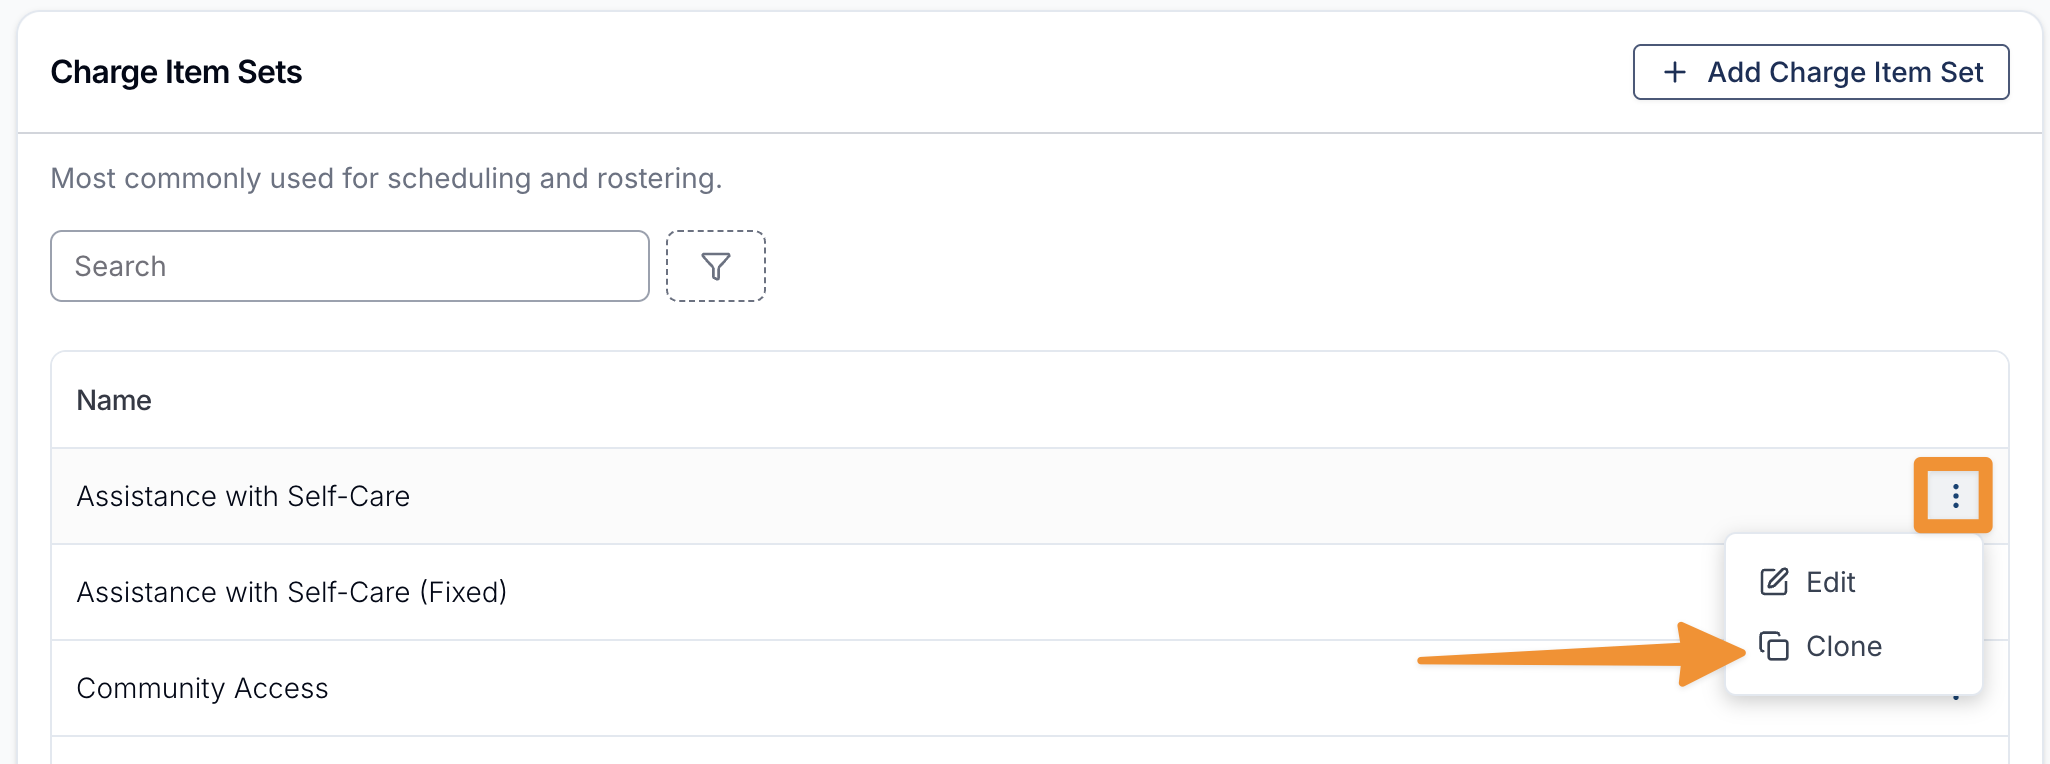
This is the set-level menu at the end of each row of the Charge Item Sets table, which also offers Edit. It isn't the three-dot menu on the individual Charge Item rows inside a set, which is where options like Copy to All Day Rates and Charge different travel rate live.
The Clone Charge Item Set drawer then opens, pre-filled from the original with:
- The Name, with (Copy) added to the end
- The Reference, Support Category, GST Code and Charge Rate Pattern
- Every Charge Item in the original set, including its Name, Number, Price, Unit, Reference, Claim Type and Notional $1 setting
Any Charge Item type the original set didn't use stays marked as N/A, and every value that has been copied across can be changed before you save.
Once you're happy with it, click Clone. A new Charge Item Set is created, and the set you copied from is left unchanged.
Changing the Claim Type on a clone
Claim Types are fully editable on a clone, which makes cloning a quick way to run the same support items under a different Claim Type.
The Claim Type selector at the top of the form sets the Claim Type for the whole set, and each Charge Item row keeps its own Claim Type column for when they need to differ within the set. Each row starts on the Claim Type it had in the original set, and the set-level selector starts on the one used by the original's weekday daytime Charge Item.
Changing the set-level Claim Type overwrites the Claim Type on every Charge Item row, so choose it first and then adjust individual rows if you need to. Travel Charge Items don't use a Claim Type, so those rows show a dash instead.
For what each of the Claim Types means, see Choosing a Claim Type.
Applying the Charge Item Set
Attach the set to an appropriate Scheduled Service before using it on a Participant support.