- Changelog
- 16 July 2026
16 July 2026
Schedule Week Start Day
You can now choose which day the Schedule Week and Fortnight views begin on, independently of your pay period, so the Schedule lines up with how your team plans their week without affecting payroll.
- Pick a day from the Week starts on setting to have the Week and Fortnight views always start on that day
- Leave it blank to keep following your pay period start day (or Monday if you haven't set a pay period)
For more information, visit the Scheduling Settings guide.
Schedule Charge Mode Filter
The Schedule filters now include a Charge Mode filter, so you can narrow the Schedule to shifts by how their charges are calculated.
- Select Auto or Manual on its own to show only shifts with that charge mode
- Select both to show every shift that has a charge mode
- Your selection is remembered, so the filter stays applied the next time you open the Schedule
For more information, visit the Viewing the Schedule guide.
Scheduled Hours Breakdown
Hover the hours counter on the Support Worker Schedule to see how a worker's scheduled hours are made up. The Scheduled hours tooltip breaks the total down by category.
- Shifts, Paid travel, and Sleepover categories that apply are shown, with a Total scheduled figure counting only hours paid as time
- Travel paid as a kilometre allowance rather than time appears as a separate Unpaid travel time line, which usually explains any gap between the counter and the pay run
For more information, visit the Viewing the Schedule guide.
Shift Assignment Worker Filters
When assigning an unassigned shift, you can now narrow the suggested Support Workers using filters above the list. These filters combine with each other and with the search box.
- Availability - show only workers who are Available or Unavailable for the current shift
- State - filter by the worker's state, selecting more than one if needed
- Team - filter by the team a worker belongs to, including Unassigned (only available if you use Teams)
For more information, visit the Unassigned Shift guide.
Weekday Worker Assignment Shortcuts
When you assign a Support Worker to a repeating support, the Shift Preview now includes a Select dropdown with shortcuts to build your selection quickly.
- All without clashes - selects every occurrence except the dates where the worker already has a clash
- Every [Weekday] - selects every occurrence that falls on that weekday
- Every [Weekday] without clashes - selects every occurrence on that weekday, skipping the clashing dates
For more information, visit the Recurring Shifts guide.
Multiple Support Workers on Internal Shifts
You can now roster more than one Support Worker on the same internal event, so you can set up a team meeting or training session once instead of creating a separate shift for each person. Every worker you add gets their own shift under the event.
- In the Support Workers field, select everyone who should be rostered on the event
- Use Add Attendees to add more workers later, including across future events in a repeating series
- Remove a worker via their own shift's Actions menu without affecting the other attendees
For more information, visit the Adding a Shift (Internal or Non-Support) guide.
Internal Event Notes
You can now add notes to internal or non-support shifts that aren't linked to a Participant, giving workers a place to document admin time, meetings, training and other internal work.
- Everyone rostered on the event shares one notes thread, so a note added by one attendee is visible to the others
- Notes can be added from both the web app and the Support Worker app
For more information, visit the Internal Event Notes guide.
Support Series Attachments
You can now attach goals and documents directly to a support, and on recurring supports add the same goal or document to the current support and selected future occurrences in one action.
- Upload files from a support's Documents tab and attach existing Participant goals from the Goals tab
- A recurring picker lets you choose exactly which future supports receive the item - useful when it applies to the next few visits but not the whole series
For more information, visit the Support Goals and Documents guide.
Removing a Cancelled Participant From a Group Support
When a Participant's support in a Group Support has been cancelled, you can now remove them from the Group Support entirely so they no longer appear as a red cancelled entry.
- The Delete Support action appears in the Participant's Actions menu, but only when they have no invoiced items on that support
- For a repeating series, you can remove the Participant from selected future cancelled sessions in the one action
For more information, visit the Adding a Group Shift guide.
Paid or Unpaid Break Tooltip
You can now check whether a rostered break is paid or unpaid straight from the shift card in the Schedule. Hover over any break and a tooltip shows either Paid break or Unpaid break, with no setup required.
For more information, visit the Meal Break guide.
Site Shortcut on the Participant Profile
When a Participant is assigned to a site, that site now appears in their profile sidebar with a shortcut arrow that takes you straight to the site's view. Because it lives in the sidebar, the shortcut stays available on every page of the profile, so you're always one click away from the site level.
For more information, visit the Participant Profile guide.
Participant Schedule Email History
You can now confirm whether and when a Participant's schedule was emailed without checking outside Astalty.
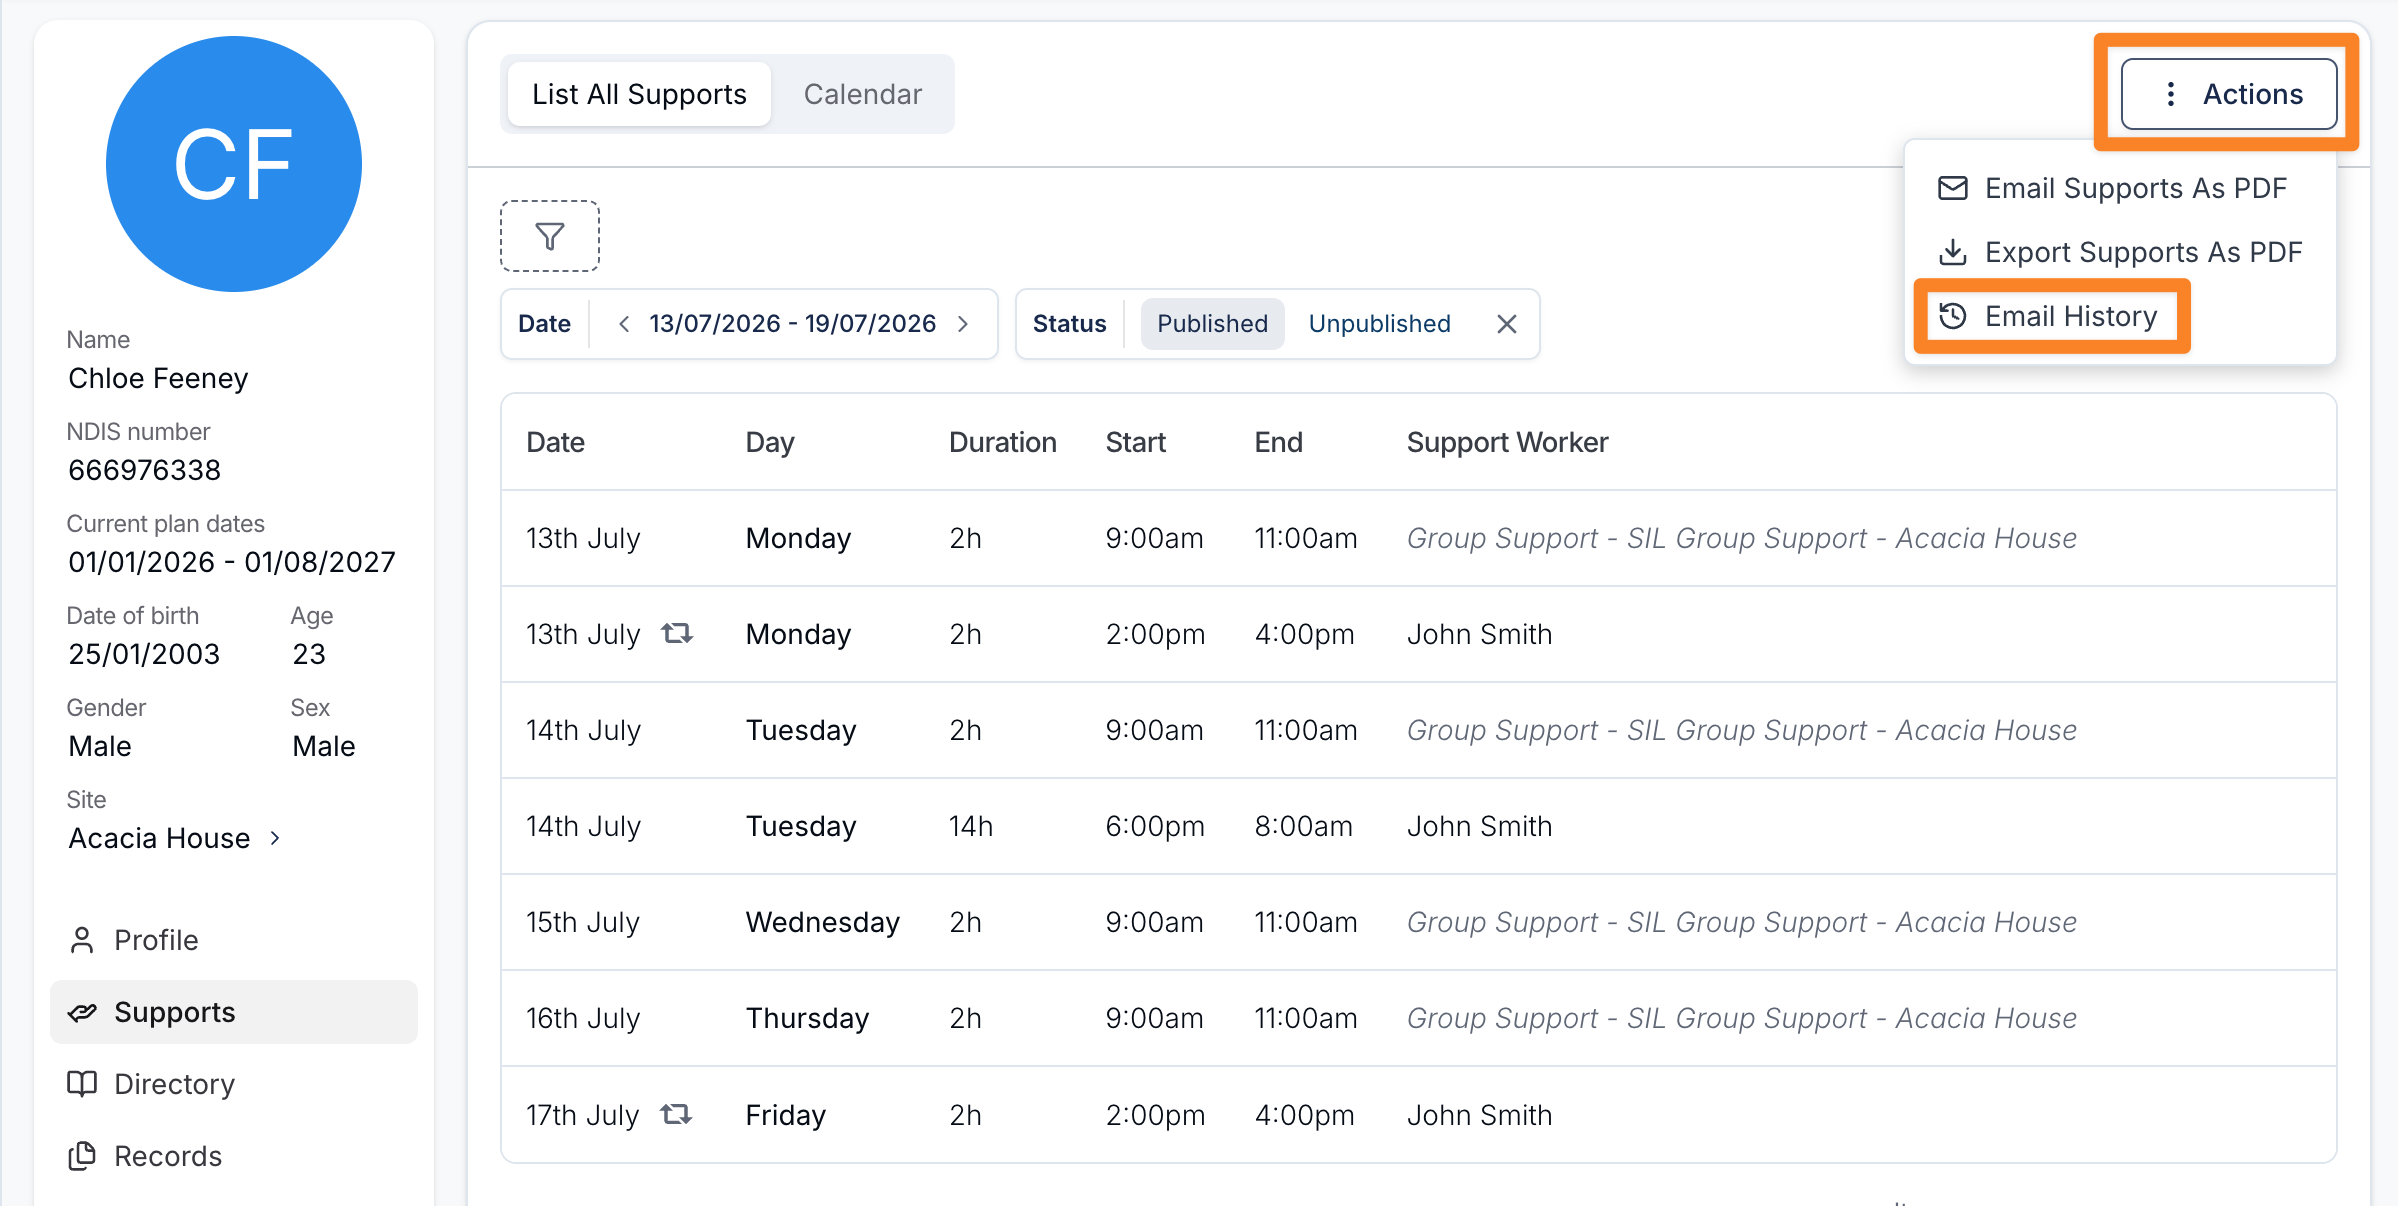
- Open the Participant's Supports page and select Actions > Email History
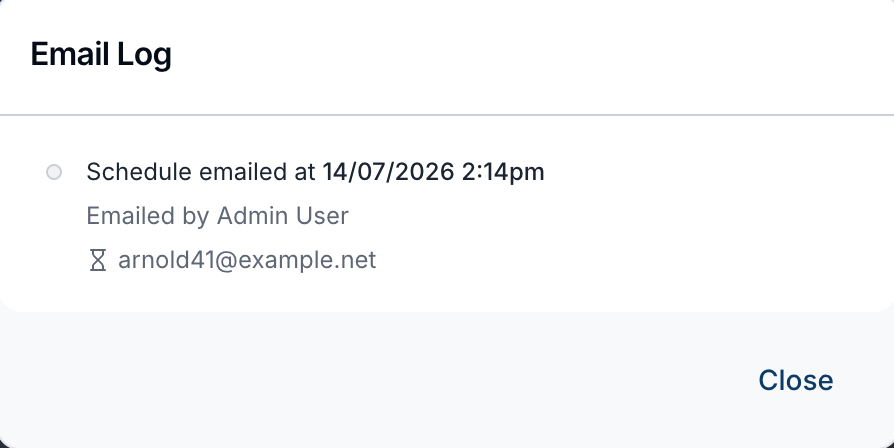
- The Email Log shows the date and time each schedule was emailed, who sent it, and every recipient's email address
- A status icon shows whether each recipient's email is being processed, was delivered, or failed
- The most recently emailed schedule appears first
For more information, visit the Viewing a Participant's Schedule guide.
Unscheduled Travel After Clocking Out
By default, Support Workers can only report unscheduled travel while they're clocked in to a shift. With the new Allow Reporting Unscheduled Travel after Clocking Out setting, you can let them report unscheduled travel on a completed shift too - so they can still log travel they forgot to record before clocking out.
- This option only appears once Allow Unscheduled Travel is turned on, and it's off by default
For more information, visit the Scheduling Settings guide.
Ad-hoc Travel Kilometre Pay and Charge
When you approve ad-hoc travel that wasn't scheduled on the shift, the Approve Travel Distance dialog now lets you decide whether the kilometres are charged and paid - independently of one another.
- Charge participant for kilometres - whether the Participant is billed for the kilometres travelled
- Pay worker for kilometres - whether the Support Worker is reimbursed for the kilometres travelled
- Useful for company or pool vehicle travel, where you can charge the Participant but turn off pay for the worker
For more information, visit Ad-hoc Travel Kilometre Pay and Charge in the Shift Approvals guide.
Active Overnight Period Audit Trail
Each active overnight period now has a View Audit Trail link showing who logged the disturbance and the exact time it was submitted - not just the start and end times the worker entered - so you can spot disturbances entered well after they happened before approving them.
- Later edits to the entered start and end times are also recorded, so you can see the original submission alongside any changes
- Available from the Active Overnight Periods section in Shift Approvals and the Active Overnight Periods drawer, when the Audit Trail feature is enabled for your provider
For more information, visit the Creating a Sleepover or Active Overnight Support guide.
Minimum Break Between Shifts
We've corrected how the minimum break between shifts works so scheduling alerts match the SCHADS Award. The required break between ordinary shifts is always 10 hours - the only reduction the Award allows is to 8 hours by agreement, and only where the break sits directly before or after a sleepover.
- The employment field is now Minimum Break Near a Sleepover - set it to 8 hours - By agreement so a compliant 8-hour break beside a sleepover doesn't raise a false alert
- Shifts rostered back-to-back with no gap now count as one continuous shift, so hours beyond the per-shift cap show as an Overtime alert rather than a missed-break alert
For more information, visit the Scheduling Award Alerts guide.
Broken Shift Minimum Gap
The Broken Shift Minimum Gap setting lets you control how large the gap between two same-day work periods must be before Astalty treats the day as a broken shift and pays the Broken Shift Allowance.
- Enter a number of minutes so that only a longer gap forms a broken shift, or 0 so that any gap counts
- Leave the field empty to keep the standard calculation - existing providers see no change unless they set a value
For more information, visit the Scheduling Award Alerts guide.
Automatic SCHADS Meal Allowances
Astalty can now automatically add a SCHADS overtime meal allowance (clause 20.5) to a worker's timesheet when they work enough overtime on a shift. This is turned off by default, so switch it on only if you pay this allowance.
- One allowance is added once overtime passes one hour, and a second once it passes four hours
- Turn it on under Settings → Scheduling by choosing Create automatically for overtime under Meal Allowance
- For Xero users, the meal allowance pay item mapping is optional and only needed when the automatic allowance is on
For more information, visit the SCHADS Interpretations in Astalty guide.
First Aid Allowance Exclusions
You can now fine-tune which hours the SCHADS First Aid Allowance is calculated on, so it isn't paid on cancelled shifts or provider travel - instead of adjusting timesheets manually every pay run.
- Choose Apply to all hours (the default), Exclude cancelled shifts, Exclude provider travel, or Exclude cancelled shifts & provider travel
- This changes which hours the allowance covers, not who receives it - the allowance is still only paid to first aid entitled workers
For more information, visit the Scheduling Settings guide.
Pre-Load an Existing Schedule in the SCHADS Playground
You can now pull a Support Worker's or Participant's existing shifts into the SCHADS Interpretation Playground for a chosen period, then layer extra work on top to model the combined cost - no need to enter every shift by hand.
- Use Load Schedule in the Work Records toolbar, choose By support worker or By participant, and set the period
- Choose Start fresh to replace what's in the playground, or Append to add the loaded shifts on top
- Only published shifts load, and they're marked with a Loaded tag so you can tell them apart from records you add manually
For more information, visit the SCHADS Interpretations in Astalty guide.
Scheduling Costs
Scheduling Costs gives you an estimate of what your roster costs before payroll runs. It interprets your scheduled shifts against the SCHADS Award and compares the cost against the revenue those shifts generate, so you can see the profitability of your schedule at a glance.
- See costs broken down by employee and by Participant, with summary cards for gross wages, allowances, super, on-costs, and revenue
- Track cancellation impacts including Paid Cancellation Cost, Lost Revenue, and Net Loss
- Use the cost schedule to add recurring expenses and revenue - provider-wide or on a SIL house - and export the full breakdown as XLSX
- Scheduling Costs is in beta and is enabled by the Account Owner from Optional Features
For more information, visit the Scheduling Costs guide.
SCHADS Pay Report
The SCHADS Pay Report is now out of beta and available to all providers with Scheduling - it no longer requires a special beta switch. The report interprets your published shifts against the SCHADS Award to give you a pay-ready breakdown before payroll.
For more information, visit the SCHADS Pay Report guide.
Leave Policy Notice Periods
You can now require Support Workers to give a minimum number of days' notice before an availability change or leave request, and show them a custom policy message when a request breaks your rules.
- Set separate Availability notice period and Leave notice period values - leave a field empty or set it to 0 to allow changes at any time
- Write a Policy message to explain your rules or point workers to how they can request an exception
- These settings, along with Negative Leave Balance, now sit together in a dedicated Leave Policy section
For more information, visit the Scheduling Settings guide.
Supporting Document Uploads for Leave
Support Workers can now attach supporting documents - such as a medical certificate - to a leave request, on both the web portal and the mobile app.
- Accepted file types on web are
.pdf,.jpg,.jpeg,.png,.heic,.doc, and.docx; the mobile app adds files from Gallery, Camera, or Files - Documents can be added or removed on an existing request after it's submitted, and reviewers can open each one from the leave details screen
For more information, visit the Leave guide.
Sleepover Window (Beta)
A Sleepover Window lets you roster one overnight support that covers the whole period - evening, sleepover, and morning - while marking the inactive sleepover stretch within it, so the worker sees a single shift instead of three.
- Tick This includes a night-time Sleepover Support segment when adding a shift, then set the Sleepover starts and Sleepover ends times
- Automatic charges split into up to three segments: hourly support before the window, one flat Night Time Sleepover charge, and hourly support after
- Use Sleepover Migration to convert eligible legacy three-support setups into a single support with a sleepover window
- Sleepover Window is available when the Sleepover Windows feature is enabled for your account
For more information, visit the Sleepover Window guide.
Claim Type on Charge Item Sets
When you create or edit a Charge Item Set, you can now choose the NDIS Claim Type it should use. Charges generated from the set are claimed under that type automatically, so you no longer need to set the claim type on each charge by hand.
- Choose from Direct Service (the default), Irregular SIL Supports, Non-Face-to-Face Services, NDIA Required Report, or Telehealth Supports
- The set-level claim type applies to every item as a default, and each Charge Item row has its own Claim Type column you can adjust individually
For more information, visit the Creating & Updating Charge Item Sets guide.
Search the NDIS Price Guide in Charge Item Sets
The Number field on every Charge Item row now searches the current NDIS price guide as you type - matching on either the support item number or the item name. Selecting a result auto-fills that row's Number, Name, Price and Unit, so there's less manual copying and fewer typos.
For more information, visit the Creating & Updating Charge Item Sets guide.
Charge Ratio Numerator Validation
When you set a billing ratio on a Group Support, the first number (the numerator) can no longer be greater than the second number (the denominator), since a ratio can only reduce a charge. Ratios like 1:2 or 1:3 work as before, but a ratio such as 2:1 is blocked and the Save button greys out with a short explanation.
For more information, visit the Adding a Group Shift guide.
Group Support Ratios on Invoices
Generated invoices now show the billing ratio directly on each affected group support line, so Participants and Plan Managers can see how a shared support was split. The ratio appears as a Ratio line under the support item name and always matches what was actually charged - including any manual overrides.
- The ratio line is automatic - there's no setting to switch on
- It only appears for group supports where the ratio is not 1:1
For more information, visit the Group Support Ratios on Invoices guide.
Show Calendar Task Times on Invoices
A new Show Calendar Task Times on Invoices setting lets you display the start and end time of tasks created from calendar events on PDF invoices - for example, 26/06/2026 (10:00 - 12:00). It's off by default, so nothing changes on your invoices until you turn it on.
For more information, visit the Invoice Settings guide.
Invoice Batch Filters
You can now narrow down which charges are included in a draft invoice batch using the filter (funnel) icon next to the Date Range. Alongside the existing Charge Type filter, you can filter by management type, task owner, and Participant.
- Management Type - only show charges for Participants with a particular management type (NDIA, Plan, or Self)
- Task Owner - only show charges for tasks owned by selected staff (this automatically sets Charge Type to Task)
- Participant - only show charges for one or more selected Participants
For more information, visit the Invoice Batches guide.
Opening an Invoice from a Charge
Once a charge has been invoiced, you can jump straight to the invoice it was billed on without hunting for it on the Invoices page. This works from the Finance tab of a task or support, and from the charges list inside a Staff Payment Batch.
- On a task or support, hover the invoice icon next to the charge name to see the invoice number, then click the icon or number to open the invoice in a new tab
- In a Staff Payment Batch, use the three-dot menu on a charge's row and select View Invoice
For more information, visit the Opening an Invoice from a Charge guide.
Claim Type Specific Line Items in the NDIA Bulk Upload File
From 1 July 2026, variant support items are reported differently in the NDIA bulk upload file. The claim type is carried as a suffix on the SupportNumber column (for example, 15_610_0128_1_3_PT), and the ClaimType column is left blank so the claim type isn't claimed twice. Non-variant items and charges dated before 1 July 2026 are unchanged.
For more information, visit the Handling claim type specific line items guide.
Sync Payroll Calendars from Xero
You can now sync your Xero payroll calendars and employee pay-cycle assignments into Astalty so timesheet batches cover the right staff and correct pay-period dates. Payroll calendars are managed in Xero and synced read-only, so you assign each employee's calendar in Xero and then pull it into Astalty.
- Sync payroll calendars pulls the list of pay cycles from Xero and keeps them up to date
- Sync employees payroll calendars updates each linked employee with the calendar they've been assigned in Xero
- Staff who aren't linked to a Xero employee or don't yet have a payroll calendar are listed in the Staff without a payroll calendar drawer and excluded from the batch until resolved
For more information, visit the Sync Payroll Calendars from Xero guide.
Integrations Section
The Integrations section now has a dedicated landing page and a page per integration, so you can see what each one does, how it works, and where to connect it. Alongside the existing Xero pages, there are now standalone pages for Employment Hero, Pay Cat, Google Calendar, and Outlook Calendar.
- Employment Hero and Pay Cat are payroll integrations - you set the payroll platform in Scheduling settings first, then connect the matching card in Settings → Integrations
For more information, visit the Integrations guide.
Editable Incident Date
You can now correct the date and time an incident occurred directly from the Update Incident drawer, which is useful when an incident was reported with the wrong date or time. This works the same way for both Participant and Staff incidents.
- Any change you make is captured in the incident's audit trail, so there's a clear record of what changed and when - available from the incident's Actions menu for accounts with the Audit Trail feature enabled
For more information, visit the Incident Follow Up guide.
Archiving Incidents
You can now archive an incident to hide it from your active register without losing any data, then restore it later whenever you need it. Archiving keeps the incident's full history and archives its linked form submission at the same time, keeping the two in sync.
- Open an incident, click Edit, then choose Archive or Unarchive - archived incidents are marked with a red Archived tag
- Use the Archived filter on the Participant or Staff Incident list to view archived incidents, which are hidden by default
- Participant incidents can be archived by Admin and Manager users; staff incidents by Admin users only
For more information, visit the Archiving Incidents guide.
Incident Alerts to Site Managers
If your organisation uses Sites, you can now notify the assigned site manager whenever an incident is logged for a Participant who lives at their house, so the person responsible hears about it straight away. Set it up under Settings → Notifications → Incidents with the Notify site managers option.
- Choose All SIL houses to cover every SIL house automatically, or Specific sites to notify only the site managers you select
- Site manager notifications work alongside your existing User Groups and Users recipients - you can use any combination
For more information, visit the Incident Notifications guide.
Conditional Logic on Layout Elements
You can now apply visibility conditions to layout elements - headers, dividers, images, and rich text blocks - not just question fields. This means a section's heading and divider can hide along with the questions they group, so there's no empty heading left behind when the section isn't needed.
- Set it up in the Form Builder the same way as any other field, under Visibility
- Layout elements can only be targets of a condition - they can't be used as the When field and have no Required setting
For more information, visit the Conditional Logic Forms guide.
Decimal Places on Number Fields
You can now control how many decimal places a Number field accepts. In the field's Appearance section, set a Decimal places limit from 0 to 6, or leave it blank to allow any number of decimal places.
- Setting the limit to 0 restricts the field to whole numbers only
- If someone enters more decimals than allowed, they'll see a validation message and the value won't save until it's corrected
For more information, visit the Form Builder guide.
Embedded Form Name Visibility
When you embed an External form on your own website, you can now choose whether the form's name appears above it - handy when your web page already has its own heading and you don't want the title showing twice.
- In the Embedded Form section, choose Show form name (the default) or Hide form name
- This only affects the embedded version; the standalone hosted form link always shows the title as normal
For more information, visit the Form Settings guide.
Start Rating Scale at Zero
For numeric ratings, you can now tick Start scale at zero in the field settings to begin the scale at 0 instead of 1 - so a five-point scale runs 0, 1, 2, 3, 4 rather than 1, 2, 3, 4, 5.
- Number of options still sets how many points the scale has; starting at zero shifts the values down rather than adding a point
- This applies to numeric ratings only - star ratings are unchanged, and existing forms keep starting at 1 unless you turn it on
For more information, visit the Form Builder guide.
Download a Blank Template
When viewing an Astalty Template, you can now use the Actions menu to Preview the layout on screen or Download blank template to get an empty PDF without selecting a Participant. This is handy for checking a template's structure, or for producing a paper copy to print and fill in by hand.
- The blank PDF keeps the template's wording, headings, and page breaks, but leaves every Placeholder unfilled and shown as a plain label in square brackets
- Available for Astalty Templates only - for Word Templates, use the Download button on the Content card instead
For more information, visit the Template Settings guide.
Clearer Form Submission Reports
The form Report tab now gives you an at-a-glance summary of every submission, turning your responses into charts and statistics so you can spot trends across the whole form. Each question now has its own card in form order, so you can see how each one performed.
- Free-text questions now each have their own card showing their response rate and skipped count, instead of being bundled into a single table
- An overview section shows totals, first and latest submission dates, average per week, and submission time trends
- A question navigation menu lets you search for and jump straight to any question's card
For more information, visit the Viewing a Form's Report guide.
Record Acknowledgements Export
You can now export Support Worker acknowledgements of Participant Records across a date range as either a CSV or a print-ready PDF, with the PDF presented as a tidy, audit-friendly table that's handy as proof of service delivery.
- Filter by Participants, Support Workers, and Status (Acknowledged or Not Acknowledged)
- Covers the same information as the Record Acknowledgement Report, as a downloadable version you can archive or share
For more information, visit the Record Acknowledgements Export guide.
Participant Record Acknowledgement Escalation Notification
You can now alert the coordinators and office staff responsible for a Participant when a Support Worker still hasn't read that Participant's records before an upcoming shift. Unlike the Record Acknowledgement Notification - which reminds the Support Worker directly - this escalation notifies office staff so they can follow up.
- Send alerts On a fixed schedule or A set time before each shift
- Choose recipients from Primary Coordinator, Service Coordinator, User Groups, and Users - Support Workers can't be selected
- Deliver Within Astalty, via Email, or both. Each recipient is only alerted about the Participants they're responsible for
For more information, visit the Participant Record Acknowledgement Escalation Notification guide.
Chat Notifications
Chat can now let you know about new messages even when you're working in another tab or have Astalty closed, so you don't have to keep the Chat window open to stay on top of conversations.
- You get a desktop pop-up with a message preview, a sound, and an unread count on the browser tab
- You won't be notified about conversations you're currently viewing or channels you've muted
For more information, visit the Chat Notifications guide.
Separate Group Chats With the Same Members
When you start a group chat with a set of members that exactly matches an existing group channel, Astalty now asks whether you want to reuse the existing conversation or start a fresh one - so you can keep several distinct group chats for the same people.
- Choose Open existing to reopen the current channel, or Create new group to spin up a separate, independent one
For more information, visit the Group Channels guide.
Chat User Groups
You can now let roles start conversations with a whole User Group, adding everyone in the group to the chat automatically. Chat permissions have also been reworked into a clearer Conversation Permissions setup that controls who each role can start conversations with.
- Use the Who Can Message Who matrix, plus Allowed Recipients (Exceptions) and Allowed User Groups (Exceptions) for fine-grained control
For more information, visit the Chat Configuration guide.
In-App Notifications Page
Support Workers can now open a dedicated Notifications page in the app to review the push notifications they've received, even after an alert has been dismissed from their device.
- Open it from the bell icon on the Profile tab, where a red badge shows the number of unread notifications
- Notifications are grouped by day, and tapping one takes you straight to the relevant area of the app
For more information, visit the App Notifications guide.
Staff Name Display
You can now choose how staff names appear throughout the app using the new Staff Name Display setting - either First & Last Name or Preferred & Last Name. It changes only how names are displayed, not the stored staff data.
- Regardless of your choice, a staff member's legal first and last names are still used on payroll, invoices and reports
For more information, visit the Users Settings guide.
Note Checker Templates and Keyword Suggestions
When setting up note flagging, you can now start a keyword note checker from a ready-made template instead of typing every term from scratch, and add suggested keywords with a single click.
- Six templates cover common areas of concern, including Behaviour Concerns, Medication Issues, and Safeguarding & Abuse
- Each template pre-fills the name, note sources and keyword groups, and everything can be edited before you save
For more information, visit the Note Flagging guide.
Coordinator Filters on the Service Utilisation Report
You can now focus the Service Utilisation Report on the Participants a particular team member looks after using separate Team Member, Primary Coordinator, and Service Coordinator filters.
- Primary Coordinator shows only the Participants a team member is the main coordinator for, while Service Coordinator shows only those they cover as a Service Coordinator
- These coordinator filters are available on the All Participants view
For more information, visit the Service Utilisation Report guide.
Management Type Filter on the Service Utilisation Report
You can now filter the Service Utilisation Report by plan management type, choosing any combination of NDIA, Plan and Self Managed.
- The filter works at the service level, so Participants whose plans mix management types are shown accurately
- A Type column also shows the management type against each service
For more information, visit the Service Utilisation Report guide.
Support Worker Column and Filter in the Support Cancellations Report
The Support Cancellations Report now shows a Support Worker column and lets you filter cancellations by a specific Support Worker.
- The column includes workers pulled from group supports; cancelled supports with no worker assigned show a blank value
For more information, visit the Support Cancellations Report guide.
Distinguishing Duplicate Participant Profiles
When two Participant profiles share the same name, Participant pickers now show each profile's External ID beneath the name so you can select the correct one. The Account Owner can also now enable Participant Duplication directly under Optional Features.
- Give each duplicate profile a different External ID to make this useful - the ID shown in the picker does not appear on invoices or documents
For more information, visit the Optional Features guide.
Participant Tag Filtering on the Shift Approvals Variance Export
The new Shift Approvals Variance Export compares scheduled shift values with the values approved for billing, and you can now scope it by Participant tags as well as by individual Participants and users.
- The Participants and Participant Tags fields work independently or together, matching Participants by either field without duplicates
- The Participant Tags selector only appears when the Participant Tags optional feature is enabled
For more information, visit the Shift Approvals Variance Export guide.
Reactivating Users Straight Away
You can now reactivate a deactivated user immediately - the previous 30-day waiting period before a user could be reactivated has been removed.
For more information, visit the Deactivating and Reactivating Users guide.