- Changelog
- 27 August 2026
27 August 2026
Bulk Update Pay Groups for Employment Hero
If you use the Employment Hero payroll integration, you can now set pay groups for your team from one screen, instead of opening each person's profile in turn.
- Find it under Settings → Integrations → Employment Hero → Configure → Employees, under Bulk Actions
- Pick a pay group, tick the people you want it applied to, and select Apply to Selected to fill it into those rows
- Anyone who needs something different can be set from their own dropdown on the same screen
- Nothing is saved until you select Update Pay Groups - and that saves every person listed, so clearing someone's pay group will leave them without one
- The drawer lists up to 1,000 people, so on a larger team anyone it does not list still needs their pay group set from their own profile
- Bulk Update Pay Groups is available to roles that can update HR details
For more information, visit the Employment Hero guide.
Employment Charge Item Set Presets
There are two new presets to choose from when you add a Charge Item Set - Supports in Employment and Employment Assistance - Finding & Keeping a Job - so you no longer need to build an employment set line by line.
- Supports in Employment charges a different rate for each part of the week, with weekday evening, Saturday, Sunday and public holiday loadings applied automatically
- Employment Assistance - Finding & Keeping a Job uses the one support item for every day of the week, so the same hourly rate applies regardless of when the support is delivered
- Both presets are priced from the current NDIS price guide for your business region, including the Remote and Very Remote rates
- Your business region must be recorded before any preset can be used
For more information, visit the Creating & Updating Charge Item Sets guide.
Every Charge Item Set Preset is Now Documented
The preset list in the guide had fallen behind the product - it named three presets when fourteen were available. It now lists all of them, alongside notes on how they are priced.
- The full list covers the CB Social, Supported Independent Living, Short Term Accommodation, Intensive and Complex Behaviour Support, House or Yard Maintenance and employment presets
- The two Short Term Accommodation presets set up hourly rates across the week plus a per-night sleepover Charge Item, and are the only presets that include neither provider travel Charge Item - add those yourself if you charge for travel
- New price guides flow through to presets automatically, but existing Charge Item Sets are unchanged - use Update Prices and Fill from NDIS Price Guide to move a set onto new pricing
- Remote and Very Remote can never be worked out from your business address, so set your Region explicitly if you deliver supports in a remote area
For more information, visit the Creating & Updating Charge Item Sets guide.
Clone a Charge Item Set
You can now copy an existing Charge Item Set instead of building a similar one line by line - handy when you need the same support items at different prices, or the same rates claimed under a different Claim Type.
- Select Clone from the three-dot menu beside a Charge Item Set under Settings → Charge Items - the same menu that offers Edit
- The form opens pre-filled with the set's details and every one of its Charge Items, and anything copied across can be changed before you save
- Claim Types are editable on the clone, either for the whole set or line by line
- Give the clone a new Reference before saving, as every Charge Item Set needs its own - updating it rewrites the Reference on each Charge Item to match
- A clone is always created as a manual set, so fields that stay locked on a preset can be edited
- The set you copied from is never changed; saving creates a new set alongside it
- Clone is available to roles that can create Charge Item Sets
For more information, visit the Creating & Updating Charge Item Sets guide.
Qualifications
You can require a Support Worker to hold a current record - First Aid, NDIS Worker Screening, Manual Handling - before they can be rostered, and choose whether a missing record warns the scheduler or blocks the shift.
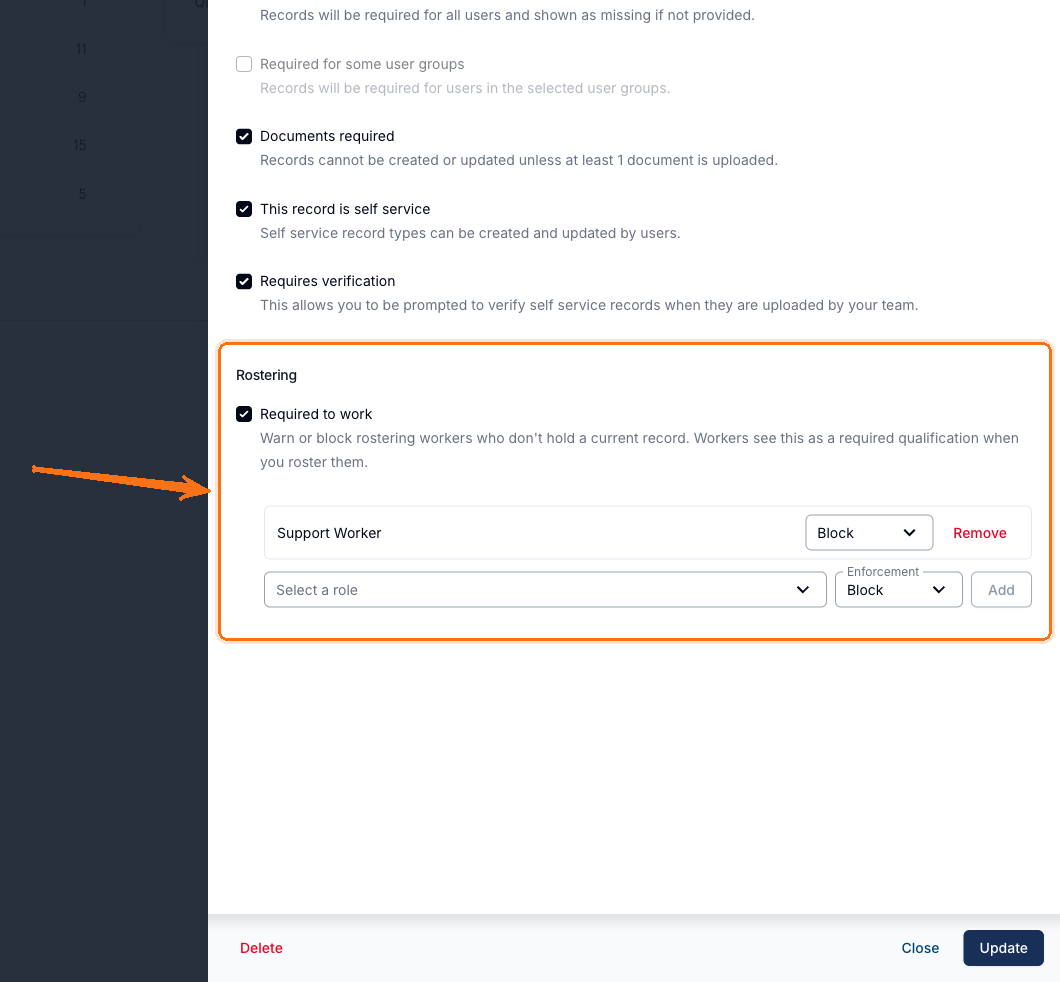
- Qualifications are built on your existing User Records - tick Required to work on a User Record Type under Settings → Users, or set requirements for one Participant on their Preferences tab
- Warn flags the worker on the schedule and in worker suggestions but changes nothing else; Block greys them out in the suggestions list and rejects the save
- Roster checks use the shift's start time, so a worker whose First Aid expires next month can still be rostered next week, but not to a shift after it lapses
- A new Qualifications Compliance report and matching export list who is missing a required qualification and why - Missing, Expired, Awaiting Verification or Declined
- A new Lapsed Qualifications notification runs a daily check and alerts your team when a worker on an upcoming shift no longer holds a required qualification, so it can be reassigned in time
- Qualifications is currently in beta and is switched on by Astalty - contact support if you would like it enabled
For more information, visit the Required Qualifications and Qualification Checks When Rostering guides.
No Charge Support Time Segments
Support Time Segments can now be marked No charge, so part of a support is rostered and worked as normal but never billed.
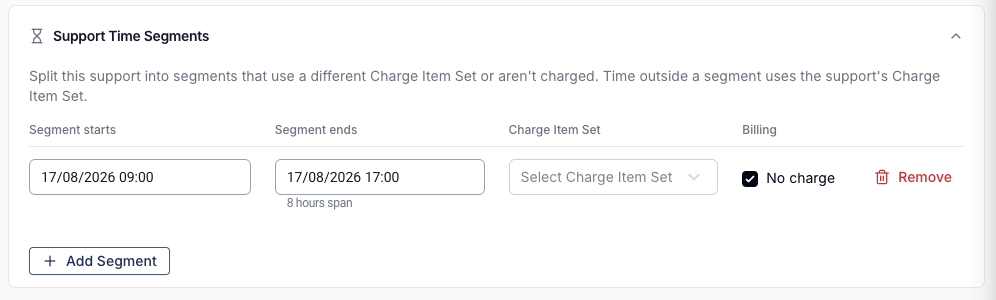
- Tick No charge in the Billing column and Astalty creates no hourly charge line at all for that window - not a zero-dollar line
- Time outside the segment still bills through the support's primary Charge Item Set, and the Support Worker's shift and pay are unchanged
- Travel, centre capital costs and additional charges keep billing across the whole support, including the no-charge hours
- On a group support you can mark one Participant's time as no charge while the others bill normally, though a charge ratio can't be set on a no-charge segment
- Once a segment's charges have been invoiced it can't be changed, so No charge is not retrospective
- Support Time Segments is still in beta and is switched on by Astalty - contact support if you would like it enabled
For more information, visit the Support Time Segments guide.
Cancelling a Range of Supports in a Recurring Series
When you cancel a support that repeats, you can now pick the other dates in the series to cancel at the same time - a Participant away for a few weeks, for example - while the rest of the series keeps running.

- Fill in the cancellation details as usual - on a repeating support the button reads Continue, and a second drawer lists the current support and every future occurrence
- The current date is ticked and locked as (Current); tick the other dates you want, select them all from the table header, or use the Every [Weekday] shortcuts, with a running count of what is selected
- The details you entered - reason, charging and payment preference - apply to every date you picked, and travel is removed from each of them
- On a recurring group support you can cancel one Participant's support on the dates you choose, leaving the other Participants unaffected
- A date that can't be cancelled - invoiced charges, or shifts in a Timesheet Batch - is flagged with its reason, and nothing is cancelled until you untick it
- Reinstating works the same way: Reinstate Support on a cancelled occurrence lists the other cancelled dates in the series so you can bring them back together
For more information, visit the Support Cancellations guide.
Service Dates on Support Charges
On a support that runs past midnight - a sleepover, an active overnight, or any shift finishing the next day - each charge can carry the day it was actually delivered, rather than every line inheriting the day the support started.
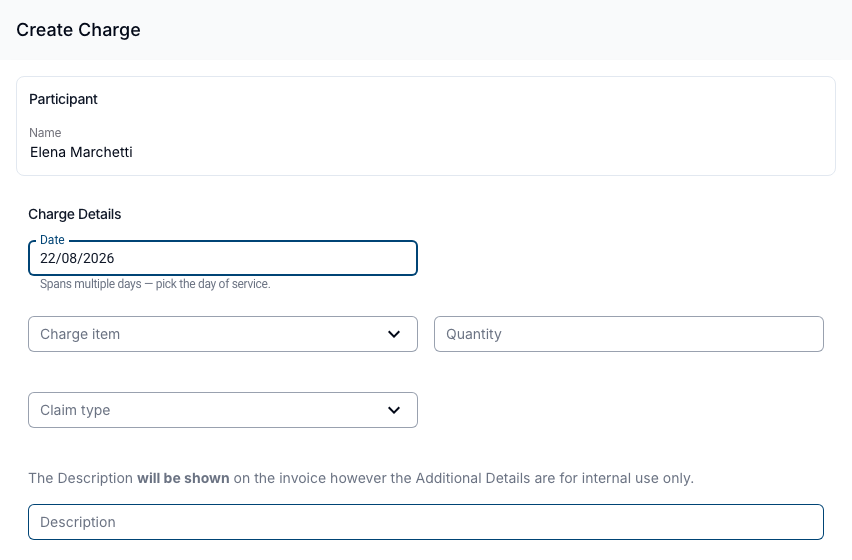
- A Date of Service field sits against each charge in the Additional Charges section when the support spans more than one day
- + Create Charge on the Finance tab always asks for a Date, pre-filled with the support's start date
- The date has to fall on or between the support's own start and end dates
- The charges table shows a Date column when the support is set to Manual Charges, or when a manually added charge sits on a different day from the start date
- Correct a date with the pencil beside it - it saves as soon as you pick a day, and on a recurring support Astalty asks which charges to apply it to
- Charges Astalty created automatically, and charges already invoiced, show a greyed-out pencil - hover to see which applies
For more information, visit the Service Dates on Support Charges guide.
Moving Upcoming Supports to a New Primary Address
When a Participant moves somewhere that isn't already on their profile, you can add the new Primary Address and shift their upcoming supports across at the same time.
- Click Add Address, enter the address, and choose Primary Address from the Type dropdown
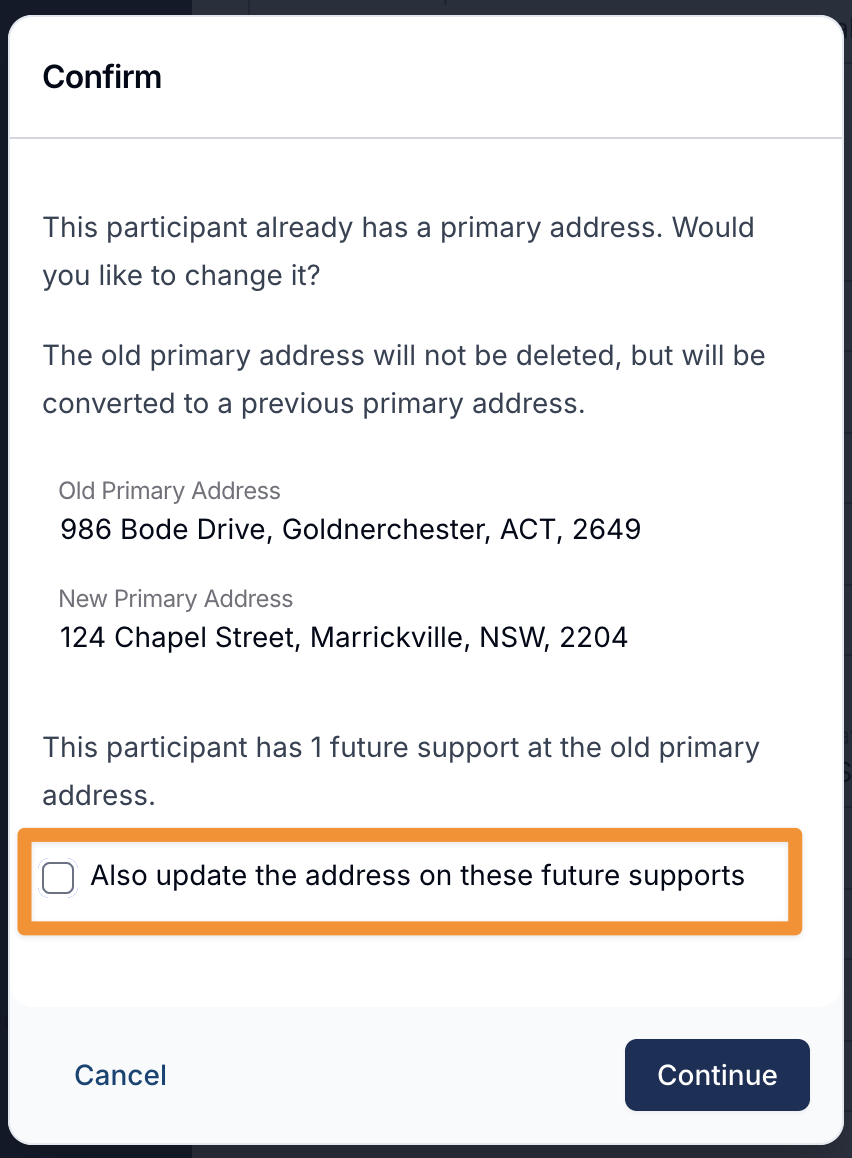
- The confirmation tells you how many upcoming supports are still booked at the old address and offers Also update the address on these future supports
- The box starts unticked, so by default the profile changes and every existing support keeps the address it was booked with
- Supports that have already started or finished are never changed, and supports at any other address are left alone
- The old address stays on the profile as a Previous Primary Address rather than being deleted
For more information, visit the Participant Profile guide.
Unavailability in Time Order on the Schedule
Unavailability now sits in time order alongside the shifts for that day, so you can see where someone's gaps fall relative to rostered work.
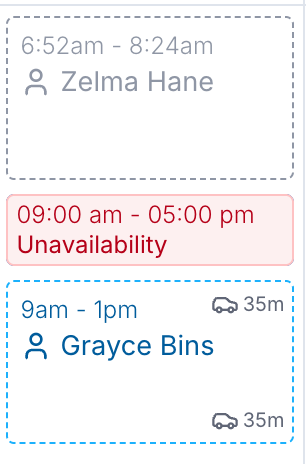
- Timed unavailability appears in its correct spot in the day, between the shift before it and the shift after it
- All day unavailability stays at the top of the day, above every shift, because it covers the whole day
- The ordering applies in the Day, Week and Fortnight views
- It applies to leave as well as unavailability, and to both approved and pending requests
For more information, visit the Viewing the Schedule guide.
Viewing and Exporting a Support Worker's Schedule
A new guide covers the Shifts tab on a Support Worker's profile and the Export Shifts As PDF action, which turns one worker's roster into a file you can print or send on.
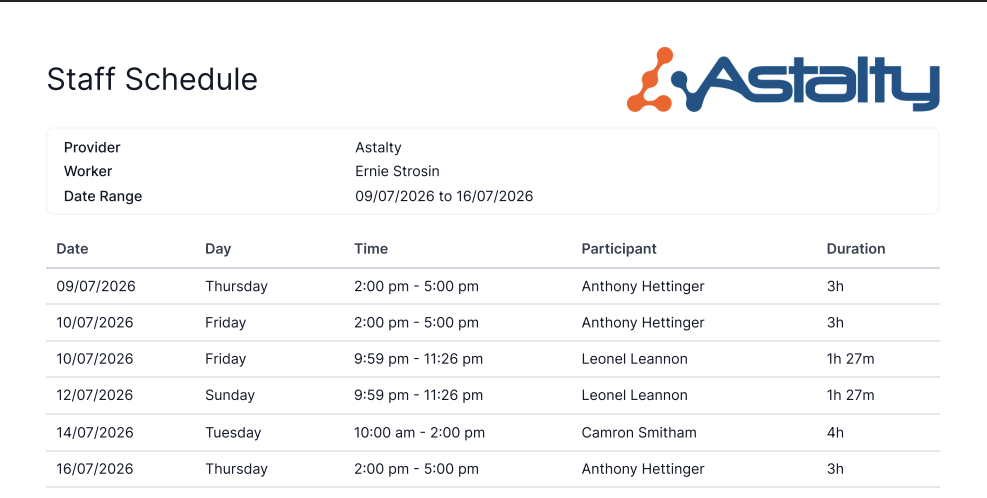
- Open the worker under Users, select the Shifts tab, and switch between the list and calendar views
- Choose Actions → Export Shifts As PDF, then set the Date Range - it is pre-filled with the period you are already looking at
- Cancelled and unpublished shifts are left out unless you tick them, so a draft roster can come back looking almost empty
- The file downloads straight to your device, named after the worker and the period - it is not queued on the Exports page and nothing is emailed
- It prints Participants' full names, so share it with care - and Support Worker Users can't export it themselves, as they only get the Astalty app
For more information, visit the Viewing a Support Worker's Schedule guide.
Filtering Your Chat List
Your chat list can now be narrowed two ways - by conversation type, and by whether you have read something - so you can cut a long list down to what still needs a reply.
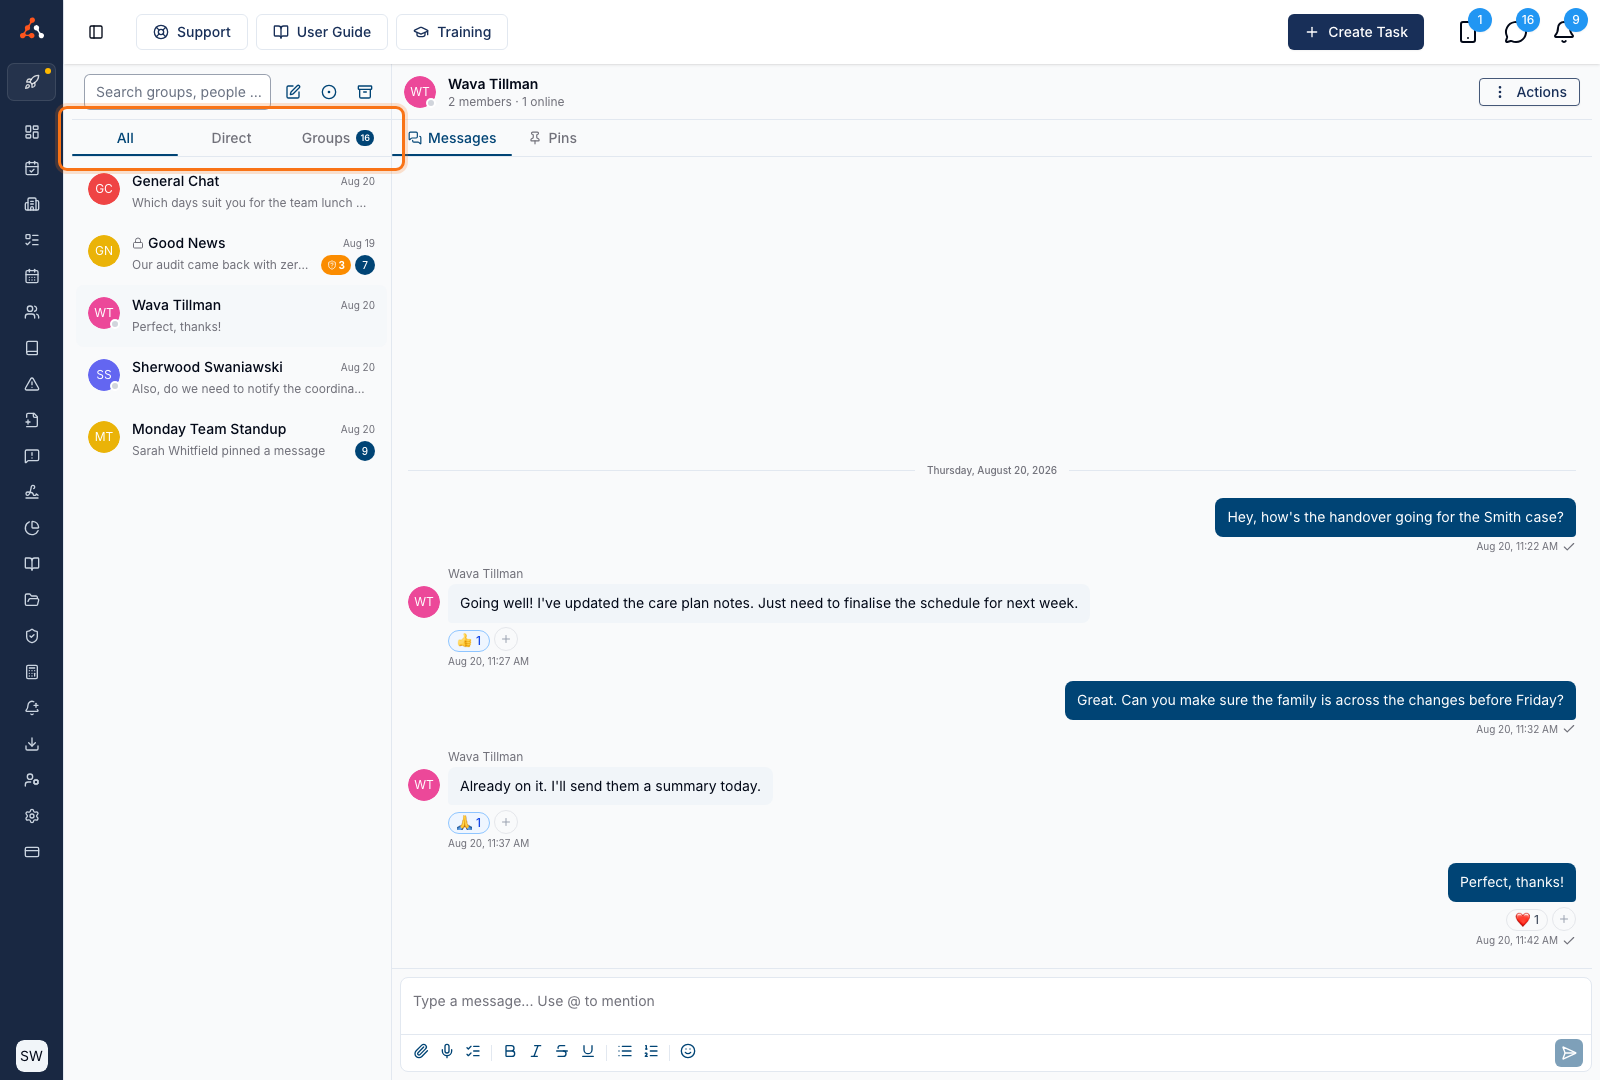
- All, Direct and Groups tabs sit above the chat list - All is the default and shows exactly the conversations Chat has always listed
- Direct and Groups each show how many unread messages are waiting in them, and a yellow dot beside a tab means one of those unread messages mentions you
- The Show unread only icon hides everything you have already read, and works alongside the tabs
- Your tab choice is remembered for you in that browser, and opening a conversation the tab would hide falls back to All just for that conversation
- The tabs and unread filter apply to archived conversations as well; search ignores them, and the Astalty app keeps all conversations in a single list
For more information, visit the Filtering Conversations guide.
Chat Message Drafts
Anything you type into the Chat compose area is saved automatically, so a half-written message is still waiting for you when you come back.
- Drafts are saved separately for each conversation, so you can have several on the go - there is nothing to turn on and no Save button
- Your text and its formatting are saved along with the message you are replying to, so a reply stays attached to the right message
- Files, images, voice notes and polls are not kept as part of a draft, and will need to be added again
- Drafts stay on the device and browser you typed them on - a draft in the browser does not appear in the Astalty app, or the other way around
- A draft is kept for 30 days from the last time you changed it, and clears as soon as the message sends or you empty the box
- If a message fails to send, the text goes back into the compose area with a Message not sent notification. Astalty does not resend it for you, so read it over before pressing send again
For more information, visit the Message Drafts guide.
Chat Privacy and Visibility
A new guide answers the question directly: no one in Astalty can browse, search, or open a chat conversation they are not part of - including an Admin.
- Chat search only ever returns messages from conversations you are a member of, and there is no organisation-wide view of chat
- An Admin's "full messaging access" means they can start a conversation with anyone, not read conversations they are not in
- Direct messages stay between the two team members involved, and members can never be added; group channels are visible to their members, with Show Message History to New Members deciding what someone sees from before they joined
- Where the wider team needs visibility, use a group channel linked to a User Group, or a read-only channel for announcements
- If you need a transcript for an HR file, complaint or investigation, export the conversation as a PDF or CSV from the Actions menu - every export records who created it and when
For more information, visit the Chat Privacy and Visibility guide.
Referral & Intake Forms and Updating a Participant from a Submission
You can now build your own referral form from scratch, and when a referral matches someone already on your books you can copy the submitted answers straight onto their profile.
- Set a form's Usage to Referral & Intake and every submission creates a referral in the Referrals register, exactly like the built-in Participant Referral Form template
- Referral & Intake forms are always External, and First Name and Last Name are added automatically as required fields
- In the form builder, use the dropdown under Advanced to link each field to a Participant profile field, so Astalty knows where an answer belongs
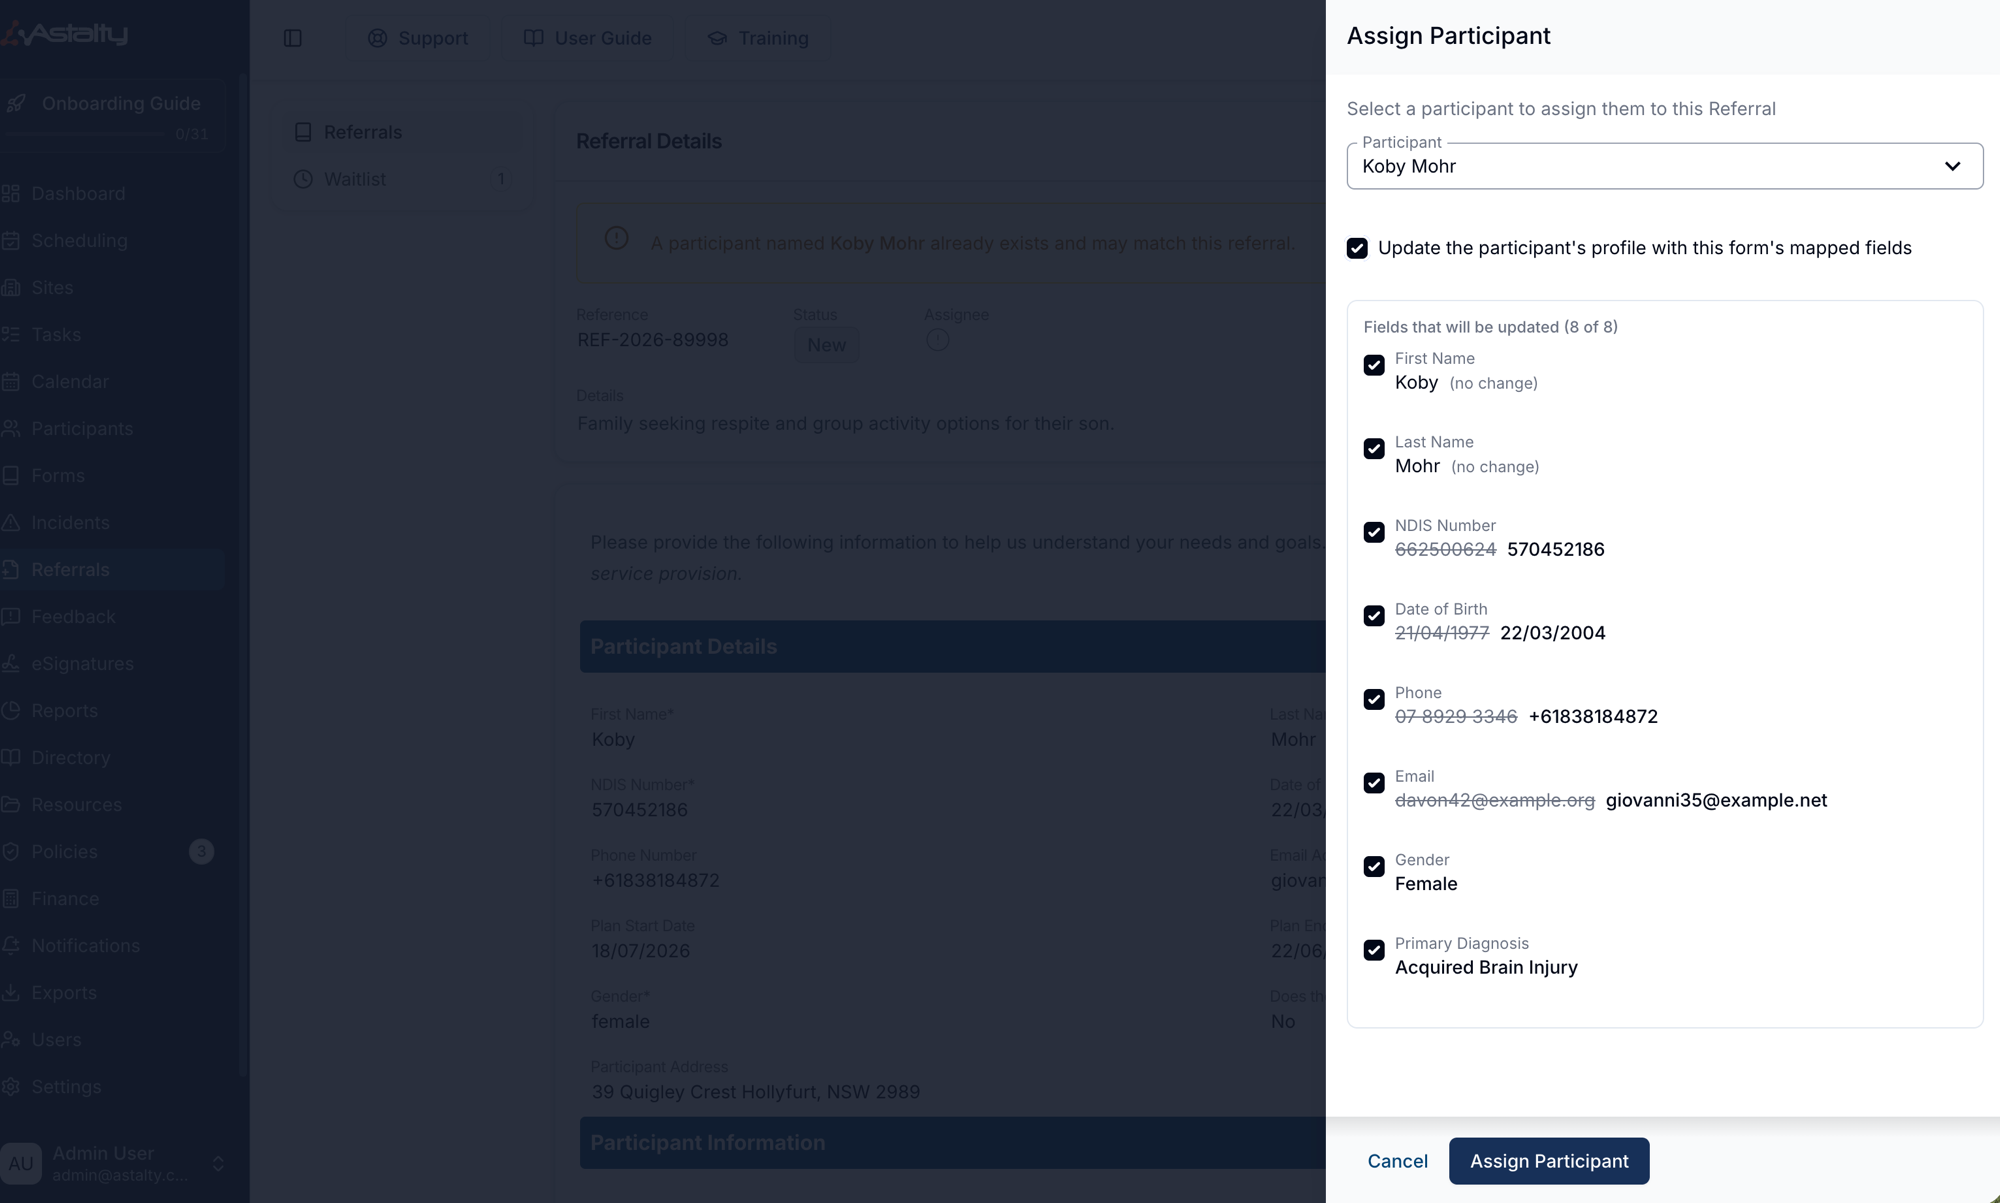
- If the name on a referral matches an existing Participant, a warning appears on the Referral Details card with an Assign to existing participant button, so you don't create a duplicate
- When assigning to an existing Participant, tick the option to update their profile to copy the answers across. A preview shows each current value struck through beside the incoming one, with a checkbox per field so you can leave anything out
- Blank answers never overwrite existing details, and address, plan dates and documents are only used when creating a brand new Participant
For more information, visit the Referral Follow Up and Create a Form guides.
Sites Import
You can now create sites in bulk from a spreadsheet, complete with their address, site manager and tags - and check every row before anything is created.
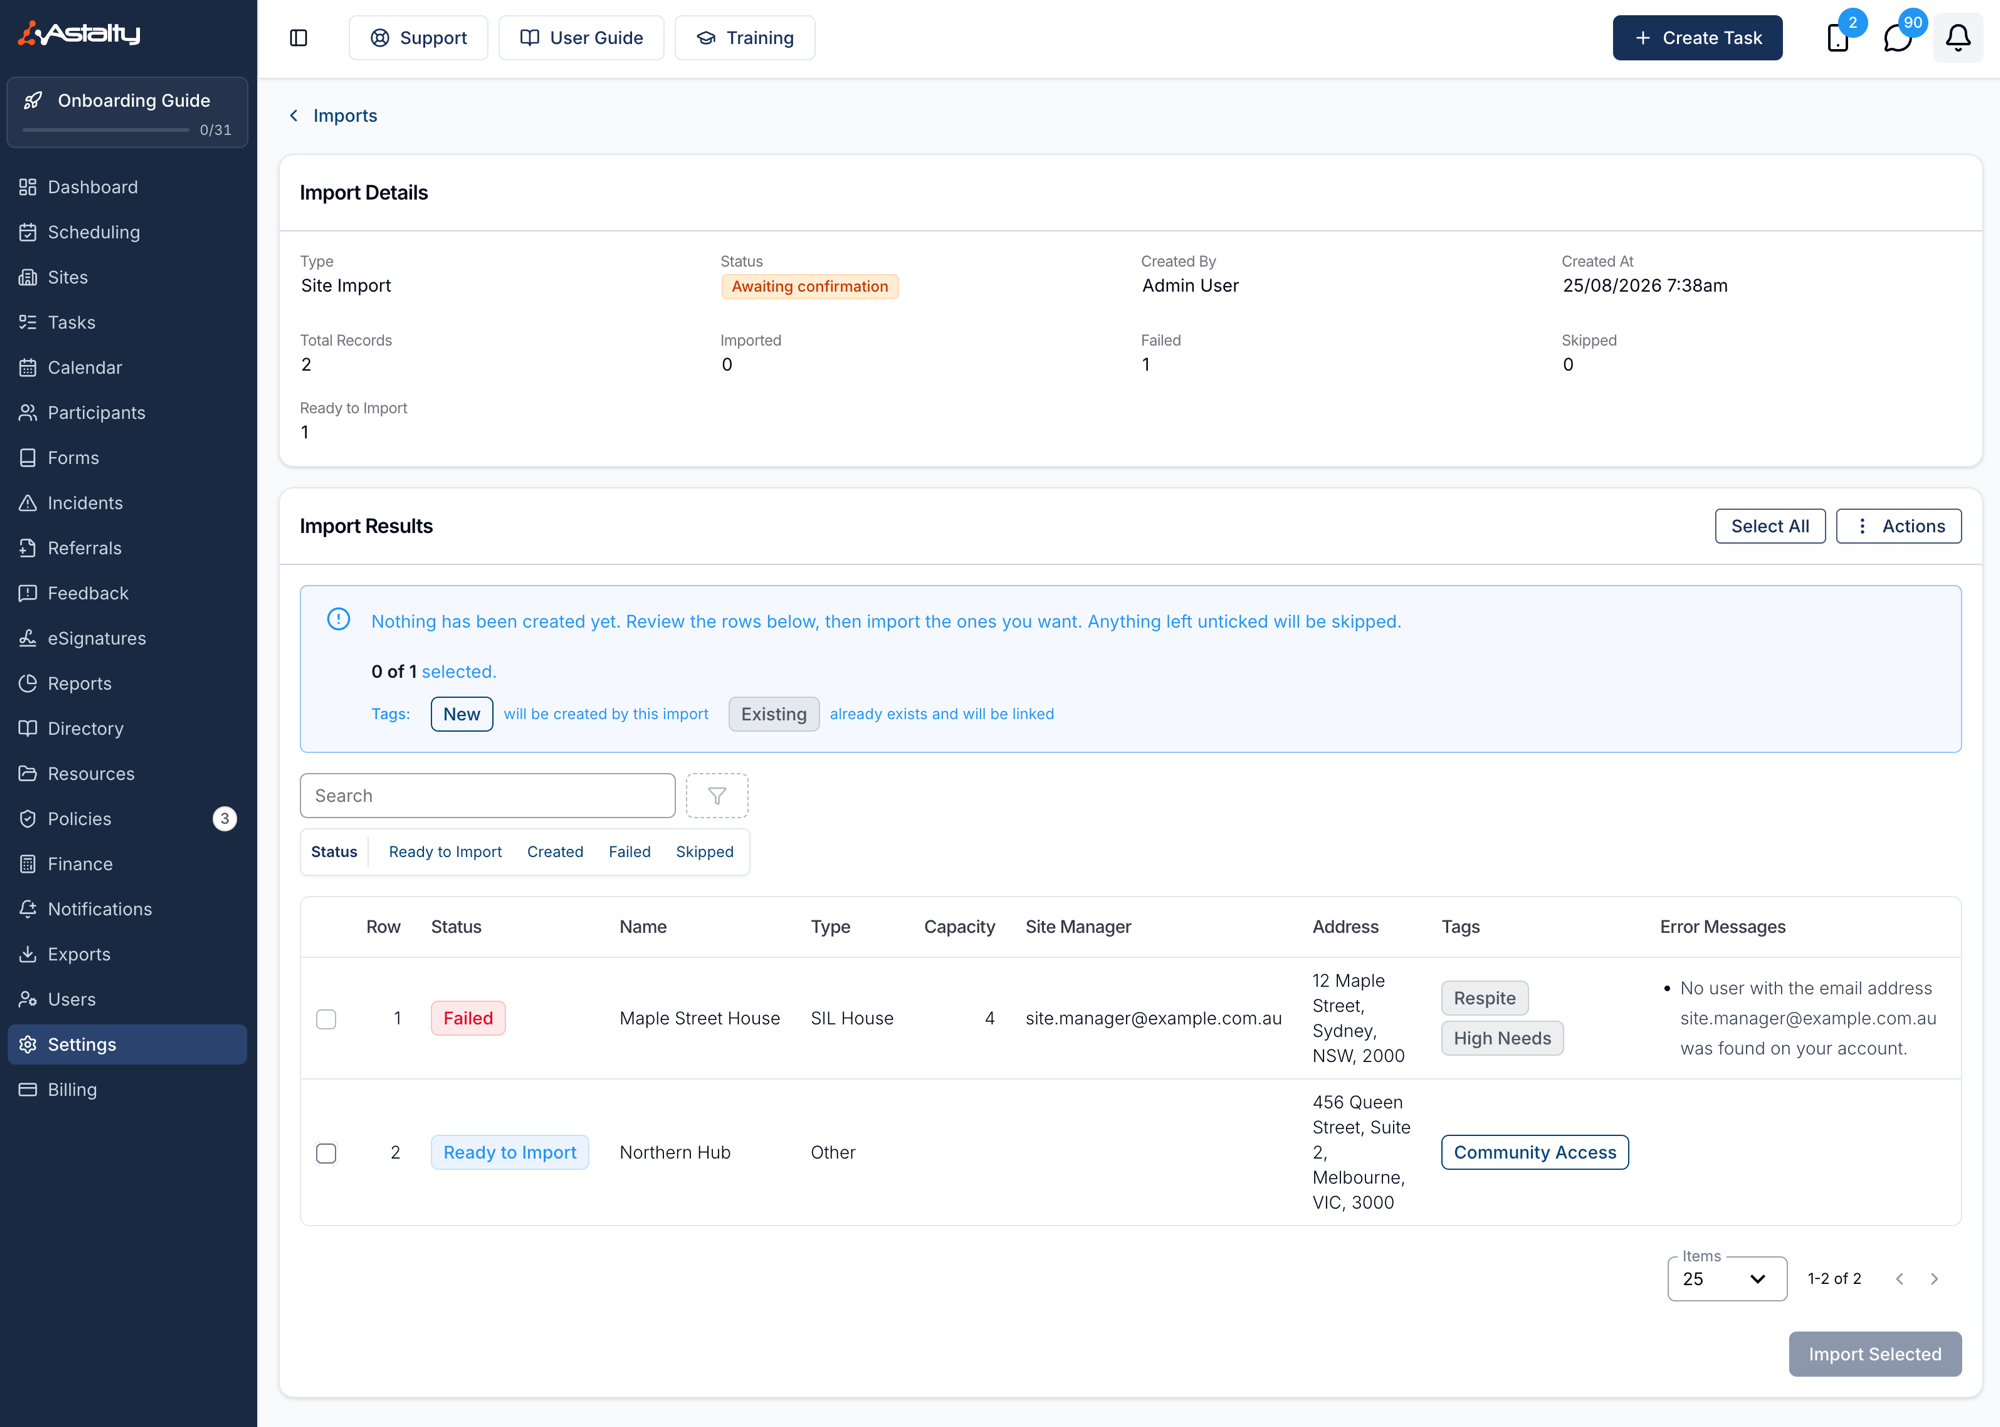
- Find it under Settings → Imports → Create Import → Sites, download the template, fill it in and upload it
- Nothing is created on upload. Every row is checked first and shown as Ready to Import or Failed, with the reason for any failure spelled out
- Tick the rows you want and select Import Selected - anything you leave unticked is marked Skipped, and an import can only be confirmed once
- Tags come through as a comma-separated list; the review screen outlines any tag that will be created and shows existing tags solid
- Skip duplicate sites is ticked by default, so a name that already exists on your account - including archived sites - is skipped rather than created twice
- Site managers are matched by email address, so run the User Import first if you want them assigned during the import
For more information, visit the Sites Import guide.
Requiring a Participant Record on a Plan Service
As well as requiring a Record Type across your whole account or by Participant Tag, you can require one for a single Service on a Participant's NDIS Plan - useful when a document is only needed because of the Service you deliver.
- Open the Participant's NDIS Plan, select the Plan and then the Service, and use Manage on the Records card to tick the Record Types that Service requires
- This is set per Participant and per Service, rather than in Settings, and needs the Can edit Participant plan services permission
- Requiring a Record is for tracking and reporting only - it never stops a Support Worker clocking out, blocks a note, or holds up invoicing
- Anything outstanding shows as Missing on the Service's Records card, on the Participant's Missing Records card, and in the Participant Records Report
- A Record can only be attached to a Service at the moment it is created, so start from the Add Record button on the missing Record row - the Service can't be changed afterwards
For more information, visit the Participant Records guide.
Front Page, Body and Footer Settings on Astalty Templates
An Astalty Template can carry its own Document Title, so the name you use internally and the heading your Participant reads no longer have to be the same. The guide now covers that field along with the rest of a Template's presentation settings.
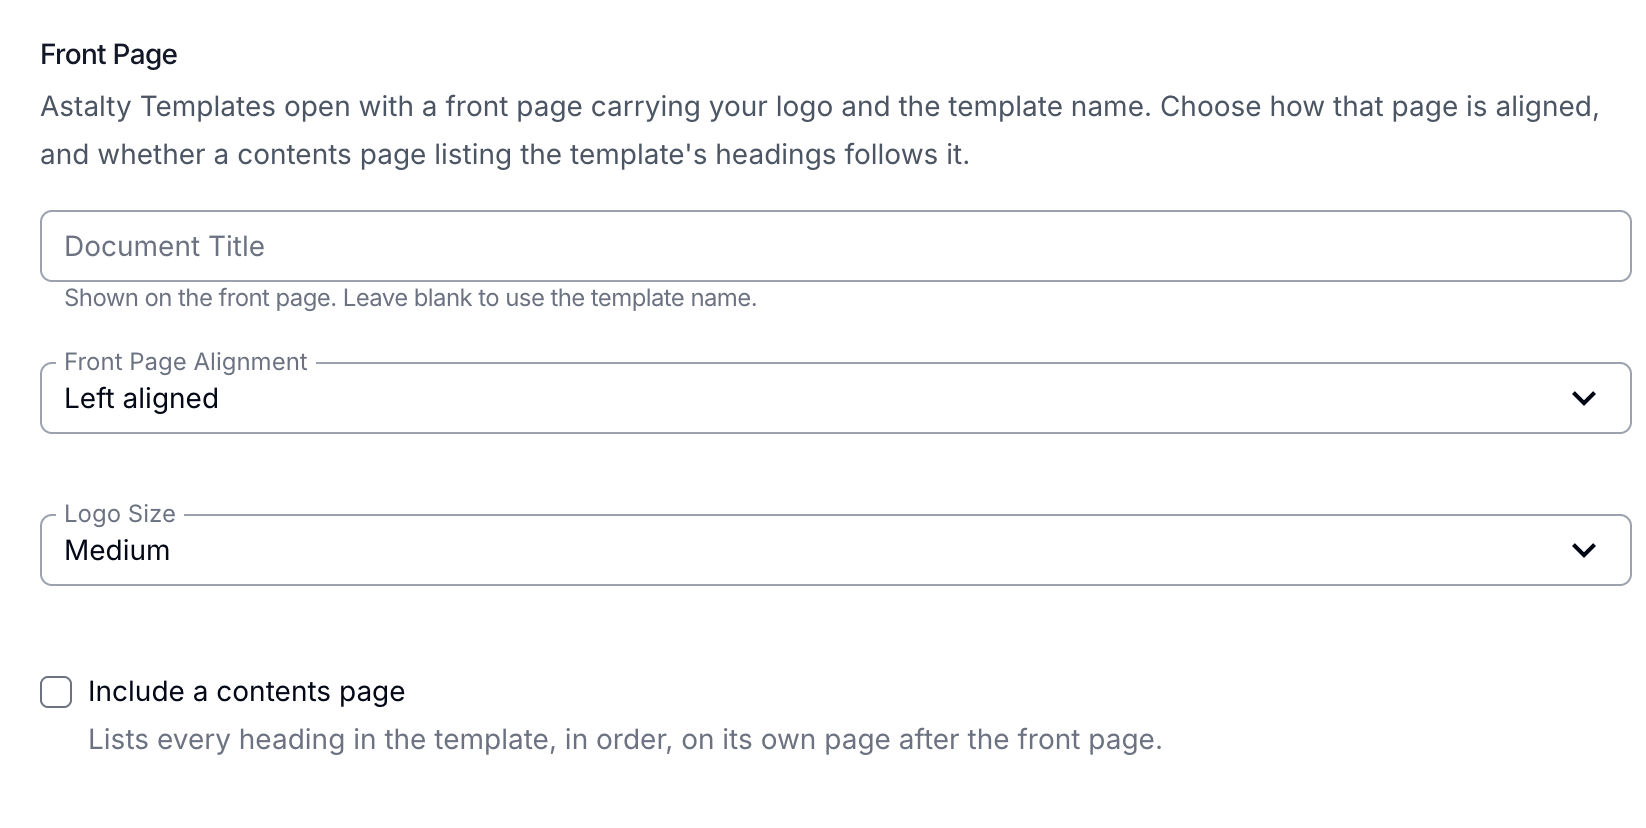
- Find the settings by opening the Template and selecting Edit on the Provider Document Template card - they can also be set when you first create the Template
- Leave Document Title blank and the front page falls back to the Template's name
- Front Page Alignment and Logo Size control how the logo and title are laid out, and Include a contents page adds a linked list of your headings, with optional section numbering
- Body Text Size enlarges the Template's own content, which is an easy way to produce a large-print version without editing the content itself
- Header & Footer text repeats on every page, with placeholders for business details such as your business name or ABN - page numbers always print in the footer
- Documents that have already been generated keep the settings they were produced with; changes only affect documents generated from that point on
For more information, visit the Template Settings guide.
Greeting Participants by Their Preferred Name in SMS Reminders
SMS reminders can now open with the preferred name recorded on a Participant's profile - "Sammy" rather than "Samantha".
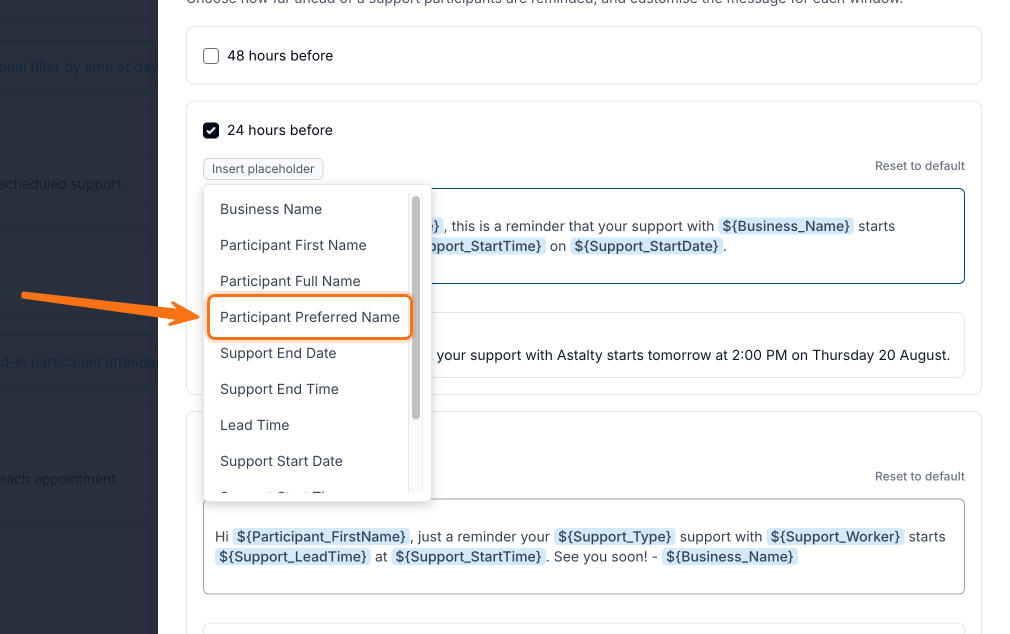
- Available on both support reminders and calendar appointment reminders, and used in the default message for each
- Where no preferred name is recorded, it falls back to the Participant's first name, so nobody receives a reminder with the name missing
- Reminders still using the default message pick the change up automatically, with nothing for you to do
- A message you have customised keeps whatever placeholder it already had - edit it to swap the first name placeholder for the preferred name one, or use Reset to default to go back to the standard wording
- Nominated contacts receive the Participant's message word-for-word, so they see the preferred name too
- Use Insert placeholder to drop it in at the cursor rather than typing it out
For more information, visit the SMS Reminders guide.
Travel Charge Items and the Travel During KM Charge Item Override
The guide now sets out what a Charge Item Set needs before travel kilometres can be charged, and the KM Charge Item Override has been narrowed to travel during a support - it is now called the Travel During KM Charge Item Override.
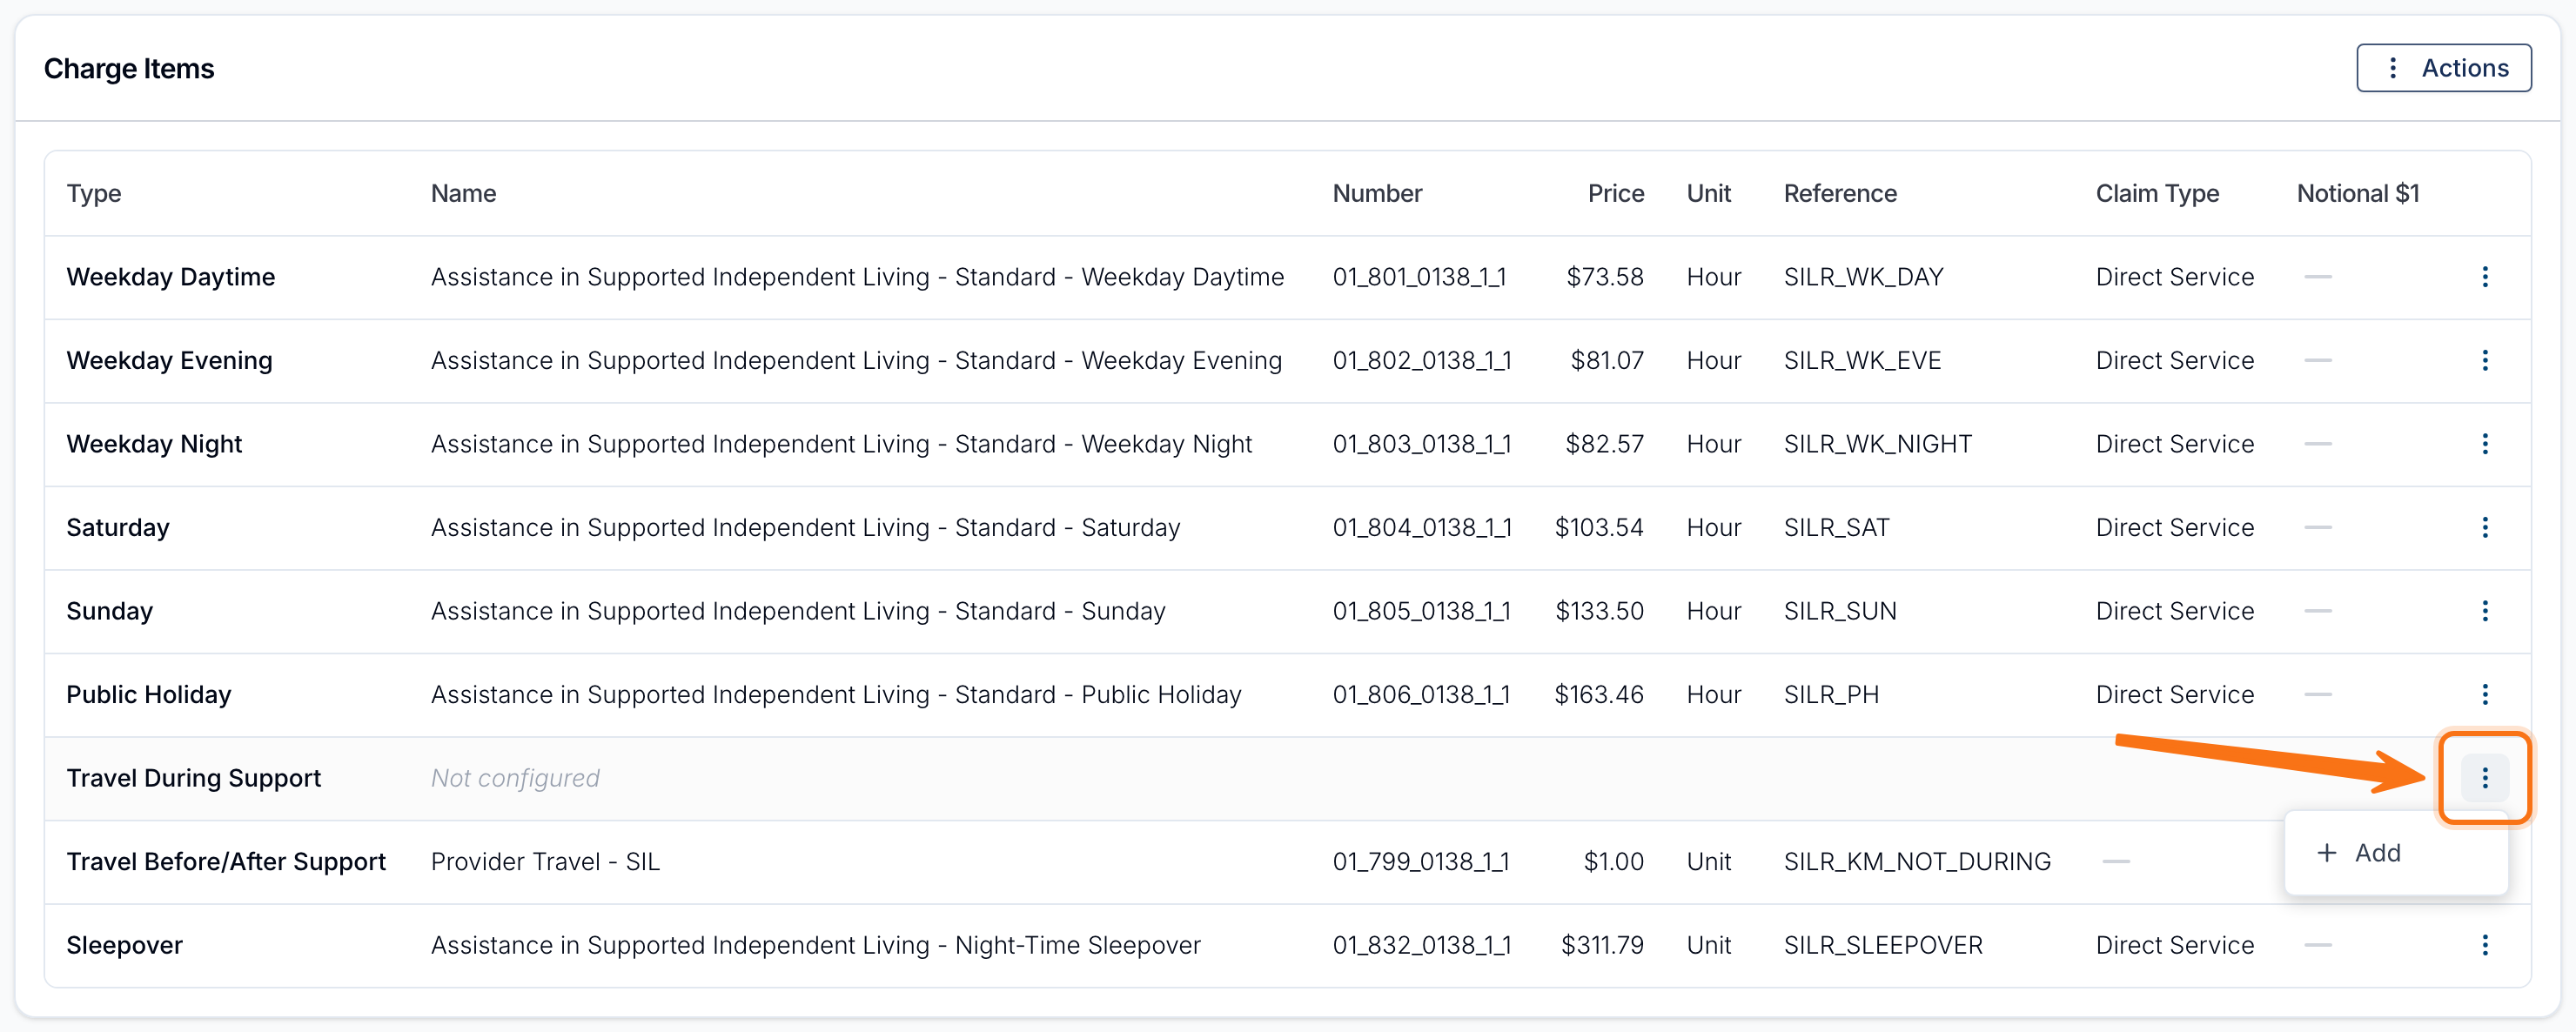
- Kilometres can only be charged where the Charge Item Set holds a travel Charge Item for that trip - Travel During Support for travel during, Travel Before/After Support for travel to and from
- Where one is missing, the Charge Items card shows that row as Not configured and you can add it from the row's three-dot menu, which covers every support using the set, existing and future
- The override applies only to Travel Type - During Support. Travel to and from a support always bills against the Charge Item Set, so an override will not clear a setup error on those trips
- The override selector only lists Charge Items already assigned to a Service in the Participant's NDIS Plan, and only appears when the Charge Item Set has no travel-during Charge Item to fall back on
- The override lives on the support rather than the Participant's profile - apply it across a recurring series, or per Participant on a group support through Update Charge Items
For more information, visit the Travel (to, during and from) and Creating & Updating Charge Item Sets guides.
Reconciling Payments in Xero
A new guide, with a video walkthrough, covers how payments recorded in Xero come back to Astalty on their own - reconcile the invoice in Xero and Astalty creates the matching payment against it, so nobody enters it twice.
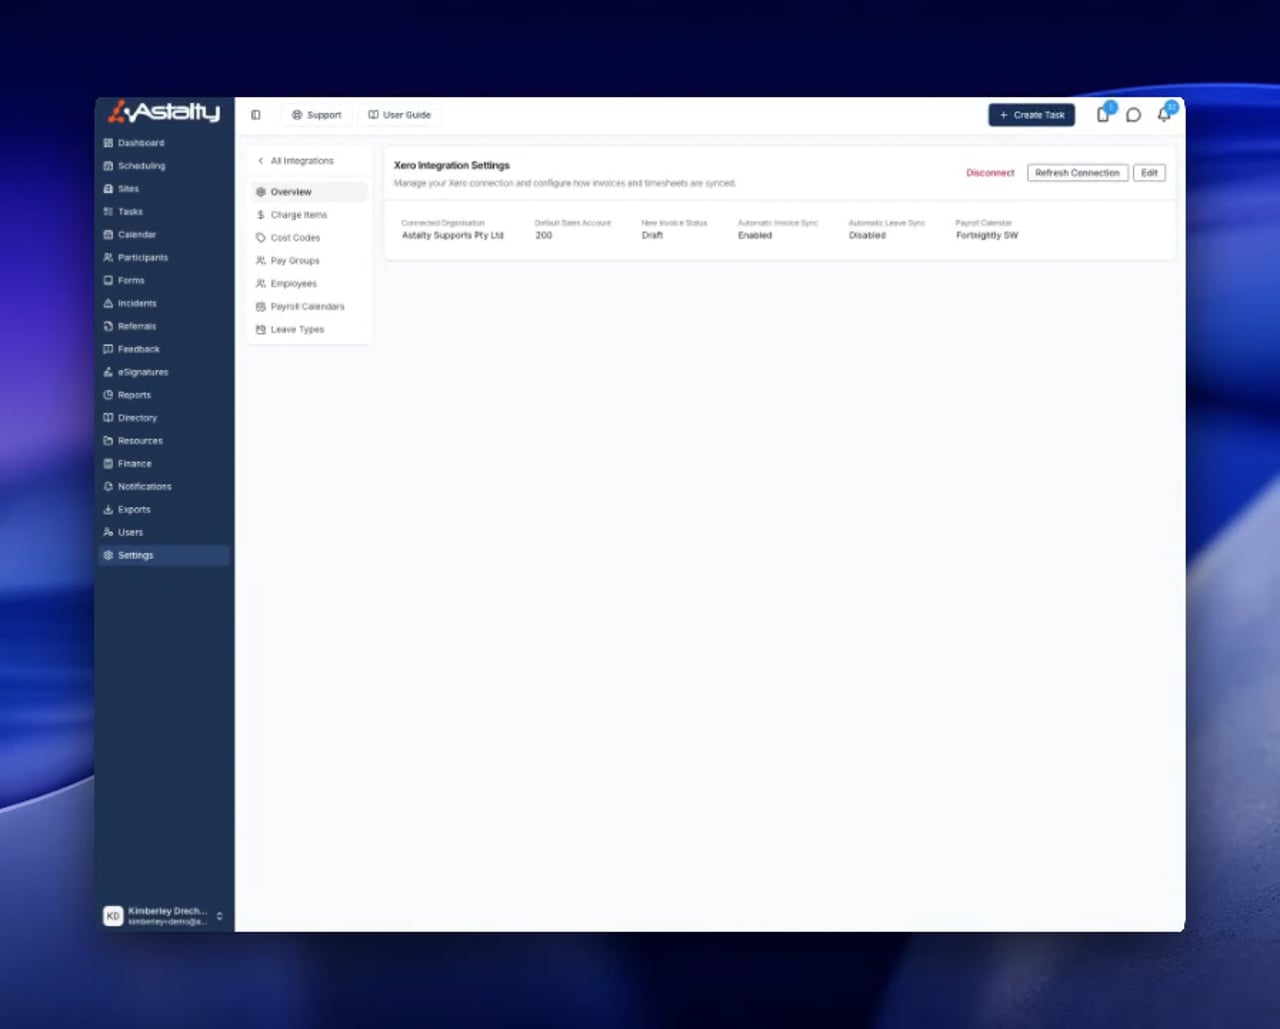
- Covers plan managed and self managed invoices, and works however you reconcile in Xero - bank feed, batch payment, or adding a payment on the invoice
- Three things have to be true first: the invoice batch has synced to Xero, the invoice is approved in Xero, and the invoice still has an amount outstanding in Astalty
- Record the payment in one place only - if you use Mark as Paid in Astalty and then reconcile the same invoice in Xero, the Xero payment is quietly dropped
- The payment that comes back carries a Xero source chip and is managed in Xero from then on: remove or amend it there and Astalty follows
- If a payment hasn't appeared, Actions → Sync Xero payments on the batch asks Astalty to go and check
- NDIA managed invoices are deliberately kept out of this flow and are still reconciled from the receipt file
For more information, visit the Reconciling Payments in Xero guide.
Fixing Timesheet Batch Export Errors
When a timesheet batch won't export, most problems now come with a Fix issue button that takes you straight to the screen where you can put it right, and the guide now covers every error you might see.

- Validation lists each problem against the worker it affects, and Fix issue opens the right HR tab, drawer or settings page in a new tab - make the change, switch back, and select Validate again
- There are now reference tables for Xero, Employment Hero and interpreted exports, naming each error and exactly where its button goes
- Some errors have no button - those that can only be fixed on the shift, in your payroll platform, or that affect the whole batch - and the guide says what to do instead
- Timesheet lines overlap also offers View in schedule, which opens the schedule at that worker and the time of the first overlap
- If a batch passes validation but Xero then rejects it, Fix issue in the Export Results panel opens a Why this export failed drawer with the reason and a link to the fix
For more information, visit the Timesheet Batches guide.
Service Utilisation Cut-off Now Available to Everyone
The Service Utilisation Cut-off, which stops new or increased task charges being recorded against a service once its funding is fully utilised, is out of beta and available on every account - there is no longer anything to ask Astalty to switch on.
- Find it under Settings → Tasks & Notes, on the Task Settings card
- It is off by default, so nothing is blocked until someone on your team changes it from Off to Block
- It applies to task charges only - shifts and supports, group supports, direct charges, recurring charges and imports are recorded as normal
- Editing Task Settings needs the settings permission, so this is typically an Admin or Account Owner
For more information, visit the Service Utilisation Cut-off guide.
Manual Charges on the Public Holiday Supports Report
The Public Holiday Supports Report has a Manual Charges column that flags a billing issue that is easy to miss: manual charges never pick up public holiday pricing on their own.
- A charge you added yourself keeps whatever Charge Item you picked, so unless you chose the public holiday Charge Item it bills at the ordinary rate
- The column shows an orange N to review chip counting the manual charges on a Charge Item whose pricing varies on public holidays - hourly and daily items only - or an em dash when there is nothing to check
- Hovering the chip shows the guidance in full and names the holiday in question
- Set the Manual Charges filter to Yes before a public holiday to work through just the supports that need a rate check
- A group support shows a single chip, rolled up to the holiday with the most affected charges, so open the group support to see every Participant's charges
For more information, visit the Public Holiday Supports Report guide.
Deactivated Users in the Support Notes Report
The Created by filter on the Support Notes Report includes people who have left, so notes written by a former Support Worker are still easy to pull up.
- The drop-down lists deactivated users alongside active, invited and restricted ones
- Select one or more names to narrow the report to just their notes
- Deactivated users aren't labelled any differently to current staff, so start typing a name in the drop-down's search box if you can't see the person you want
- Created by combines with the Date, Participant and Site filters
For more information, visit the Support Notes Report guide.
Participant Notes Export
The guide previously said exporting notes to PDF was not available. It is - and the page now covers the whole form, including filters and options that were never documented.
- Choose CSV or PDF under Export Format. PDF is included on the Professional plan and above, and only becomes selectable once you have chosen a Participant
- The filters are all documented: a From and To date range, Participant, Select a Team Member (CSV only, and it includes deactivated users), and Source for notes recorded against a support or a task
- All ten CSV columns are listed, including NDIS Number and the Participant's first and last name
- The PDF gives each note its own block with the date, who wrote it, any task or check-in type, and the note's original formatting - and a PDF covering more than 100 notes is delivered as a ZIP split into parts
- Include formatting does not change a CSV; note content is always written as plain text, so it is best left unticked
For more information, visit the Participant Notes Export guide.
Changing Your Password and Signing Out Other Devices
A new guide covers the two security actions on your own profile - changing your password, and signing yourself out of Astalty everywhere else you are still logged in.
- Change your password from My Profile → Change Password. Astalty ticks off each requirement as you type, and emails you once the change is saved
- Changing your password ends every other browser session on your account, and so does a Forgot Password reset - the device you are using stays signed in
- To sign other browsers out without changing your password, use Logout all other sessions on the Security tab and confirm with your current password
- Neither action signs you out of the Astalty app, API keys, or connected apps such as the Outlook add-in, so a Support Worker mid-shift is never locked out
- You can only ever change your own password - an Admin cannot set one for somebody else
For more information, visit the Passwords and Active Sessions guide.
User Groups on the User Record Types List
The User Record Types list has a User Groups column, so you can see who each record is required for across the whole list instead of opening every record type in turn.
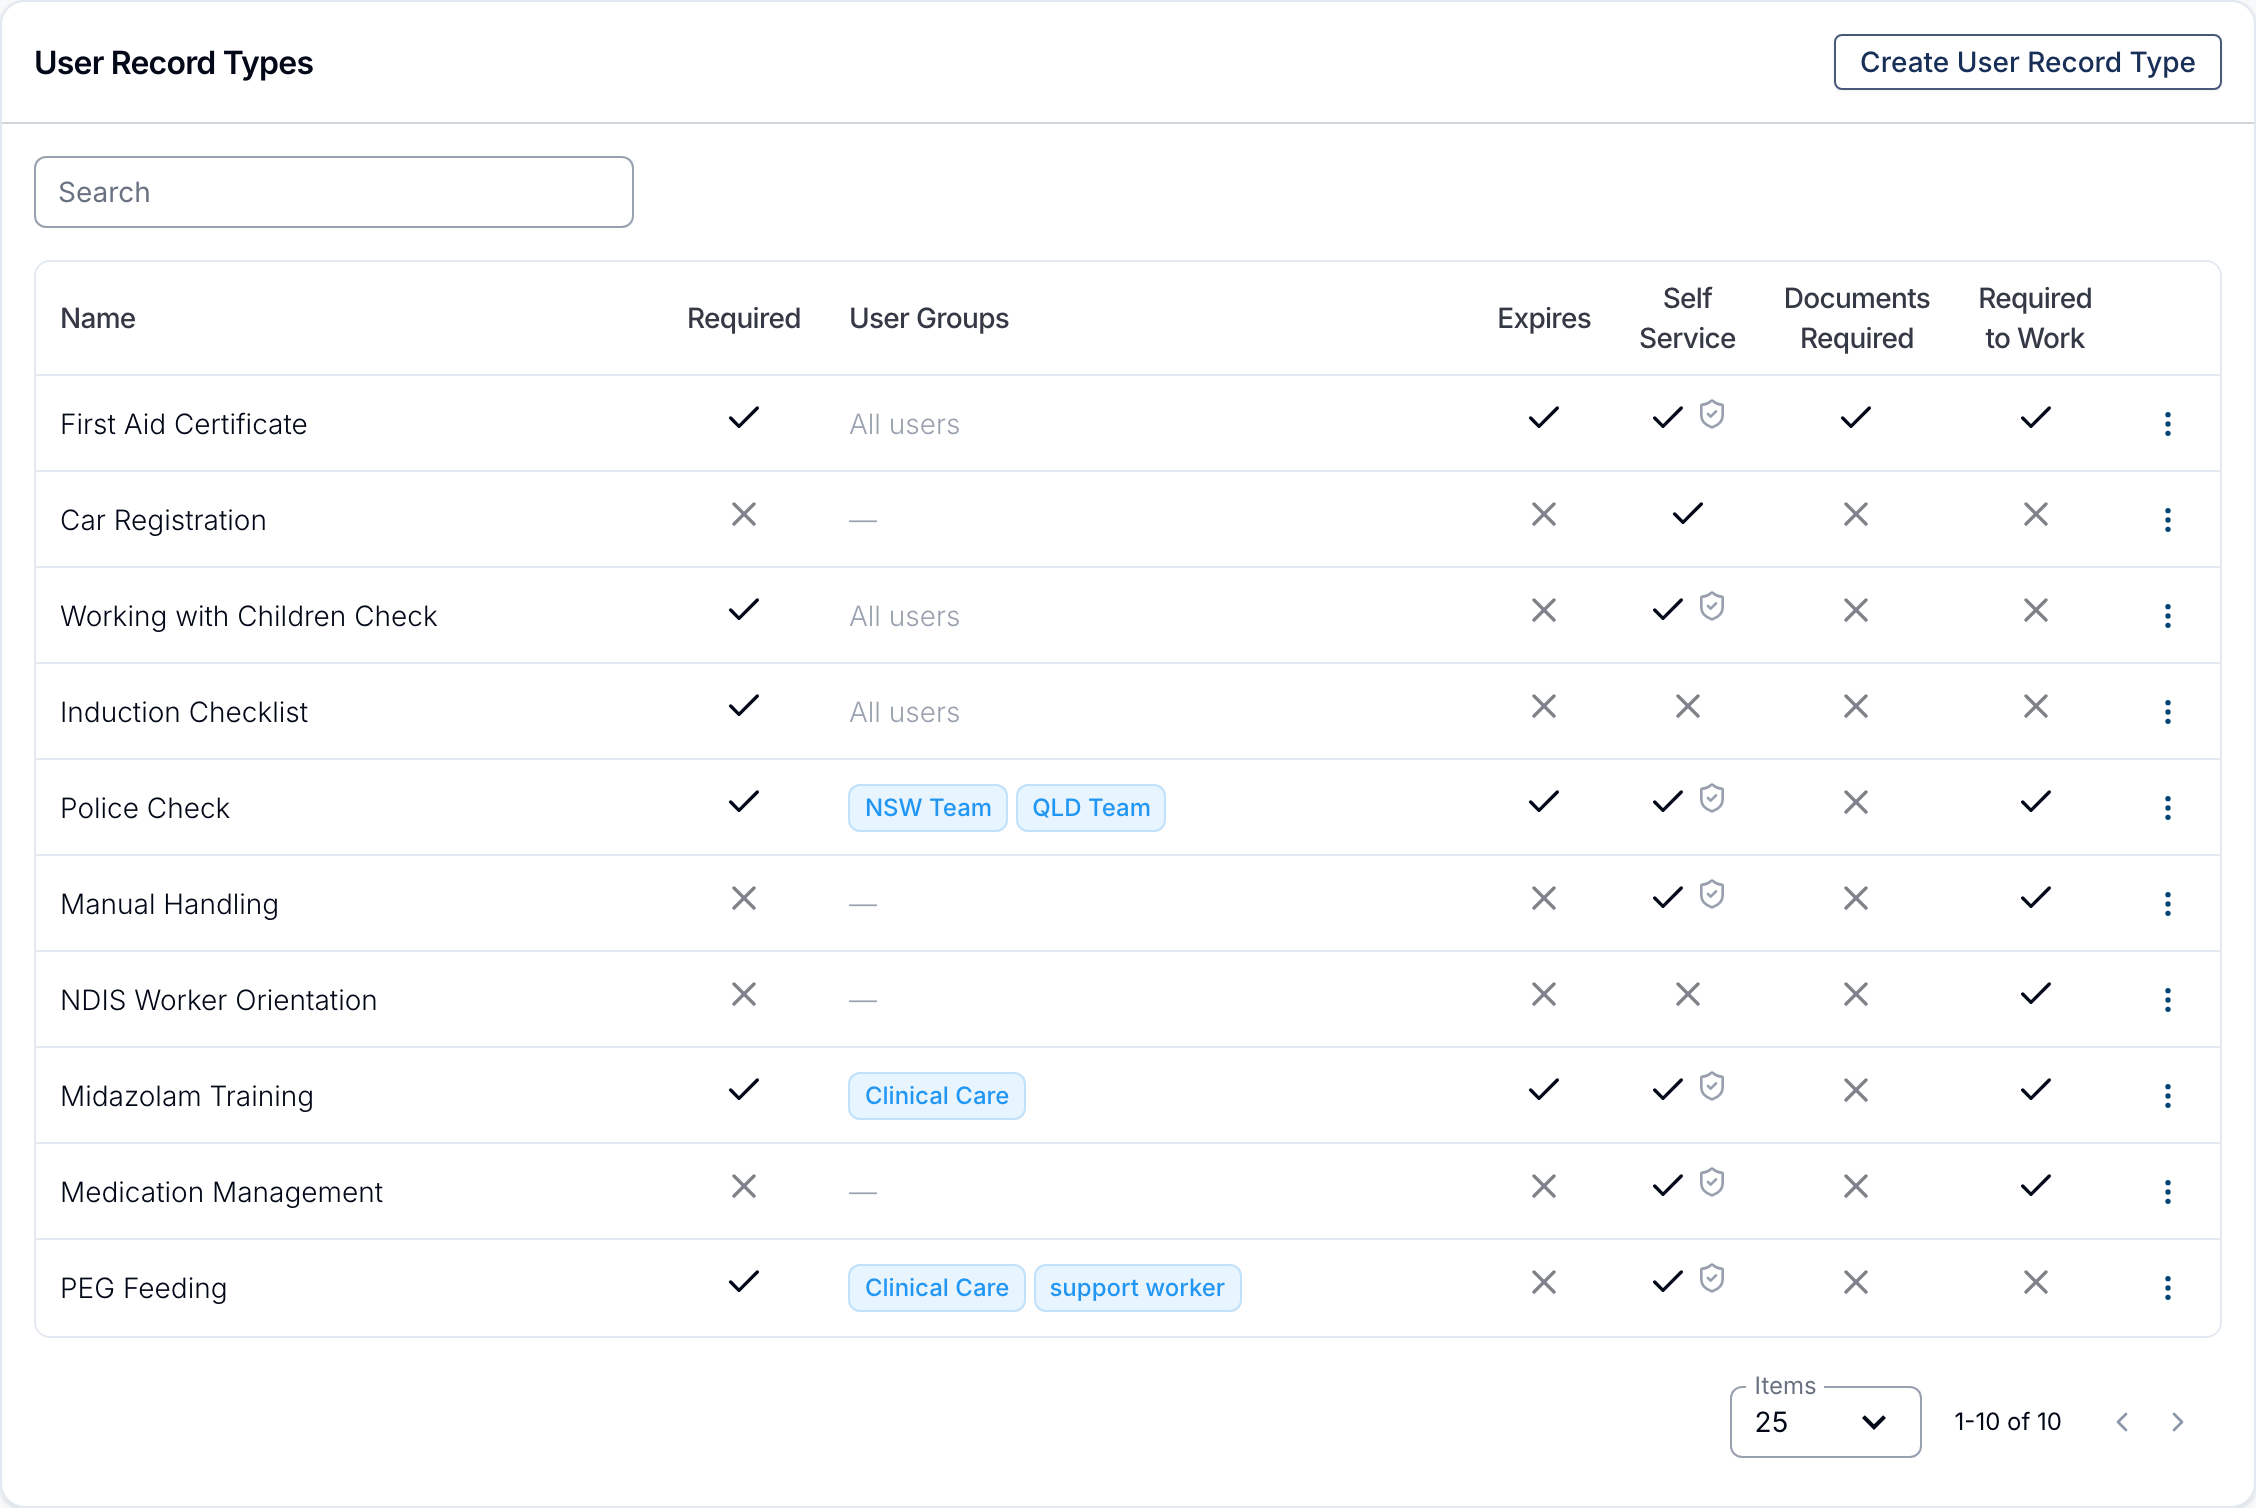
- Group names in the column mean only the users in those User Groups need the record
- All users means the record type has Required record ticked, so everybody needs it
- A dash means the record type is not required at all, so it is never reported as missing
- The Required column is ticked in both of the first two cases, so the User Groups column is what tells you how far a requirement actually reaches
- The guide now also explains the two options on the record type itself - Required record and Required for some user groups - which are mutually exclusive
For more information, visit the User Records guide.
Support Worker Case Note Permissions
The guide said a Support Worker's permissions could not be edited, and that you had to convert them to a Standard User to change what they can see. That is no longer true - Support Workers have two permission toggles of their own.
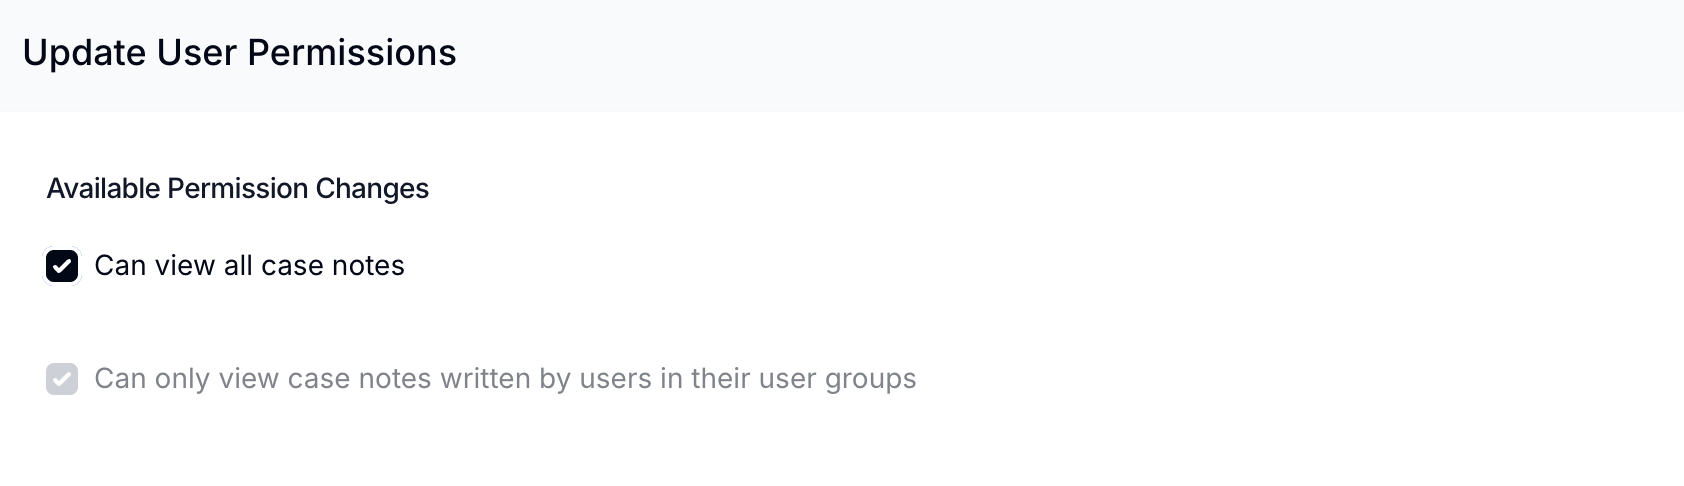
- Can view all case notes and Can only view case notes written by users in their user groups both sit on the Support Worker's Permissions tab
- While Can view all case notes is ticked, the user-group option is greyed out - untick the first to make the second selectable
- Restricting one person this way works on any plan; only the role-wide screen under Settings → Permissions needs Premium
- There is no need to convert a Support Worker to a Standard User just to limit case notes, which also avoids the pro-rata charge a conversion triggers
- Notes written on a shift behave differently on each platform: in the browser a Participant's note history still shows every support note, while the Astalty app filters them down to the worker's own user groups plus the shifts they personally worked
For more information, visit the Updating Roles and Permissions guide.
Charge Intervals Live Under Tasks & Notes
Charge Intervals are set from Settings → Tasks & Notes, and that is now the only place the guide covers them.
- The Business Settings page carried a second copy of the same instructions, describing a panel that is no longer on that screen
- Business Settings now points across to Tasks & Notes, so an old bookmark or search result still gets you to the right place
- Charge Intervals themselves are unchanged - the 6-minute and 15-minute presets, and any custom interval you define, all work as before
For more information, visit the Tasks & Notes guide.
The Four Business Information Identifiers Explained
Business Settings holds four identifiers issued by three different bodies, and three of them had a heading with nothing under it. Each is now explained, along with where to find it and what Astalty does with it.
- A table names the issuing body for your ABN, Registration Number, PACE Organisation ID and NDIS Registration ID, and where to look each one up
- Your Registration Number is the NDIA number you claim against - it fills the registration number column of the bulk upload file, and can appear on invoices and on the header of note, form and risk PDFs
- PACE Organisation ID and NDIS Registration ID are stored against your business for reference only; nothing in Astalty reads either, so neither affects claiming or invoicing
- Leaving the Registration Number blank does not stop the bulk upload file being generated, as the guide previously said. The column is written empty and the NDIA rejects the payment request when you upload it
- Timezone is now explained: your business timezone covers dates not tied to a record with a timezone of its own, while a shift keeps the timezone it was scheduled in
For more information, visit the Business guide.
How Quick Action Menu Search Works
The Quick Action Menu guide has been rewritten to explain what its search can actually do - which matters, because the keyboard shortcut is the only way to open it.
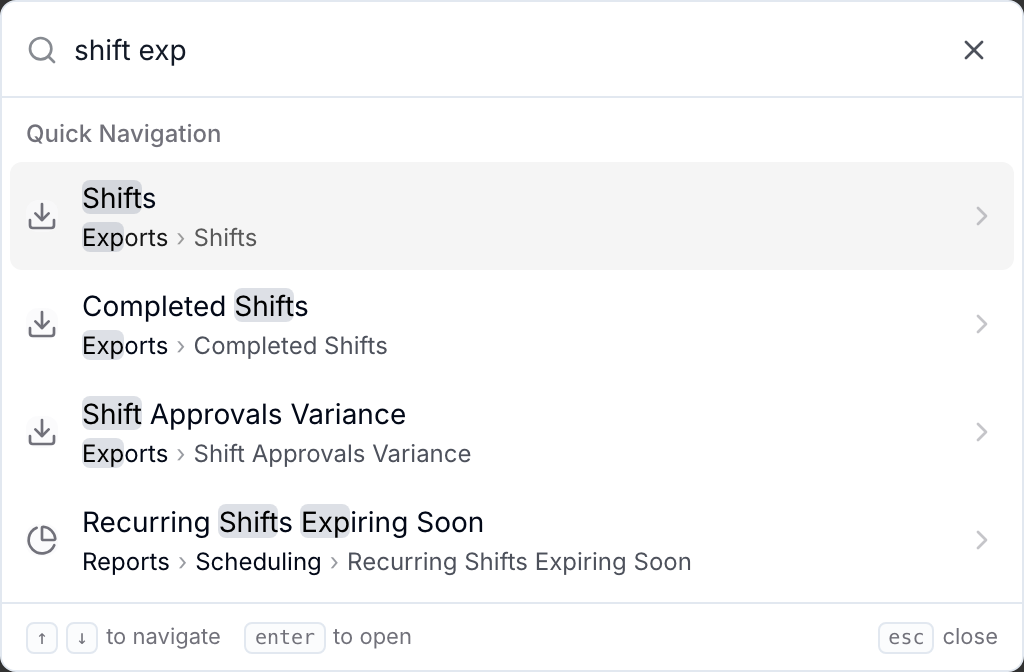
- The menu matches the whole path to a page, not just its name, so you can type a category and a name together
- Every word you type has to match, the order doesn't matter, and part of a word is enough
- Some pages answer to the words you would normally use - 2fa, mfa, two factor and authenticator all find Settings → Security, even though none of those words appear in the result
- Sections within a page have their own entries, so note tem takes you straight to Note Templates
- There is a full keyboard shortcut table, and the shortcut works even while your cursor is in a text field
- Results are filtered to your role, permissions and enabled features, and the menu searches pages and actions rather than your data
For more information, visit the Quick Action Menu guide.
Using Astalty Outside Australia
Two questions that come up regularly now have an answer in the guide: where the Support Worker App can be used, and whether a VPN is needed.
- The Support Worker App is available in Australia and the Philippines - use from other countries is not currently supported
- If a Support Worker can't install or use the app because they are somewhere else, that is expected rather than a fault to report; contact Astalty support to discuss options for your team
- The browser version of Astalty can be used from any country, with no country-based restriction on signing in
- No VPN is required for standard Users - access is over HTTPS in a browser, with no special network setup
- Australian-only parts of Astalty, such as ABNs, state and territory addresses, Australian mobile numbers for SMS and Australian timezones, still apply wherever you sign in from
For more information, visit the Support Worker App Overview and Security guides.
The NDIS Consent Form Duration is Optional
The guide's wording for the consent duration question has been corrected - it is optional, not required.
- Under How long is the consent for? (Optional), choose One time only, Ongoing, or Until a set date
- Choosing Until a set date reveals a Consent Expiry Date field, which must be filled in before the form will generate
- Leave all three options unselected and the form still generates, with the duration question unticked and the expiry date blank, ready to complete by hand at signing
- If you enter an expiry date and then switch to a different duration, that leftover date is not printed on the generated form
For more information, visit the NDIA Templates guide.