- Changelog
- 3 September 2026
3 September 2026
Contacting a Support Worker from a Shift
You can now start a chat with the Support Worker assigned to a shift straight from the Schedule, instead of going to Chat and searching for them.
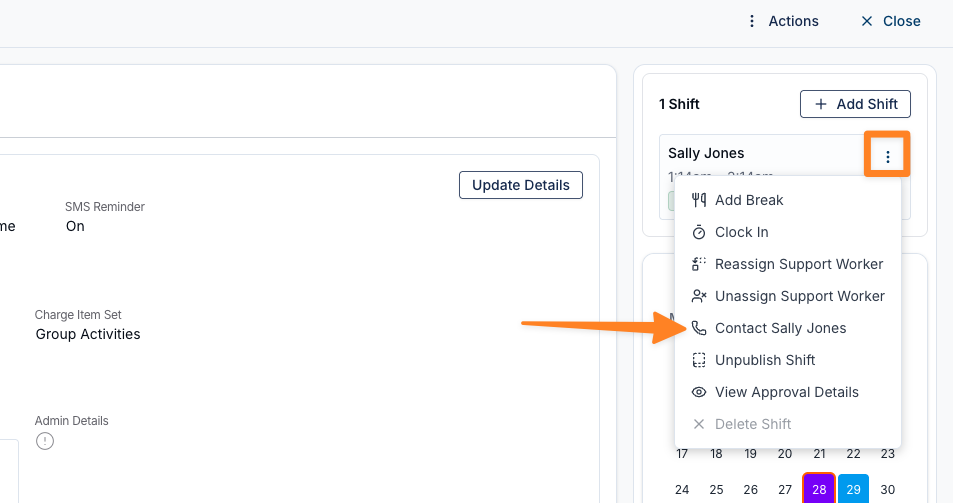
- Open a support on the Schedule, click the three dots next to the assigned worker's name, and choose Contact followed by their name
- From there you can copy their mobile number, call them, or select Send Chat Message
- The conversation opens in a new browser tab — an existing conversation with that worker is reopened rather than a new one started
- Send Chat Message only appears if Chat is switched on for your organisation and your role is allowed to message Support Workers, so your existing rules about who can message who still apply
- The Contact option only appears once a Support Worker is assigned to the shift
For more information, visit the Direct Messages guide.
Filtering the Schedule by Support Time Segments
You can now filter the Schedule to show only the shifts whose support splits its billed time across more than one Charge Item Set, so you can find segmented supports without opening them one at a time.
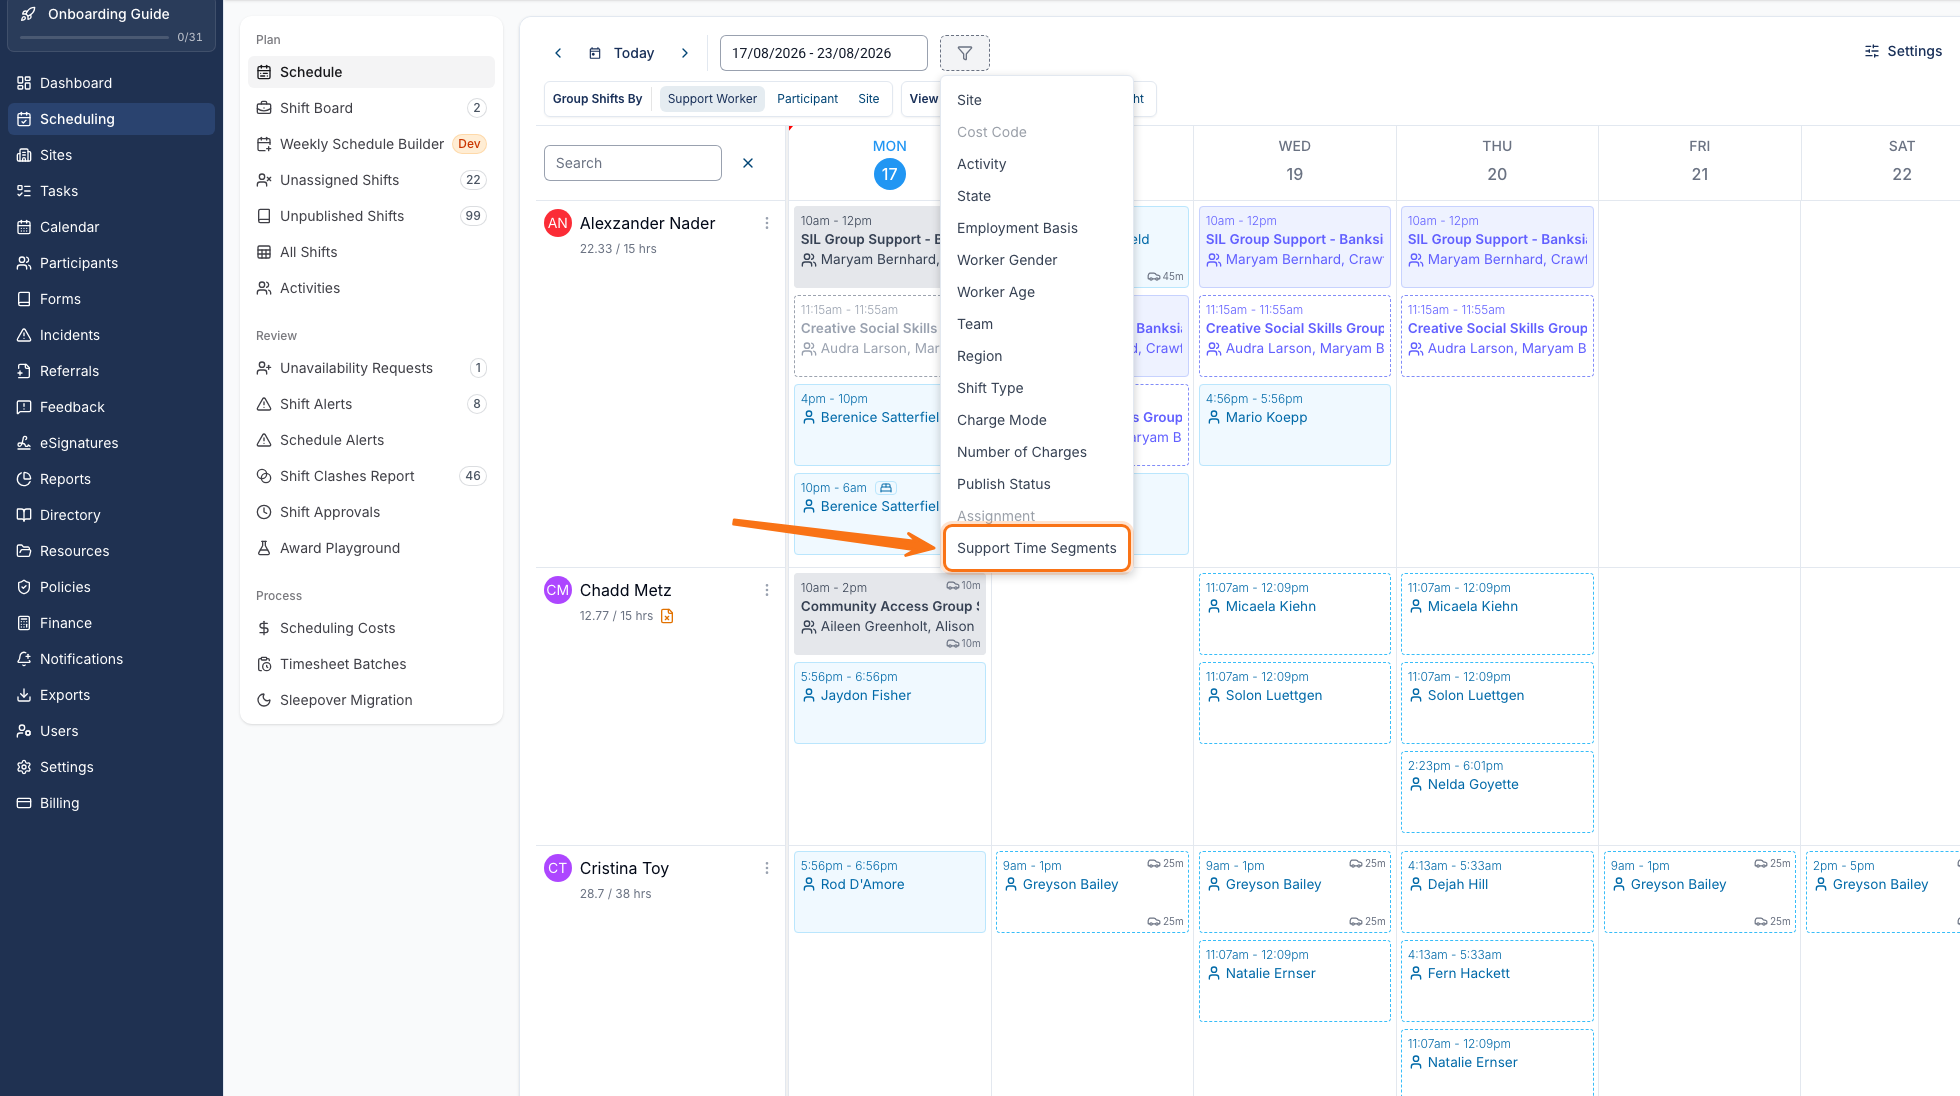
- Select the filter icon on the Schedule, choose Support Time Segments, then pick With or Without
- Group supports show under With if any participant on the group has time segments
- A support switched to manual charging shows under Without, because its segments no longer apply to billing
- Unavailability and leave stay visible on the Schedule whichever option you choose
- Support Time Segments is currently in beta and is switched on by Astalty — contact support if you would like it enabled
For more information, visit the Viewing the Schedule guide.
Confirming Before Removing Recorded Travel
If a Support Worker has already recorded readings or times against a travel item, Astalty now asks you to confirm before it is removed, so their record is not lost by accident.
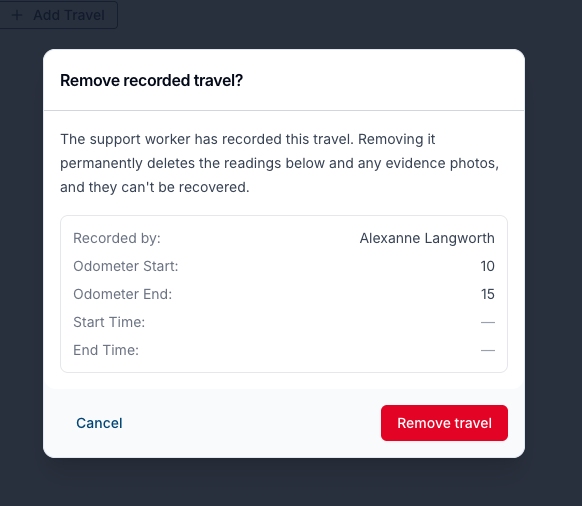
- Select Remove on a travel row and the confirmation shows what the worker recorded before you continue
- Choose Cancel to keep the travel, or Remove travel to take it off the form — you still need to select Update to save the support
- Applies wherever you manage travel on an existing support, including Update Travel and Update Group Travel
- Travel with nothing recorded against it is removed straight away, and every removal is recorded on the support's audit trail
For more information, visit the Travel (to, during and from) guide.
SMS Reminder Bells When Creating a Support
When you create a support for a participant who can receive SMS reminders, a bell now shows whether a reminder will be sent for that support.
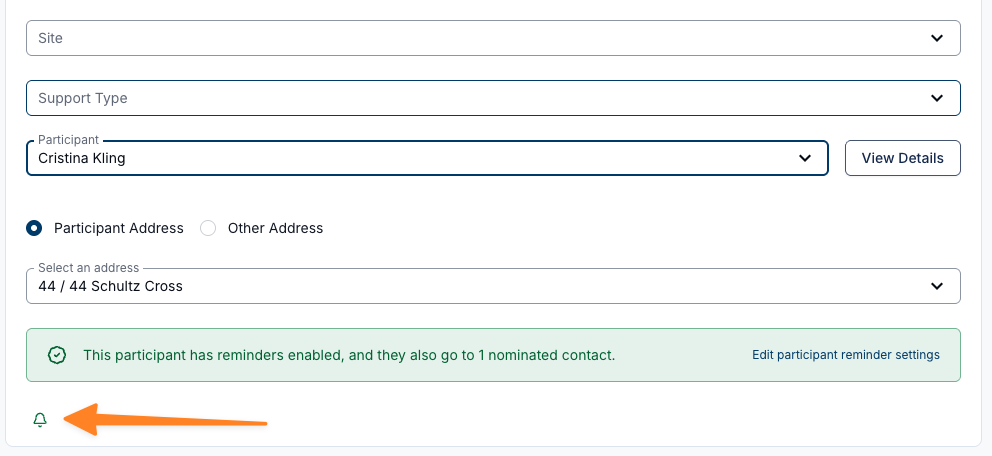
- On a 1:1 support the bell starts green, meaning the reminder is on — click it to switch the reminder off for that support, and click again to switch it back on
- On a group support each participant gets their own bell; green and navy bells can be clicked, while amber, grey and red bells explain why a reminder cannot be sent when you hover over them
- Nominated contacts count towards eligibility, so a participant can still show a clickable bell even if their own reminders are switched off
- Clicking a bell only affects that one support — it never changes the participant's own reminder settings
- Bells appear while you are creating a support; once it exists you switch the reminder using the Send SMS reminder for this support checkbox instead
For more information, visit the SMS Reminders guide.
Renaming a Public Holiday Group
You can now rename a Public Holiday Group instead of recreating it, if it was set up with the wrong name.
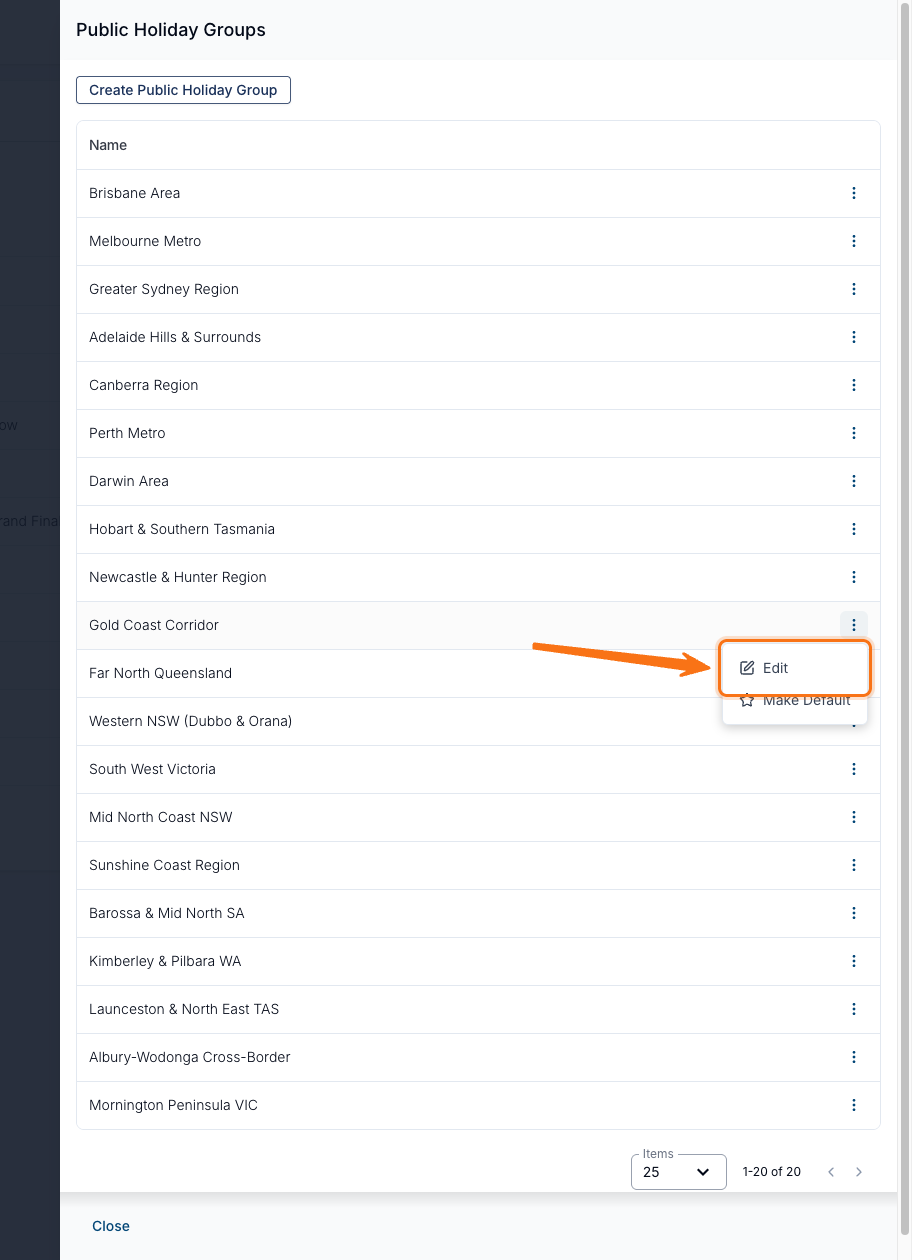
- Select the three dots next to a group under Public Holiday Groups and choose Edit to change its name
- Renaming only changes the label — the participants assigned to the group, its linked holidays, its default status and its charge rates all stay the same
- Any group can be renamed, including the one currently set as the default
- Group names must be unique, so a name another group already uses shows an error and is not saved
For more information, visit the Public Holidays guide.
Support Ratios on Budget Items
When a support is shared between participants, you can now set a ratio on a budget item so their reduced rate and total are worked out in the budget itself — instead of only becoming visible once the support is delivered and invoiced.
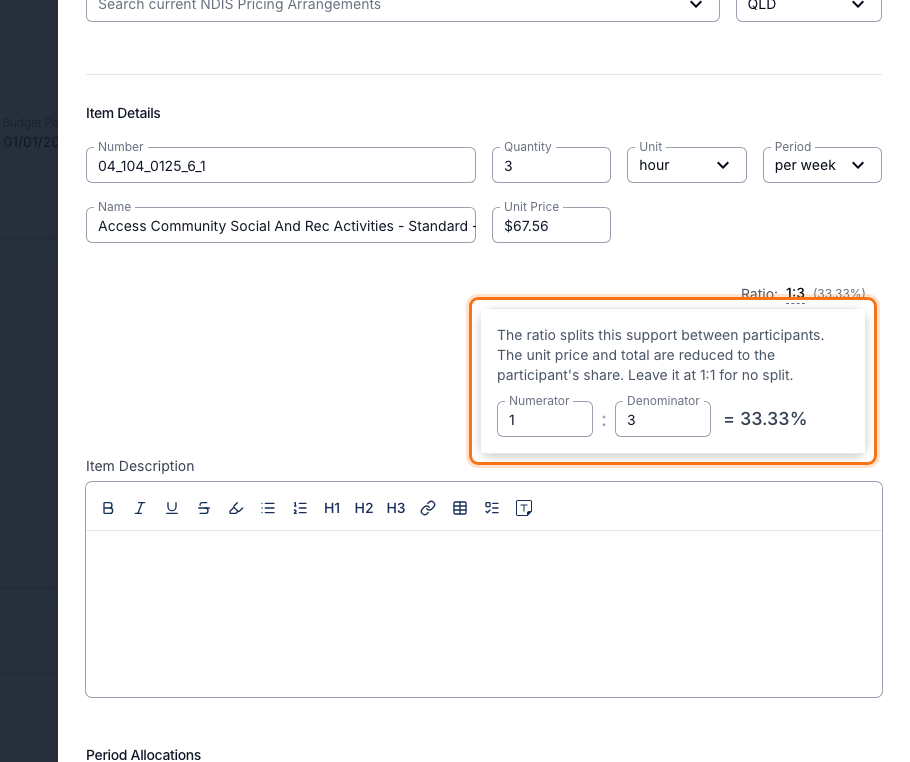
- Enter a numerator and denominator on a budget item and the ratio unit price and item total update as you type, while the full Unit Price stays visible
- The reduced amount then flows through to the budget's item list, the Schedule of Supports on a generated Service Agreement, and the exported budget PDF
- A ratio only ever reduces a rate, and 1:1 means no ratio is applied
- The budget ratio plans and communicates the participant's share — what actually gets invoiced is still driven by the ratio on the delivered group support
- Support Ratios are part of Astalty Premium
For more information, visit the Budget Functionality guide.
Budget Descriptions and Budget Item Allocations
You can now add an optional description to a budget for extra context, and — for accounts using Budget Item Allocations — split each budget item across your funding periods instead of entering period amounts by hand.
- Add a formatted Description to a budget, with headings, lists and links — it shows in Budget Details, and long descriptions collapse to three lines with Show more
- The description is for on-screen context only; unlike budget item descriptions, it is not included in the budget PDF or the Schedule of Supports
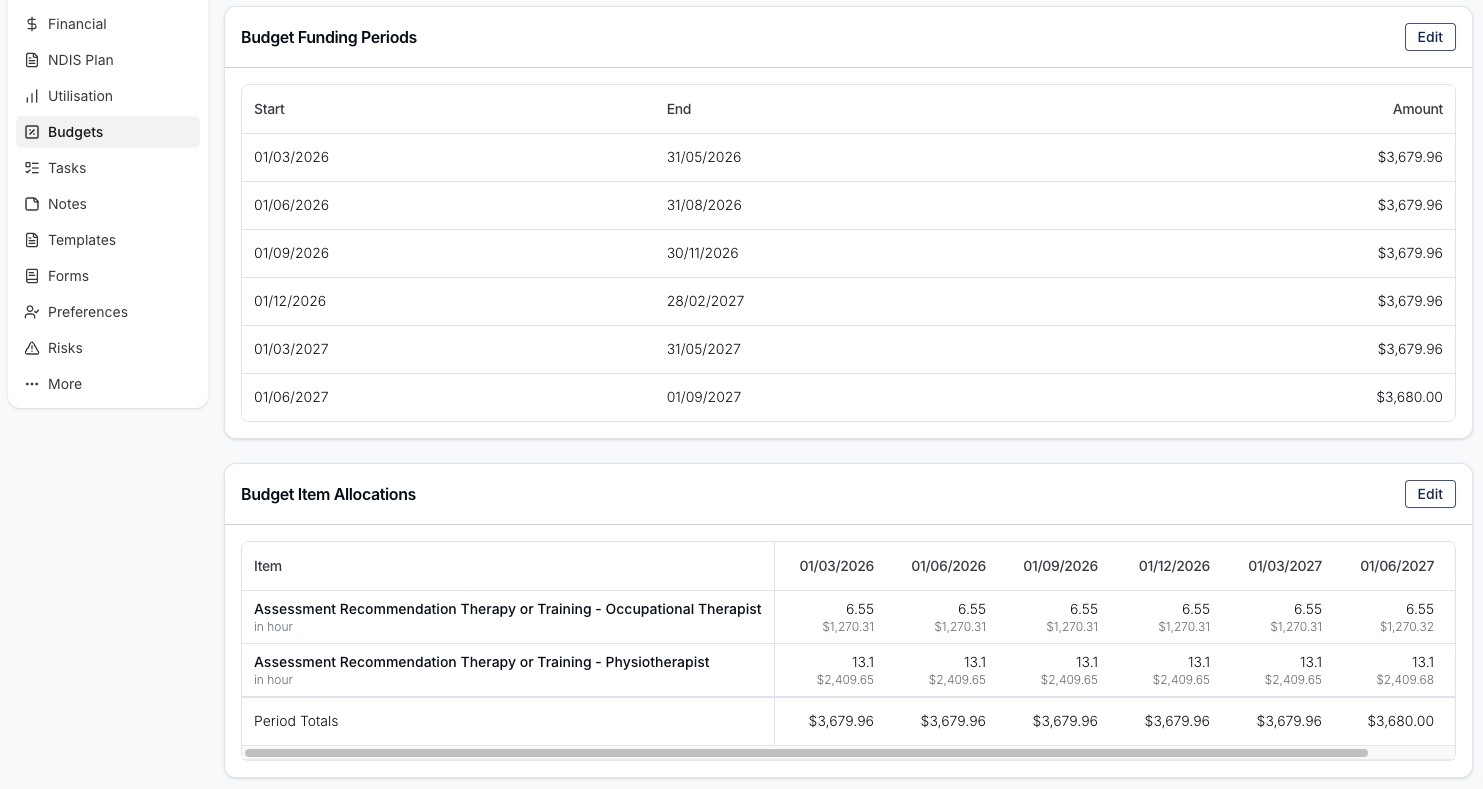
- With Budget Item Allocations switched on, split each item across the budget's funding periods and Astalty works out each period's amount for you
- Edit allocations from the budget item itself, or from a single grid covering every item and period at once
- Budget Item Allocations is in beta and enabled per account by Astalty, on top of Astalty Premium, and needs the budget to have a funding schedule
For more information, visit the Budget Functionality guide.
Unresolved Voided Charges
When a charge on a finalised invoice batch is voided, the Unresolved Voided Charges card now shows the date of the task or support it relates to, so you can find the day you are chasing without opening every charge.
- Each row shows a date — the support's own timezone for a support charge, and your organisation's timezone for a task or direct charge
- The list is sorted by date, most recent first; click the column heading to flip the order
- Click a row to open the task or support, fix the underlying issue, then create a new invoice batch covering those dates to re-invoice it
- The card disappears from a batch once every voided charge on it has been resolved
- To review voided charges across your whole account rather than one batch at a time, use the Voided Charges report instead
For more information, visit the Unresolved Voided Charges guide.
Extreme Incident Severity
Incidents can now be marked Extreme, a new severity level above High, so your most serious incidents can be picked out from everything else.
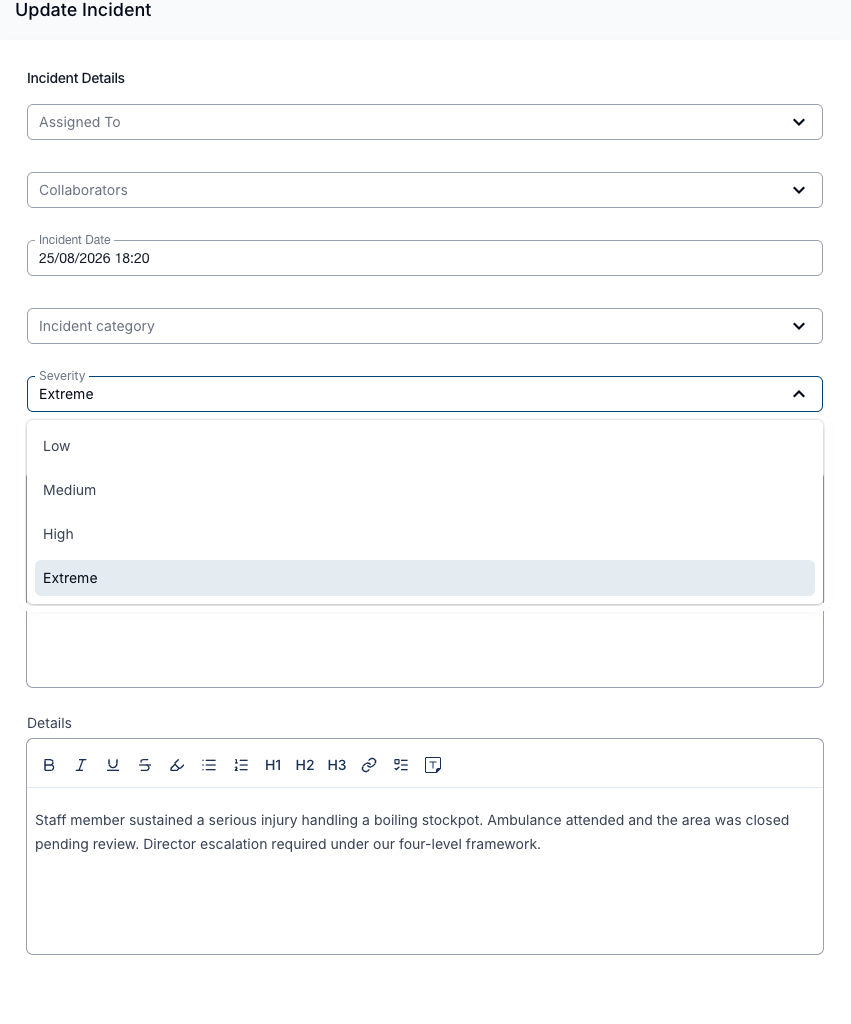
- The Severity dropdown, set during incident follow up, now offers four levels: Low, Medium, High and Extreme
- Extreme incidents can be searched and filtered separately in the staff and participant incident registers, and appear in the Incidents Export and in incident notifications
- Severity stays blank until someone reviews the incident and chooses a level — it is not set automatically when an incident is first reported
- If your organisation built its own incident report form, the Severity of Incident question on that form keeps its original three options; add Extreme yourself in the Form Builder if you would like it to match
For more information, visit the Incident Follow Up guide.
Flagging Notes for Missing Content
Note checkers can now flag a note for content it is missing, not just content it contains — so a note nobody ever added a required section to gets picked up automatically.
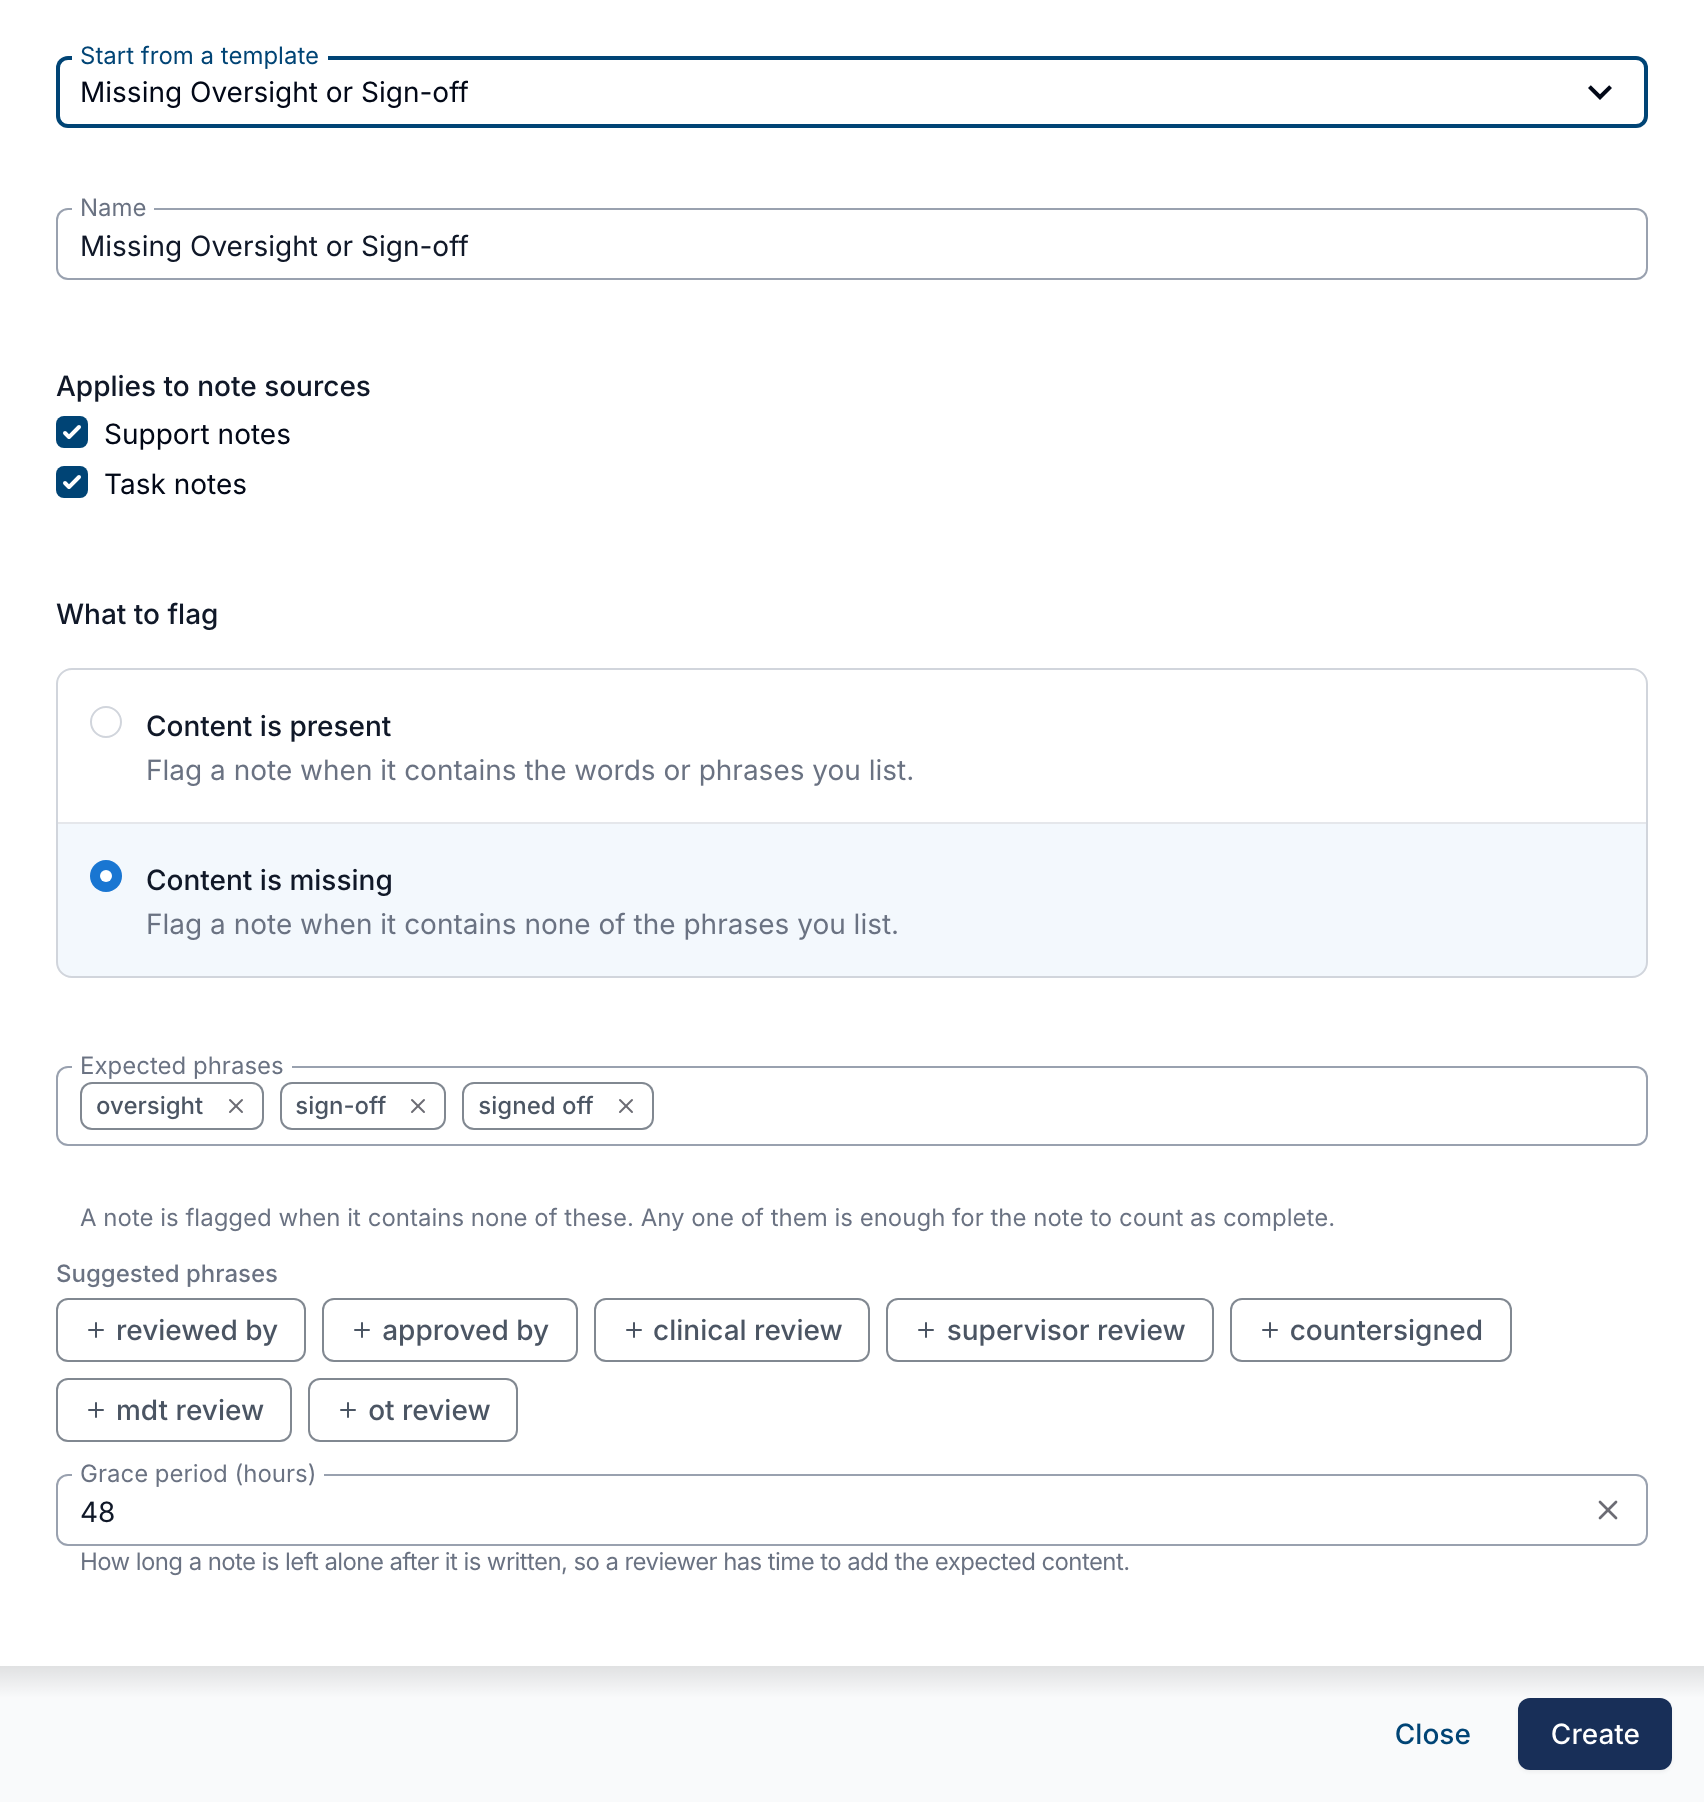
- Set What to flag to Content is missing and list the expected phrases — a note is flagged if none of them appear
- A new Missing Oversight or Sign-off template gives you a starting point, alongside the existing safeguarding templates
- A grace period, 48 hours by default, gives reviewers time to finish a note before it is flagged, measured from when the note was created
- Use Check Existing Notes to preview how many already-written notes a checker would flag before you rely on it
- Flags now carry a type — Needs review or Incomplete — shown on the Flagged Notes report, so the two kinds can be worked separately
For more information, visit the Note Flagging guide.
Deleting Case Notes
Account Owners can now allow Admins to permanently delete a case note — useful for a note saved against the wrong participant or created by mistake.
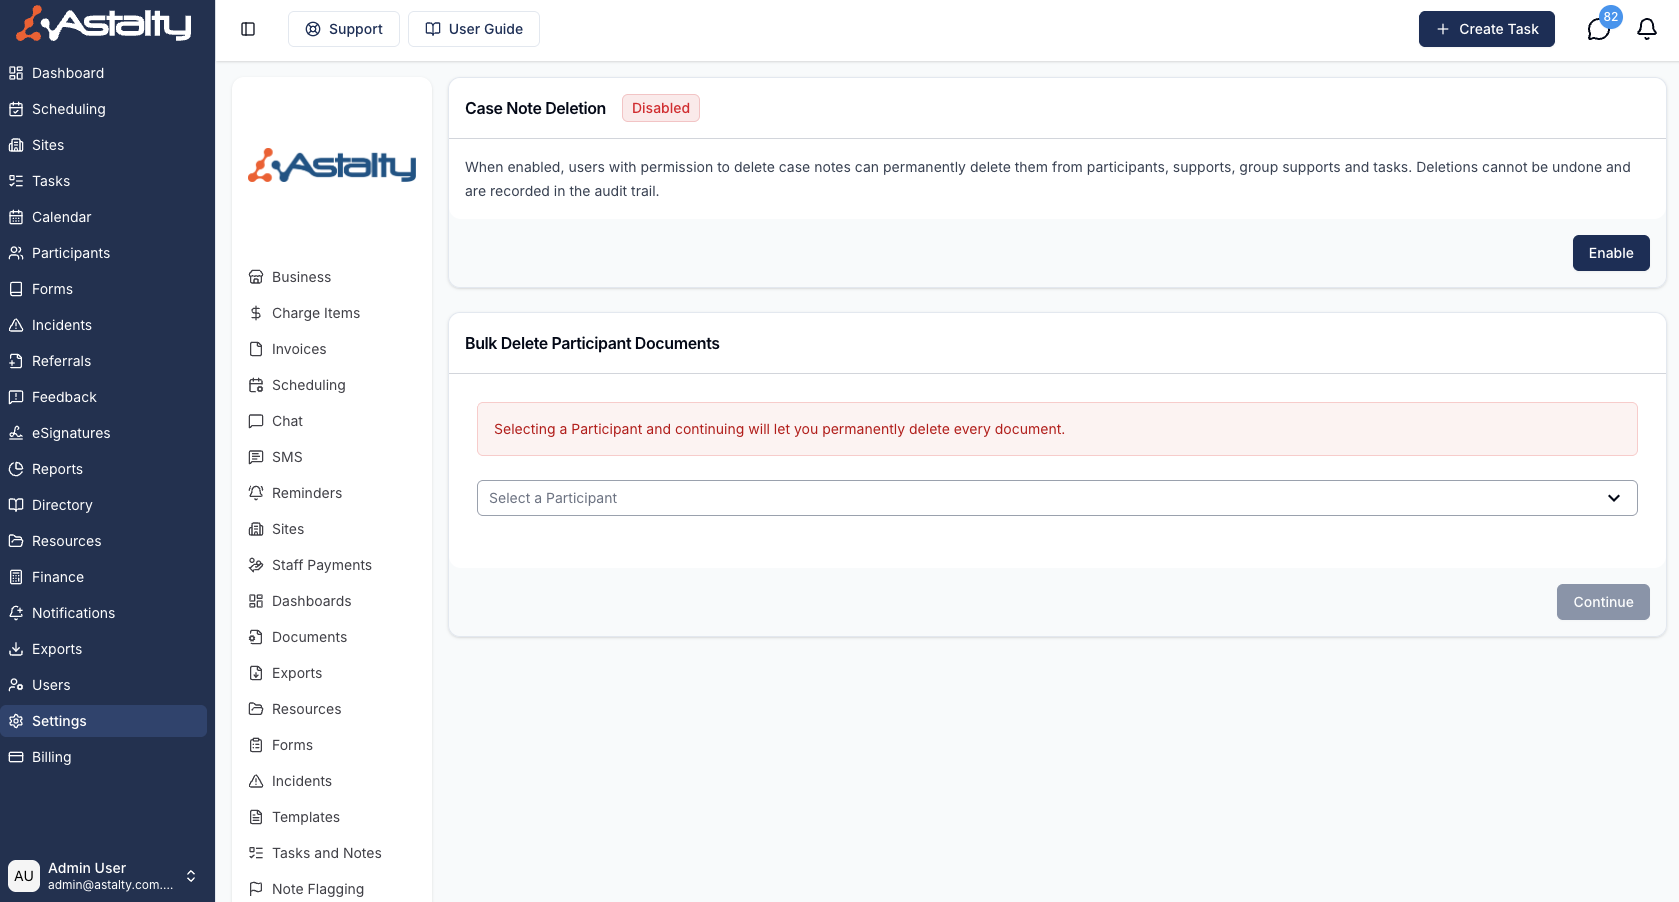
- Turn it on under Settings → Data Management — only the Account Owner can switch it on, and only Admins can then delete a note
- Deleting a note is permanent: it removes the note's full revision history, any flags on it, and its goal link, and deleting a check-in note deletes the check-in itself
- The note's author cannot delete their own note, even with the setting turned on
- Case notes can only be deleted from Astalty in a browser, not from the mobile app
For more information, visit the Deleting Case Notes guide.
Referral Follow Up Notifications
You can now set up a notification that alerts your team when a referral has been sitting in the same status for too long, so stalled referrals stop being missed.
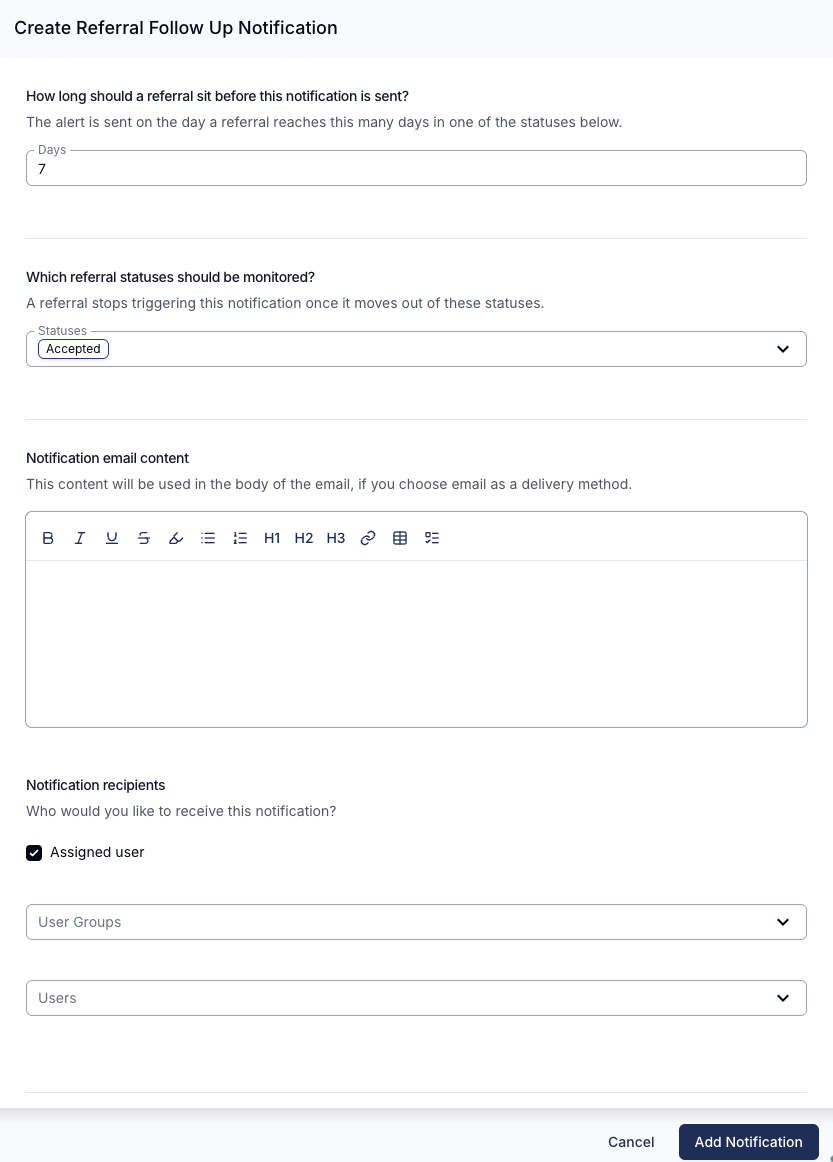
- Set them up under Notifications → Forms → Referral Follow Up
- Choose how many days a referral can sit in a status before it is flagged, and which statuses to watch
- The countdown restarts whenever the referral's status changes, and the alert is sent once on the day it crosses the threshold rather than repeating
- Notify the assigned user, specific User Groups or users, in Astalty, by email, or both
- Create more than one rule to cover different statuses and thresholds — for example Under Review at 3 days and Accepted at 14 days
- Referral Follow Up notifications are part of Astalty Premium
For more information, visit the Referral Follow Up Notifications guide.
Starter Templates for Record Types and Documents
Setting up a new account is faster — when creating a participant or user record type, or a document template, you can pick from ready-made options instead of building everything from scratch.
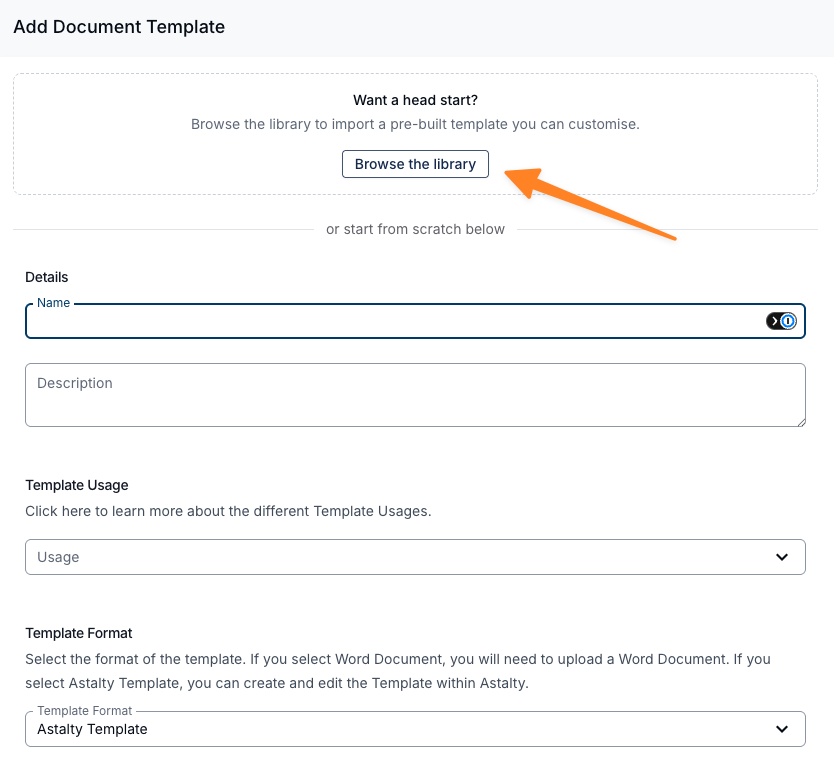
- Select Browse the library on the create screen to see suggested record types for participants or users, or pre-written document templates such as a Service Agreement or Support Plan
- Tick the record types you want and add them in one step — record types you already have are skipped automatically
- Document templates can be previewed before you import a full, editable copy
- Anything you add behaves like a record type or template you built yourself, and will not change if Astalty updates the original
- Suggested record types are added as required by default, so review what you tick — adding them all can immediately flag missing documents across your team or participants
For more information, visit the Document Template Library and User Records guides.
Formatting Tables in Templates and Documents
You can now format tables in Astalty's text editor — shade cells, align text, merge and split cells, and turn header rows and columns on and off — wherever you write template content, generated documents, notes or resources.
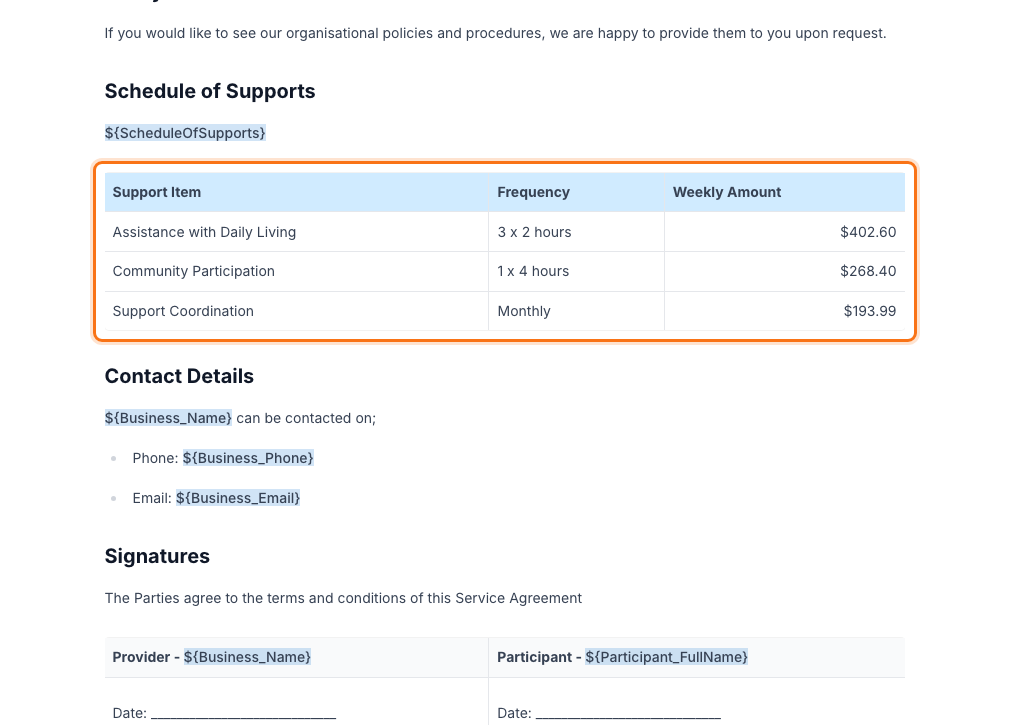
- Insert a table up to five rows by five columns, then add or remove rows and columns from the table options menu
- Shade cells with one of seven colours or your own custom colour, and align the text inside them left, right or centre
- Merge cells together, or split a merged cell back apart
- Shading and alignment are saved with the content, so they carry through to generated PDFs
- Tables pasted in from Excel or Word now keep their shading, so older templates built that way may look different next time you open them
For more information, visit the Formatting Tables guide.
Fixing eSignature Delivery Failures
If a signature request email cannot be delivered, you can now see why next to the signer's email address, and either resend it or update the address — all from the signature request.
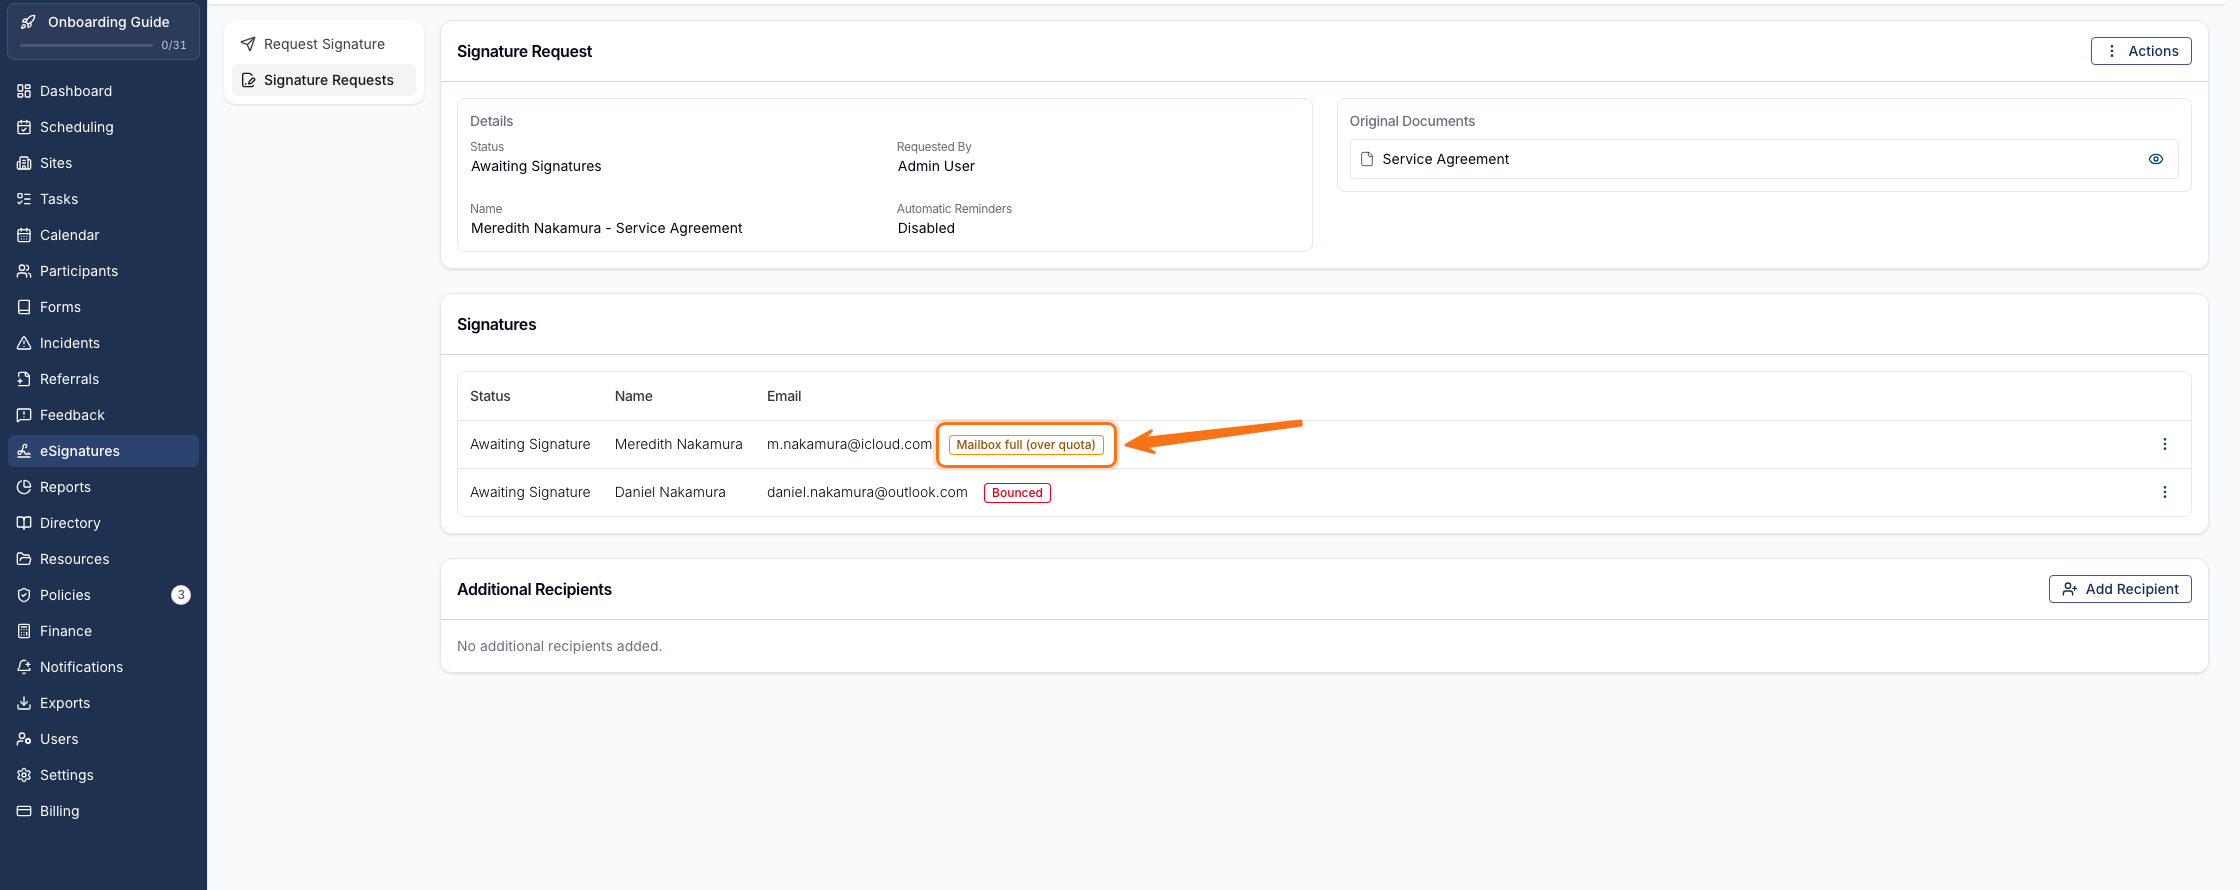
- A coloured label appears next to the signer's email if their request could not be delivered — amber means it may be worth trying the same address again, red means you will need a different one
- Hover over or click the label to see when delivery failed and a plain-English reason
- Use Retry send to resend to the same address, or Update Email to switch to a different one
- The label clears once an email is confirmed delivered, not simply because you selected Retry send
- The person who requested the signature is emailed about the failure, and it is recorded in the request's activity log
For more information, visit the Fixing Delivery Failures guide.
When a Record Type Cannot Be Sent for Signing
User Records now explain clearly when a record type is not available for signature, instead of leaving you looking at a signing option that could never be completed.
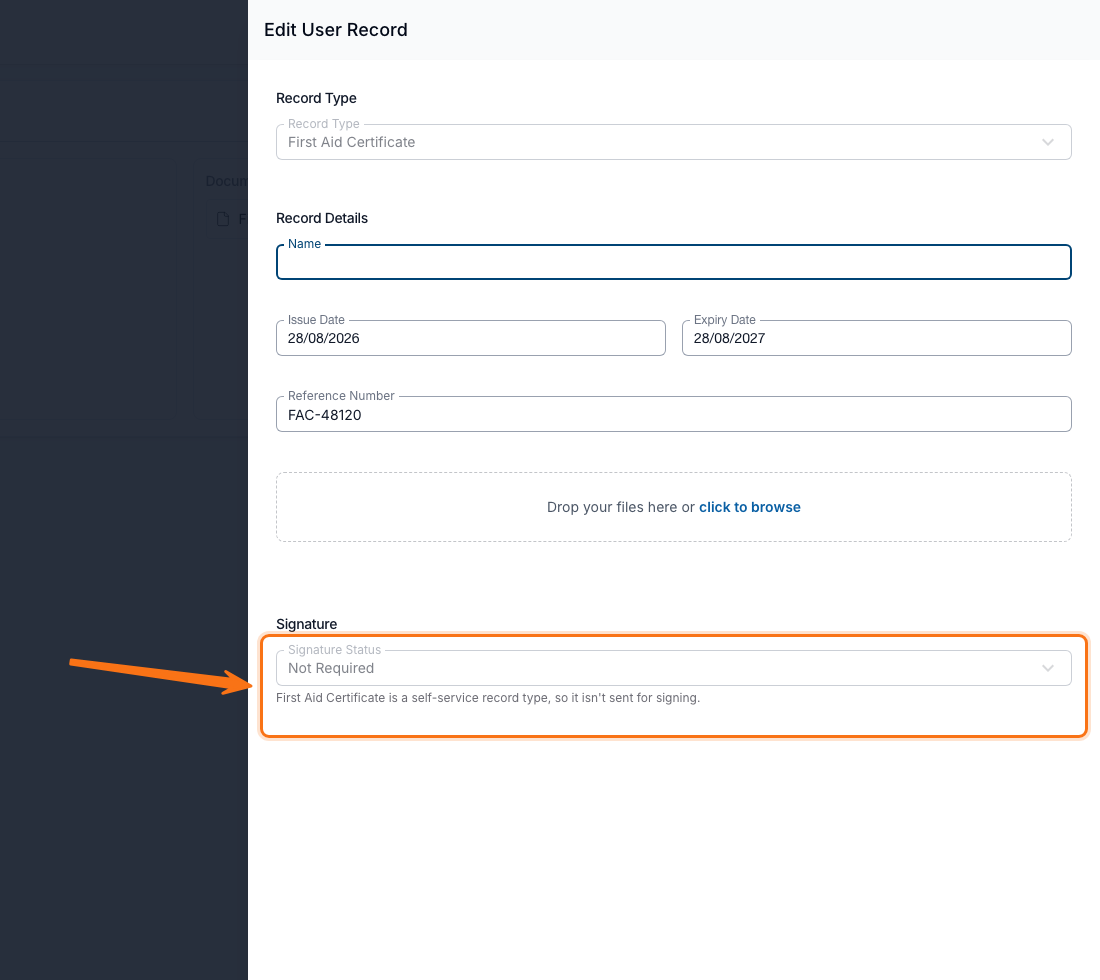
- A record type can only be sent for signing if Documents required is ticked and This record is self service is not
- For record types that do not meet this, the signing question is hidden when creating a record, and Signature Status is locked to Not Required when editing one, with a short explanation shown either way
- Send for Signing does not appear on these records, and they are left out of multi-record signing requests
- If a record is stuck on Not Sent after its record type was changed, you can clear it by setting its signature status to Not Required
- Records already Awaiting Signatures or Signed keep their status even if the record type changes afterwards
For more information, visit the User Records guide.
Photos and Files in the SMS Inbox
Your SMS inbox can now receive photos and files sent to your dedicated number, alongside any text message.
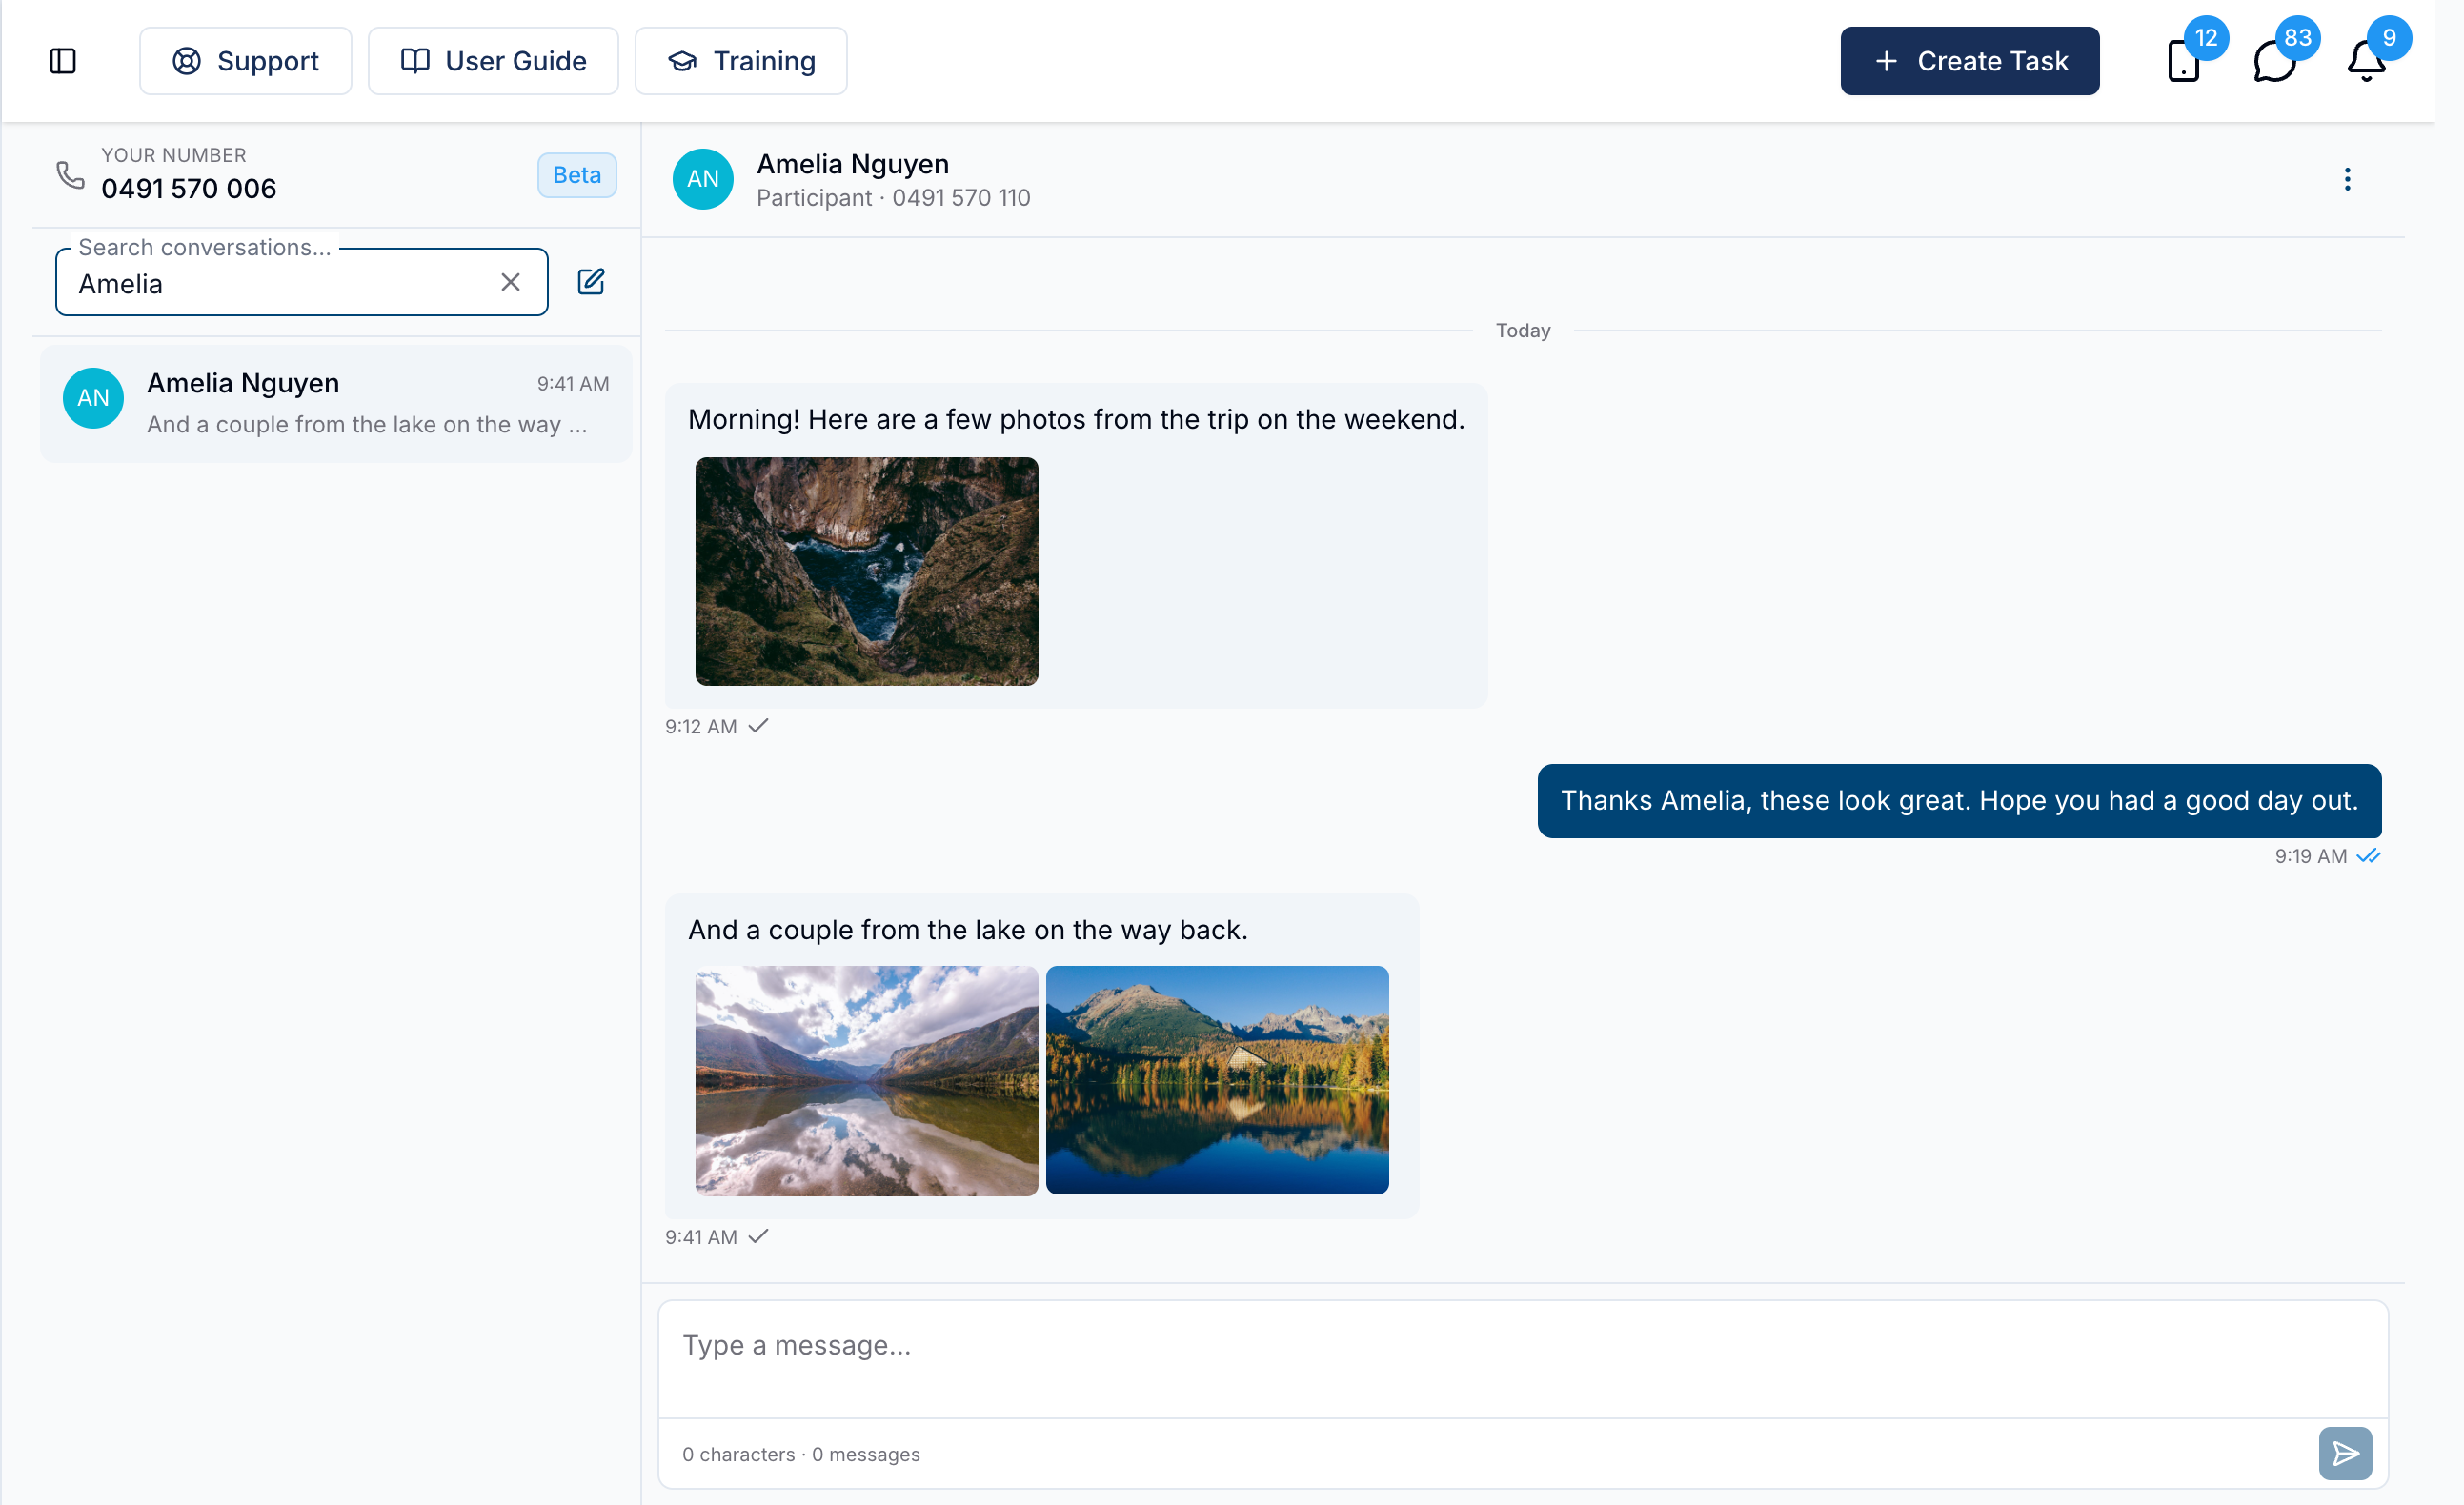
- Photos show as thumbnails in the conversation — click one to view it full size, and use the arrows to move between multiple photos on the same message
- Other files, such as PDFs or videos, appear as a named row you click to download
- Astalty can only receive attachments, not send them — the message box stays text only
- Only users with SMS inbox access can open received photos and files; access to other documents in Astalty is not enough
- Receiving photos and files is included in the existing SMS add-on at no extra cost
For more information, visit the Two-Way SMS guide.
Public Holiday Group Assignments Report
You can now see every participant's Public Holiday Group on a single list, and change it without opening each profile.
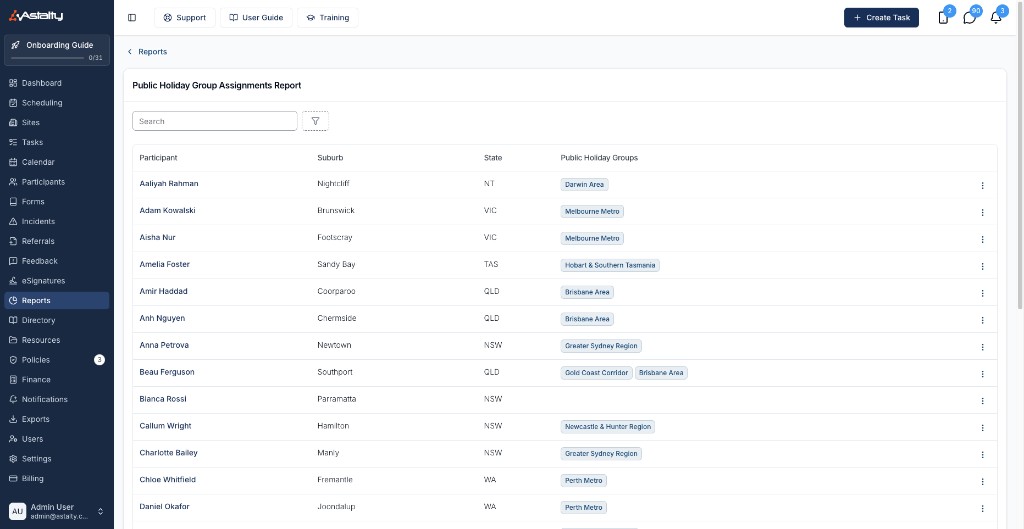
- Each row shows a participant's name, suburb, state, and the Public Holiday Groups they belong to
- Filter by suburb, state or group, including a Not assigned option to find participants with no group at all
- Update a participant's groups directly from the report
- Changing someone's groups can re-rate their existing supports for the public holidays those groups cover, so it is worth checking the effect before saving
- The report cannot be sorted or exported
For more information, visit the Public Holiday Group Assignments Report guide.
Birthdays by Month on the Birthday Reports
Both the Participant and Staff Birthdays Reports include a Birthdays by Month card, so you can see every birthday in any month instead of only the ones coming up.
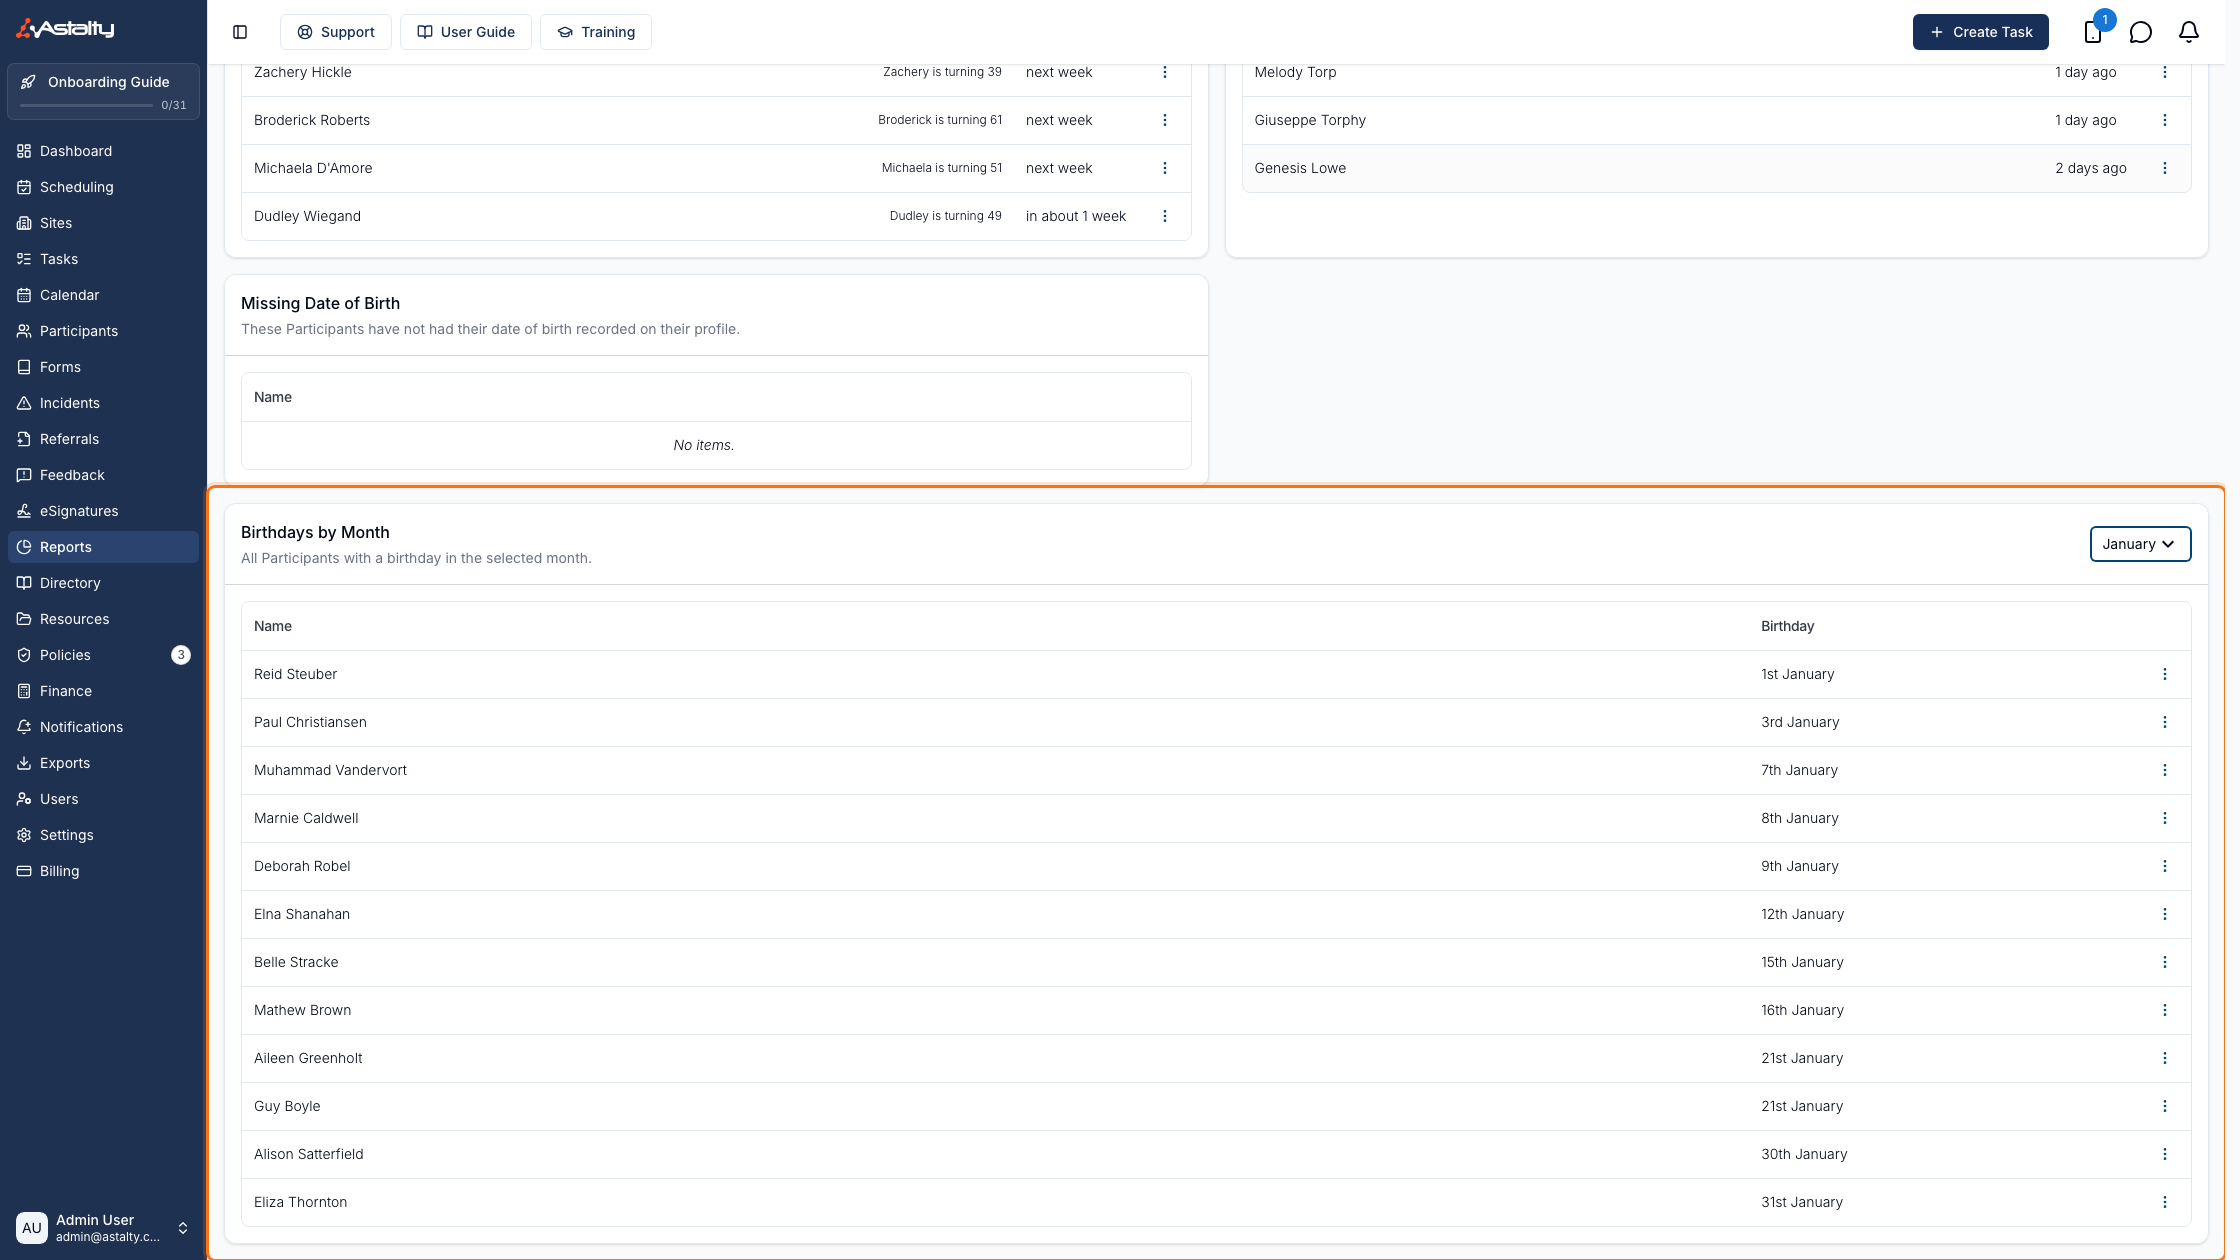
- Use the month dropdown to pick any month; the card opens on the current month
- Results are ordered by day of the month, then alphabetically by name, and show only the day and month — no year or age
- Use a row's menu to open that participant's or staff member's profile directly
- The Staff Birthdays Report is included on the Professional plan and above
For more information, visit the Participant Birthdays Report and Staff Birthdays Report guides.