- Changelog
- 10 September 2026
10 September 2026
Alerts Before a Support Worker's Recurring Unavailability Ends
The Recurring Unavailability Ending Soon notification tells your team before a Support Worker's repeating unavailability finishes, so you can roster them back on or extend it before the pattern lapses.
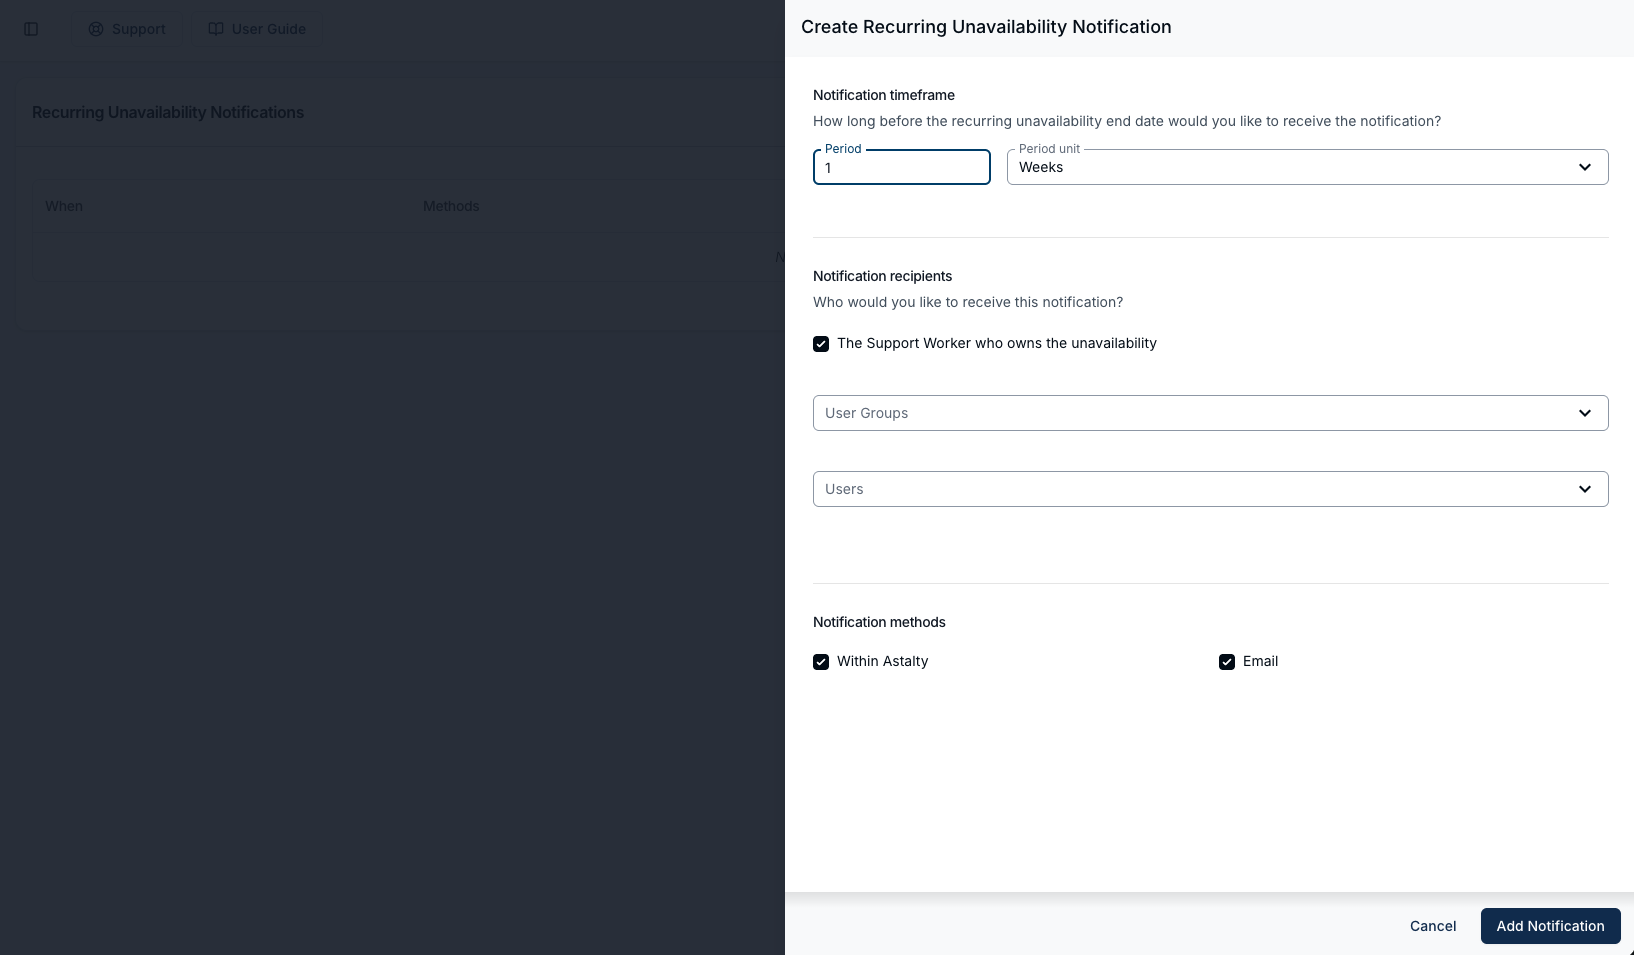
- Set it up under Notifications, then set Period and Period unit - Days, Weeks or Months - for how far ahead the alert goes out; a new notification starts at 1 week
- Tick The Support Worker who owns the unavailability, and add User Groups or individual Users; at least one recipient and one method is required
- Managers get the worker's name, times, dates and reason with a Review [worker name]'s Availabilities button; the worker's version is shorter and carries no button
- An ongoing recurrence saved with no end date never triggers it, and a request submitted with a Type of Leave is excluded even when it recurs
- The unavailability has to be approved - one awaiting a decision, cancelled, or belonging to a deactivated user is skipped silently
- Use Clone to add a second reminder on a different timeframe; requires the Scheduling add-on
For more information, visit the Recurring Unavailability Ending Soon Notifications guide.
Warning Reviewers About a Negative Leave Balance
Each leave type can warn or stop a reviewer when approving a request would take the employee's payroll leave balance below zero.
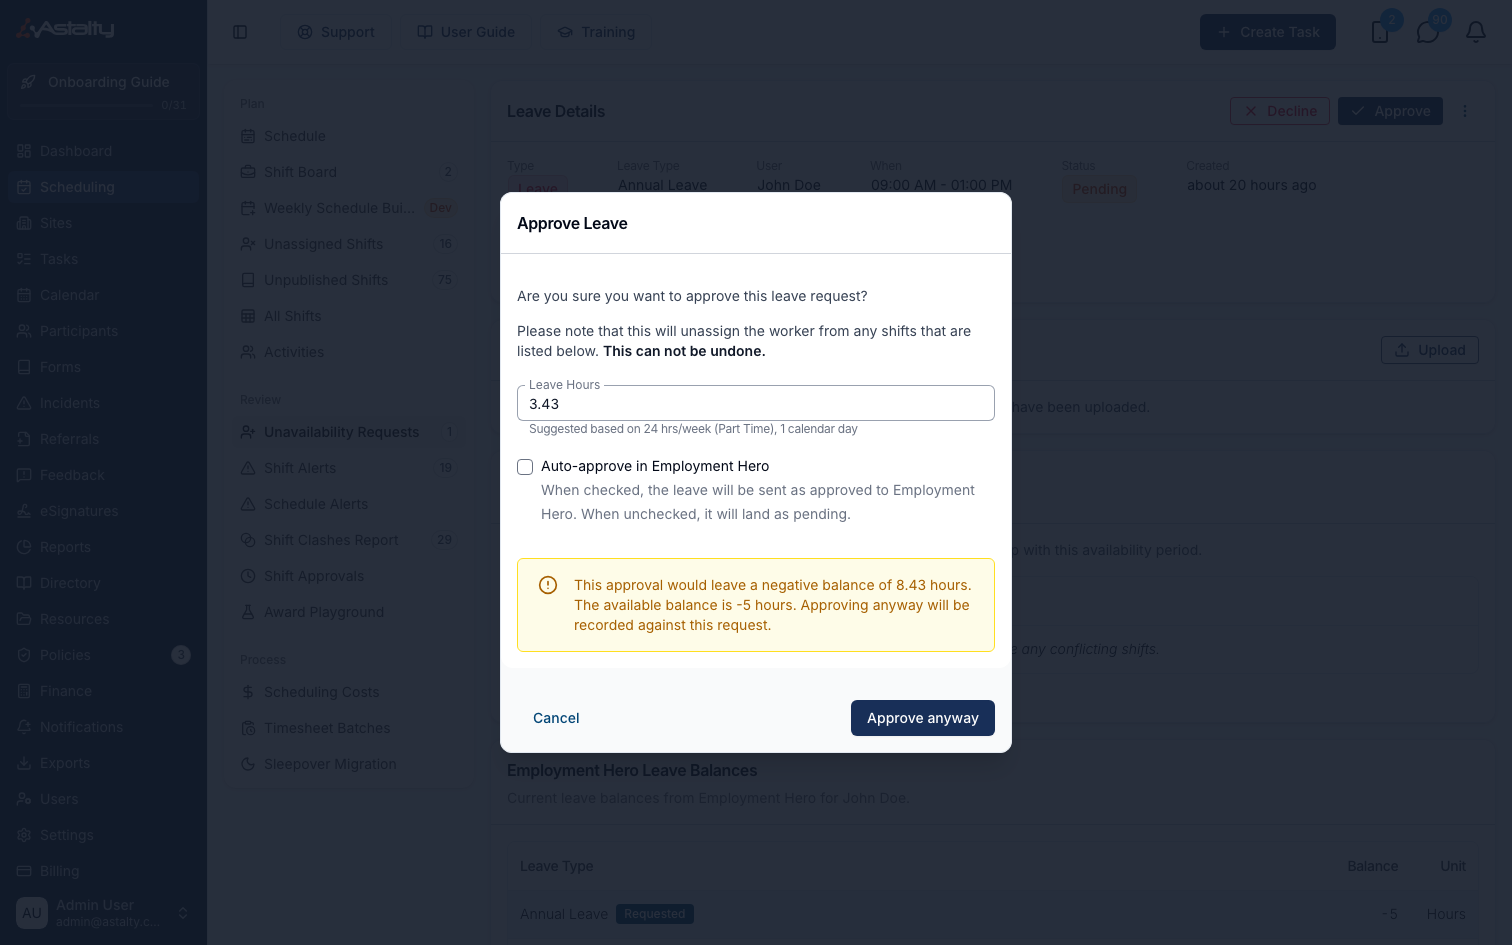
- Set Negative Leave Balance on a leave type to Allow (no check, and the default for new and imported leave types), Warn or Prevent
- On Warn, the first Approve is stopped, the dialog shows the shortfall and the available balance, and the button changes to Approve anyway; editing Leave Hours clears the warning so the corrected figure is checked again
- Anyone who can already approve leave can approve anyway - there is no separate permission - and the override is recorded against the request
- Only balances payroll reports in hours are checked; if the balance comes back in days, the employee isn't linked to payroll, or no balance is returned, the approval goes through as normal
- The check reads today's balance from Xero or Employment Hero and does not forecast what will have accrued by the time the leave is taken
- Leave is in beta, enabled by Astalty, and requires the Scheduling add-on
For more information, visit the Leave guide.
Removing a Blocked Support Worker From a Cloned Group Support
When you clone a group support, any Support Worker who can no longer be assigned on the new date is named in a warning before you press Create, and can be taken off the support.
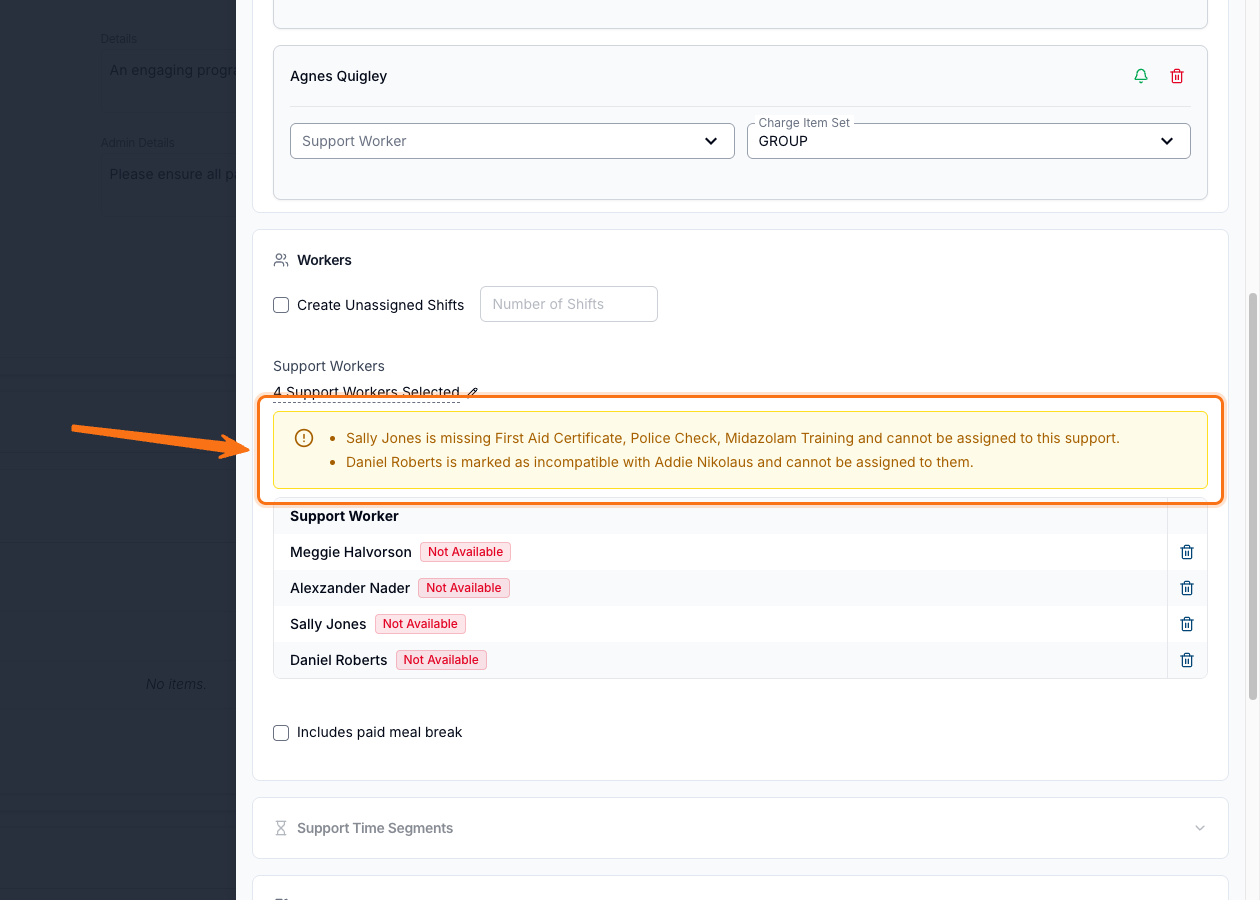
- The warning sits above the selected Support Workers, one line per worker, naming the qualifications they are missing or the Participant they are marked incompatible with
- Remove them with the bin icon on their row, or by unticking them in the Support Workers list
- A worker already on the support keeps a working tick and a Qualification Not Met chip instead of Qualification - Selection Blocked; untick them and the row greys out so they cannot be added back
- Astalty does not drop the worker for you, because the check depends on the date and the Participants, and both are still editable on the clone form
- Pressing Create with a blocked worker still selected stops the support being created, and removing that worker clears the error straight away
- The qualification reasons need the Qualifications beta; without it the warning still covers workers marked incompatible with a Participant
For more information, visit the Adding a Group Shift guide.
Support Time Segments on Sleepover Supports
A sleepover support with a sleepover window can now also carry Support Time Segments, so the waking hours either side of the sleepover can bill through a different Charge Item Set. The two could not previously be used together.
- Every segment must sit entirely outside the sleepover window. An overlap is refused with "A support time segment must sit outside the sleepover window.", and a segment that meets the window exactly is fine
- Set the sleepover window first: a sleepover with no window is refused with "Set a sleepover window before adding support time segments."
- Add Segment pre-fills each new row outside the window - on a 6:00 PM - 10:00 AM support with a 10:00 PM - 6:00 AM window, the first offers 6:00 PM - 10:00 PM and the next 6:00 AM - 10:00 AM
- The window itself is never subdivided and still bills one flat Night Time Sleepover charge; because segments split the active hours further, a combined support can produce more charge lines than a sleepover window alone
- Bill only through Support Time Segments is still blocked on a sleepover group support - ordinary segments are fine
- Support Time Segments is in beta and enabled per account by Astalty
For more information, visit the Support Time Segments guide.
Adding Several Goals to a Task at Once
Tagging Goals to a task opens an Add Goals drawer where you tick as many of the Participant's Goals as you need, instead of picking them one at a time.
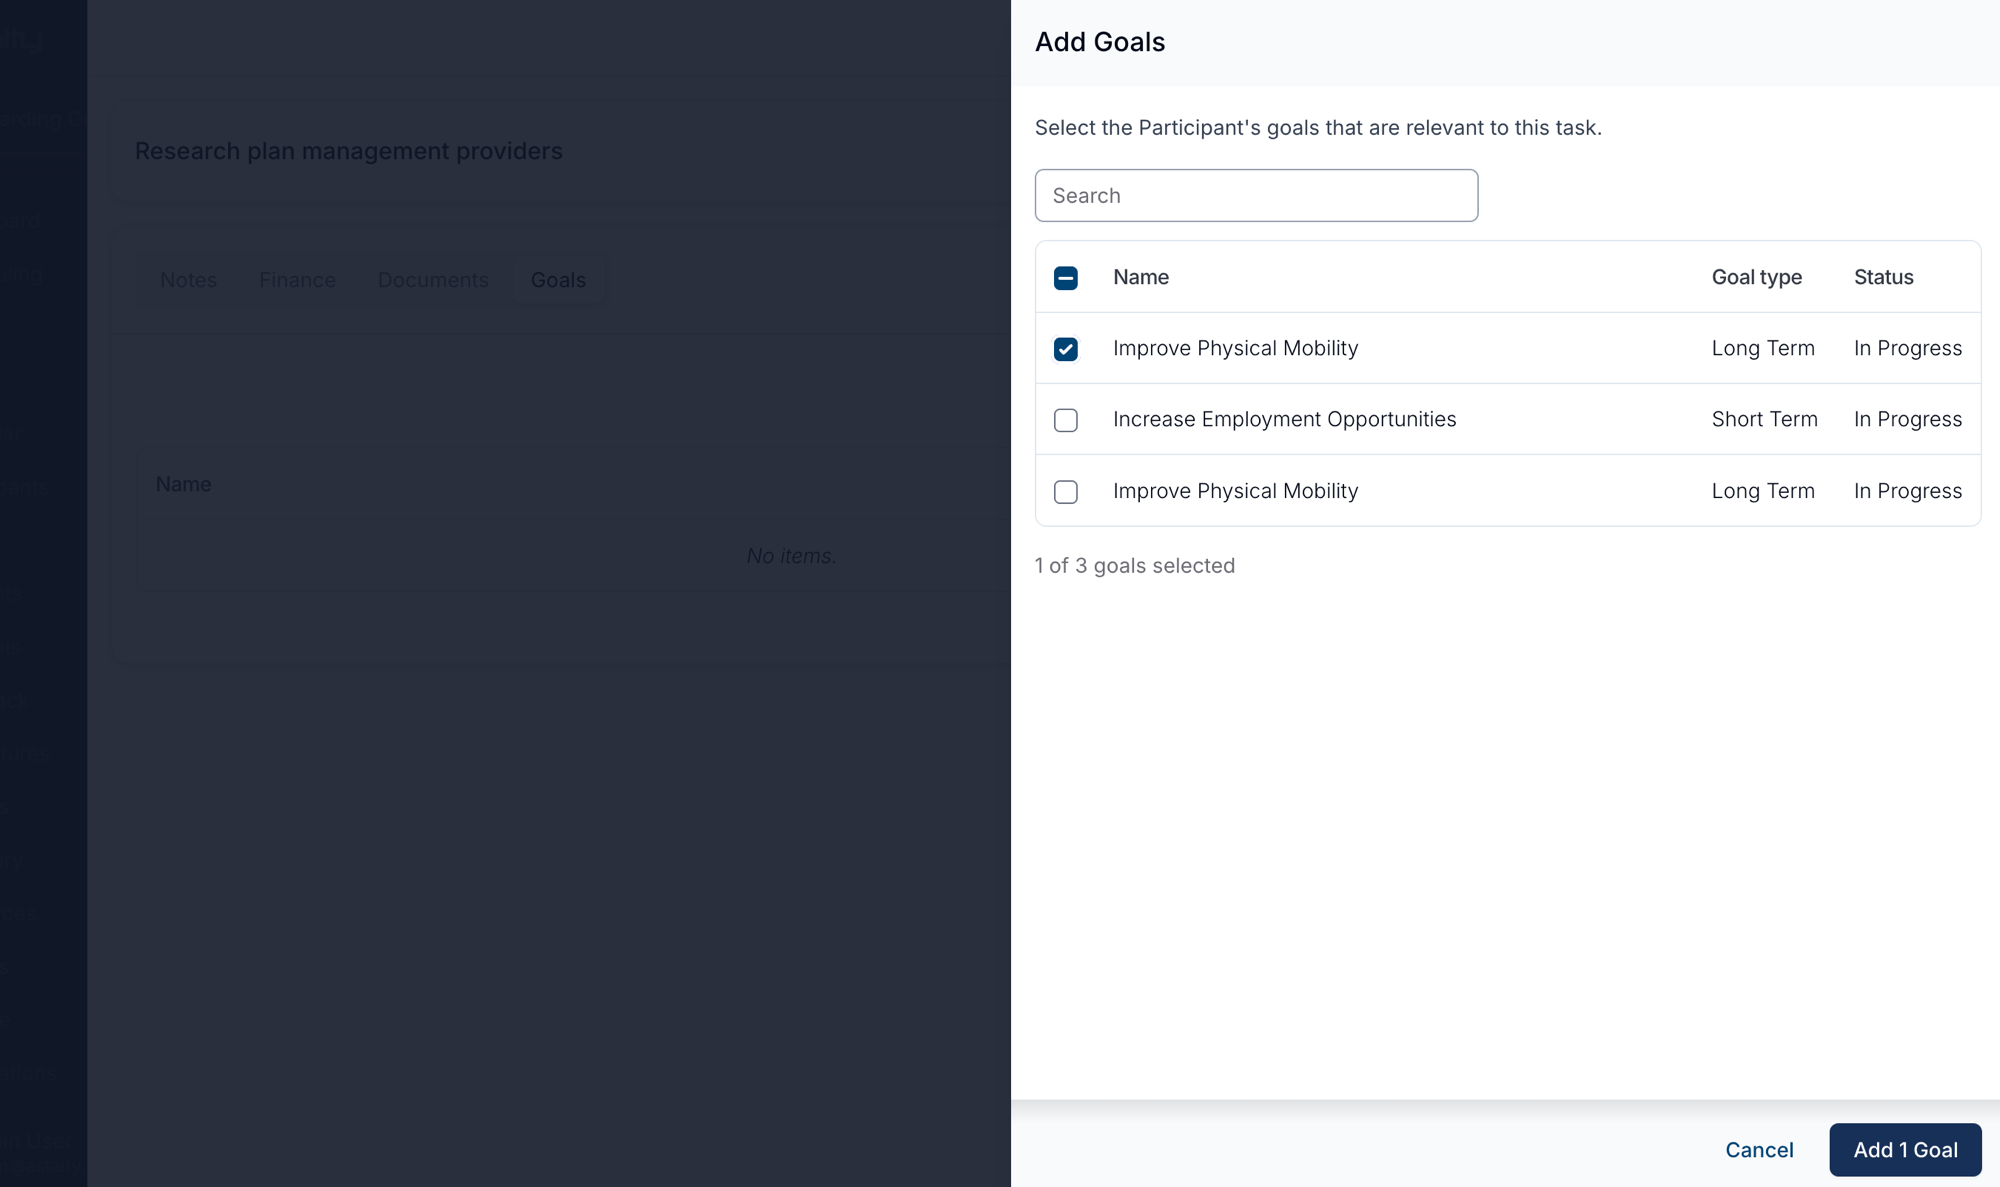
- Open the task, select the Goals tab and click Add Goals, tick the Goals you want, then use the add button - it counts your selection and reads Add 1 Goal or Add 3 Goals
- The drawer lists each Goal with its Goal type and Status, has a search box, and a tick box in the table header to select everything listed
- Goals of any status appear, including ones already marked Achieved or Unattainable - useful when recording work against a Goal that has since been met
- Archived Goals and Goals already tagged to the task are left out, so an empty list means every Goal is one or the other
- A task with no Participant selected shows No goals available - add the Participant first
- Detach removes only the link; the Goal stays on the Participant's profile
For more information, visit the Assigning Goals To Tasks guide.
Messaging Group Support Participants by SMS
You can send a one-off SMS to everyone booked on a group support straight from the support - to say a session has moved, or that a Support Worker is running late.
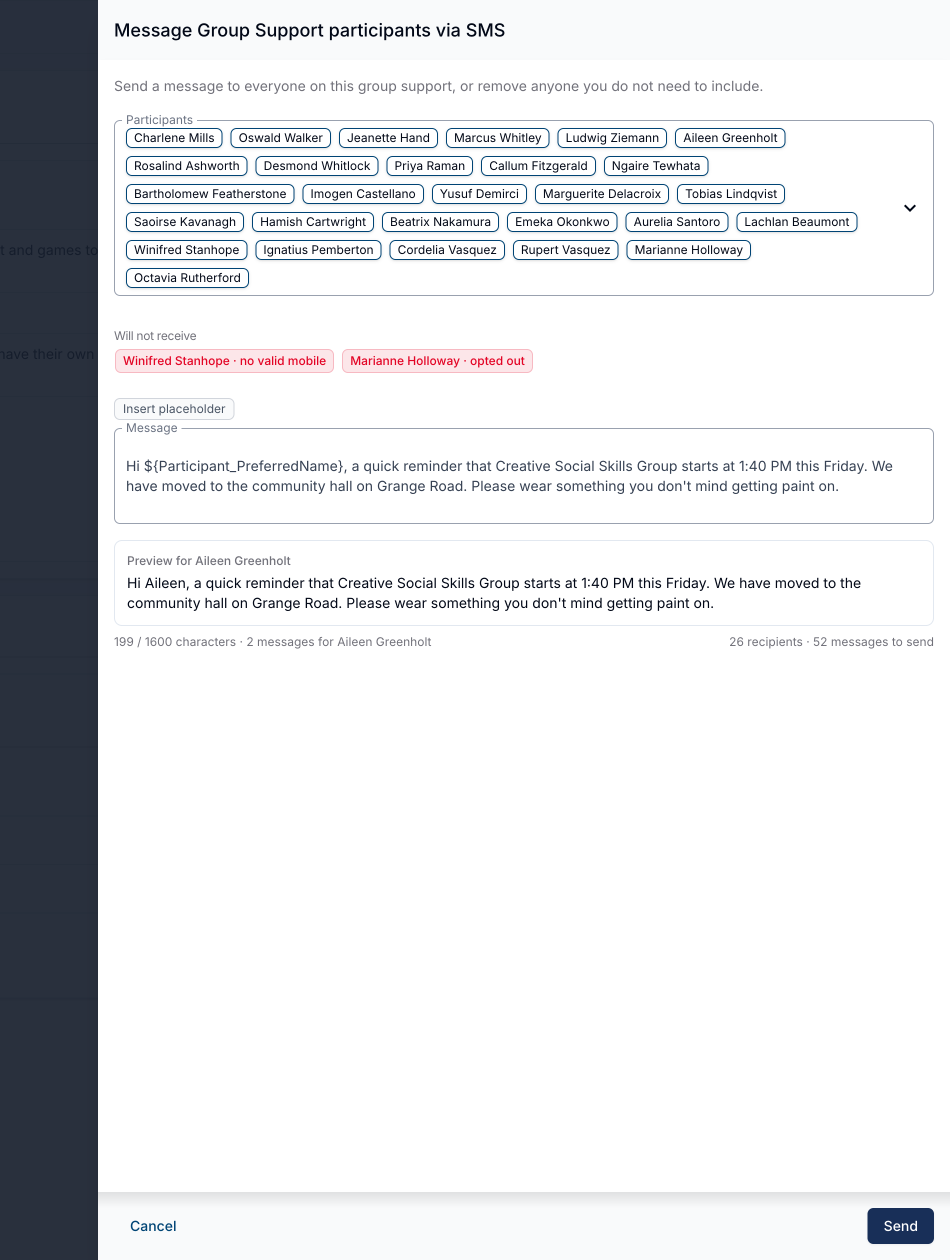
- Open the group support, choose Message participants via SMS from the Actions menu, remove anyone who should not get it, type your message, then check the preview before sending
- Each message is sent individually - nobody sees who else was messaged - and replies land in the SMS inbox in that Participant's own conversation
- Use Insert placeholder for
${Participant_PreferredName},${Support_Name},${Support_StartDate}and the rest; dates and times use the group support's own timezone, not your provider's - Anyone who cannot be reached is listed under Will not receive with the reason: no valid mobile, opted out, archived, shares a number, or message too long
- Limits are 200 Participants per send and 1,600 characters per rendered message; cancelled Participants are excluded
- Requires Two-Way SMS with a dedicated number, the Can access the SMS inbox permission, and the Scheduling add-on. Standard charges of $0.10 per outbound segment apply
For more information, visit the Messaging Group Support Participants via SMS guide.
Warning When Approved Kilometres Cannot Be Charged
Both travel approval dialogs warn you when the support's Charge Item Set has no travel Charge Item for that travel, so kilometres aren't signed off as billable when nothing will ever be billed to the Participant.
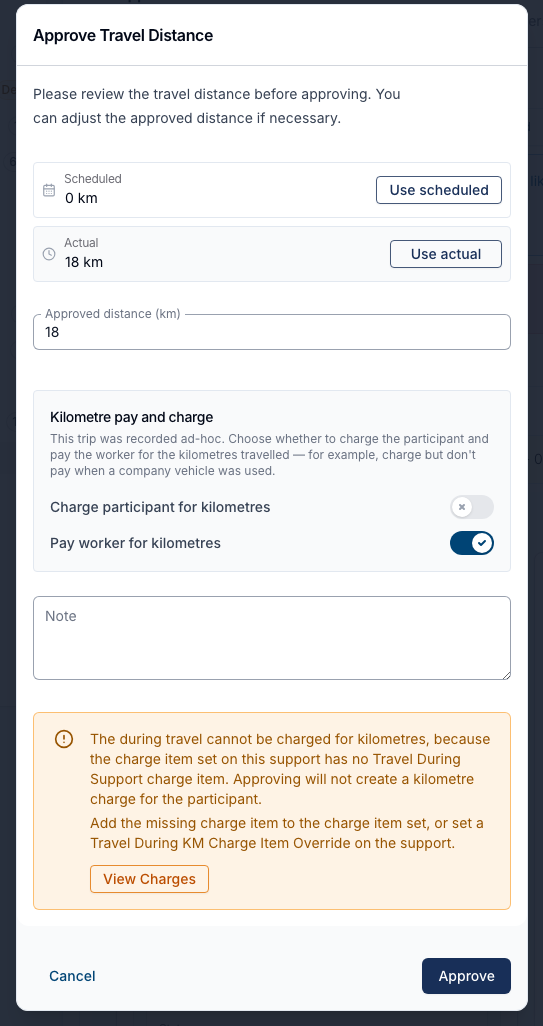
- The warning names the travel affected and the Charge Item that is missing - Travel During Support for travel during, Travel Before/After Support for travel to and from
- It appears when the support charges automatically, the distance being approved is above zero, kilometres are expected, and no Charge Item covers them
- Adding the missing Charge Item to the set fixes it; a Travel During KM Charge Item Override is only an option for travel during the support
- View Charges opens the support's Finance tab in a new browser tab so you can check what has been billed without losing the dialog
- The warning never blocks the approval - the hours, the travel duration and Pay worker for kilometres are unaffected
- On ad-hoc travel where kilometres can't be billed, Charge participant for kilometres is now disabled with the reason shown beneath it
For more information, visit the Shift Approvals guide.
Travel Charge Variance Report
A new report lists supports where the travel approved for billing doesn't match the travel the Participant was charged for, so approved kilometres and travel hours that never reached an invoice can be found in one place.
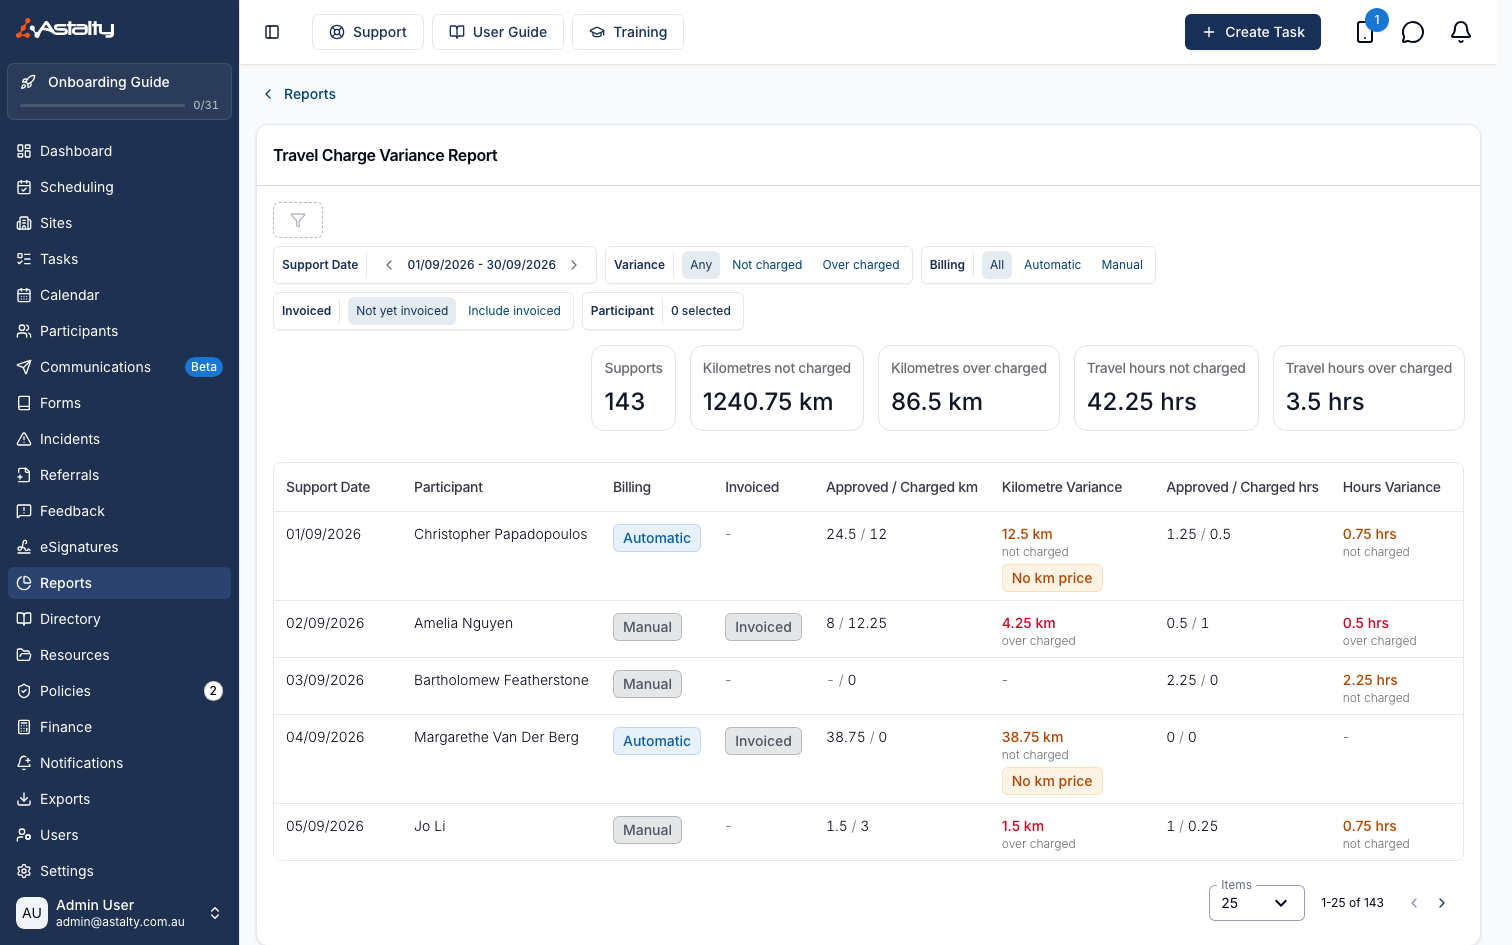
- Find it under Reports → Scheduling → Travel Charge Variance - part of the Scheduling add-on, available to the Admin and Manager roles by default
- A positive variance is labelled not charged, a negative one over charged; kilometres and hours are compared separately, so a support can be over charged on one and not charged on the other
- Filter by Support Date (defaults to the current month, and can't span more than 366 days), Variance, Billing, Invoiced - which opens on Not yet invoiced - and Participant
- A variance is only shown once every trip in that comparison has been approved; until then the column shows a dash
- A No km charge item chip means the approved kilometres had no Charge Item to bill against
- Select a row to open the support on its Finance tab; the report cannot be exported
For more information, visit the Travel Charge Variance Report guide.
Opening a Shift's Timesheet Batch from Shift Approvals
From a shift on Shift Approvals you can open the timesheet batch it was paid in, instead of hunting for it in the batches list.
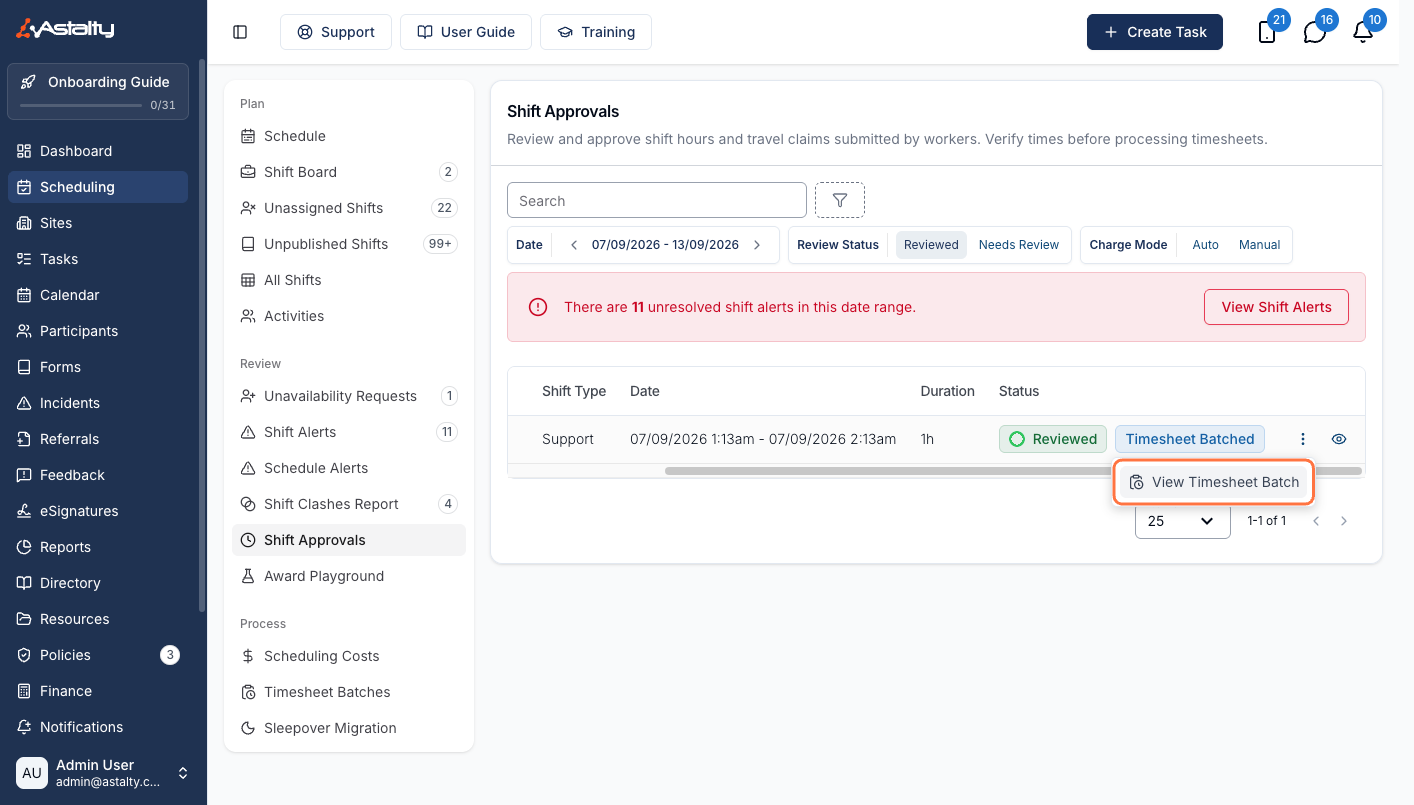
- Set the date range to cover the shift, then set the Review Status filter to Reviewed - a batched shift is fully approved, so it never appears under Needs Review
- Find the row by the Timesheet Batched chip in its Status, then click the ellipsis (3 dot menu) and choose View Timesheet Batch
- This lands on the Details of the batch the shift was included in
- On accounts whose payroll platform is Xero, that batch also has an Award Interpretation menu breaking the shift's hours down into pay lines
- The 3 dot menu is not there on a shift no timesheet batch has picked up, or if you do not have permission to open timesheet batches
For more information, visit the Shift Approvals guide.
Scheduling Costs: Overtime, Sections and a Daily Chart
The Scheduling Costs summary is grouped into four sections with the numbers you are most likely to want pinned at the top, a day-by-day cost chart sits between the summary and the breakdown tabs, and overtime is shown at three levels of detail.
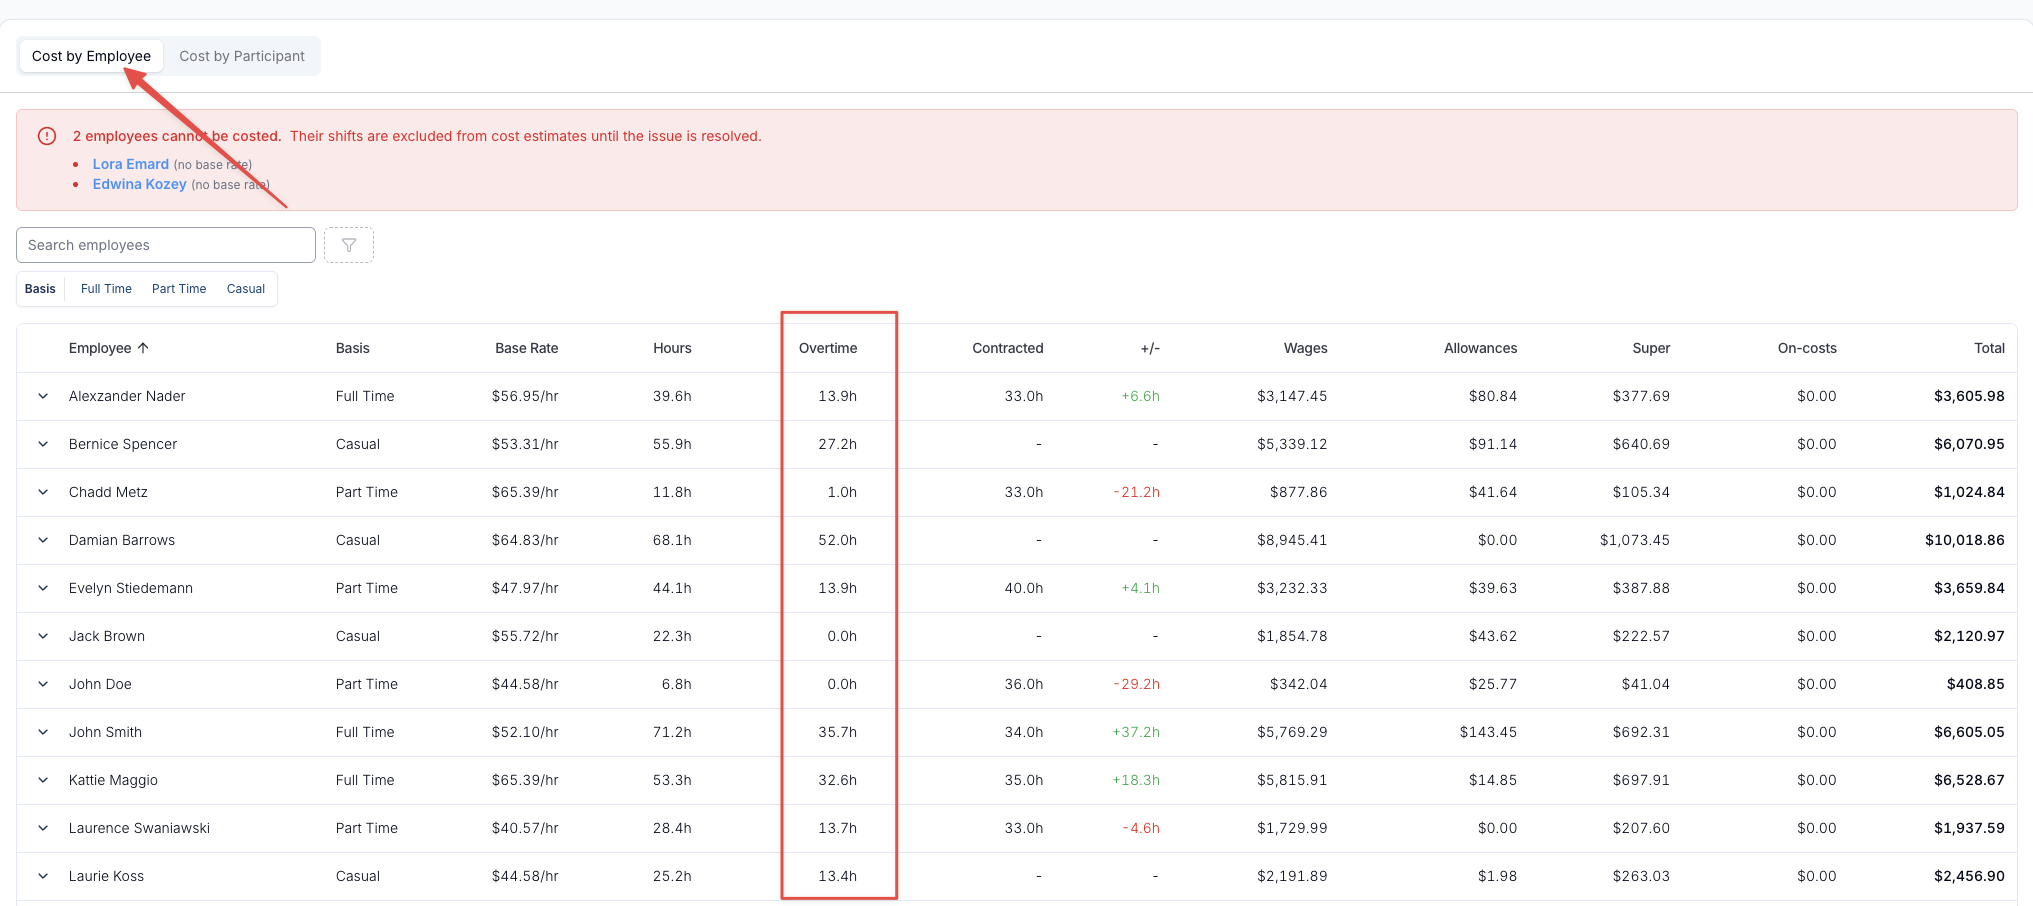
- Key figures leads with Total Revenue, Total Cost, Net Profit and Gross Wages; the rest sit under Cost breakdown, Revenue breakdown and Workforce & cancellations
- Cards only appear when they're relevant - Fixed Costs needs a fixed-amount cost item, Overtime Hours needs overtime in the period, and the whole Revenue breakdown section is hidden when there's no revenue
- The daily chart stacks each day's Wages, Allowances, Super, On-costs, Fixed Costs and Paid Cancellations, with revenue drawn over the top; hover a day for its full breakdown and net figure
- Overtime appears as a summary card for the period, an Overtime column per employee on the Cost by Employee tab, and a per-pay-rate split when you expand an employee's row
- The Totals row covers everyone matching your current filters and search, not just the employees on the page you're looking at
- Overtime means any hours paid at an overtime rate under the award on the worker's employment contract - most often hours past their ordinary hours cap, but active sleepover work and broken-shift spans count too
- Requires the Scheduling add-on and is switched on by the Account Owner under Optional Features
For more information, visit the Scheduling Costs guide.
Spotting Billable Tasks With No Charge Before You Invoice
A Task marked billable with no charge attached has nothing to invoice, so it is passed over when a batch is built and the work is never billed. Astalty warns you about these Tasks before you generate the batch.
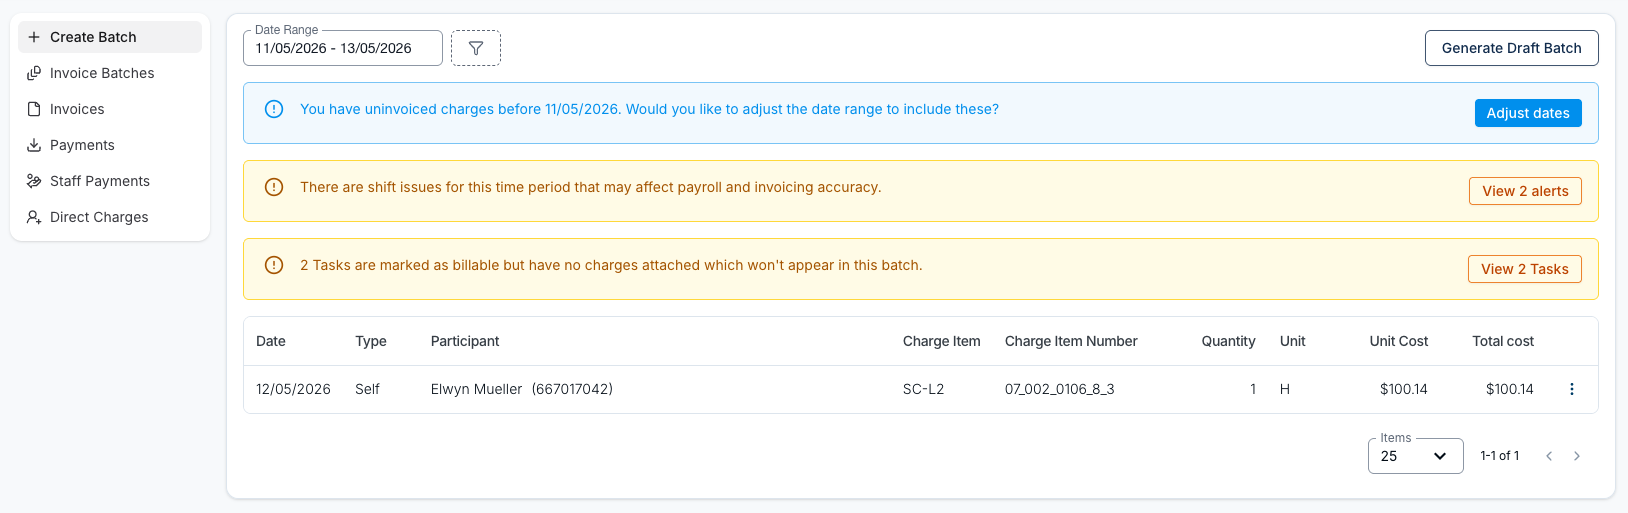
- On the Create Batch page the warning appears as soon as you set the date range - for example "2 Tasks are marked as billable but have no charges attached which won't appear in this batch."
- View Tasks opens the Tasks Missing Charges drawer, grouped by scheduled date oldest first, each row showing the Participant's initials, the Task name and its duration. Click a row to open the Task
- Fix a Task by attaching a charge on its Finance tab, then create the batch again - a draft batch is a snapshot, so a charge added afterwards is not pulled into it
- A Task is counted only when it is billable, completed, has both a Participant and an owner, has no charges at all, and falls inside the batch's date range
- The Charge Type, Task Owner and Participant Create Batch filters narrow the warning - setting Charge Type to Support or Direct Charges hides it entirely
- Finalising a draft batch with Tasks still missing charges asks you to confirm, but that check only looks at Participants who already have Task charges in the batch - act on the Create Batch warning rather than relying on the dialog
For more information, visit the Tasks Missing Charges guide.
Including the Budget Description in the Budget PDF
When you export a budget as a PDF you can now choose to include the budget's description, so the context you wrote against the budget goes out with it.
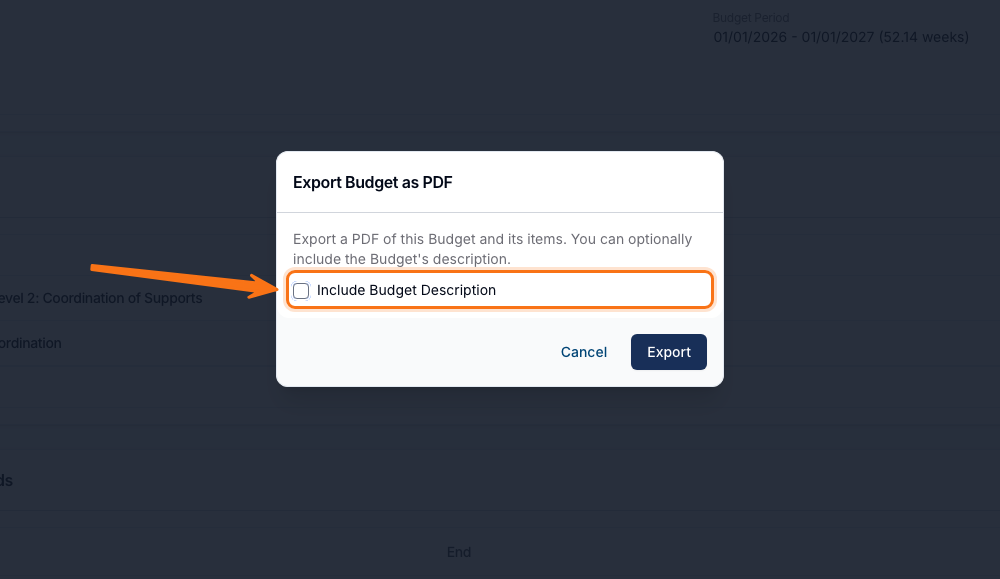
- Choosing Export as PDF from the Actions button opens an Export Budget as PDF window with a single Include Budget Description option
- The option is off by default, so the PDF contains the budget and its items only unless you tick it
- Tick it and the description is added as its own Budget Description panel, between the Participant details and the list of budget items
- Formatting is kept - headings, bold text, lists and links come across as you wrote them
- If the budget has no description, ticking the option changes nothing rather than printing an empty panel
- The description is still never included in the Schedule of Supports on a Service Agreement
For more information, visit the Budget Functionality guide.
Changing Contractor Payment Rates
A contractor's payment rate can be changed at any time, including after a payment batch has been finalised. Each task is paid at the rate that applied on the day the work was delivered, not the day of the batch or the change.
- Select the three dots next to a Charge Item under Manage Payment Rates and choose Update rate - the drawer shows the Current Rate and the date it applies to work from
- Finalised and Paid batches keep the amounts they were calculated with; the only exception is a Calculated batch returned to Draft by voiding a charge, which is re-rated when you recalculate it
- The first rate on a Charge Item applies from 1 July of the current financial year, every rate after that from the day you set it - and setting a rate again the same day replaces that day's rate rather than adding a second one
- A batch cannot be calculated while a task has no rate covering its delivery date; Astalty lists the Charge Items missing a rate, and work delivered before 1 July of the current financial year can only be dealt with using Exclude Charge
- A payment rate cannot be deleted - set a new one in its place
- Astalty emails the Account Owner whenever a Charge Item's payment rate changes
For more information, visit the Staff Payments Settings guide.
More File Types on Plans and Records
An NDIS Plan takes photos and saved emails, and Participant and User Records take video, so a plan can be attached exactly as it arrived and a Record can hold a demonstration rather than only paperwork.
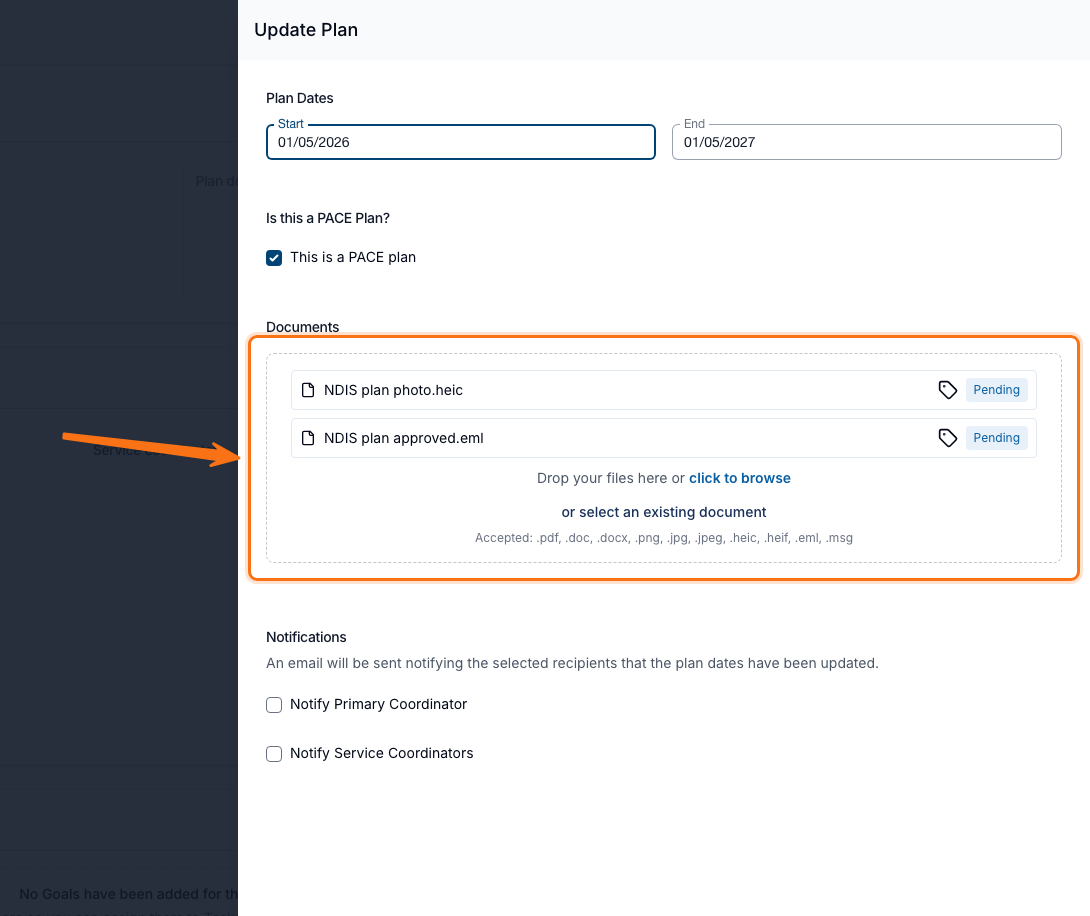
- The Documents section on the Create Plan and Update Plan forms takes up to 10 files at a time. Accepted types are documents (.pdf, .doc, .docx), photos (.png, .jpg, .jpeg, .heic, .heif) and saved emails (.eml, .msg)
- Select or select an existing document to attach a file already on the Participant's profile rather than uploading a second copy
- iPhones save photos as .heic, which uploads fine but can't be displayed by web browsers - set Settings → Camera → Formats → Most Compatible to capture previewable .jpg instead
- Records accept MP4, WebM and MOV alongside the usual document and image formats, with every file up to 500 MB
- Only PDF and Word (DOCX) files can be signed, so a Record with only videos on it doesn't show the signing question at all
- Video can only be attached from the browser - a Support Worker uploading their own User Record through the mobile app can supply PDF, JPG or PNG only, up to 15 MB. A video Record can be acknowledged the moment it opens, so the acknowledgement confirms the worker opened it, not that they watched it through
For more information, visit the NDIS Plan and Participant Records guides.
Contact Relationships on NDIA Forms
When an NDIA form asks you to pick one of the Participant's Contacts, each Contact is listed with their relationship, so you can tell the Guardian from the Trustee without leaving the form.
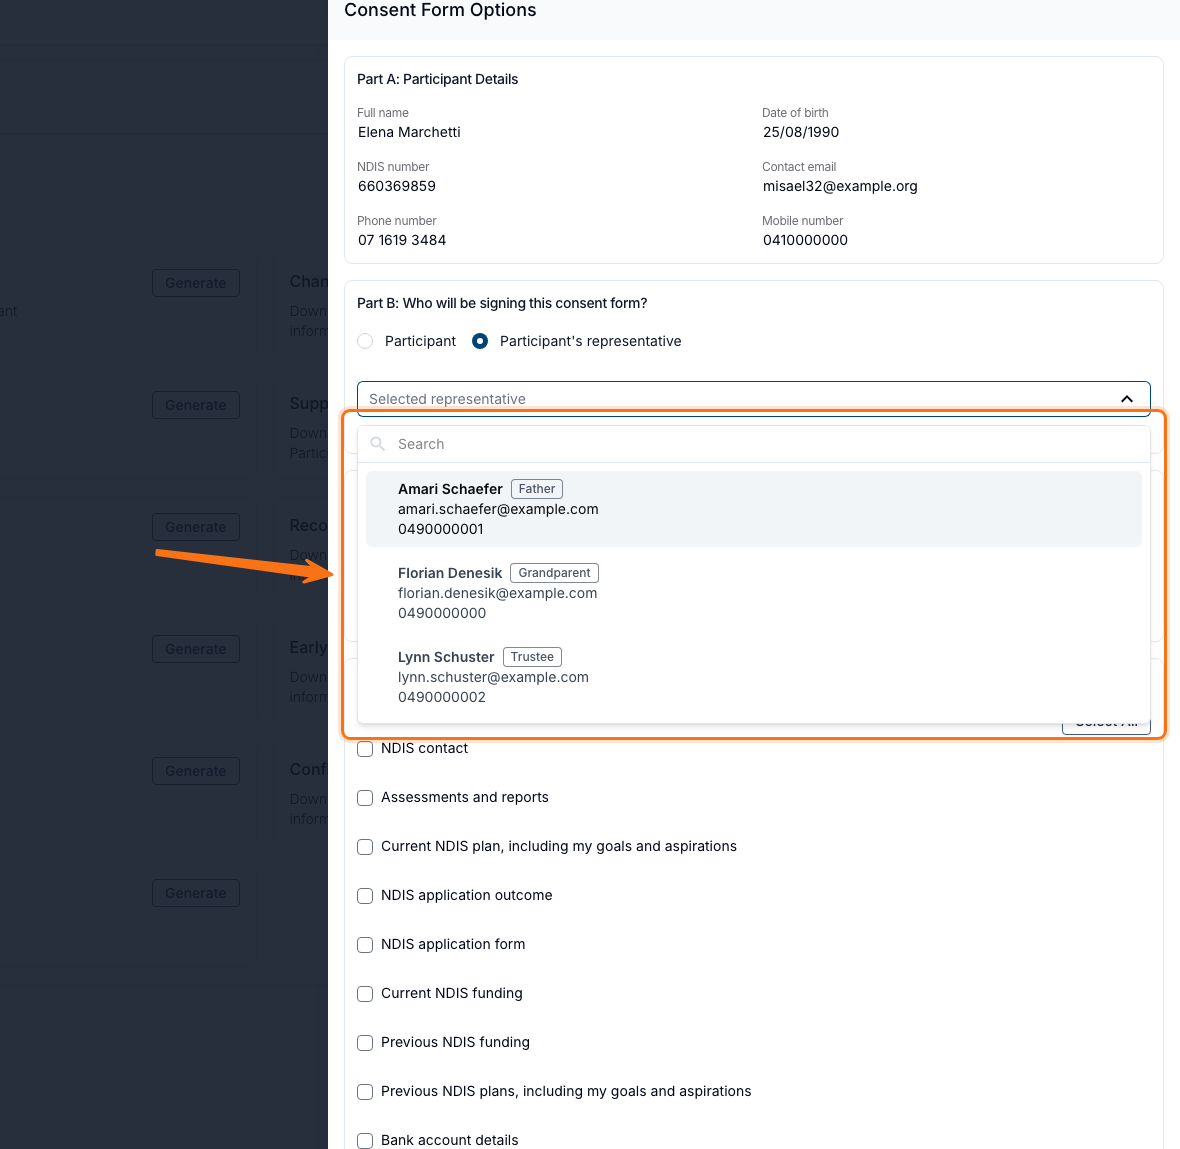
- Open the contact dropdown and each Contact shows their relationship as a chip beside their name, with their email and mobile underneath
- Emergency Contact is red and Primary Contact navy; every other relationship uses a neutral chip, and a Contact with no relationship recorded shows none
- Search the list by relationship - typing
Trusteereturns the Contacts recorded that way, including custom relationships you typed in yourself - The Participant's Contacts table search matches relationship the same way; the Relationship Type filter only lists Astalty's predefined relationships, so custom ones never appear there
- Contact placeholders match the relationship wording exactly, ignore archived relationships, and are left blank in the generated document rather than raising an error when nothing matches
- NDIA templates are part of Astalty Premium
For more information, visit the NDIA Templates guide.
Confirmation Emails for Form Submissions
A form can email the person who submitted it to confirm their submission was received, separately from the notifications that alert your managers.
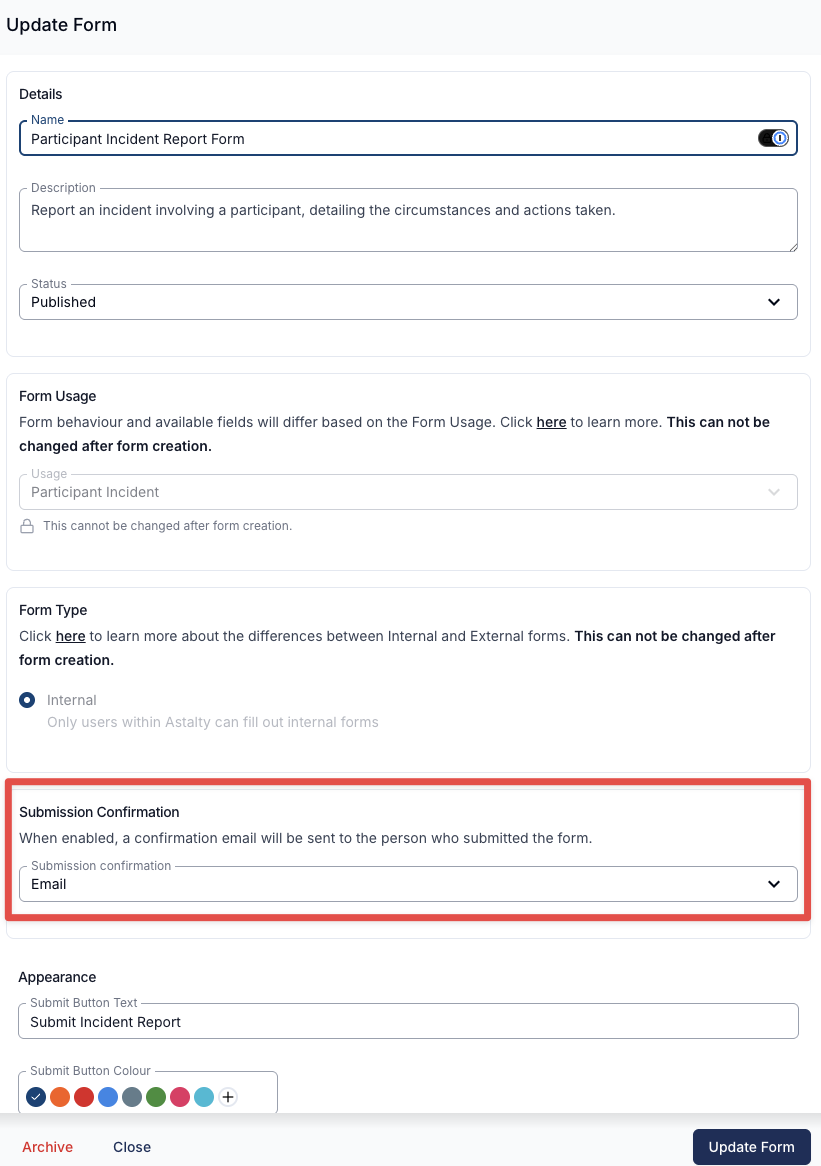
- Set Submission Confirmation in the form's settings to Email; the default is Disabled
- The email goes to the address on the submitting user's Astalty profile, and to that person only
- Only Internal forms have the section, because Astalty needs a logged-in user to know where to send it - external forms, including all Referral & Intake and Feedback & Complaints forms, don't offer it
- A General form sends Form Submission Confirmation naming the form; Participant Incident and Staff Incident forms send Incident Submission Confirmation with the incident Reference number and the Date and Time of Incident
- Duplicating a form copies the Submission Confirmation setting to the new form
For more information, visit the Form Settings guide.
Reminding Every Outstanding Signer at Once
Bulk Send Reminders emails every signer who hasn't signed yet across all of your organisation's awaiting signature requests, instead of opening each request and chasing people one at a time.
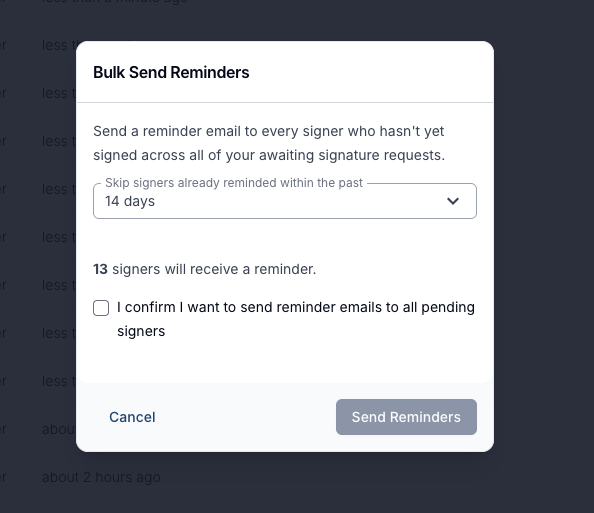
- Open Signature Requests and select Bulk Send Reminders at the top right of the All Signature Requests card
- Choose how recently a signer must have been reminded to be skipped: 24 hours (the default), 48 hours, 3 days, 7 days, 14 days or 30 days. Both manual and automatic reminders count towards the window; the original request email doesn't
- The window shows how many signers will be emailed and updates the count as you change the period
- It covers every awaiting request in your organisation, not just the ones you created. Partially signed requests are included and only their outstanding signers are emailed; draft, completed, cancelled, declined, expired and archived requests are left out
- Every reminder is recorded under Actions → View Activity Log on its request
- Sending runs in the background and is deliberately spaced out, and each request is re-checked with Docusign just before sending, so slightly fewer reminders can go out than the preview showed. Needs the Manage Signature Requests for Others permission
For more information, visit the Sending Bulk Reminders guide.
Incident Follow Up Notifications
You can set up a notification that alerts your team when an incident has been sitting in the same status for too long, so a reported incident doesn't quietly go unreviewed.
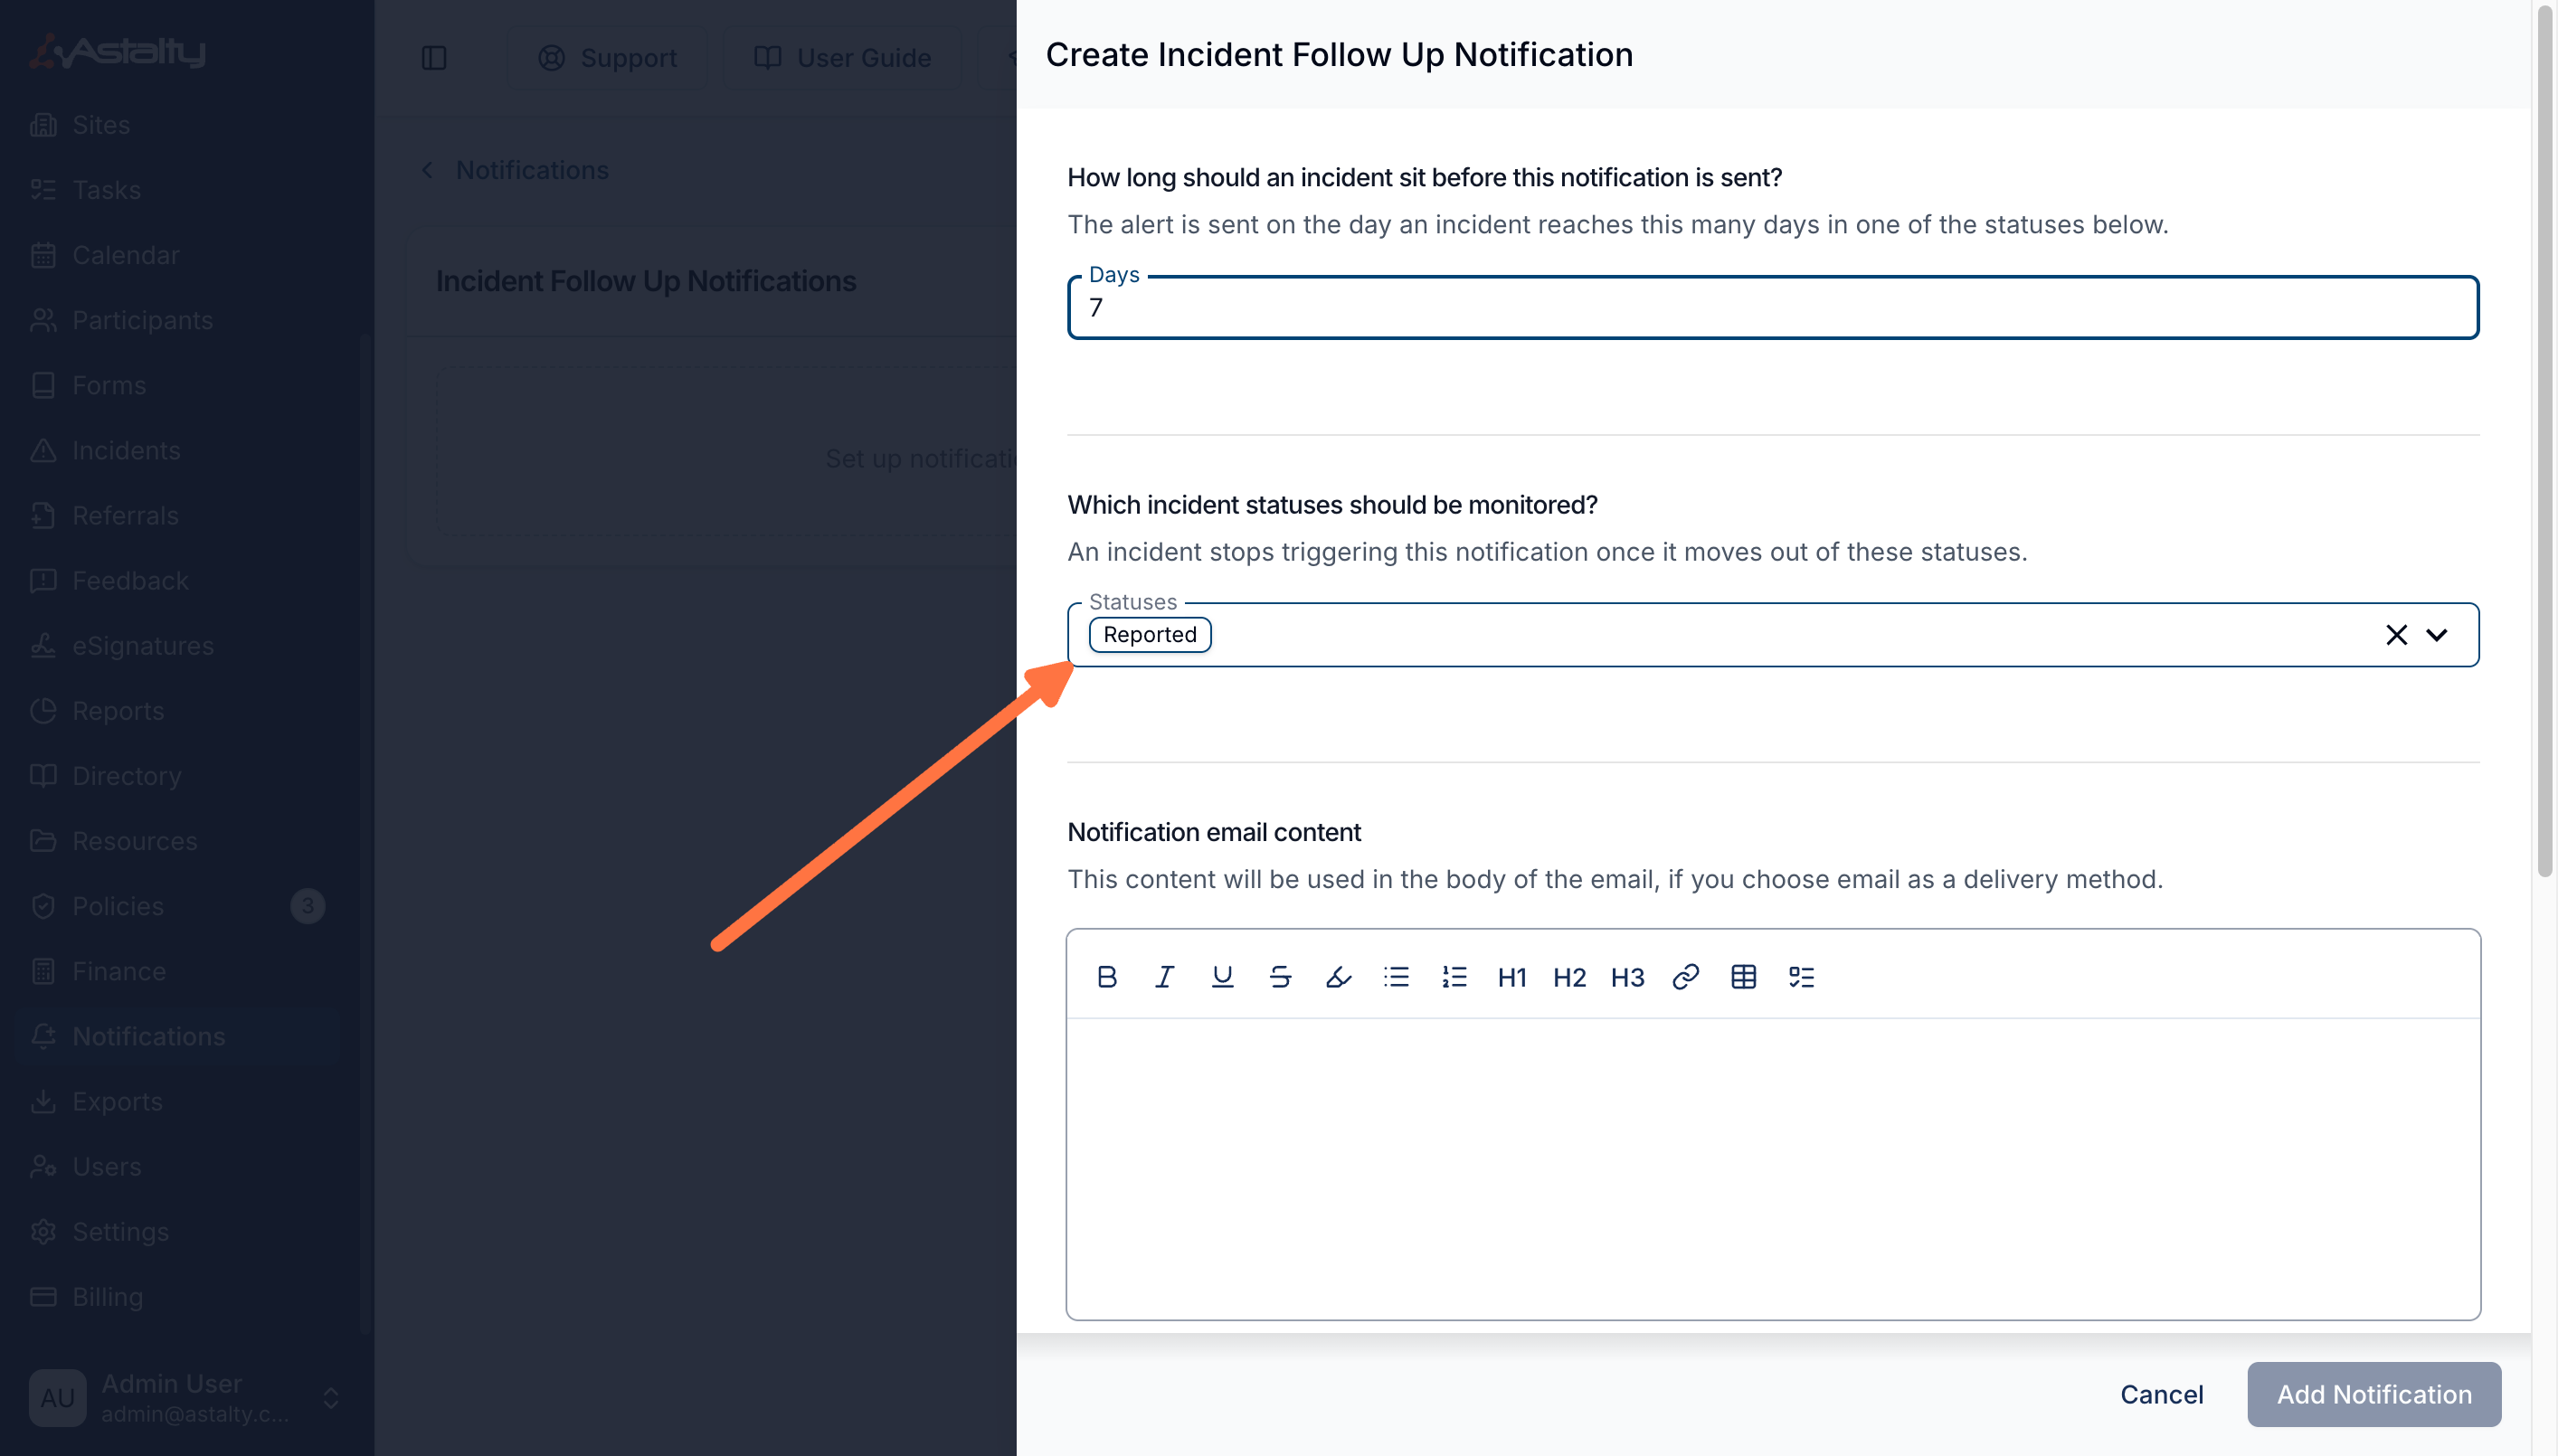
- Set them up under Notifications → Forms → Incident Follow Up
- Enter how many Days an incident can sit before it is flagged - the default is 7, and anything from 1 to 365 is accepted - and choose which statuses to watch from Reported, Under Review and Resolved
- The countdown runs from the last status change, not from when the incident was reported; editing details, severity or category doesn't restart it
- The alert is sent once, on the day the incident hits the threshold, rather than repeating daily
- Notify User Groups, specific Users, or the Assigned user - assigned user is off by default, because incidents arrive unassigned, so always add a group or named users
- Archived incidents are skipped, and Incident Follow Up notifications are part of Astalty Premium
For more information, visit the Incident Follow Up Notifications guide.
Finding Supports with No Charges Attached
The Supports Report can be filtered by whether a support has charges attached, and by Site, so delivered work with nothing to bill against it can be found before you invoice.
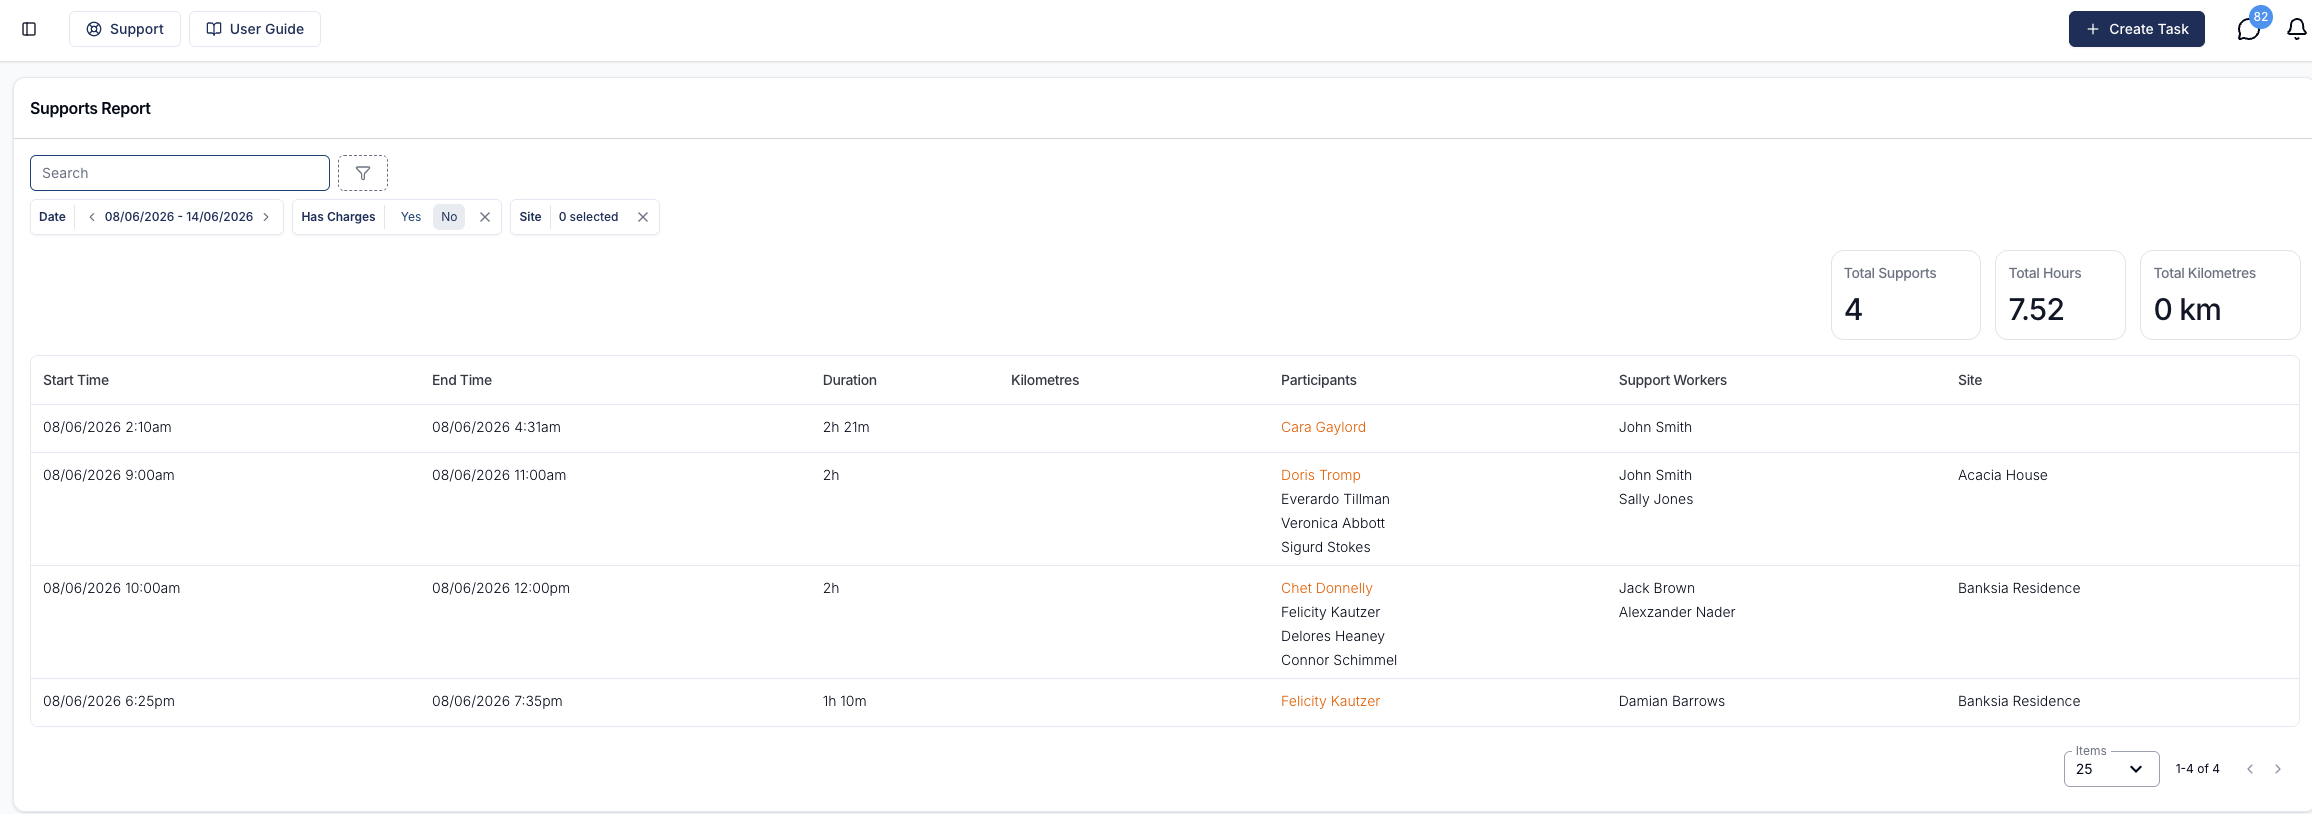
- Has Charges offers Yes and No - it only checks whether charges exist, taking no account of their state or whether they have been invoiced
- Any Participant in a support with no charges is highlighted orange in the Participants column, with the tooltip "No charges attached to this participant's support"
- A group support where only some Participants have charges appears under both Yes and No, and the highlighting shows exactly who is missing them
- Site filters by one or more Sites assigned to the support or the group support, and each support's Site shows in the Site column
- Pair Has Charges: No with Cancellation Status: Not Cancelled - the report includes cancelled supports by default
For more information, visit the Supports Report guide.
Participant Column on the Completed Supports Without Notes Report
The Completed Supports Without Notes Report shows the Participant each outstanding note relates to, so you can prioritise follow-up by Participant as well as by Support Worker.
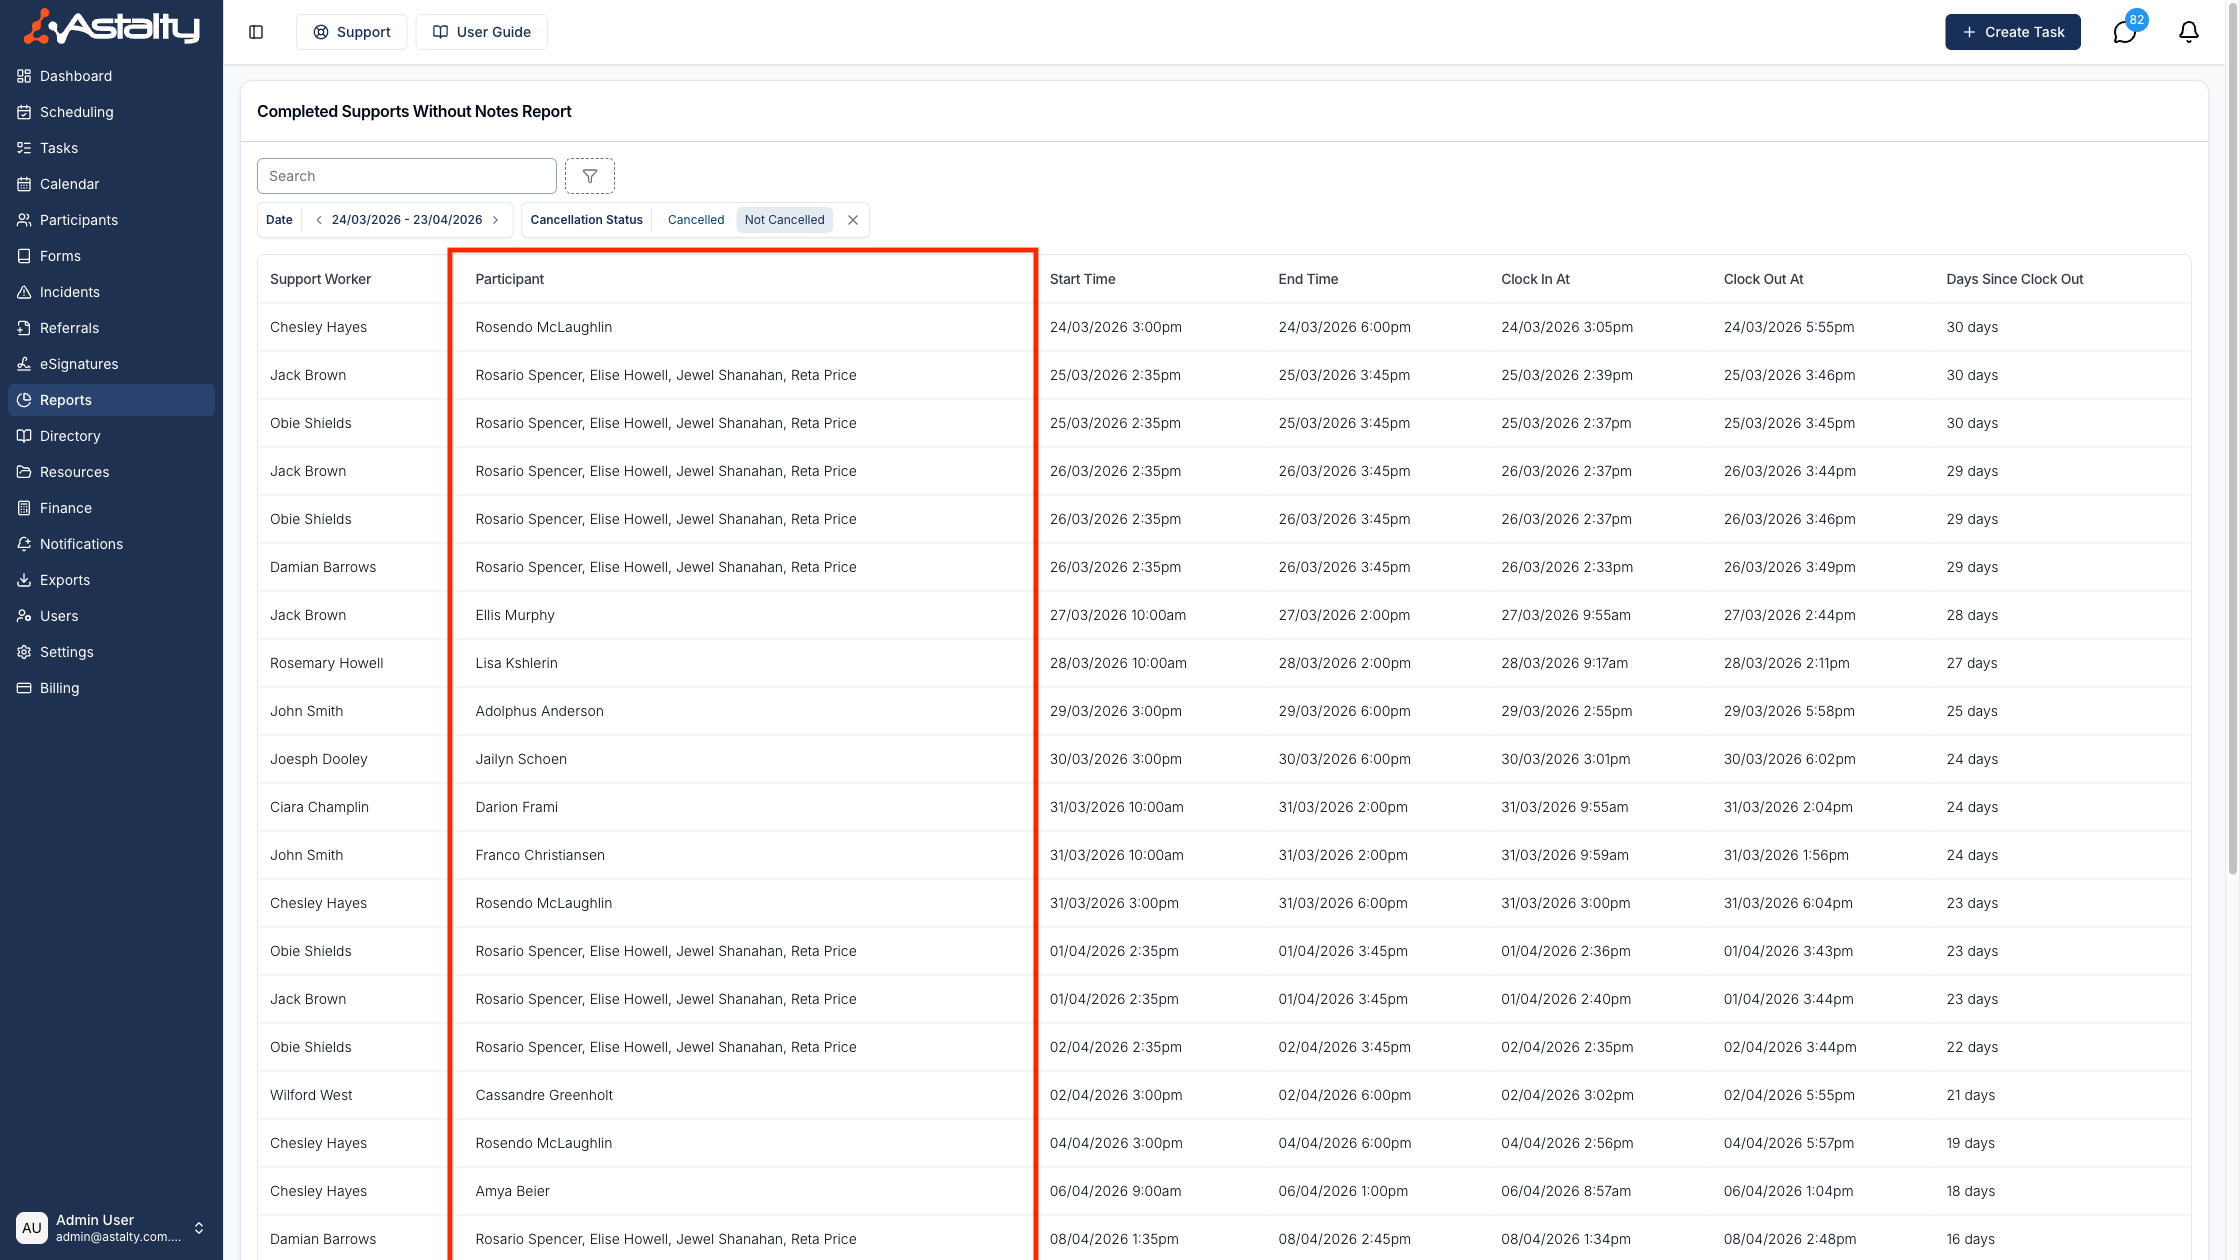
- Participant sits between Support Worker and Start Time in the column list
- A Group Support lists every Participant on that support, separated by commas
- Search and the Support Worker filter act on the Support Worker, and there is no Participant filter
- To narrow results by Participant or Participant Tag, use the Supports Without Notes Export instead
- The report's remaining columns are Start Time, End Time, Clock In At, Clock Out At and Days Since Clock Out
For more information, visit the Completed Supports Without Notes Report guide.
Participant Retention Report
The Participant Retention Report summarises how many Participants started with you and how many left, month by month, with churn and retention rates. It is included with Astalty Premium with nothing to switch on.
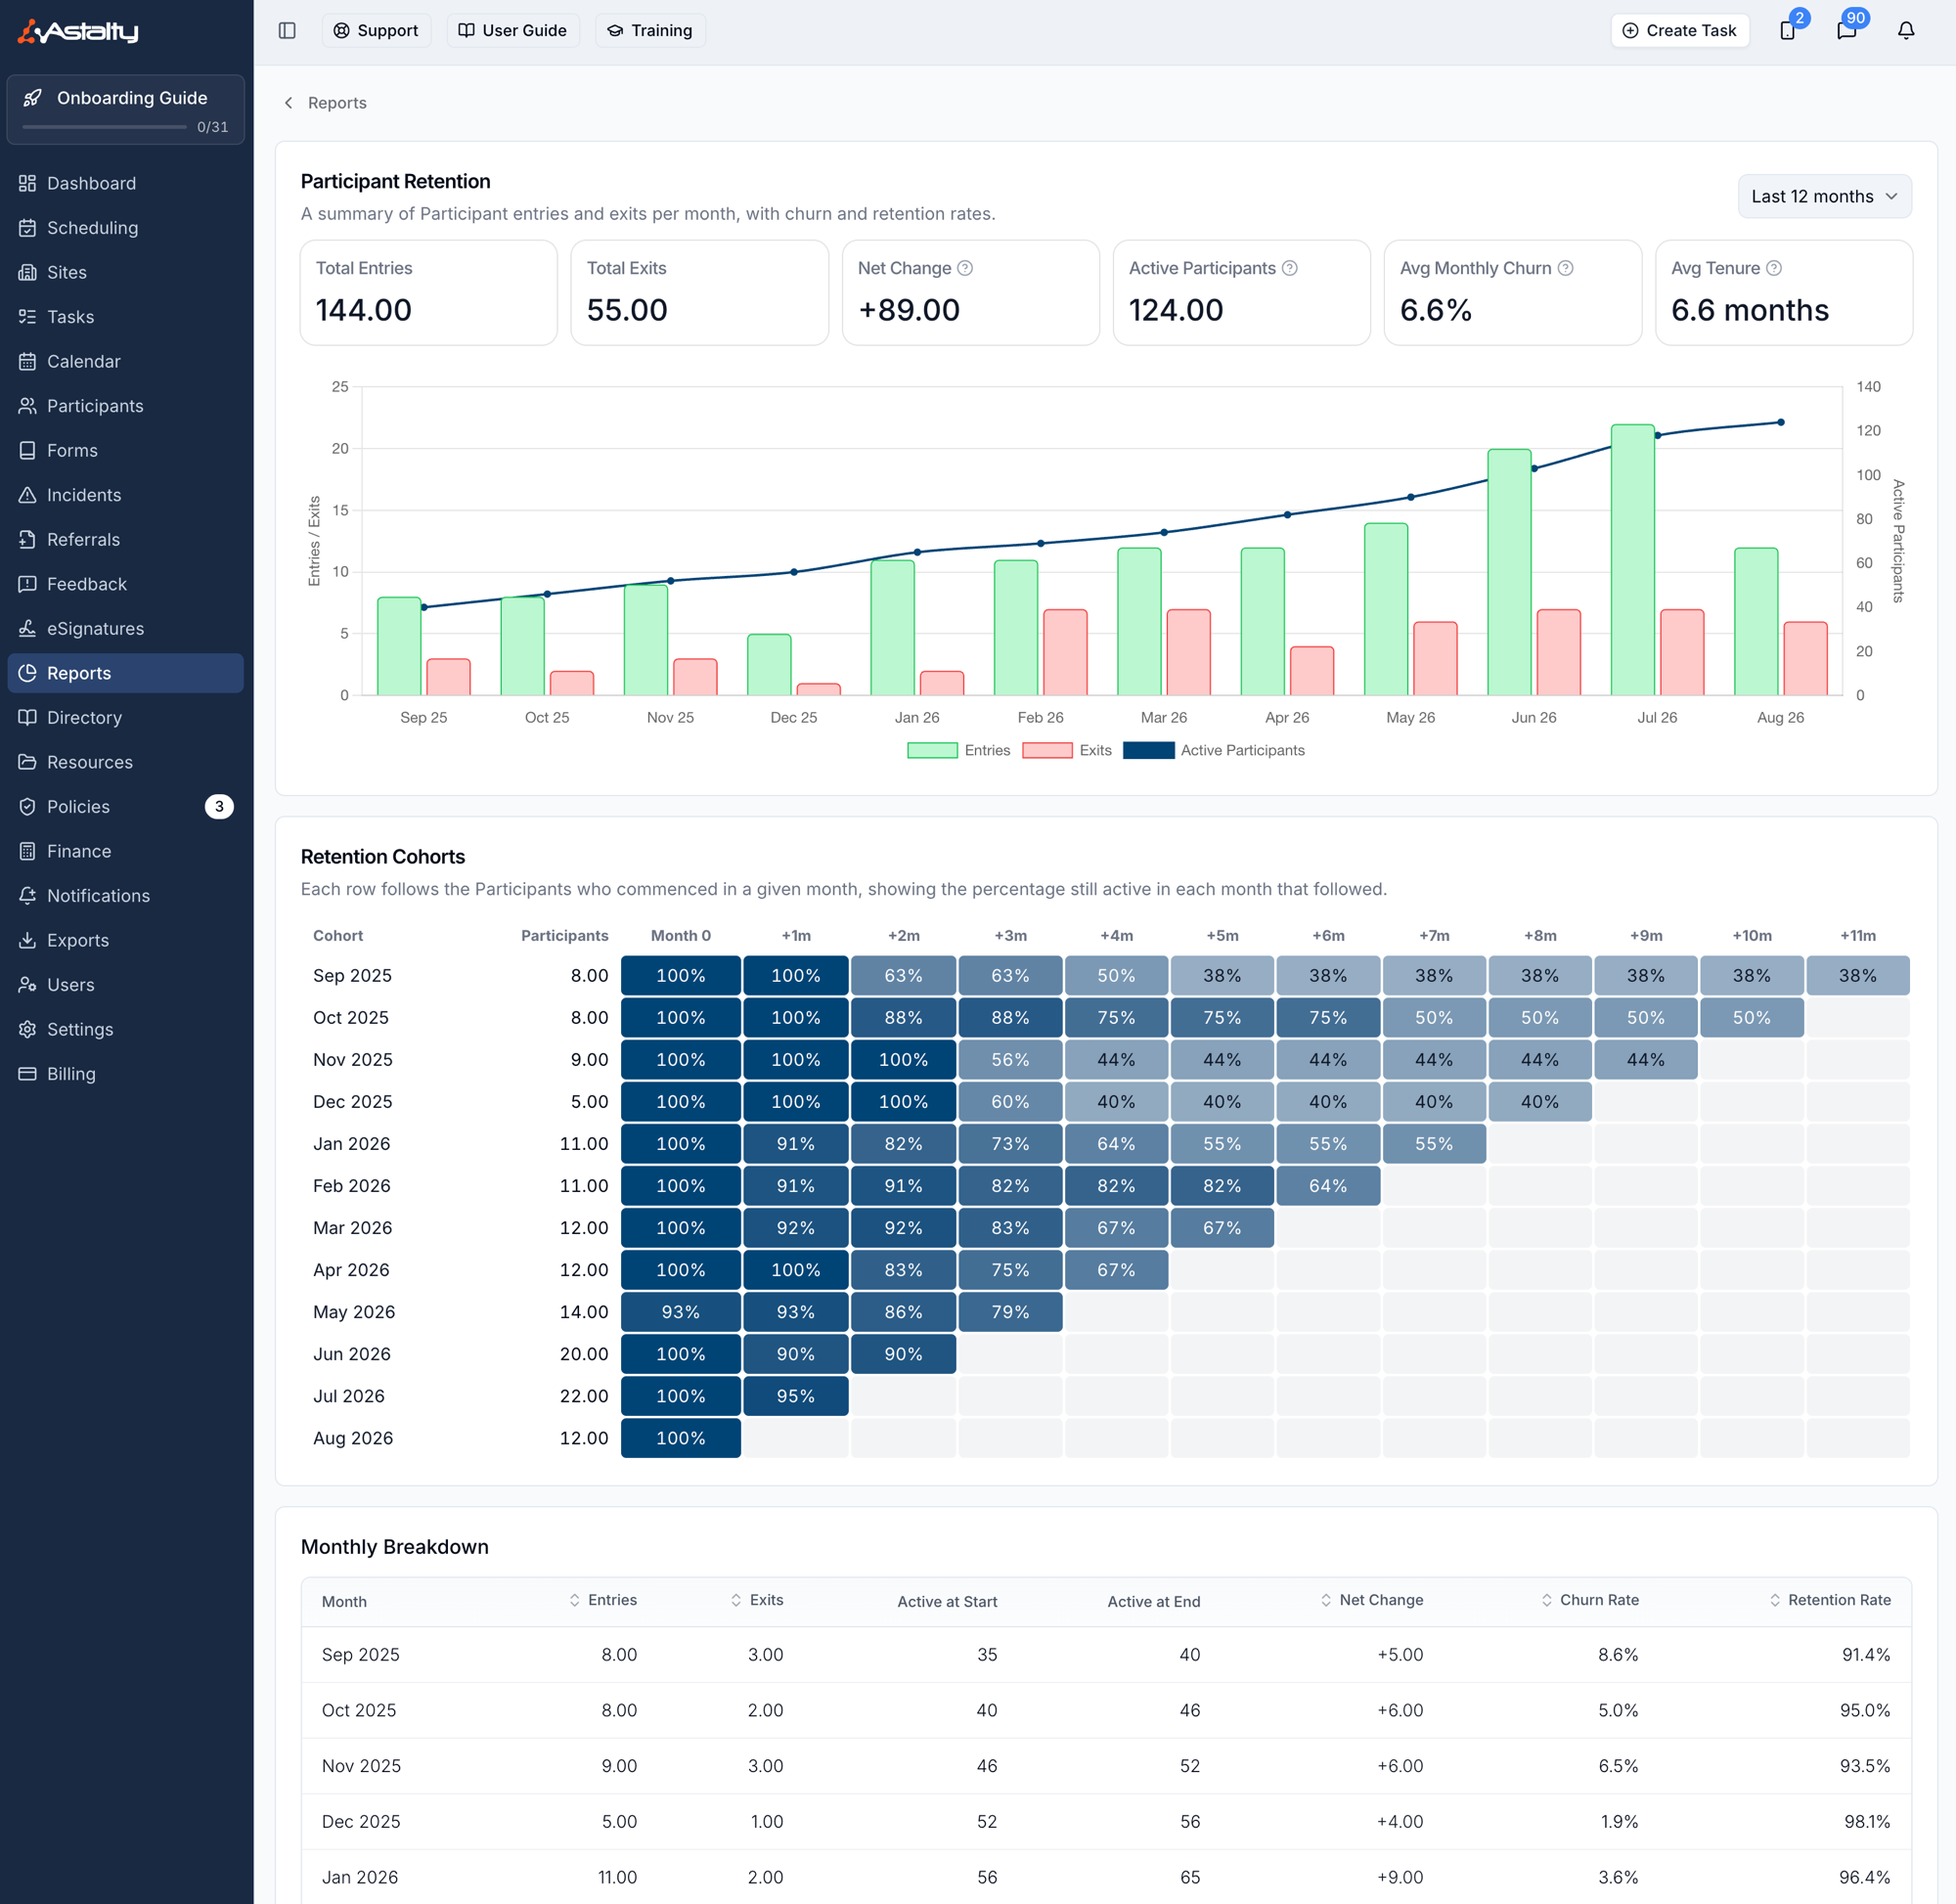
- Open it from Reports → Participants → Participant Retention and choose Last 12 months, Last 24 months or Last 36 months
- Six figures across the top: Total Entries, Total Exits, Net Change, Active Participants, Avg Monthly Churn and Avg Tenure
- Retention Cohorts follows each month's intake as a group so you can see how long an intake stayed and compare intakes at the same age
- Monthly Breakdown gives the entries, exits, active counts, churn rate and retention rate behind it, with sortable columns
- Entries and exits come from the Service Commencement Date and Service Exit Date - where those are blank, Astalty falls back to when the Participant record was created and archived, so the numbers describe data entry rather than service
- The report covers every Participant in your account, not only the ones you personally support
For more information, visit the Participant Retention Report guide.
Document Layout Options for Astalty Templates
You can control how an Astalty Template prints - the front page, an optional contents page, body text size, and a repeating header and footer with page numbers.
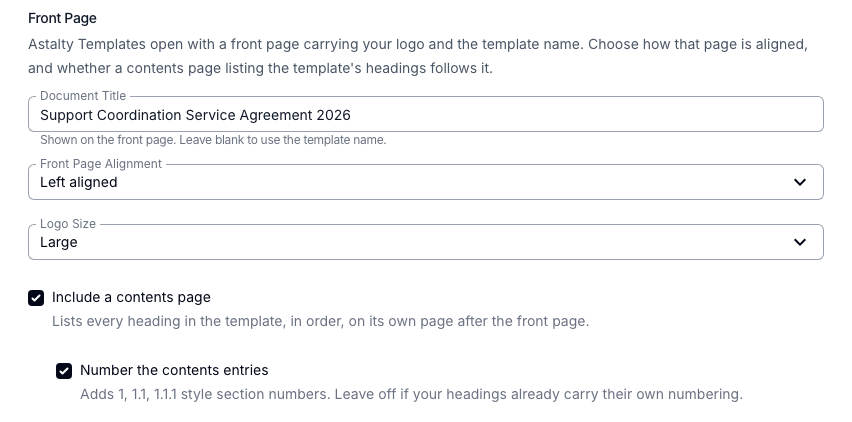
- Open Settings → Templates, select a template and choose Edit to set the options under Front Page, Body and Header & Footer
- Document Title prints a name different to the template's own, Front Page Alignment offers Left aligned or Centred, and Logo Size caps the business logo at 64×160, 100×250 or 150×360 pixels
- Tick Include a contents page to list the top three heading levels as clickable links, and Number the contents entries for 1, 1.1, 1.1.1 numbering - a template whose content has no headings produces no contents page even with the box ticked
- Body Text Size offers Small (the default, and how templates have always printed), Medium or Large, and scales tables with the text
- Header and footer text repeats on every page except the front and contents pages, takes the eight business placeholders, and prints Page N of M on the opposite side to the footer text
- Settings are captured when a document is generated, so editing a template later does not restyle documents already produced from it. Word Templates and NDIA Templates are unaffected, and Templates are part of Astalty Premium
For more information, visit the Document Layout guide.
Seeing Each User's Own Event Colours on the Calendar
Other users' Calendar events normally all appear in that user's single Calendar colour. You can now show each event in the colour its owner gave it instead, which helps if you book or manage appointments on someone else's behalf.
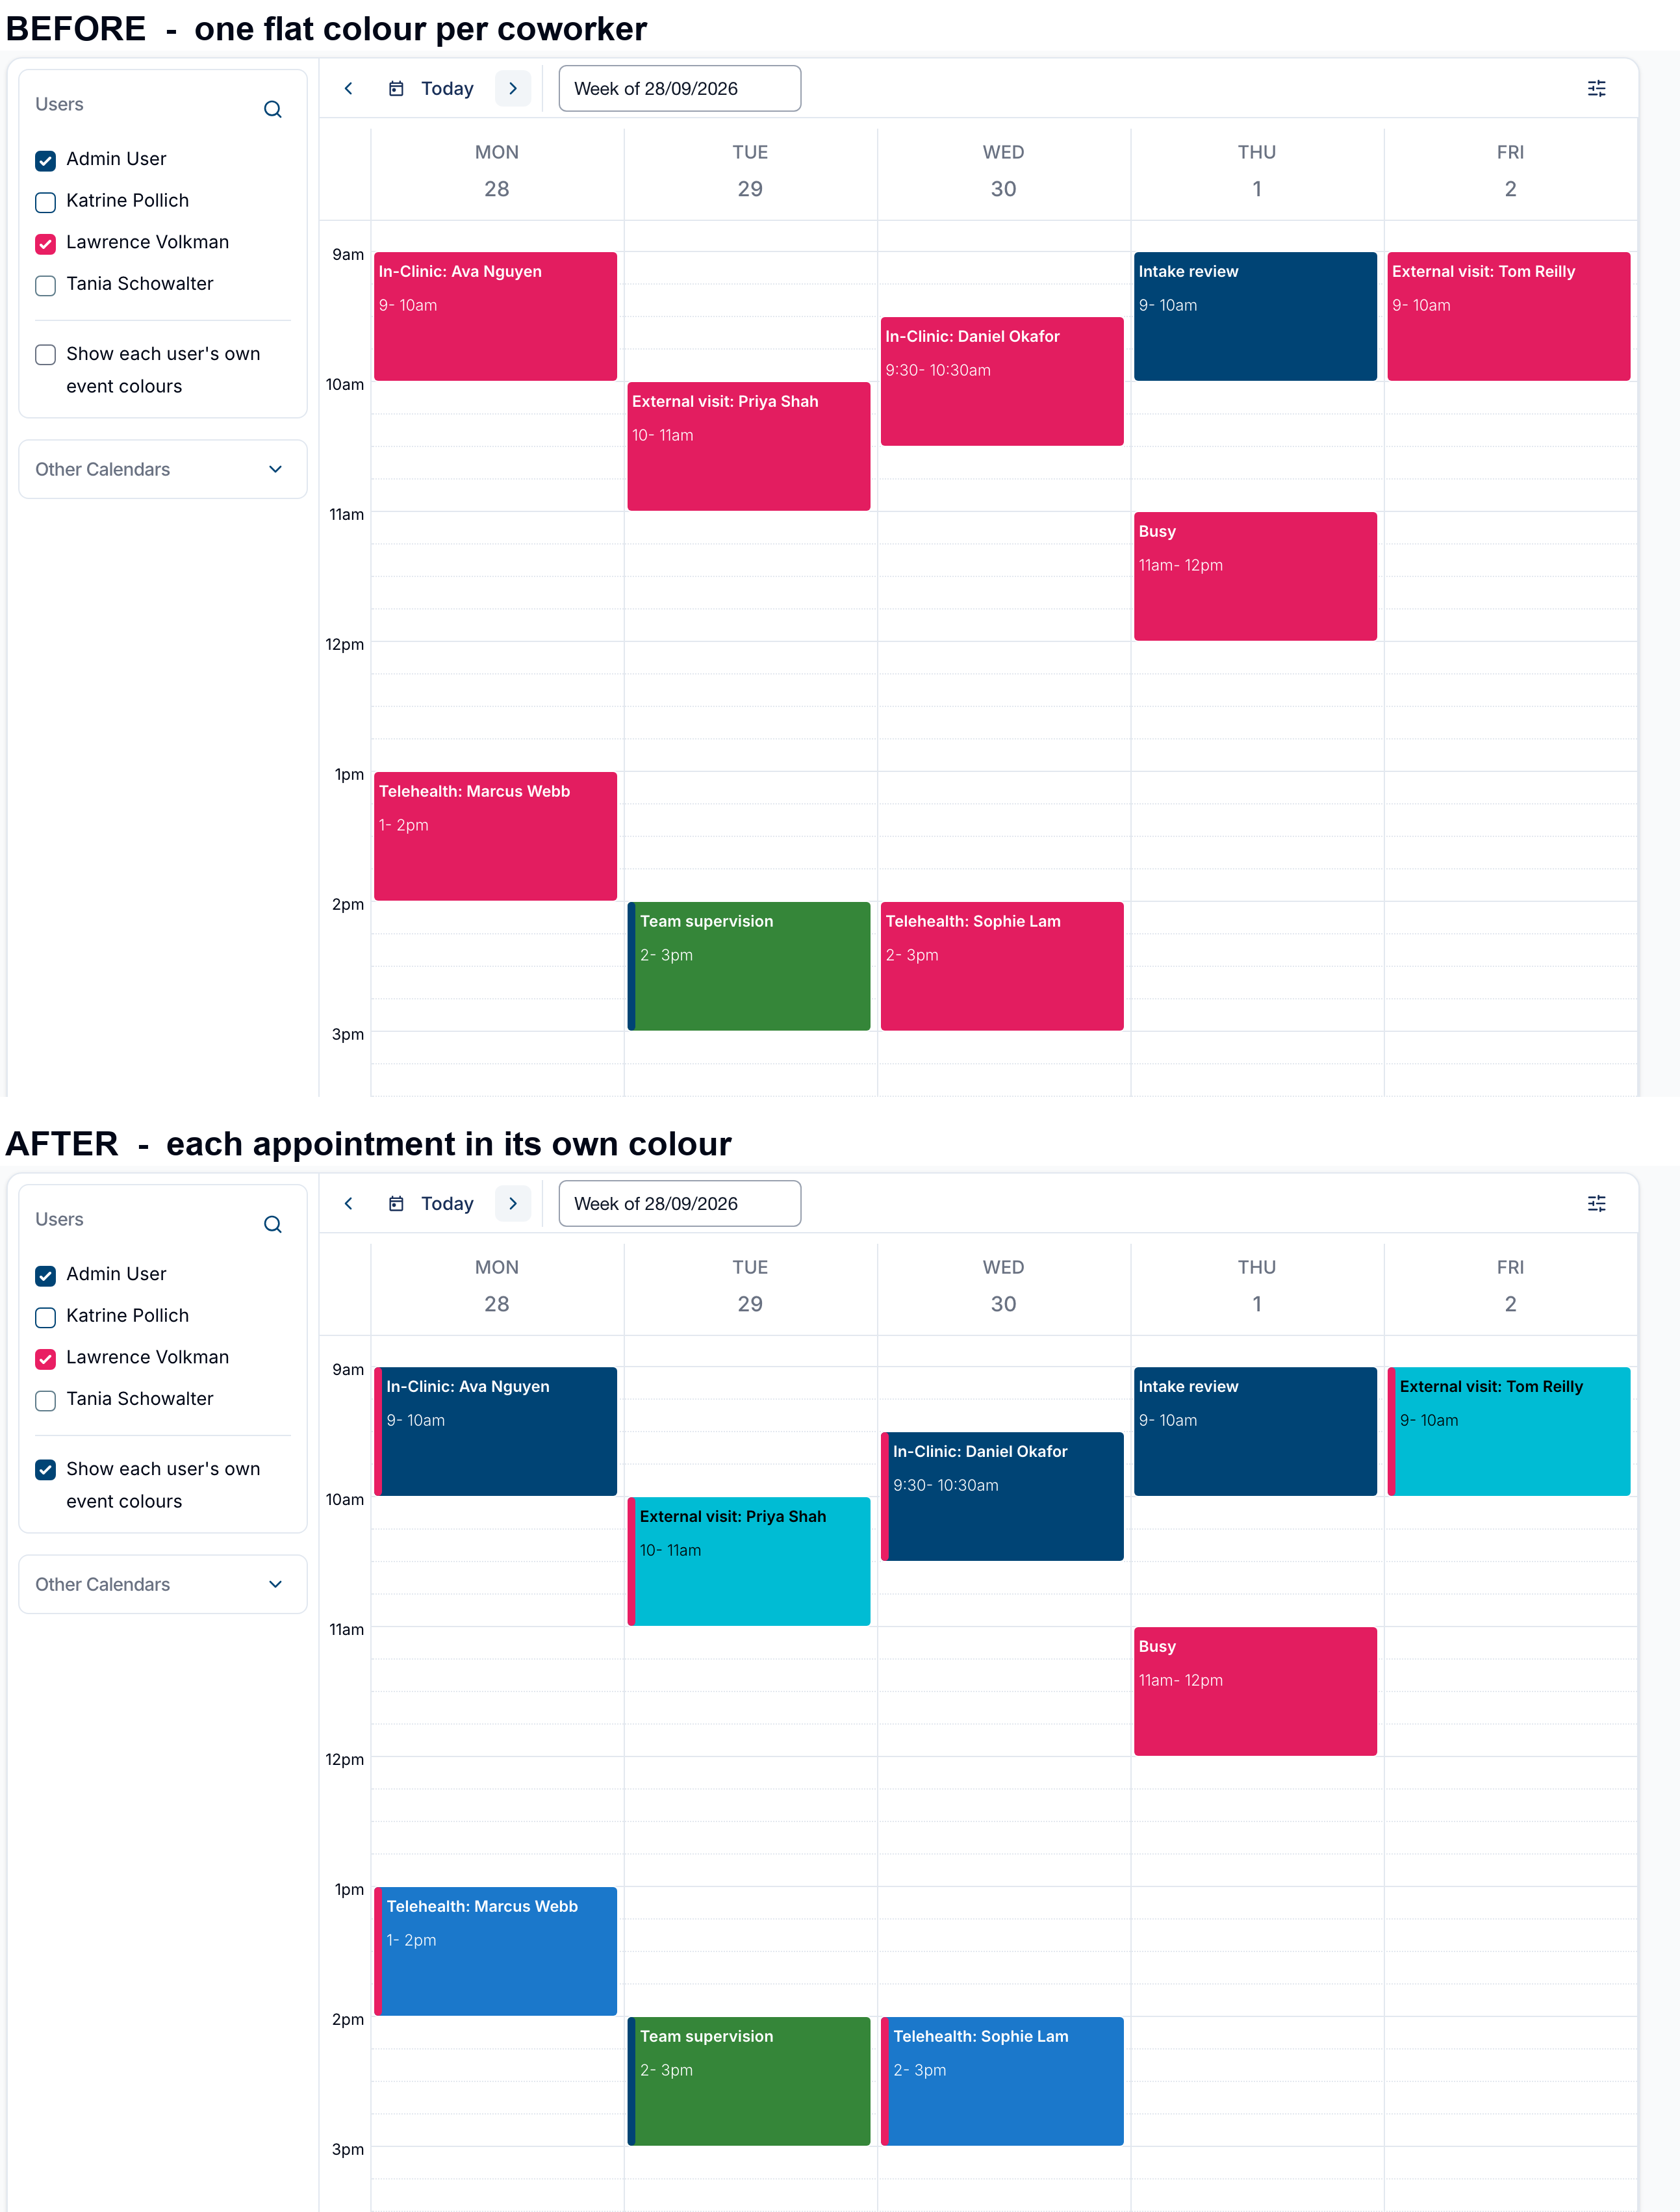
- Tick Show each user's own event colours, underneath the list of Users on the Calendar
- Events with a Colour Tag show in that colour; events without one keep showing the owner's Calendar colour
- A thin stripe in the owner's Calendar colour runs down the left edge of each colour-tagged event, so you can still tell whose Calendar it belongs to
- Your own events always show their Colour Tags whether the setting is on or off
- The setting applies only to you and is remembered in the browser you set it in
- The checkbox only appears when you can view more than one user's Calendar
For more information, visit the Navigating the Calendar Interface guide.
Employment Hero Businesses and Employing Entities
The payroll integration card lists the additional employing entities inside the business you are connected to, so you can confirm a second ABN is already covered without checking in your payroll system.
- When you connect, Astalty asks you to choose a payroll business - the list holds every business the user who authorised the connection can access
- Once a business is selected, the card on Settings → Integrations shows the connected Business and an Additional employing entities section naming each entity, with its ABN where the payroll system holds one
- The section only appears when the business actually contains additional entities - a business built on a single ABN shows no list, which is normal rather than a sign the wrong payroll file was connected
- Entities are assigned per employee in the payroll platform, so Astalty never lists or selects one; staff from every entity in the business appear on the Employees page ready to be linked
- If a payroll file is missing from the business list, the user who authorised the connection doesn't have access to it - employing entities are never the reason
- The same card is used by Employment Hero, Pay Cat and QuickBooks Payroll
For more information, visit the Employment Hero guide.
Sending Invitations in Bulk
Everyone still waiting on an invitation can be emailed from a single drawer on the Users page, instead of opening each person's profile.
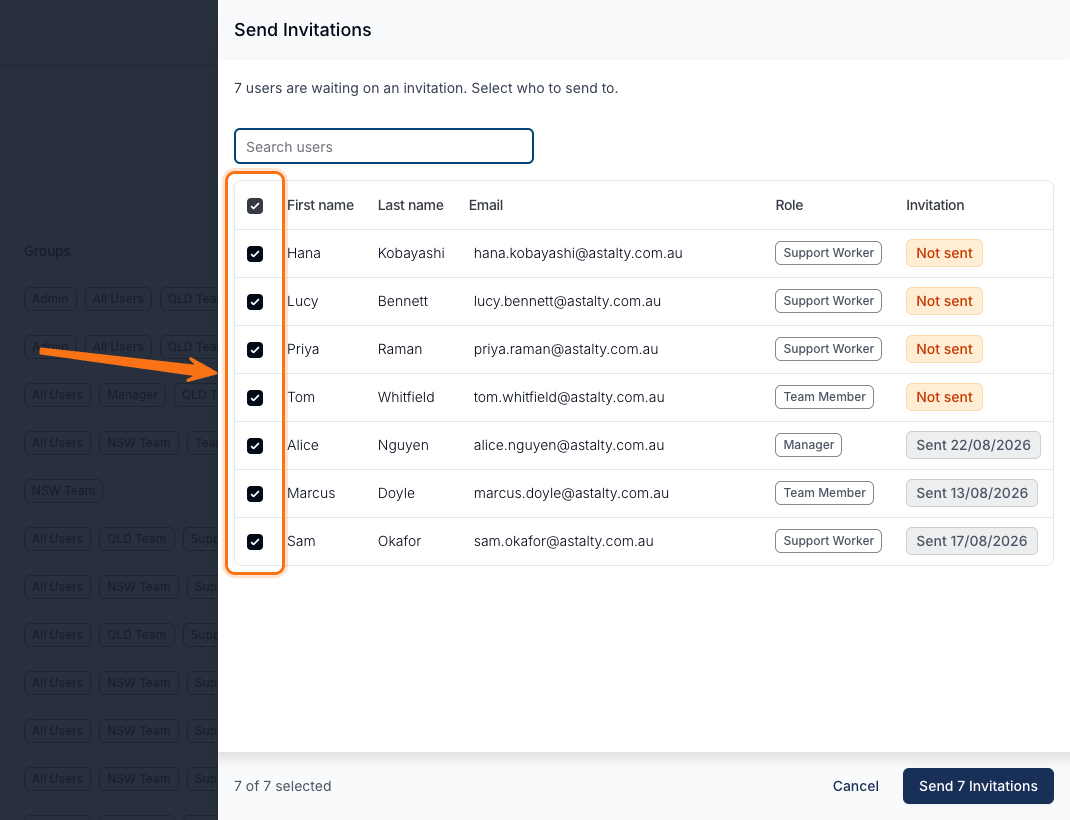
- Select Actions in the top right of the Users page and choose Send Invitations - it only appears if you have the Create Users permission, which is on for Admins by default
- The list covers everyone who hasn't logged in and set a password yet, each marked Not sent or Sent [date], with people never emailed listed first
- Search by first name, last name or email; the header checkbox selects only the rows matching your current search, and anyone already ticked stays selected when you change the search
- Emails are queued and sent in the background, and each one carries a brand-new link - the quickest way to fix expired or lost invitation links for a group
- Anyone who has already accepted, been deactivated or is restricted is skipped rather than failing the batch, and the confirmation says how many were skipped and why
- The drawer loads and sends to at most 500 people at a time
For more information, visit the Sending Invitations in Bulk guide.