- Scheduling
- Workers
- Skills
Skills
Overview
Skills are a catalogue of the things your workers can do, for example Auslan, Meal Preparation, or Comfortable with Pets. You build the catalogue once for your organisation, then use it from both sides:
- Workers hold skills. Record what each Support Worker can do on their profile.
- Participants desire skills. Record what each Participant is looking for on their Preferences page.
When you roster, Astalty compares the two and shows how much of what the Participant wants that worker actually has.
Skills vs Qualifications
This is the most important distinction to get right before you start building your catalogue.
| Qualifications | Skills | |
|---|---|---|
| What it is | A compliance record, such as a certificate, check, or clearance | A capability or preference-fit signal |
| Has an expiry date | Yes, and it is checked against the shift time | No |
| Has a level or proficiency | Yes | No, a skill is just a name |
| Effect when missing | Surfaces as a failed check, and outranks skills when workers are ordered | Only lowers the worker's position among workers who are otherwise equal |
Do not record a compliance requirement as a skill. Things like an NDIS Worker Screening Check, a Working with Children Check, a First Aid certificate, or a driver's licence belong in Qualifications, because they expire and they need to be checked as at the time of the shift. Skills have no expiry and no pass or fail, so recording a certificate as a skill gives you no warning when it lapses.
Use Skills for the softer things that help you pick a good fit but should never stop a shift going ahead, such as languages, cooking, comfort with animals, hoist experience, and particular interests.
Creating and managing the skill catalogue
The catalogue is shared across your whole organisation, and skill names must be unique.
- Go to Settings > Users.
- Scroll to the Skills card.
- Click Create Skill.
- Enter a Name and click Create.
A skill is only a name. There is no category, description, proficiency level, or expiry date, so keep names specific and self-explanatory, such as Auslan rather than Communication.
To change a skill's name, use the actions menu on its row and click Edit, then Update. Renaming a skill updates it everywhere it is used; it does not create a new one.
The Skills table can be searched by name, sorted by Name or Created, and filtered by Status (Active or Archived). It defaults to showing active skills only.
Assigning skills to a worker
- Go to Users and open the worker's profile.
- Find the Skills card.
- Click Edit.
- Tick each skill the worker has in the Select Skills list, then click Update Skills.
The card lists the worker's skills as chips, or shows No skills assigned. where none have been set. Only active skills appear in the list. If the list is empty, no skills have been created in Settings > Users yet.
Setting a Participant's desired skills
Desired skills sit with the Participant's other matching criteria, directly below Required Qualifications.
- Go to Participants and open the Participant's profile.
- Select Preferences from the Participant profile menu.
- Scroll to the Desired Skills card.
- Click Edit, tick the skills you want workers to have in the Select Desired Skills list, then click Update Desired Skills.

Record what genuinely helps for this Participant rather than everything that would be nice. Every skill you add becomes part of the denominator in the match, so a long wishlist makes every worker look like a poor fit.
For the Participant's other matching criteria, including age, gender, ethnicity, and preferred or incompatible workers, see Participant Preferences.
How skill matches appear when rostering
Wherever Astalty suggests Support Workers, including Unassigned Shifts, the Shift Board, and support creation, a Skills column shows a chip for each worker.
Direct supports
The chip reads as matched skills out of desired skills, for example 2/3 skills. Hover over it to see which skills matched (green dots) and which are missing (grey).
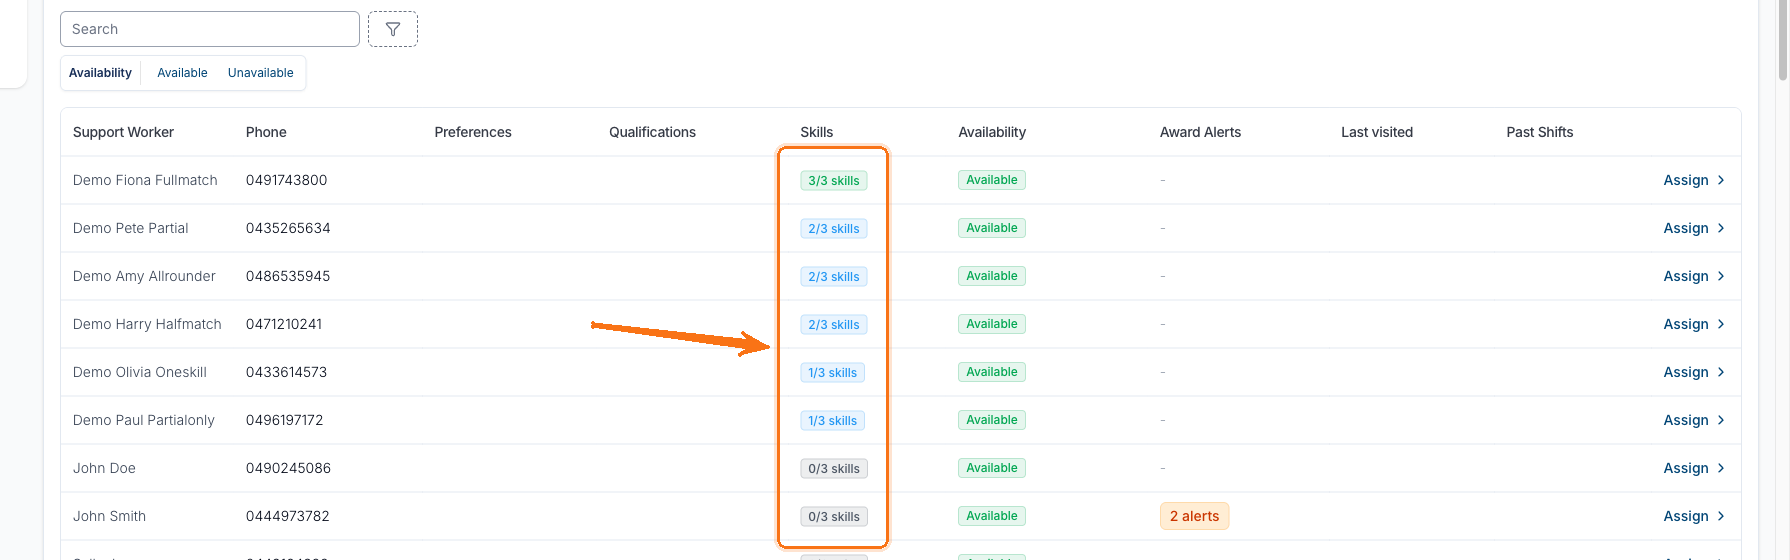
The colour tells you at a glance how the worker fits:
- Green - the worker has every skill the Participant wants.
- Blue - the worker has some, but not all, of them.
- Grey - the worker has none of them.
The match is exact and one-directional. The denominator is always what the Participant asked for, so extra skills a worker holds that nobody requested do not improve their match. A worker with fifty skills and a worker with exactly the two requested both show 2/2 skills.
Group supports
On a group support the chip counts Participants, not skills, for example 2 of 3 Participants. That means the worker is a complete fit for 2 of the 3 attendees who have desired skills recorded:
- An attendee only counts toward the total if they have at least one desired skill. Attendees with none are left out of both numbers.
- A partial fit counts as not matched in the headline number. Hover over the chip to see the per-Participant breakdown, which shows exactly which skills matched and which are missing for each attendee.
- Attendees whose attendance has been cancelled, and archived Participants, are not counted.
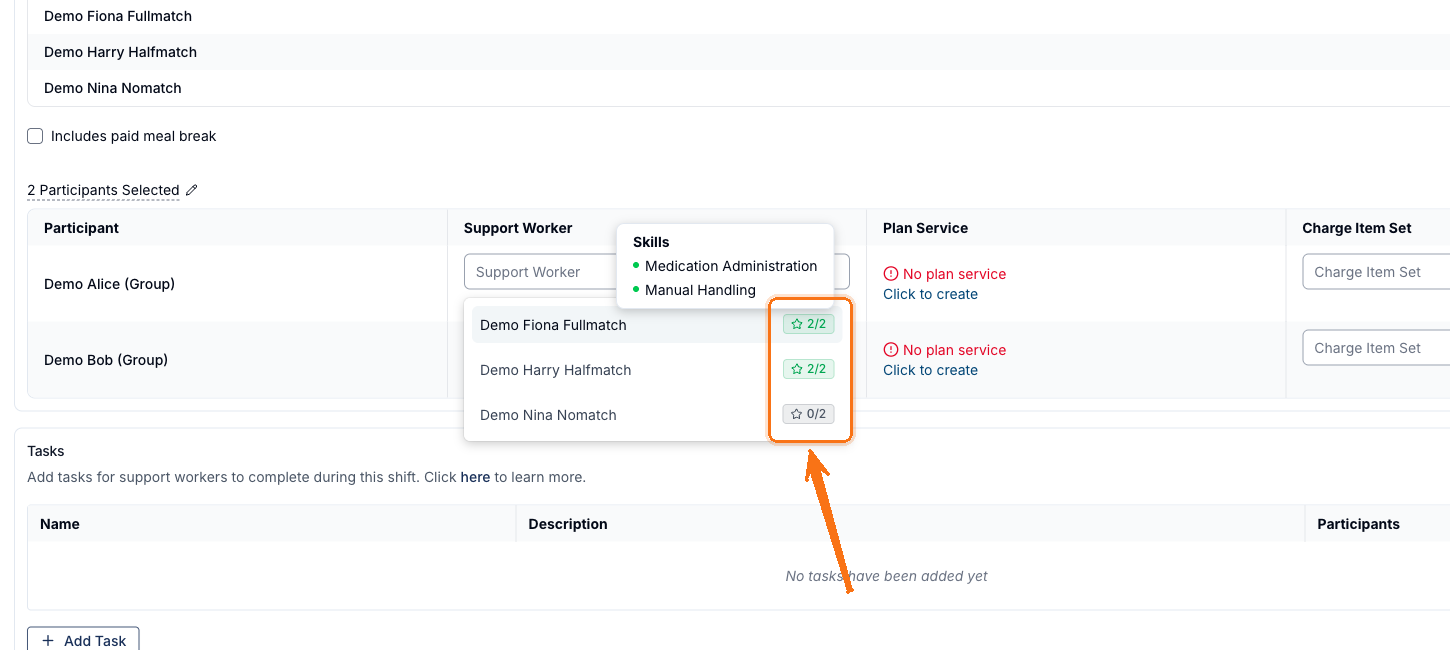
When you build the group support itself, each attendee gets their own Support Worker dropdown. Every worker in that list carries a compact star chip, such as 2/2, scored against that attendee's desired skills rather than the group as a whole. Hover a chip for the same matched and missing breakdown.
Where skills sit in worker ordering
Skills are the last thing Astalty considers when ordering suggested workers. Workers are ordered by, in priority order: incompatibility with the Participant, availability, preferred status, Participant preference checks, qualification checks, how many previous shifts they have done with the Participant, and only then their skill match.
In practice this means skills break ties between workers who are already equal on everything that matters more. They never move an unavailable or incompatible worker up the list.
Archiving a skill
There is no way to delete a skill. Retire one you no longer use by archiving it instead.
- Go to Settings > Users and find the skill in the Skills card.
- Open the actions menu and click Edit.
- Click Archive, then confirm.
Archiving a skill:
- Removes it from the lists you pick from on worker and Participant profiles.
- Hides it on worker profiles and Participant Preferences pages, even where it is still linked.
- Excludes it from every skill match, so it can neither be desired nor counted as held.
- Removes it from the Worker Skills report, and from that report's Skills filter.
Archived skills keep their name
Archiving does not free up the name. If you archive Auslan and then try to create a new skill called Auslan, Astalty rejects it and tells you an archived skill already uses that name.
You have two ways out, both reached by setting the Status filter on the Skills card to Archived:
- Unarchive the existing skill and carry on using it, or
- Edit the archived skill and rename it, which frees the name for the new one. You do not need to unarchive it first.
The Worker Skills report
Reports > Team > Worker Skills lists every rosterable worker alongside the skills they hold, so you can see coverage across your team and find who has a particular skill. See Worker Skills Report.
Who can do what
| Capability | Admin | Manager | Team Member | Support Worker |
|---|---|---|---|---|
| See skills on worker and Participant profiles | Yes | Yes | Yes | No |
| Create, rename, and archive skills | Yes | No | No | No |
| Change a worker's skills | Yes | No | No | No |
| View the Worker Skills report | Yes | No | No | No |
A few things sit outside the table:
- Building the catalogue happens in Settings, which is generally only available to Admins and the Account Owner in any case.
- Setting a Participant's desired skills uses the same permission as editing the Participant, rather than a skills-specific one. Anyone who can update a Participant and can see skills can set them.
- The skill match chip is not separately permission-controlled. Anyone who can reach a screen that suggests Support Workers will see it once the feature is enabled.
These are the defaults for each role. For more information on permissions, see Roles & Permissions.