AI & MCP Access
To use Astalty's AI features, both Ask Astalty and the Astalty MCP server, a user needs an AI seat. You can manage seats at Billing > Add-ons > AI & MCP Access.
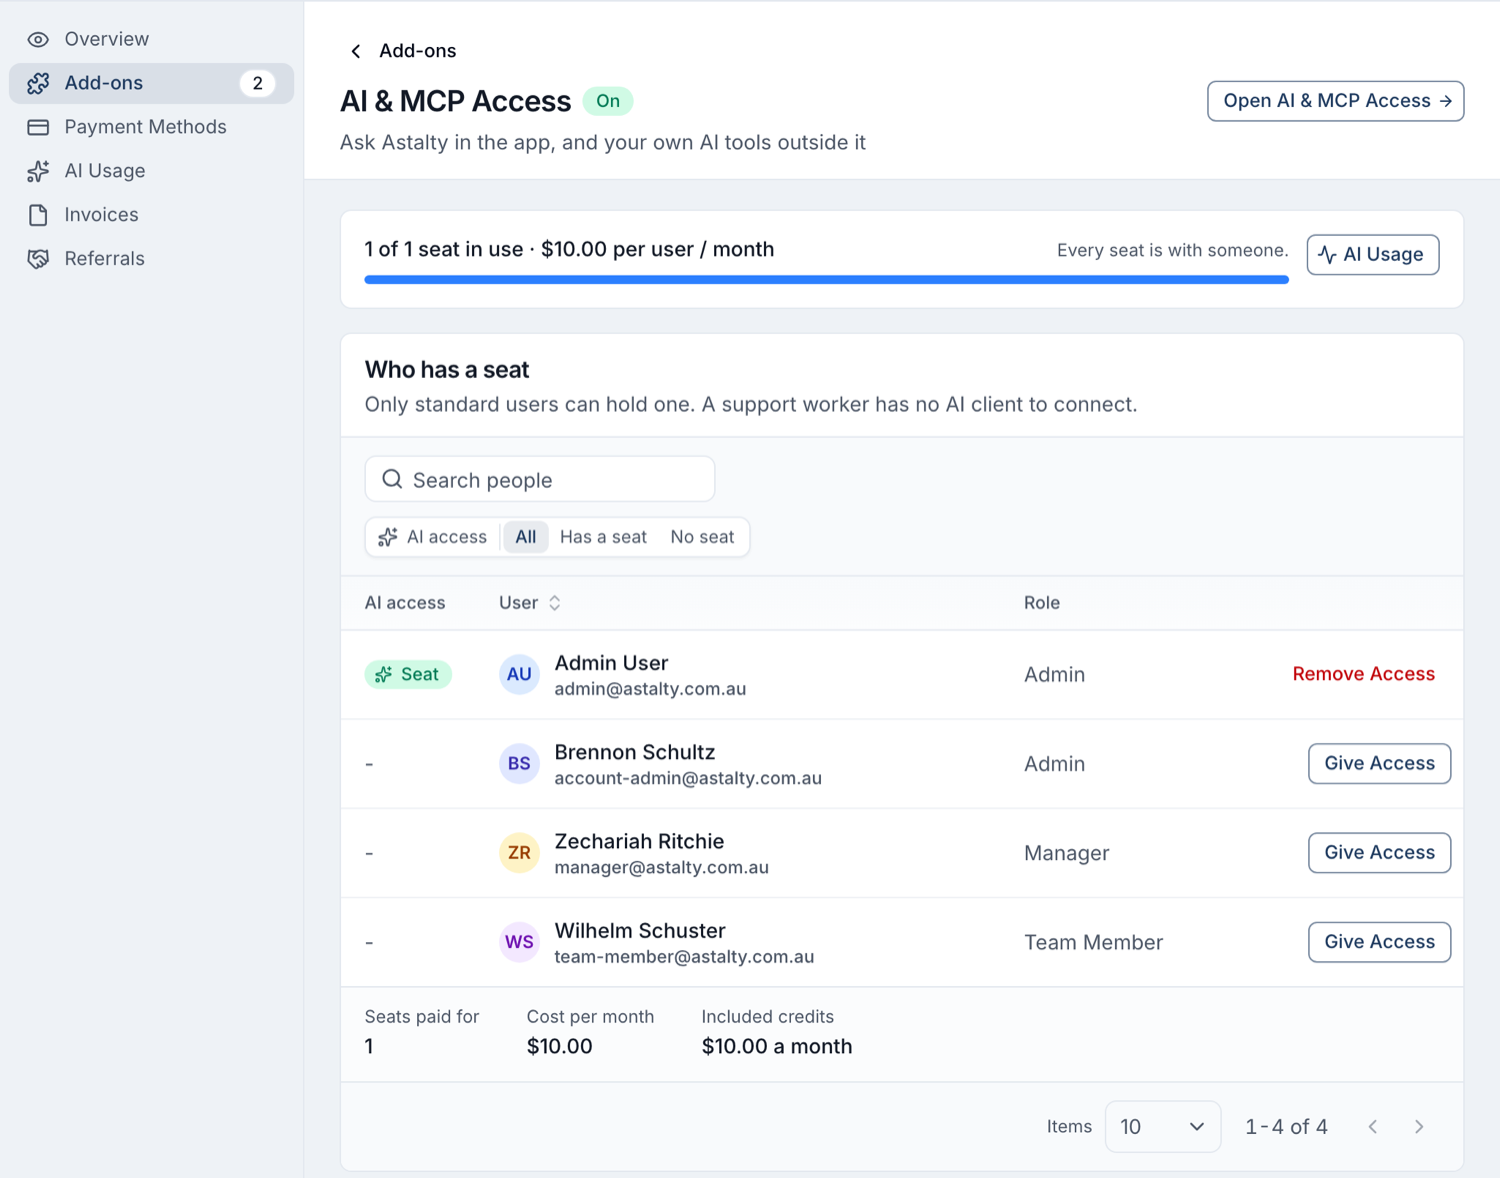
What An AI Seat Gives A User
Ask Astalty is the assistant inside Astalty. It can look things up and make changes for the user.
The Astalty MCP server lets the user connect an AI assistant they already use, such as Claude or ChatGPT, to Astalty. They can then ask that assistant about their work in plain language.
Both work as that user. They can see only what the user can see in Astalty, and every request is recorded against the user's account.
Each seat includes monthly AI credits. To see what has been used, open Billing > AI Usage.
If you do not see AI & MCP Access in Billing, give the seat from the user's profile instead, as described below. If the profile has no AI tab, AI is not available on your account yet. Contact Astalty support to ask about it.
Give A User An AI Seat
The Account Owner gives seats from Billing:
- Open Billing > Add-ons > AI & MCP Access.
- Under Who has a seat, find the user and select Give Access.
- Check the cost shown in the dialog, then select Give Access.
The dialog shows what the seat will cost, which depends on your billing period, whether you have a spare seat, and whether you are on a trial.
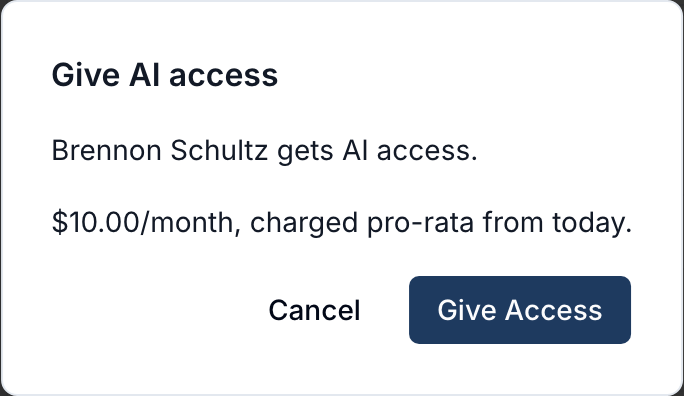
The user can start using Ask Astalty straight away. Astalty emails them a link to their AI page and this guide.
An Admin can also give a seat from the user's profile. Open the profile, select AI, then select Give AI Access.
Support Workers cannot hold a seat.
Let A User Connect Their Own Assistant
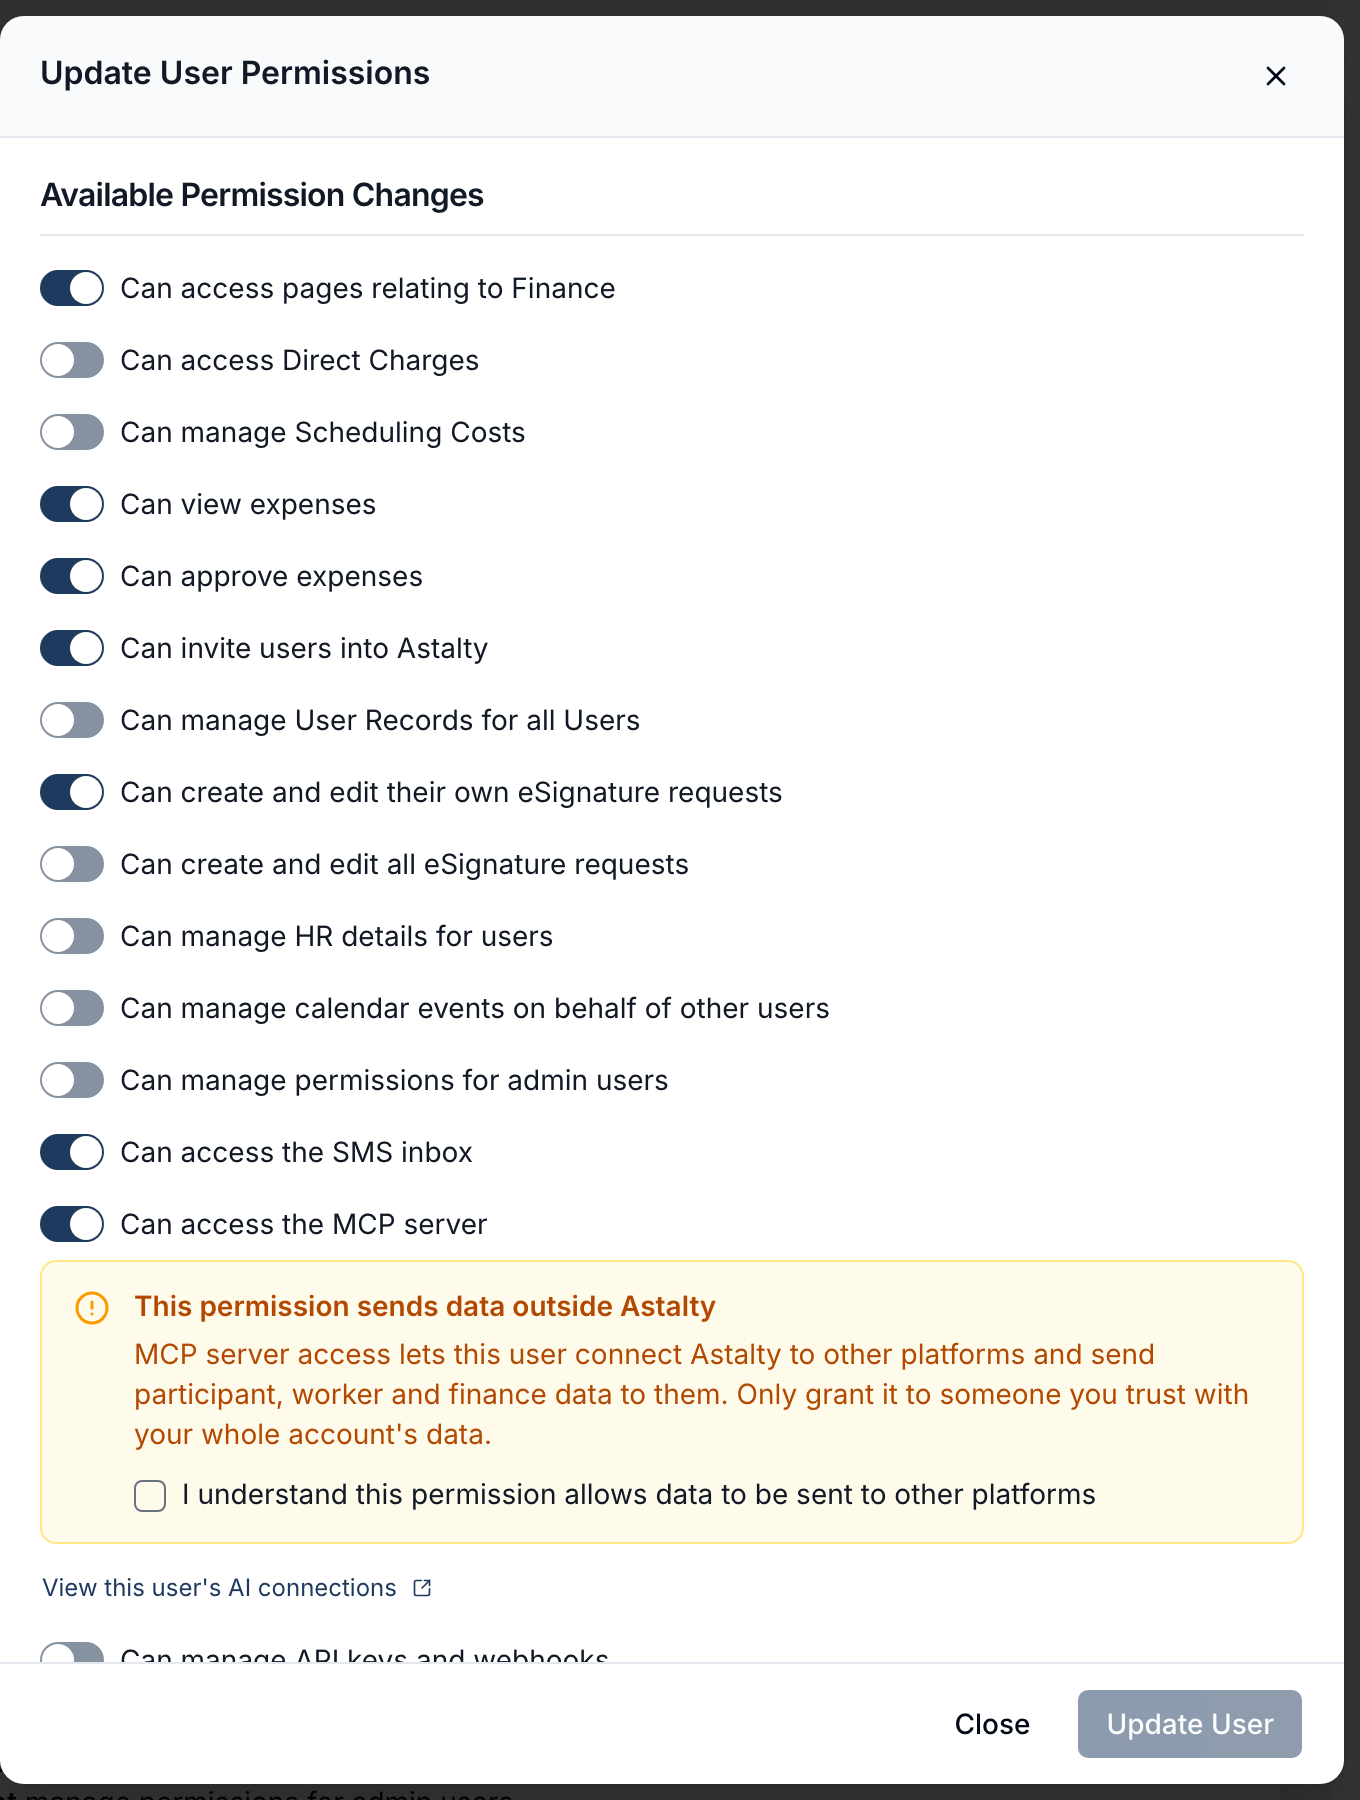
A seat is enough for Ask Astalty. To connect their own assistant, a user also needs MCP access, which is separate because it sends data outside Astalty.
The Account Owner has MCP access already. Only Admins can be given it, so a Manager or Team Member with a seat can use Ask Astalty but cannot connect an assistant.
As the Account Owner:
- Open the Admin's profile, select Permissions, then select Edit on the card of the same name.
- Turn on Can access the MCP server.
- Read the warning, tick the box to confirm you understand it, then select Update User.
Connect Your AI Assistant
Once you have a seat and MCP access, select your name at the bottom of the main menu, then select Connect your AI. The page shows the server URL and the steps for each assistant.
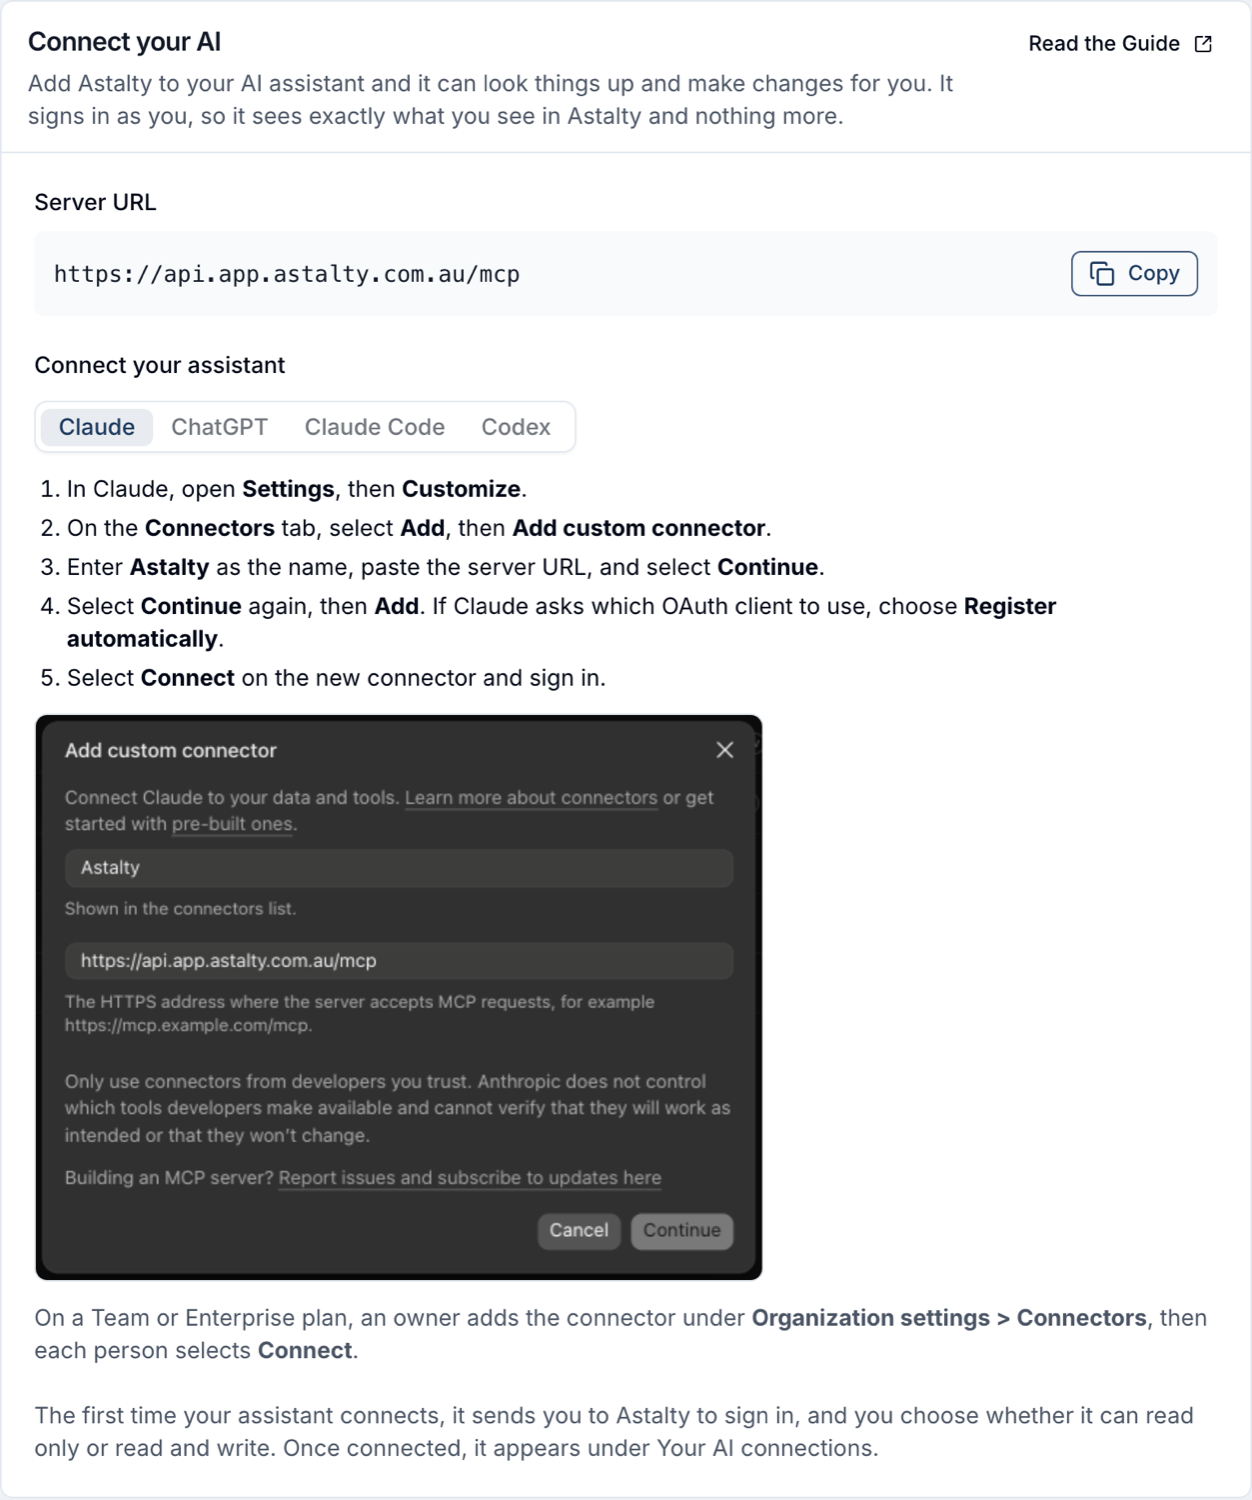
The server URL is the same for every assistant:
https://api.app.astalty.com.au/mcp
Follow the steps for your assistant below. The address is meant for assistants, so opening it in a browser only shows a short page explaining what it is.
Claude
- In Claude, open Settings, then Customize.
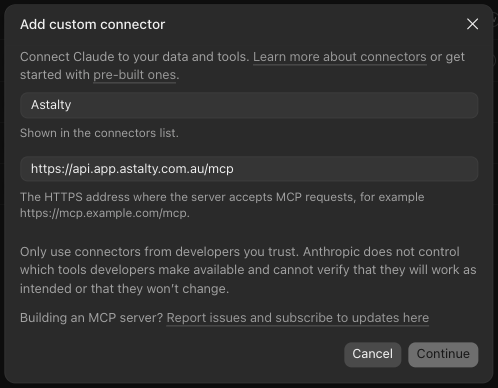
- On the Connectors tab, select Add, then Add custom connector.
- Enter Astalty as the name, paste the server URL, and select Continue.
- Select Continue again, then Add. If Claude asks which OAuth client to use, choose Register automatically.
- Select Connect on the new connector and sign in.
On a Team or Enterprise plan, an owner adds the connector under Organization settings > Connectors, then each person selects Connect. A Free plan is limited to one custom connector.
ChatGPT
In the ChatGPT app:
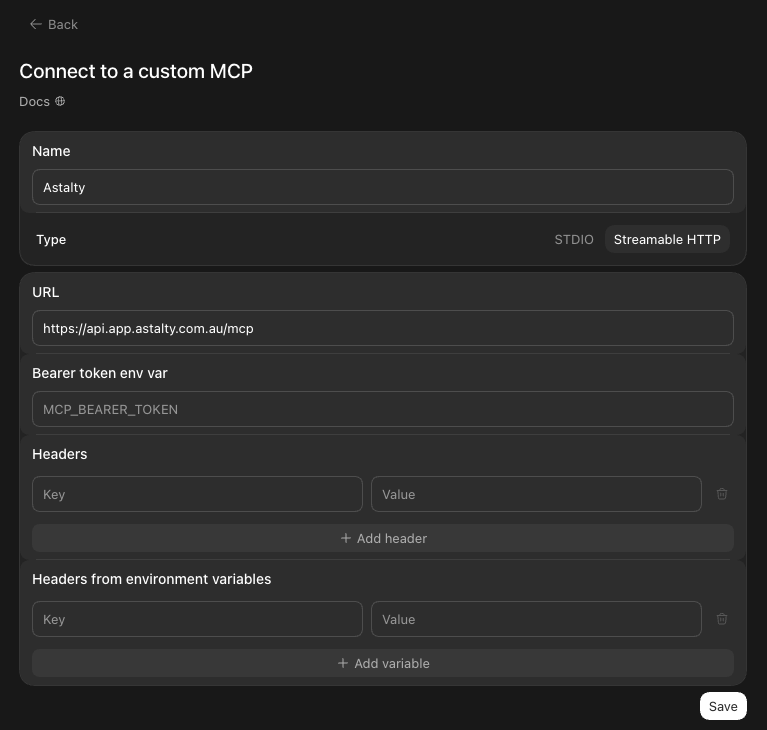
- Open Settings, then Plugins, then the MCPs tab.
- Select Add, then Add MCP server.
- Enter Astalty as the name, choose Streamable HTTP, and paste the server URL into URL. Leave the bearer token and header fields empty.
- Select Save, then Authenticate and sign in.
On chatgpt.com:
- Open Plugins, select the plus button, then Add custom MCP server.
- Enter Astalty as the name and paste the server URL.
- Review the warning, select Create as a plugin, and sign in when ChatGPT asks you to.
If you cannot add one, your ChatGPT plan or workspace may not allow custom MCP servers.
Claude Code
Run this in your terminal:
claude mcp add --transport http astalty https://api.app.astalty.com.au/mcp
Then run /mcp inside Claude Code, choose astalty and sign in.
Codex
Run this in your terminal:
codex mcp add astalty --url https://api.app.astalty.com.au/mcp
Codex opens your browser so you can sign in. If it does not, run codex mcp login astalty.
Sign In And Choose What The Assistant Can Do
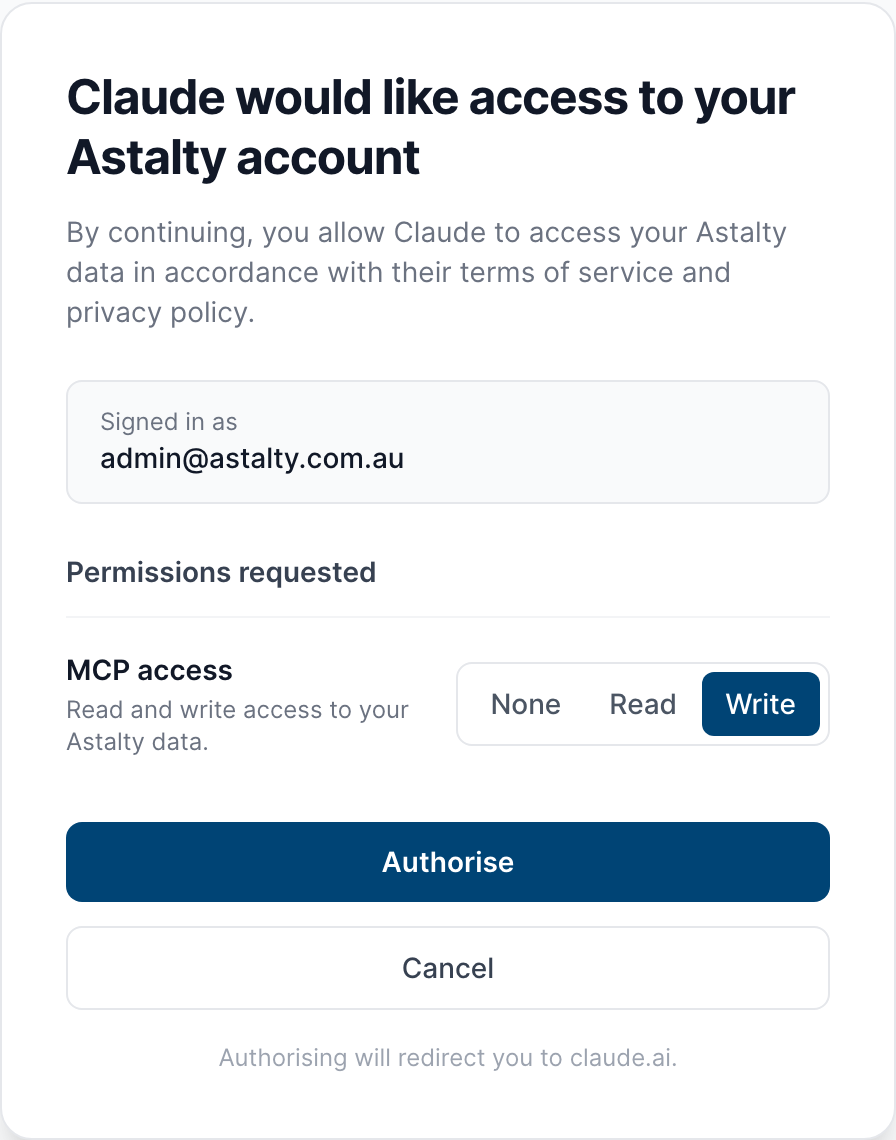
The first time your assistant connects, it sends you to Astalty. Sign in if you need to, check that the page names the assistant you expect, then choose how much it can do:
- Read lets it look up Participants, shifts, notes, reports and anything else your role can open. It cannot change anything.
- Write also lets it create and update records. Anything destructive, such as deleting or archiving a record, comes back as a preview first, and the assistant has to show you what will change and wait for you to agree.
- None gives it no access.
Select Authorise to finish.
If your organisation requires two-factor authentication, turn it on for your account first.
Check It Worked
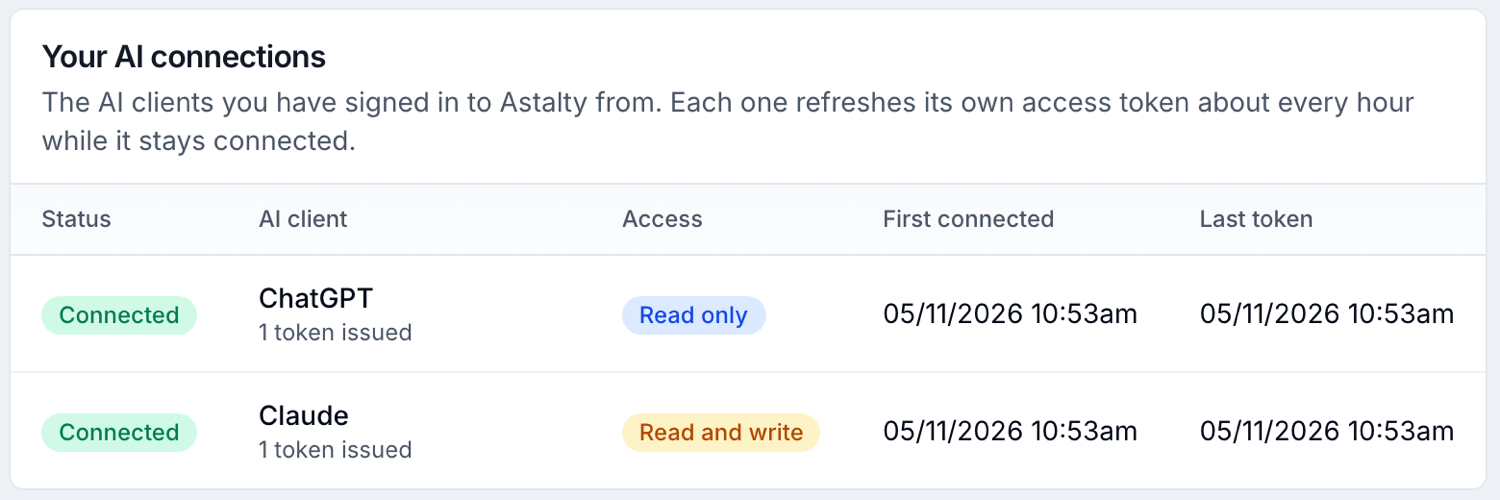
Select your name at the bottom of the main menu, then select Connect your AI. Under Your AI connections, each assistant you have signed in from is listed as Connected, with Read only or Read and write beside it.
Then try a simple question in your assistant, such as "Which shifts do I have this week?".
Disconnect An Assistant
To disconnect an assistant, remove Astalty from it. It can stay listed as Connected in Astalty for up to 30 days.
To end access straight away, do one of these:
- An Account Owner can turn off Can access the MCP server on the user's profile. The user keeps their seat and Ask Astalty.
- An Admin can remove the user's seat, which also ends Ask Astalty.
Remove A User's AI Seat
The Account Owner removes seats from Billing. An Admin can also do it from the user's profile, by selecting AI, then Remove AI Access.
- Open Billing > Add-ons > AI & MCP Access.
- Under Who has a seat, find the user and select Remove Access.
- Check the dialog, then select Remove Access.
The user loses AI access straight away, and any assistant they connected stops working.
The dialog shows what happens to your billing, which depends on your billing period and whether you are on a trial. On a monthly subscription, your next invoice bills one seat fewer, and no refund is issued for the rest of the month. On a yearly subscription, you keep the seat until your subscription renews and can give it to someone else. No refund is issued.
If You Cannot Connect
The sign-in page says your account does not have MCP access. You need both a seat and MCP access. Ask your Account Owner to check both steps above, then try connecting again.
You cannot see Connect your AI. You need a seat and MCP access, and MCP needs to be available on your account.
Your assistant has no option to add a custom connector. Your assistant's plan or workspace may not allow it. Ask whoever manages that account.